✨Books !✨

✨Books !✨
A small gift made for a relative ! I’m not entirely happy with the result, because it feels a bit empty, but anything I tried to add did not help (such as plants, to get a result similar to this old MOC I made a while ago).
Anyway, other angles, because I like these small MOCs to be visible from all angles :


Also, if anyone like the design of these books, you might want to check what lies below~

Feel free to use this !
I made this because I did some tests virtually before actually building it, and although I slightly modified the design to stack them up, it’s pretty much the same~
More Posts from Antrylis and Others


✨Aroace Door Tag✨
‘Name' looks really terrible, but couldn’t just put my real name here-
In hindsight, Sample might have been better. Anyway, if you want to get something like that yourself and are struggling with the letters, my dms are open — or asks even, if you’re feeling bold-
And of course, studio closeups bellow the cut
With, and without 'name' (M is really a terrible letter because of how wide it is, though now that I’m writing this, I know how I could have done it better. Well, too late.)


A tangent about hexagons
Because the project I’m working on brought it, I found it interesting, and I thought some people might need it.
So, as I’m working on a quite large project (hopefully done by next week, although I have doubts on that), and the base structure of it is more or less hexagonal. Anyway, here are some of my tips to get good hexagonal shapes.
The easiest way to do this is obviously with hinges and plates, like that :

While not necessarily accurate, it’s cheap and efficient, albeit squishy, and can be expanded to any size.
Instead, we can go the technical way, and use maths, by considering that a hexagon is the combination of 6 equilateral triangles. We end up with this :

Practically unbreakable, very stable, and can be made with as much technical bricks as possible, so it is easily expandable, but it’s harder to attach it to classic bricks.
So, none of these two designs are really good alone, whether on pure usability, or on durability. Alone, that is. Now, here is the fun part : thanks to the way Lego works…


…they work together ! And, with some modified 2*2 plates, they mostly hold to one another ! Isn’t that awesome ? What’s more is that, while I’m using 2*4 plates and a 7 holes technic bars, that also works with 2*6 and 11 holes bars, which is good.
Now, let’s apply this knowledge to make a solid prism with an hexagonal base :

By using a bunch of plate and two of these hexagonal bases, we get a hollow tube, which is solid through the hexagons, but can still break because of a diagonal force. To fix that, we need to add supports between the supports, like so :
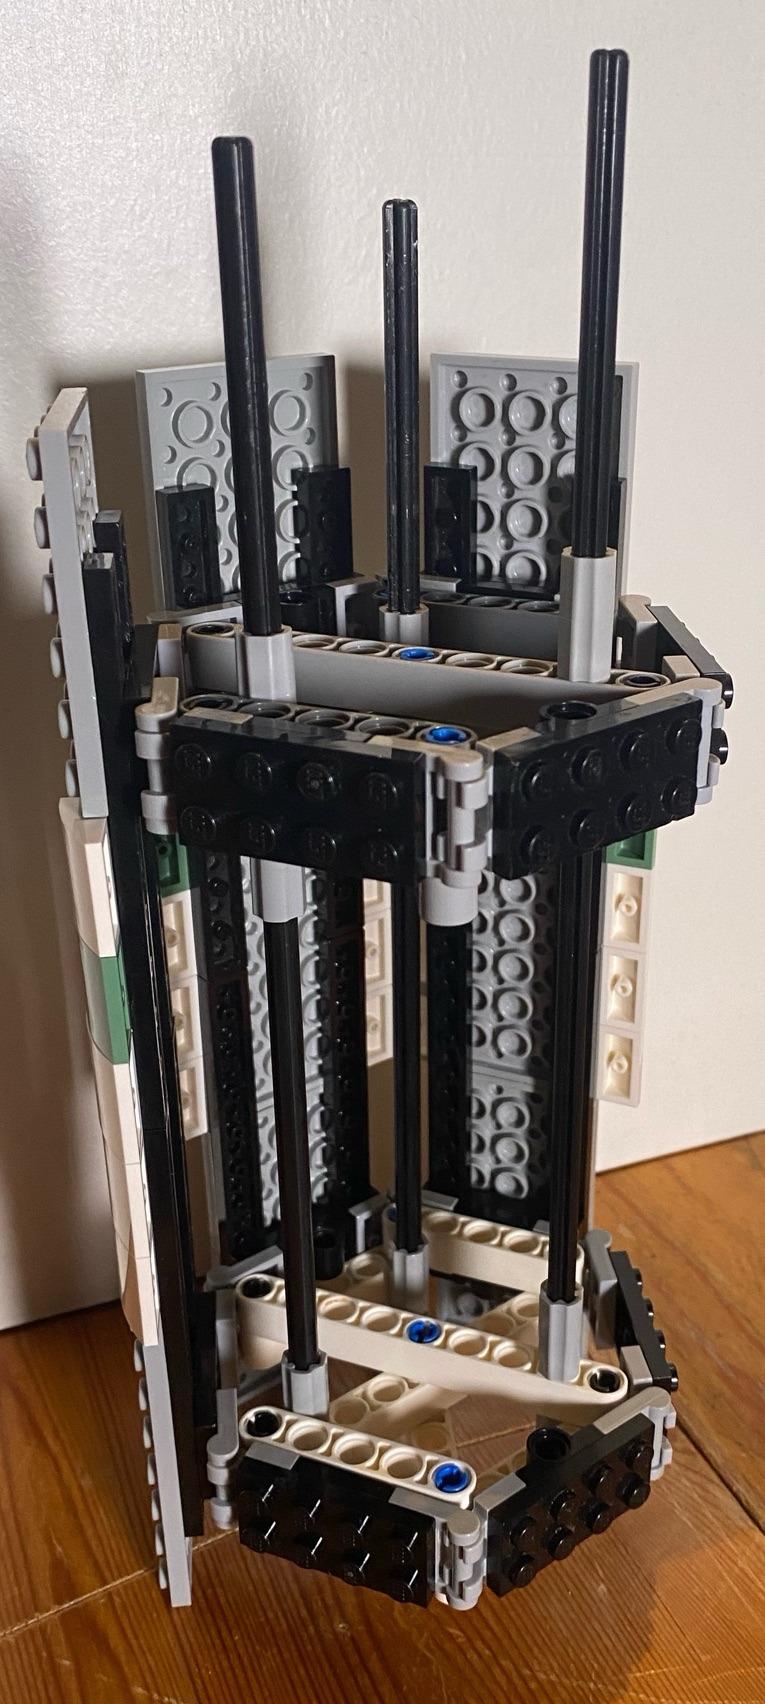
This also means that this design becomes stackable. Congrats, you made a long hexagon tube ! It can also be round, with the right modifications, notably with 2*2 curved tiles :

It fits perfectly, and it’s good to make solid near-circles !
Sorry for the photos’ quality !- They were taken quite late with my phone, and without proper lighting.
I rarely, if ever, reblog things, but that’s just beautiful; Lego at its finest.
BESTIES BESTIES BESTIES

FOUND THIS SUCKER IN A LEGO STORE IN NYC
and the employees had pronoun pins as well!

✨Custom ice Toa !✨
And another one ! If the others were already experimental, this one is much, much more-
Closeups under the cut !
Front/back views :


That one was a lot of fun ! But it’s also not really stable, considering there are some weird piece combinations. This one also has disproportionate legs, compared to the rest of the body, but it’s alright.
With that one, I really tried to remain within Kopaka’s spirit (notice the ski blades and the Kanohi). The bow and arrow (which doubles down as a lance, and is using one of Kopaka’s blades), is a weapon I don’t think has been used before in the original bionicles (correct me if I’m wrong).
The arms/hands are using Pridak’s feet, because it works well and still allows for large movements.
I used some darker white pieces on the back and shoulders to get some slight contrats, and used technic pieces on the chest to get a proper body shape, with a leg piece underneath.
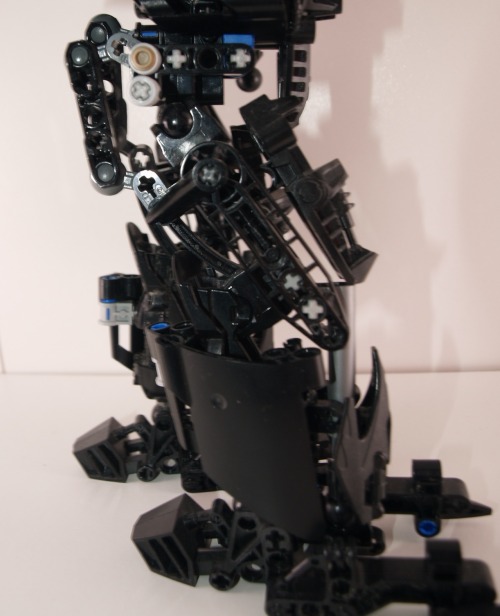
Legs :

(Too) Many details on the legs ! The blades under the feet are a combination of Kopaka Nuva’s blades and Glatoran blades, which also hold a shoulder piece used as a supplementary leg pieces.
Now is the here we enter the mess : all of the ankle sockets you can see are not used for the articulations, and are only here to keep the back piece in place (Star leg), while the actual socket is behind the technic gear plate. Then there is a socket which doesn’t even have a ball, it is directly stacked on top of another socket, and I use multiple feet to cover the leg areas which would expose how terrible the inside is. At the front, you might also notice a 1*2 curved slope tile held by two technic pins. It’s floppy, and it looks weird from the side, but the front appearance makes it worth it. Finally, at the front, I also use part of a Vahki’s head as a final plate, before we finally reach the connection between the legs and the body. As I said, that whole part is a mess.
Head :

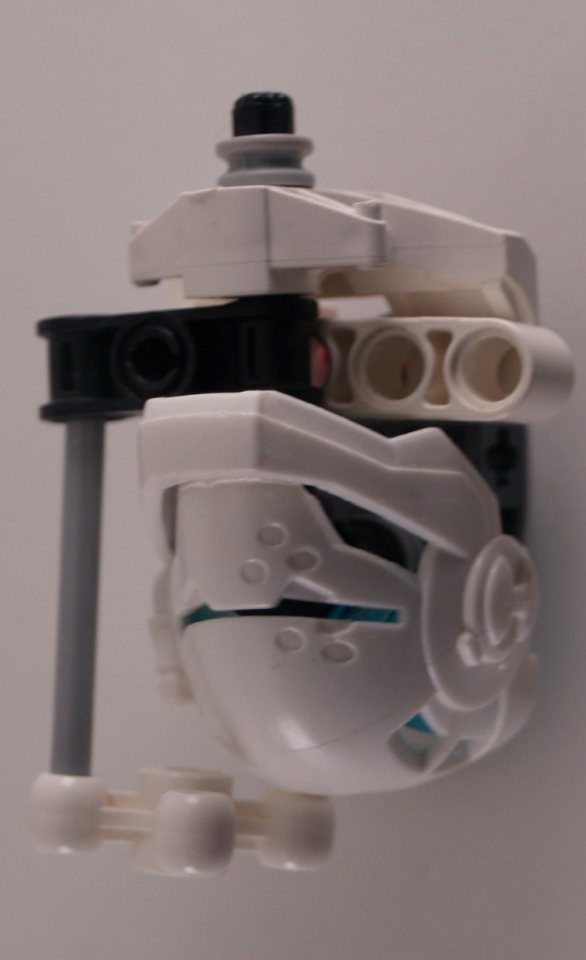
Tried to remain close to Kopaka’s appearance here too, by adding a X-ray vision thing, but the most important part is that the Kanohi is Hero Factory Stormer’s mask, but sideways. The trans blue pieces are Borhok eyes, which fit perfectly, and I managed to cram a socket connector inside, making the head quite mobile and sturdy.
Next week is another one ! Not sure which of the three it will be, but I haven’t decided which one yet (tell me if you have a preference~).
I also finally received my new parts, meaning I can get back to working on my big project, yay !

✨Aroace pride flag✨
Since I’m mostly doing these as room decoration for me, I’m slowly running out of idea, but I’m open to taking requests (potentially with instruction, if anyone is interested, simply ask me) :}
(See previous work here)

✨Pride clones !✨
As I mentioned somewhere in my previous post (I think ?) I found my clones missing colours. So I did a rainbow Cody, and things went downhill from here.
There's not much to say about it built-wise that I haven't already said, but a few mentions of my colour palette might be interesting, notably some shade of 'rubber' materials, for a few of the purples. Also, there aren't nearly enough blue-green shades to satisfy my needs, but I can't do much about it.
You may also ask for other flags, who knows how they'll look...
Speaking of, the flags here have nothing to do with any headcannons or whatnot, they're purely aesthetic - or practical, since some colour subdivisions are easier to represent on some models than on others.
Nice LEGO work! Glad to see MOCs are still shared by folks.
Thank you very much !
And as a proper answer, here is a little silly thing I made recently !
Still working on making it reliable, but’s a fun little project on the side of other things I have going on !

✨Custom technic vehicle !✨
Something which I had never really posted on before was that, although I enjoy bricks (or Bionicle parts) a lot, I also like to mess around with Technic, when I have the occasion to.
Most of this one is a bunch of additions made on top of the 42065 set, because it's an overall really fun set, with enough space inside to cram in some additional mechanisms.
Here is a video of that thing performing :
...And the remote !

Of course, details and close ups under the cut !
So, here is the (non exhaustive) list of what I added/changed :
Colours of the middle line and addition of some decorative tubes;
A fancy blade at the front;
Plenty of lights;
A turret.
I'll discuss all of these below (except for the first point, which is quite straight forward.
The front :

So, the main plate I used for the vehicle's blade is often used in large Technic cars, mostly for roofs; but used the other way around, it has a nice shape. It's not very functional, but it's aesthetic, and inside are two of the lights I have integrated (some of the cables are visible on the right).
The side :

From here, we can see my beautiful mess of cables (I forced the top open to show it, because it's not as opened at rest). Most of the large cables here are getting power from the battery to the RC receivers; while the small cables are all lights (I might have used too many-).
You might also notice the there are some bumps on the tread pieces : these are rubber grip pieces which I stole from a Nexo Knight Fortrex (it's doing fine without them). These make the plastic less slippery when on rock, but it does a poor job on grass (because grass blades get caught in the gaps of the treads pieces) - to fix that, I would use some of the old rubber treads, but they're way to small to be used as suchs. Instead, to remedy to the problem, I changed the original motors from the default PF M to PF L, which have more power and torque (and can thus reach their max speed even with the added mass). While the two motors have the same theoretical speed, this modified model drives faster than it's standard counter part (it's funny to take over other cars, don't judge).
Back view :

Here you can see the PF M I was talking about (bottom right, the second one is at the front of the vehicle). You may also notice that I have a second mess of cables , because my two receivers are here.
Two major problems with that :
The placement of the receivers makes it so that I can't control the vehicle, unless behind it (oops 1);
Because one of the receivers (on top) had bad wiring with one of the tread motors, the turret is heavily limited in its movements (oops 2).
Turret :

So ! That's the most interesting part of it (obviously).
Now, please note that it was my first time trying to do it, and plenty of my design choices were bad, but fixed in my V2 (will probably be posted next week~).
The way it works is actually quite simple : I have a motor underneath (PF M) positioned horizontally, which is connected directly to the light gray gear (just under the trans green piece on the left) which itself connects to the black base gear on which is mounted the turret. Because of the direct motor connection, the turrets is a nightmare to aim. Not good.
As for the cannon, it's just a servo and a spring cannon. When the servo is activated, the grey technic piece presses the projectile and it flies. Surprisingly simple. (It also lights up the green lights on the side, for fun).
Anyway, this is a fun project to play with. Next week, I might post the V2, which is...Quite different. You'll see :}
And bonus cat picture !

Hey I don't know if you saw my repost on your post but I would appreciate and would definitely built a brickheadz version of the boba fett prototype minifig that I have as my profile picture. Your post says feel free to request any more and I thought it was worth a shot even though I doubt he'd appeal to more people than me.


✨Boba Fett Prototype ! ✨
Hi ! This has been in my inbox for ages, I know. Finally had time to give it a try ! Had a lot of fun, actually, mandos have some really interesting shapes.
And, because it took me so long, I figured, I'd also give instructions, too. Some colours might not be available, though, but white should be pretty easy to find for the outside pieces.
Instructions can be found here !

✨Custom earth Toa !✨
It’s spiky ! And we’re now at 5/6 !
More below !
Front/back :


He’s spiky ! Some might have already noticed I took for base the old Von Nebula set, because I acquired it recently and it worked well, plus the joints are interesting. Pretty much everything else was change, though I kept the mask, sphere, and spiky plates. These were nice, and even if stone colours are usually black and purple, but blue works well too.
I relocated the sphere directly in the thorax so that it looks like some kind of core. The back is mostly composed of two large car pieces.
The hands are using black pieces to make them larger, which works well with the blue blades (which supposedly come from either Chima or Hero Factory, I can’t remember).
Leg :
Another type of Bohrok piece to act as feet ? Yes. These are the head pieces, and they work well with a classic foot as a back piece. The piston in the leg was there originally, but I covered it with these large technic panels and some other technic pieces.
There is also an interesting mechanism to stop the legs from doing too odd moves on top, which can have some interesting applications. Here, I’m wondering about removing them to gain a larger range of movements though.
Head :

Kept the original mask and teeth, but with a cable and a spider’s claw to elongate it.
This picture also allows for a clear view of how much dust has accumulated. Don’t judge me, these are on a top shelf which isn’t the easiest to clean…
Also, my project is now finished (officially) ! I went to a small exhibition with it this weekend actually, and…a recruiter from a much larger exhibition found it good enough to offer me a place next month (I’ll post it here once the bionicle series is done) ! I also brought some of my pride flags, which seemed to be doing their effect, so I’ll bring more next time. So overall, yay !
-
 nasthesilly liked this · 4 months ago
 -
 zerosocialskillz reblogged this · 6 months ago
 -
zerosocialskillz liked this · 6 months ago
-
 theonethatburned liked this · 6 months ago
 -
 the-bigger-fish liked this · 7 months ago
 -
 antrylis reblogged this · 7 months ago

They/them - AroaceLego MOCs and photography with a wide range of different characters and environments, every Wednesday (in theory-)
77 posts