✨Pride Clones !✨

✨Pride clones !✨
As I mentioned somewhere in my previous post (I think ?) I found my clones missing colours. So I did a rainbow Cody, and things went downhill from here.
There's not much to say about it built-wise that I haven't already said, but a few mentions of my colour palette might be interesting, notably some shade of 'rubber' materials, for a few of the purples. Also, there aren't nearly enough blue-green shades to satisfy my needs, but I can't do much about it.
You may also ask for other flags, who knows how they'll look...
Speaking of, the flags here have nothing to do with any headcannons or whatnot, they're purely aesthetic - or practical, since some colour subdivisions are easier to represent on some models than on others.
More Posts from Antrylis and Others
So, uhm. I wanted to post something a bit different here today. Behold a short thing I did a while ago (I'm actually posting it because I found it while cleaning some files). I'll admit, the quality of both the image and whatever I was trying to tell is pretty low. But I think overall, it's still surprisingly decent, for what it's supposed to be.
I did a lot of these some time ago, but it's terribly time-consuming, so I've had to stop. Hopefully, next break, I'll have the occasion to do these again (now with better image quality, and even proper MOCs to use). I miss doing stop-motion a lot-
I sadly don't have much of that project left (images, bits of the background...), though strangely enough, I still have some of the characters. Though I know why the lighting is so bad : at that point, I only had a set of blue lights, which caused this blue filter all over it (it looked really nice, though. Without any camera...)
I won't point out all of the weird details, but I am still quite proud of that odd use of a hair piece as a broom. Some pieces certainly have some unexpected uses.
I rarely, if ever, reblog things, but that’s just beautiful; Lego at its finest.
BESTIES BESTIES BESTIES

FOUND THIS SUCKER IN A LEGO STORE IN NYC
and the employees had pronoun pins as well!
Hey I don't know if you saw my repost on your post but I would appreciate and would definitely built a brickheadz version of the boba fett prototype minifig that I have as my profile picture. Your post says feel free to request any more and I thought it was worth a shot even though I doubt he'd appeal to more people than me.


✨Boba Fett Prototype ! ✨
Hi ! This has been in my inbox for ages, I know. Finally had time to give it a try ! Had a lot of fun, actually, mandos have some really interesting shapes.
And, because it took me so long, I figured, I'd also give instructions, too. Some colours might not be available, though, but white should be pretty easy to find for the outside pieces.
Instructions can be found here !

✨Bionicle insect !✨
Yay, back to Bionicles MOCs !
I made fewer of these, but here is the first one (other images and additional details below the cut).
I’m still not entirely convinced of the edited photos, but given the size of these MOCs, I didn’t really have much choice but to do how I did. At least the ones with background give a few colours.
Anyway, photos of the left and underside !


This was really a fun one to work with, obviously largely inspired by the Visorak sets (I kept the head piece and the claws), but with more legs !
The claws are combined with feet to add some shape (the two pieces work quite well together) to the end of the legs, then I made of 4 joints articulations to give it a proper insect-like stance. The middle legs are slightly longer (using a long transparent blue piece, instead of the small dark one), which makes it less linear.
I kept the disc of the Visorak, held in place by…a broken Pirahka headpiece. Yes, I’m not exactly very original in my techniques, and I have a lot of these broken pieces. As you might see in the third picture, I have the secondary connectors of that piece attached to the belly of the beast, so to speak.
Although, speaking of techniques, the one I’m using for the 'tail' is not exactly recommendable. It’s a bit tough to see, but there is an elastic band attached to the foot used as a tail part on the third picture. It’s the only element which connects the end of the tail (shiny Visorak claw in second picture) to the rest of the body, which makes it wobbly but offers some interesting movements if needed.
Oh yeah, I also used Vakama’s disc launcher again, as mandibles this time. I originally tried to make a transparent blue disc (from all promotional sets) inside, but it doesn’t fit well enough).
I’m considering making another in another colour, but I’ll have to see if I even have enough ressources to do so~ Maybe green and silver, since these are pieces I have a bunch of, or black and silver…Only time will tell.

✨Trade space station !✨
<Previous< [2/4] >Next>
Today’s gonna be about the progress of the build in time, which allows me to ramble about the building process. Yay !

Before actually commenting the build. You may notice chocolate and my (empty) tea mug. They should be apparent in most of the earliest pictures (there was not enough space on the table for them at the end of the project, sadly~
So, here, you can see that my first step was to see the scale of my project. The template of the large ring to see how much space it would take, and the small ring to see how round I could make it (and at the bottom, you can see the white curved pieces. Enjoy this view, it won’t last.)
You can also notice above that I already stared making some small ships.

The next day ! You can see on the left my long rod. This was the ideal height for the central cylinder. I also created the first core of the build (replaced later because too fragile), and the first arms to hold the ring (too fragile too).

Progress ! This is the moment I realised my original color scheme would not work (you can see orange and bright green on the side, which I tried before the sand green).
I had half of the big cylinder added (you can see the slots left for the additional details) and another naked half on the right side. And my collection of boxes on the table is growing. It’s only getting worse after that.

See ? More boxes (and pieces) scattered all around. And a hammer, too. I at this point mostly finished the big cylinder (or so I thought, some reinforcements were necessary), started the smaller cylinder, and realised white pieces were running out. I also still haven’t touch the ring yet, as I wanted to stay focused on one bit.

Mostly done with the cylinders at the point (you can even see the start of the smallest one on the right side). Agin the boxes grow ominously.
Since it was time to start the ring, I created a replica of a sixth of it. Given that there were twelve sections, I wanted to be sure of the design before starting to build them all, starting with the facade. It took some fiddling around (you can see these aren’t symmetrical, as I was trying out different designs). Really, if you have this kind of things to do, try to make it in a vacuum first, you’ll gain a lot of time later, once the prototype has every problem answered (mine were mostly the curve, and the link between each plates (solved with mod 1*2 black plates).

See ? After the prototype was done, I simply built all of the facades and attached them (you can see my 1*4 curved pieces were all missing at the time though).
I kept the prototype on the side, because I’ll still need it later. I also am missing half of the ring (the part above, since there is only a structure below), because I was not sure of how everything would fit, and I waited until these parts were assembled before making it, in case adjustments were needed.

Here is the top part ! And all the hangars done, too. It took me a surprising amount of time to do all twelve of them…

Huge progress ! There is no more room on the table for the boxes, but you can see them…on the floor, on the left…Lot was done, from the bottom cylinder now finished along with its ring, the covering pieces of the big ring (except the internal faces), the hat of the station, and a huge reinforcement for the six arms, which was done separately). At this point, except for a few details, the station itself is finished.

And there is a picture taken moments before disaster. The station is done (ignoring the transitions between cylinders) the arm…supposedly, too.
Sadly, the arm wasn’t, in fact, finished. If you read the first post, you will notice it isn’t as bulky, and isn’t attached on baseplates yet.
Well, guess what ? When I finally tried to see if the arm would hold onto the station, it broke. Rather, two pieces broke, then the rest came down, and so did the station, which shattered on the floor below. Luckily for me, the main cylinder was so dense it practically completely survived. Most of the hangars of the rings only broke section per section, so it only took a few hours to get it back together, but much more time to make the arm solid. And now, it can hold the station for ten hours without flinching ! So, here is a lesson. If something you do fails when you do it with your heart, let the rage flow through you and build it back out of spite. It works* !
*don’t hold me accountable for any failure using that method

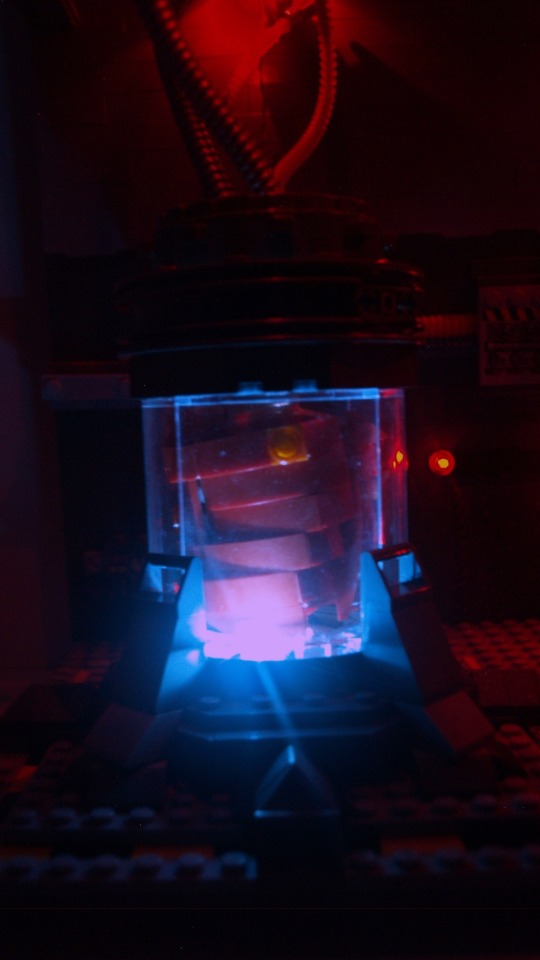
✨ Breach of containment ✨
This is the last I’ve been working on for the past few weeks, very, very inspired by the game Carrion (if you haven’t played it yet, you absolutely should !), which is made all the more special because I finally took time to use my lighting kit (seem below). Of course, closeups and commentaries below the cut

Left containment unit closeups :

Right containment unit closeups :


Top closeup :

Alt version (studio lights + in-built lights) :

This is one of the screenshots I’ve been working with (where the monster just breached containment) :

So, as I said previously, this piece is heavily inspired by Carrion. I tried to look up any previously made Lego thing related to the game, but all I could find were a few Reddit posts with (debatably) interesting takes on the monster. So, the good news is that this is most likely the most original piece I’ve made yet.
The original plan was to have only one container, and one monster, with left being the body inside and right being the outside part. However, placing Left in the middle of the transparent pieces made it mostly good on its own, so with some modifications, I made it work alone and expanded the outside part inward, and ended up with two of them.
Left is pretty okay from all angles, but Right is not necessarily as good from the back, and had a supplementary jaw on the side of the container which can’t be seen on the photos.
Getting back to comparing that to the game. I tried to stay close while adding my own little details. The wiring and cable system is from me, but the container is mostly inspired by the game, just like the electric box (middle) and the little informative display (under the electric box) which is…empty, yes.
Some details can’t be seen on the photos (or barely), which are mostly some filler sci-fi stuffs to make the wall less flat and less empty.
What also helped with breach the flatness of the wall is the switch from dark grey to light gray, using the awesome spring projectile launcher piece, which has this very nice shape which make the transition just a bit smoother.
So, let’s talk about whatever I’ve done with the lighting !
I’ve had this old lighting kit (originally designed for a car model) lying around for a long time, and finally got to use it ! It doesn’t look really good without my studio lights because my camera is not made for that (The effect in reality really gives escaping monstrosity a dark vibe which is not well depicted with my photos…). Another thing which is not noticeable with the photos is that the two red dots in the center are actually blinking lights (and somehow, they tend to desynchronise).
The choice of letting some of the wires out is debatable, but I think it adds to the vibe (and some of them would have been a pain to hide anyway). And sadly, the back is but a mess of wires, but I can’t actually do anything about that.
Speaking of the back, the whole thing is one dot large and completely flat, and the ceiling only hold without pillars because of the use of tension linking directly the baseplate and the roof through the use of technic bars; and probably because the ceiling itself is not that heavy. It is, in fact, only constitued of six old road pieces connected together and frames, which give the roof little weight and high sturdiness (and the shape on the side of the piece offers a nice sci-fi effect as a bonus).
The addition of tentacles in the vent (which hides the connection between road plates in the roof) is just another reminder of the game : you can’t be safe anywhere, if air flows~

✨Clone wars diorama !✨
Another one, technically the largest I have posted (yet~), featuring the 212th and a (placeholder) Jedi.
Of course, closeups and additional details below !
Views from directly in front/above :


Before I continue, I must confess it. This horrendous mistake, which you might spot by paying close attention to the right part of the image.
Yes. I somehow created an offset on the entirety of the wall’s height.
Overall, I’m quite happy with this one, mostly the environment, which turned out great (except for the offset….). What I’m not really sure leases with are the cheap AT-RTs from the battle packs, which are too bulky, but it works well enough for the moment, and since I’m not exposing to any connoisseur, it does the job.
Most of the minifigs are from these battle packs too, except for the Jedi, which is actually a savage oppress with a cloak, but every time I try to just remove the minifig, it feels like something is missing. The paratrooper captain has the hold grey kama and pauldron which always work well, even if it could have done with an additional visor.
Anyway, let’s get going with the closeups !
AT-RT scenes :


On the left, an engineer (my favorite kind of clone) fixing a broken down leg, with the help of one of the pilots. It was hard to get the minfigs in a 'lively' position, and the photo doesn’t render it correctly. The small white backpack is a piece I’ve stolen from the 501st specialist pack, because it’s nice.
On the right, a paratrooper with a completely inaccurate rocket launcher (the clone wars’ ones don’t look as cool, though). I quite like the way this part came together, even if it’s just a small detail.
Explosion scene :


I’ll admit it’s my first try with building explosions, and I’ll hopefully improve.
On the right, the clone says hi ! Well. No. He doesn’t, but it’s what he looks like on the photo, which I funny, I’ll admit, but not the image I wanted to convey, even if technically he’s set properly, as a projectile caused by the explosion.
The picture on the right convey the feeling of movement much better, with the clone shooting on the left, the others running along, and the paras being blown.
Other scenes :


The focus on the left is the droid ! I really like how it’s sprawled over that rock. Other droids can be found in the diorama, notably one being crushed by the rocket launcher AT-RT, partially under a rock, and part of one in the explosion.
On the right, we see a paratrooper down (but still fighting !) with, at his side, a medic applying a hypo. While it’s hard to see with this picture, he has a pouch at his side, and some chroma-black legs, because I was missing a pair of legs the medic has prosthetic legs, isn’t that awesome and convenient ? That is a lesson to learn, any lack can become lore ! Well, kind of. It’s what I also did with the Kashyyk MOC : I was missing all but the helmet of my ninth minifig, so I turned it into a grave of the missing squad member.

✨Books !✨
A small gift made for a relative ! I’m not entirely happy with the result, because it feels a bit empty, but anything I tried to add did not help (such as plants, to get a result similar to this old MOC I made a while ago).
Anyway, other angles, because I like these small MOCs to be visible from all angles :


Also, if anyone like the design of these books, you might want to check what lies below~

Feel free to use this !
I made this because I did some tests virtually before actually building it, and although I slightly modified the design to stack them up, it’s pretty much the same~

✨Cargo starship ! ✨
A 'little' part of a larger idea I’m developing~
Right under the cut, closeups and some explanations !
Tiny container carrier :


It’s small, it’s adorable, and I still haven’t figured to how the container will be properly held, so the entire system underneath is improvised and will be subject to changes, hopefully.
Cargo closeups :


Lot more to say about this ! Firstly, that the support I gave it is very unstable, but that should be fixed later.
I was playing around with the idea of a small ship with six rows of container in an hexagon, and ended using a combination of 3-branched crossed around a technic axe to do that. Then, one thing following an other, I needed up with two sections connected by one of these large rings like you see in some movies for gravitational purposes. The entirety of this piece, at the exception of the very beginning of it, it held by a single long technic axe. Obviously, large transparent-blue rods to make reactor trails and truncated cones as the reactor bases. The ring is held by rods, too, with an upside down tread — getting them to have a proper circular shape was a complicated journey.
The colourful containers were another fun thing to do : firstly, getting all the right pieces and make the pattern not too regular. And to pretend they’re all connected by nothing, they’re only partially connected, and 'held' by an electromagnetic field figured by the transparent blue pieces on each side of the container rows, which would then be picked by the small container carrier above.
And now, the most important thing : the reason of why I absolutely needed to make this cargo, instead of anything else. It’s quite simple, actually. I needed to get the scale of these containers. Because. Because I had this idea to make a large, large trading spare station with a ring around a large axis, which would be the perfect excuse to make an awful lot of small spaceships. And for that, I needed something for scale, and since it’s a trading station, a container was my best bet. So I have a plan, which I’ll elaborate on probably next week, along a batch of my small ships.
Ah, I knew a special occasion would present itself that would be worthy of this cat !
Get booped
Get booped back ! Ah !
Oh, and have an actual (Lego) cat while I’m at it !

-
 nasthesilly liked this · 4 months ago
 -
 aeramisu liked this · 6 months ago
 -
 small-ratchild liked this · 6 months ago
 -
 sadcena reblogged this · 6 months ago
 -
sadcena liked this · 6 months ago
-
 antrylis reblogged this · 6 months ago

They/them - AroaceLego MOCs and photography with a wide range of different characters and environments, every Wednesday (in theory-)
77 posts