✨ Breach Of Containment ✨

✨ Breach of containment ✨
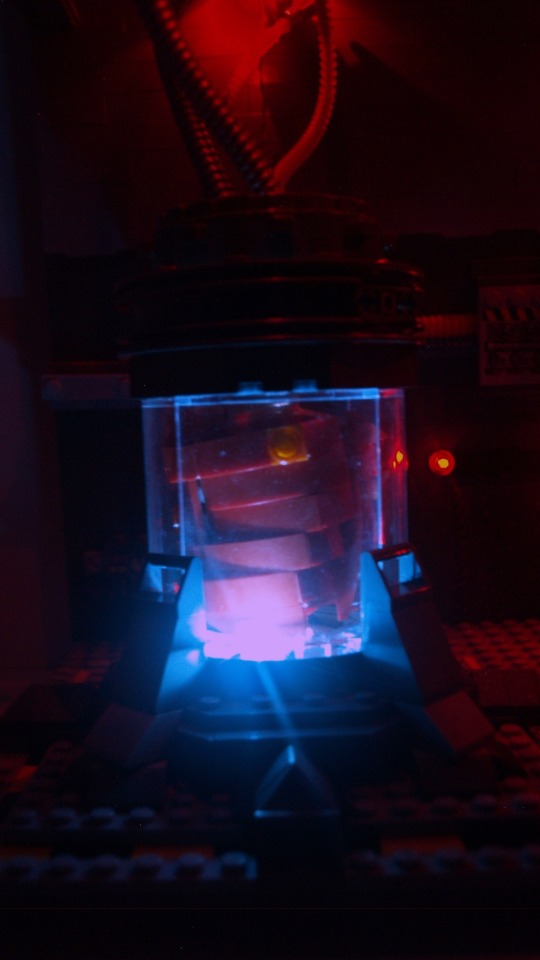
This is the last I’ve been working on for the past few weeks, very, very inspired by the game Carrion (if you haven’t played it yet, you absolutely should !), which is made all the more special because I finally took time to use my lighting kit (seem below). Of course, closeups and commentaries below the cut

Left containment unit closeups :

Right containment unit closeups :


Top closeup :

Alt version (studio lights + in-built lights) :

This is one of the screenshots I’ve been working with (where the monster just breached containment) :

So, as I said previously, this piece is heavily inspired by Carrion. I tried to look up any previously made Lego thing related to the game, but all I could find were a few Reddit posts with (debatably) interesting takes on the monster. So, the good news is that this is most likely the most original piece I’ve made yet.
The original plan was to have only one container, and one monster, with left being the body inside and right being the outside part. However, placing Left in the middle of the transparent pieces made it mostly good on its own, so with some modifications, I made it work alone and expanded the outside part inward, and ended up with two of them.
Left is pretty okay from all angles, but Right is not necessarily as good from the back, and had a supplementary jaw on the side of the container which can’t be seen on the photos.
Getting back to comparing that to the game. I tried to stay close while adding my own little details. The wiring and cable system is from me, but the container is mostly inspired by the game, just like the electric box (middle) and the little informative display (under the electric box) which is…empty, yes.
Some details can’t be seen on the photos (or barely), which are mostly some filler sci-fi stuffs to make the wall less flat and less empty.
What also helped with breach the flatness of the wall is the switch from dark grey to light gray, using the awesome spring projectile launcher piece, which has this very nice shape which make the transition just a bit smoother.
So, let’s talk about whatever I’ve done with the lighting !
I’ve had this old lighting kit (originally designed for a car model) lying around for a long time, and finally got to use it ! It doesn’t look really good without my studio lights because my camera is not made for that (The effect in reality really gives escaping monstrosity a dark vibe which is not well depicted with my photos…). Another thing which is not noticeable with the photos is that the two red dots in the center are actually blinking lights (and somehow, they tend to desynchronise).
The choice of letting some of the wires out is debatable, but I think it adds to the vibe (and some of them would have been a pain to hide anyway). And sadly, the back is but a mess of wires, but I can’t actually do anything about that.
Speaking of the back, the whole thing is one dot large and completely flat, and the ceiling only hold without pillars because of the use of tension linking directly the baseplate and the roof through the use of technic bars; and probably because the ceiling itself is not that heavy. It is, in fact, only constitued of six old road pieces connected together and frames, which give the roof little weight and high sturdiness (and the shape on the side of the piece offers a nice sci-fi effect as a bonus).
The addition of tentacles in the vent (which hides the connection between road plates in the roof) is just another reminder of the game : you can’t be safe anywhere, if air flows~
More Posts from Antrylis and Others

✨Neon and its pilot !✨
Combat mech again ! Wew ! (See other works here)
Closeups and lore under the cut !
Mech :


Pilot :

Lore ! (Check the previous posts of this series if you want to find out more)
So, if Artefact was a first-gen, this mech, called Neon (for obvious reasons), is from the last gen of mass-product combat mechs. It isn’t really meant to get to high level competition, simply for amateurs wanting to give the sport a try. Yet, this pilot made it further than most. Just like their mech, they are one of the youngest in this tournament, but both mech and pilots already have claimed multiple battles.
Indeed, if one pays close attention, it’s easy to notice that some of the claws were replaced, and scratches can be founded in multiple places. The base mech has also been modified a bit, mostly with the addition of electric arc creators (at the top of the mech).
What’s more surprising is how powerful this 'beginner' mech is. Because it’s meant for amateurs, it is extremely sturdy, to make things interesting (because breaking down after only one hit would make a lot of people abandon immediately, which isn’t the point).
Last but not least, the large and broken metal beam carried Neon is a piece which belonged to the first mech which was defeated in a qualification match. The mech was so wrecked only beams were lefts.
Building notes ? Building notes.
The feet were a pain to make, and may fall apart at any moment. But it is necessary to get this shape without being very bulky. All of the joints on that one are small ball and sockets joints, appart from the waist one, which is a turntable. Pragmatically, the three 'replaced' claws are actually just me missing blue pieces. Moreover, the broken beam I had no idea how to use. I acquired it twisted, and it would hardly be used anywhere, and this mech didn’t really have any aggressive stance, so this did the trick.
The sticker plate in the middle is of Nexo Knight origine, and so are probably all the 'shield' pentagonal pieces (which are really good, I might be in love with these). It was also originally all solid blue and grey, but as I added the figure, I realised it needed a bit more energy, so I added the amber and neon pink pieces to give some sparkly accents, which somehow worked in the end
Finally, the (blurry) pilot : most of the pieces come from my random character mix, except the torso (minus the arms) which come from a funky Ninjago character sold in a polybag, and the helmet, which comes from Power Miners (hopefully I’ll have enough time to make a diorama for that theme one day~)
Also, I’m not sure what happened with these pictures, they’re more blurry than usual, yet they all were taken in a batch with previous pictures. I’m hoping the next one isn’t gonna be as blurry, or I’ll have to look into things further. I only have one more builds of these, but another idea is there, so maybe it won’t end with the next one. Who knows, really ?

✨Books !✨
A small gift made for a relative ! I’m not entirely happy with the result, because it feels a bit empty, but anything I tried to add did not help (such as plants, to get a result similar to this old MOC I made a while ago).
Anyway, other angles, because I like these small MOCs to be visible from all angles :


Also, if anyone like the design of these books, you might want to check what lies below~

Feel free to use this !
I made this because I did some tests virtually before actually building it, and although I slightly modified the design to stack them up, it’s pretty much the same~

✨Tree ! ✨
So I found another technic. And it makes for great (albeit round) trees.
Anyway, some rambling about that below.
Another angle. It's not needed; but oh well.

It's very simple, I'll admit that. Then again, I don't do purely organic MOCs very often, the last one was probably my Camp Site, and it wasn't the main focus at the time, but I'm trying.
Anyway, if you actually decided to read that, you're probably seeking whatever technic I used to make that, not the random rambling. So here it is :

To sum it up : core piece is a modified 1x1 brick, surrounded on all sides by two flower stems (I've used the bar ones, the stud variants work too). Then flowers and leaves. To give some varied shapes, you can get some leaves upside down (cyan ones on the image), and you can also get rid of flowers by using a piece on the other side of the leaf (any piece works as long as it has a small bar connection), like the blue one on the right. Of course, same trick as before to give some shapes. It has some limitations, but I still think it's relatively good. If you like sphere, that it, hence why using a couple of them is better.
Also, I feel like, since I'm yapping about organic MOCs, I have to present my very first one :

That's ugly. But at least, you can technically tell it's a flower.
It's fragile and it's not interesting, though one funny thing is that, in order to keep it from collapsing under its own weight, I've had to add small iron bars (think unfolded paper clips) in the stem, which is actually really sturdy, while allowing for curvy shapes. Probably the only thing worth keeping from that thing.
Anyway, this whole tree thing was an accidental tangent from an actual, cool(?) MOC I was working on, which might actually be posted next week. Or maybe not, who knows really ?

✨Custom air Toa !✨
6/6, that’s the last one ! And the biggest one, too-
Closeups under the cut !
Front/back views


As you might notice, it is tall. And it has more than four limbs, which would not be a problem if it was the only one. But. It appears that all my green mocs end up with too much limbs, and I can’t fathom why. Really, another prototype standing on my desk also has for and so does the green hero factory one…You get the idea.
Anyway, the colour scheme for this one is dark green and silver, with some translucent bright green accents. Using only bright green would have brought too much contrast with the others Toas (notably the dark red one), but I had these cool pieces to use and no one else to put them onto. And since these are experimental…
The two supplementary limbs are intended as movement claws, given that we usually see air Toas moving in jungles (Lewa mostly, that is). The silver pieces at the front and back ends are respectively Kopaka’s skis and Pohatu’s foot pieces (shoes ?). The largest bits are made out of technic pieces directly, to give some simple angles.
Bust views


I find this silver/green chest piece really cool, it’s a shame I don’t have much of them. The two bright pieces on either sides are Vahki head pieces, and since their only connectors are on their relative tops (side of the piece in their actual orientation), you may remark that they are connected to nothing. I’m having the arm socket go through them, and the rest of the body’s shape avoid too many movements. While nice, this also limits the movement range of the arms, but it works well enough (these are not really made to play, anyway~). The two bright pieces with spikes are from a Ehlek. Wish I could have managed to put that one back together, but it instead served a higher purpose.
The Kanohi is Hordika Matau’s, with transparent Bohrok eyes underneath (it share this technic with my previous white Toa). The back piece is coming from a Piraka, but it’s actually a broken piece. I have quite a bunch of these, where the mask and flexible parts have broken off, so I make the most of it (like you might see in the future on another MOC). I’m using technic angle (type 3, to be precise) to keep the shape of the middle ones, but the others are free.
Finally, a (dismantled) leg view.

Finally, the leg segment !
The Toa was too big for proper leg showcase, my lights created terrible contrasts (shelf not deep enough…), so here is a stand alone leg instead.
Once again I have integrated the Metru chest piece to the leg, but as a foot this time. It offers a good stability and looks nice.
The next part doesn’t have much interesting bits, except that I’m using technic tubes to hold the additional piece, making this technic less illegal that my usual works (keyword : less; there is still a whole lot of stress on these poor pieces).
The top part is…somewhat more complicated. The frame is of technic pieces (like the additional limbs), which keeps together an immobile socket joint which keeps the double socket and two Bohrok feet (one for decoration, one connected to the hip socket). The double socket is used both to connect the two halves of the leg and to hold the small arm piece which is here only for decoration.
And that’s it for this series ! I’m hoping to bring them to next month’s exhibition, along with some Bionicle MOCs I haven’t showcased here because…shelf…Given the sheer size of my big project (posted here next week in theory), I’m gonna have to improvise something quickly, and profite of it to get some pictures of my other big ones while I’m at it. Eh, I’ll figure it out (and if I don’t, I’ll just delete that statement later :}
Thanks for reading, have a good day !

✨Clone wars diorama !✨
Another one, technically the largest I have posted (yet~), featuring the 212th and a (placeholder) Jedi.
Of course, closeups and additional details below !
Views from directly in front/above :


Before I continue, I must confess it. This horrendous mistake, which you might spot by paying close attention to the right part of the image.
Yes. I somehow created an offset on the entirety of the wall’s height.
Overall, I’m quite happy with this one, mostly the environment, which turned out great (except for the offset….). What I’m not really sure leases with are the cheap AT-RTs from the battle packs, which are too bulky, but it works well enough for the moment, and since I’m not exposing to any connoisseur, it does the job.
Most of the minifigs are from these battle packs too, except for the Jedi, which is actually a savage oppress with a cloak, but every time I try to just remove the minifig, it feels like something is missing. The paratrooper captain has the hold grey kama and pauldron which always work well, even if it could have done with an additional visor.
Anyway, let’s get going with the closeups !
AT-RT scenes :


On the left, an engineer (my favorite kind of clone) fixing a broken down leg, with the help of one of the pilots. It was hard to get the minfigs in a 'lively' position, and the photo doesn’t render it correctly. The small white backpack is a piece I’ve stolen from the 501st specialist pack, because it’s nice.
On the right, a paratrooper with a completely inaccurate rocket launcher (the clone wars’ ones don’t look as cool, though). I quite like the way this part came together, even if it’s just a small detail.
Explosion scene :


I’ll admit it’s my first try with building explosions, and I’ll hopefully improve.
On the right, the clone says hi ! Well. No. He doesn’t, but it’s what he looks like on the photo, which I funny, I’ll admit, but not the image I wanted to convey, even if technically he’s set properly, as a projectile caused by the explosion.
The picture on the right convey the feeling of movement much better, with the clone shooting on the left, the others running along, and the paras being blown.
Other scenes :


The focus on the left is the droid ! I really like how it’s sprawled over that rock. Other droids can be found in the diorama, notably one being crushed by the rocket launcher AT-RT, partially under a rock, and part of one in the explosion.
On the right, we see a paratrooper down (but still fighting !) with, at his side, a medic applying a hypo. While it’s hard to see with this picture, he has a pouch at his side, and some chroma-black legs, because I was missing a pair of legs the medic has prosthetic legs, isn’t that awesome and convenient ? That is a lesson to learn, any lack can become lore ! Well, kind of. It’s what I also did with the Kashyyk MOC : I was missing all but the helmet of my ninth minifig, so I turned it into a grave of the missing squad member.

✨Custom technic vehicle !✨
Something which I had never really posted on before was that, although I enjoy bricks (or Bionicle parts) a lot, I also like to mess around with Technic, when I have the occasion to.
Most of this one is a bunch of additions made on top of the 42065 set, because it's an overall really fun set, with enough space inside to cram in some additional mechanisms.
Here is a video of that thing performing :
...And the remote !

Of course, details and close ups under the cut !
So, here is the (non exhaustive) list of what I added/changed :
Colours of the middle line and addition of some decorative tubes;
A fancy blade at the front;
Plenty of lights;
A turret.
I'll discuss all of these below (except for the first point, which is quite straight forward.
The front :

So, the main plate I used for the vehicle's blade is often used in large Technic cars, mostly for roofs; but used the other way around, it has a nice shape. It's not very functional, but it's aesthetic, and inside are two of the lights I have integrated (some of the cables are visible on the right).
The side :

From here, we can see my beautiful mess of cables (I forced the top open to show it, because it's not as opened at rest). Most of the large cables here are getting power from the battery to the RC receivers; while the small cables are all lights (I might have used too many-).
You might also notice the there are some bumps on the tread pieces : these are rubber grip pieces which I stole from a Nexo Knight Fortrex (it's doing fine without them). These make the plastic less slippery when on rock, but it does a poor job on grass (because grass blades get caught in the gaps of the treads pieces) - to fix that, I would use some of the old rubber treads, but they're way to small to be used as suchs. Instead, to remedy to the problem, I changed the original motors from the default PF M to PF L, which have more power and torque (and can thus reach their max speed even with the added mass). While the two motors have the same theoretical speed, this modified model drives faster than it's standard counter part (it's funny to take over other cars, don't judge).
Back view :

Here you can see the PF M I was talking about (bottom right, the second one is at the front of the vehicle). You may also notice that I have a second mess of cables , because my two receivers are here.
Two major problems with that :
The placement of the receivers makes it so that I can't control the vehicle, unless behind it (oops 1);
Because one of the receivers (on top) had bad wiring with one of the tread motors, the turret is heavily limited in its movements (oops 2).
Turret :

So ! That's the most interesting part of it (obviously).
Now, please note that it was my first time trying to do it, and plenty of my design choices were bad, but fixed in my V2 (will probably be posted next week~).
The way it works is actually quite simple : I have a motor underneath (PF M) positioned horizontally, which is connected directly to the light gray gear (just under the trans green piece on the left) which itself connects to the black base gear on which is mounted the turret. Because of the direct motor connection, the turrets is a nightmare to aim. Not good.
As for the cannon, it's just a servo and a spring cannon. When the servo is activated, the grey technic piece presses the projectile and it flies. Surprisingly simple. (It also lights up the green lights on the side, for fun).
Anyway, this is a fun project to play with. Next week, I might post the V2, which is...Quite different. You'll see :}
And bonus cat picture !


✨41st Recon Squad Camp Site ! ✨
Closeups and other stuffs under the cut !
Backside :

Right scene closeup :


Campfire scene closeup :


Tomb scene closeup :


And finally, my personal favourite :

New lights, new camera settings, and a larger space…because this one didn’t fit the other one…Indeed, using shelves as a photo studio is not my brightest idea, but in my defence, it works.
This MOC has entirely been made because of the camouflage cloak I found in the bottom of a box. I don’t know where it’s from, but it looked very cool with that particular trooper, and thus I needed to show it off.
It was also helped because the large amount of olive green plants I received recently (those that are all over the place).
I tried something new, which is that I have not a rectangular base, but rather, three trapezoidal ones linked together to play with the shapes a little. Some parts were a pain to link together, but some tricks can help with that. The crates, for instance, are on top of a hole I couldn’t fill because of the odd shape.
The tombstone was actually the best idea I could get because I’m missing a trooper torso ! I can’t find it, and a pair of legs and a helmet are all I have left, and I might have watched Tales of the Jedi again recently, so that ended up being here.
The tent itself is made thanks to a fun discovery of mine, combining nets and my recent shipment of plants. I put a plant every three holes, in one line, and continue the pattern diagonally. In the back, to hold them in place, I used 1/2 technic bushes, which are quite convenient. And of course, this part is not connected to the poles at all, I case I want to add something in the tent.
Finally, some will notice the main incoherence of the thing : all the smaller wooden poles (tent and fire pit) are not birch-coloured. That’s mainly because finding the good pieces would have been a terrible hassle, and also because the campfire would really look weird in white.
Also, I might have spent an entire night on these trees to find what the colour balance and shape would look the more natural, I hope these are good.

Here is a second batch of custom minfigs ! (Yes, these are Nexo knight based too. What can I say, the original designs are just too good.)
Closeups and commentaries underneath the cut !
Closeups are from left to right

So, starting with the pretty basic guy. Quite a mixup of different things : the helmet is modified from some type of samouraï thingy, the pauldron probably from clone wars, and the axe’s blade (beautifully chromatic bronze, so rare these days) come from an old castle set. Other than that, the base is mostly a basic evil guy starter set, but the armour details are really neat

This one ! Probable the most customised. Legs are from one of the cool original minifigs, torso is from the (meh looking) main antagonist, with both arms equalised with red color (the purple arms came handy for something else~). The armor piece is from a Ninjago skeleton, the head is also from Ninjago, but with a much later subtheme, and the bit of hair comes from the nice guys of Nexo knights. Sword comes from China Chima, and the shield ! The shell is made from an Hero Factory piece, and it looks pretty nice like that. And of course, I can’t not mention my favorite piece, the cloak, that I put literally everywhere, because it goes with a lot of things. It also comes from Chima.

Probably my favourite. It’s not really modified much from the original (ultimate) version because it is very, very cool. I did make some slight modifications on the blade to use shiny dark grey; and the armor piece + pauldron are just an addition to make him look more menacing. But it simply looks great as it is !

…Yes, the cloak is here again. Ignoring it, everything is recycled from somewhere in Nexo knights, here. The body is from the moltor guy, the head is, too, but with the back in front, framed by the helmet to make it an eye. And the two sword. These I can’t use as much as the cloak, but if I could, I certainly would. An awesome addition, really.

Finishing touch is quite simple. Most of the piece are from different characters of Nexo knight, mostly following a default character, and the two tridents are from Atlantis (a really really good Lego theme. One day I’ll have a diorama of these)
You’ve made it here ? We’ll be aware I have a batch of the blue ones that will arrive…at some point. Probably not next week, I’m hoping to have enough time to put my bionicle customs in my larger studio for next week.

✨Santa’s sleigh !✨
I showed last week the Christmas tree I made last year, now is time for what I did for 2023 !
Closeups and commentaries beneath the cut !
Sleigh closeups :


Reindeers closeups :


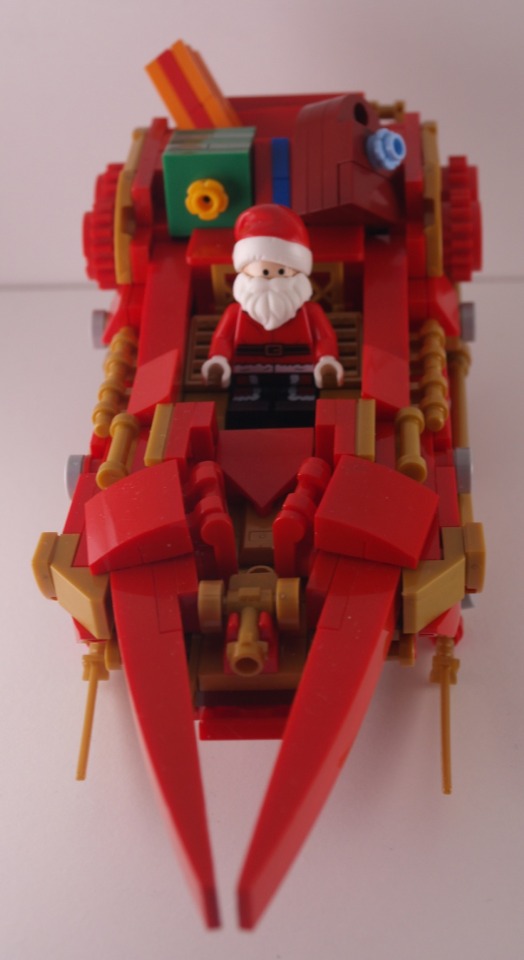
Santa :

SO. Had a lot of fun with that one. The sleigh doesn’t have much exciting parts, except the blades, which are actual blades (Ninjago sabers, to be precise). The back is filled with presents from top to bottom, so they can be rearranged to give a different look each time it’s put together.
The part connecting the sledge to the reindeers probably could use the help of an iron wire to keep its shape (a neath technique I’ve used for a flower in another one of my builds to make the bendable pieces stronger), and the threads between the reindeers is a very cheap finition, but in my defence, I was on a time limit.
Reindeer-wise, I’ve hesitated whether to give them all a red nose, but they didn’t look nearly as cute without. And the antlers, I must admit, are very unsteady, because they’re illegally connected, but this was the best way to keep a small overall shape.
Finally, the Santa minifig was probably, and surprisingly, one of the hardest parts of this MOC, because the parts I stole borrowed to other minifigs were spread in multiple places, and I didn’t have one of the official Santa minifigs. So most of the piece come from different Star Wars advent calendars (mostly Darth Vader and C-3PO).

✨Custom ice Toa !✨
And another one ! If the others were already experimental, this one is much, much more-
Closeups under the cut !
Front/back views :


That one was a lot of fun ! But it’s also not really stable, considering there are some weird piece combinations. This one also has disproportionate legs, compared to the rest of the body, but it’s alright.
With that one, I really tried to remain within Kopaka’s spirit (notice the ski blades and the Kanohi). The bow and arrow (which doubles down as a lance, and is using one of Kopaka’s blades), is a weapon I don’t think has been used before in the original bionicles (correct me if I’m wrong).
The arms/hands are using Pridak’s feet, because it works well and still allows for large movements.
I used some darker white pieces on the back and shoulders to get some slight contrats, and used technic pieces on the chest to get a proper body shape, with a leg piece underneath.
Legs :

(Too) Many details on the legs ! The blades under the feet are a combination of Kopaka Nuva’s blades and Glatoran blades, which also hold a shoulder piece used as a supplementary leg pieces.
Now is the here we enter the mess : all of the ankle sockets you can see are not used for the articulations, and are only here to keep the back piece in place (Star leg), while the actual socket is behind the technic gear plate. Then there is a socket which doesn’t even have a ball, it is directly stacked on top of another socket, and I use multiple feet to cover the leg areas which would expose how terrible the inside is. At the front, you might also notice a 1*2 curved slope tile held by two technic pins. It’s floppy, and it looks weird from the side, but the front appearance makes it worth it. Finally, at the front, I also use part of a Vahki’s head as a final plate, before we finally reach the connection between the legs and the body. As I said, that whole part is a mess.
Head :

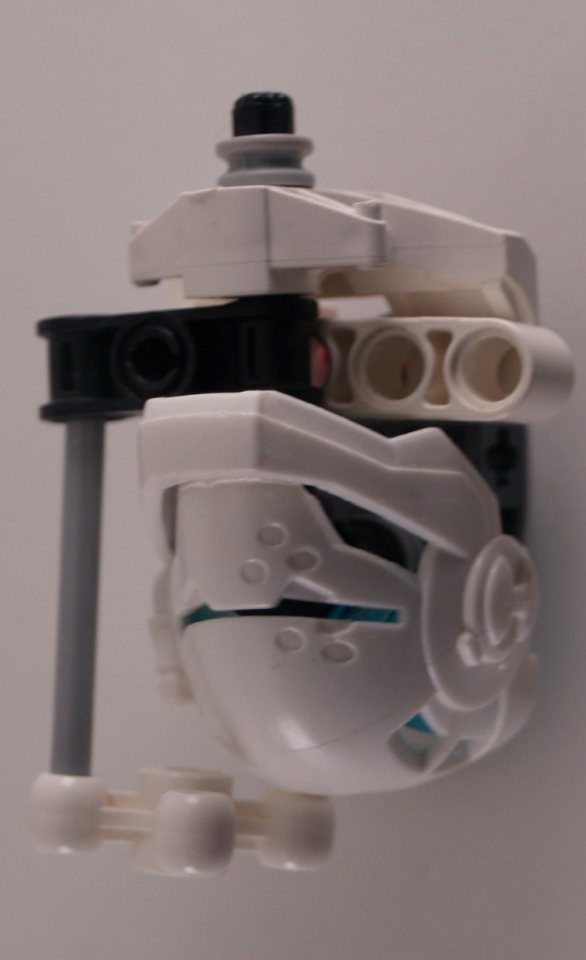
Tried to remain close to Kopaka’s appearance here too, by adding a X-ray vision thing, but the most important part is that the Kanohi is Hero Factory Stormer’s mask, but sideways. The trans blue pieces are Borhok eyes, which fit perfectly, and I managed to cram a socket connector inside, making the head quite mobile and sturdy.
Next week is another one ! Not sure which of the three it will be, but I haven’t decided which one yet (tell me if you have a preference~).
I also finally received my new parts, meaning I can get back to working on my big project, yay !
-
 roboticexplorer liked this · 1 month ago
 -
 butchass reblogged this · 1 month ago
 -
butchass liked this · 1 month ago
-
 typhonlure liked this · 1 month ago
 -
 newnicemice liked this · 4 months ago
 -
 dinkiestboi reblogged this · 4 months ago
 -
 mr-space-man liked this · 4 months ago
 -
 freakish-hazzard reblogged this · 5 months ago
 -
freakish-hazzard liked this · 5 months ago
-
 scrumpyfan43 liked this · 5 months ago
 -
 sennakoshiba liked this · 5 months ago
 -
 fetus-cakes reblogged this · 5 months ago
 -
 nick-chinchill liked this · 5 months ago
 -
 hendratds reblogged this · 5 months ago
 -
hendratds liked this · 5 months ago
-
 degrodach liked this · 5 months ago
 -
 miniatureobjectperson liked this · 6 months ago
 -
 carolina5760 liked this · 6 months ago
 -
 transrai reblogged this · 6 months ago
 -
transrai liked this · 6 months ago
-
 scp3199 liked this · 6 months ago
 -
 thexifsanna liked this · 7 months ago
 -
 gaxhar reblogged this · 7 months ago
 -
 my-t4t-romance liked this · 7 months ago
 -
 maxsmin liked this · 7 months ago
 -
 67i203 reblogged this · 7 months ago
 -
 identityarchitect reblogged this · 7 months ago
 -
 t1ts0nt0ast liked this · 7 months ago
 -
 feral-yhs-fan liked this · 7 months ago
 -
 ilikehfjone liked this · 8 months ago
 -
 marshtherocketgrunt liked this · 9 months ago
 -
 churchydragon reblogged this · 9 months ago
 -
churchydragon liked this · 9 months ago
-
 loreparmenter liked this · 9 months ago
 -
 pokenerd265 liked this · 10 months ago
 -
 scartalon13 liked this · 10 months ago
 -
 sweetcreatortimetravel reblogged this · 10 months ago
 -
sweetcreatortimetravel liked this · 10 months ago
-
 shehulk152 liked this · 11 months ago
 -
 goodtimeobtainer reblogged this · 11 months ago
 -
goodtimeobtainer liked this · 11 months ago
-
 the-patience-bean liked this · 1 year ago
 -
 peaforbrains liked this · 1 year ago
 -
 mosscoveredcockring reblogged this · 1 year ago
 -
mosscoveredcockring liked this · 1 year ago
-
 sketchygainedyoursoul reblogged this · 1 year ago

They/them - AroaceLego MOCs and photography with a wide range of different characters and environments, every Wednesday (in theory-)
77 posts