Here Is A Second Batch Of Custom Minfigs ! (Yes, These Are Nexo Knight Based Too. What Can I Say, The

Here is a second batch of custom minfigs ! (Yes, these are Nexo knight based too. What can I say, the original designs are just too good.)
Closeups and commentaries underneath the cut !
Closeups are from left to right

So, starting with the pretty basic guy. Quite a mixup of different things : the helmet is modified from some type of samouraï thingy, the pauldron probably from clone wars, and the axe’s blade (beautifully chromatic bronze, so rare these days) come from an old castle set. Other than that, the base is mostly a basic evil guy starter set, but the armour details are really neat

This one ! Probable the most customised. Legs are from one of the cool original minifigs, torso is from the (meh looking) main antagonist, with both arms equalised with red color (the purple arms came handy for something else~). The armor piece is from a Ninjago skeleton, the head is also from Ninjago, but with a much later subtheme, and the bit of hair comes from the nice guys of Nexo knights. Sword comes from China Chima, and the shield ! The shell is made from an Hero Factory piece, and it looks pretty nice like that. And of course, I can’t not mention my favorite piece, the cloak, that I put literally everywhere, because it goes with a lot of things. It also comes from Chima.

Probably my favourite. It’s not really modified much from the original (ultimate) version because it is very, very cool. I did make some slight modifications on the blade to use shiny dark grey; and the armor piece + pauldron are just an addition to make him look more menacing. But it simply looks great as it is !

…Yes, the cloak is here again. Ignoring it, everything is recycled from somewhere in Nexo knights, here. The body is from the moltor guy, the head is, too, but with the back in front, framed by the helmet to make it an eye. And the two sword. These I can’t use as much as the cloak, but if I could, I certainly would. An awesome addition, really.

Finishing touch is quite simple. Most of the piece are from different characters of Nexo knight, mostly following a default character, and the two tridents are from Atlantis (a really really good Lego theme. One day I’ll have a diorama of these)
You’ve made it here ? We’ll be aware I have a batch of the blue ones that will arrive…at some point. Probably not next week, I’m hoping to have enough time to put my bionicle customs in my larger studio for next week.
More Posts from Antrylis and Others


![✨Looks To The Moon✨ [1/2]](https://64.media.tumblr.com/8673892d6391d798d2e17a3d5ce540c4/b43f6ed2c41a5d1f-3b/s500x750/bc7b11f6b9448e7e96451100f0081125861f2c1f.jpg)
✨Looks To The Moon✨ [1/2]
Where do I even start with that ? Oh, yeah. It’s not done just yet (if that wasn’t obvious enough).
Though, I won’t have the opportunity to work on it for a while, so I figured I might as well share the progress.
Obviously, I’m missing the water; and an outside — as well as a few other things I’ll mention somewhere below (along with closeups and way too many details, as always).
If you don’t care about any of that, you could still check up my silly little FP there !
Lots, lots of things to talk about here…
(Structure first, feel free to skip to the first actual close up if you consider that as boring.)
First of all, here is an edited version of the first pic, with water :
![✨Looks To The Moon✨ [1/2]](https://64.media.tumblr.com/ea39d63ea2dcbb3bc92aa755b0d4d40c/b43f6ed2c41a5d1f-71/s500x750/61199b745c19b0917b1b6e8368b0c7546abaa1a8.jpg)
Looks much better already. And although it might prove complicated, I have a plan. Sort of. Because Lego has this really cool, transparent blue piece which they produced a lot of : folding garage doors. They’re everywhere on firefighter sets, and they’re really wide. With a few tricks, they might work.
As for the outside, well…I’m not there just yet. I’ll try to cover it up with some Iterator-esque pattern, I suppose.
I’m also missing a scug ! I absolutely want one, and given how I chose to represent the scene, it won’t be Saint nor Spears (shame). Rivulet is really tempting, but it might make too much blue; currently, my choice might be on Monk, to have sufficient contrast (and Monk is cute). Though I might change that, depending on how much small yellow pieces I have.
Now, before talking about the inside, let’s take a peek at the outside :
![✨Looks To The Moon✨ [1/2]](https://64.media.tumblr.com/871f4a5f0d56b953e8de148ff40a2c3c/b43f6ed2c41a5d1f-0a/s500x750/11b869101b74a3016e20b69dbf5ba74211c1b821.jpg)
Here it is (back side, specifically). It’s a bit of mess because of the technics im using — which I’ll come to in just a seconds — but I also find it oddly fitting with the Iterators theme. The blacks on each sides are holding the cube together, and the technic bars in the middle are ensuring everything is held together — and also compensating for the weight of the top plate, kind of like how I did with my Carrion MOC a while back.
Anyway, the Technic™️.
The one thing which I find striking in Iterators cans is the tiling (14x14 from my last count), and it’s not that easy to replicate through Lego. Either you have no gap at all, and you use only the tiles’ grove as a separation (which, here, is way too small) or you make them very far apart, which looks terrible here). However, my tiling technic here is (not entirely mine) usually something you’d see to make floors, especially castels.
Here, I have three layers : the dark grey layer, which is the base; the light gray, which is the tiles; and, in between, I have a layer of black dots forming a grid diagonally to the first layer, on which the tiles are placed. This diagonality explains why, on the pic above, my plates have so much spiky edges, and which I have to use this whole complicated system to hold everything together.
Of course, it gets worse ! Because the cans are not perfect cubes, the edges are bevelled. And so I bevelled. Now, with all these intricacies, there was no way any regular connection would keep these edges in place. You can also spot what I used instead, which is an awful lot of ball and socket joints (mixel style). Incredibly useful, those pieces.
Anyway, enough boring structural details, here come the fun part !
Small things first, here is a comparison of the first vs final design for the neuron flies :
![✨Looks To The Moon✨ [1/2]](https://64.media.tumblr.com/6fc18f71aa5a566f239a04658bdaa2b1/b43f6ed2c41a5d1f-d7/s500x750/8c00b65ae9ed9e3815a0dfa05afac4aef312f2c9.jpg)
![✨Looks To The Moon✨ [1/2]](https://64.media.tumblr.com/7aa3ed3889c2725fda3cb5707181c360/b43f6ed2c41a5d1f-00/s500x750/cf712d96ae5c58a6774642670aa9cc465c46911d.jpg)
I’m really glad I actually managed to do that — they’re an important element, and the conception had me worried for a little bit.
The first design is, in my opinion, the best one can make at this scale. Slight issue : it’s not actually physically possible to make it hold together. After a lot of different iterations (ah !) I’m came up with the design on the right. It’s a bit more square, but it has a distinct head and floppy tails, which was all I was asking for. Obviously, the two tooth pieces I’m using are hardly held at all (using a mod 1x1 joint piece). There’s also, behind, a white dot with a hole, which ensures that these can be connected to the background via the long, transparent bars. Wasn’t easy to stick them without breaking them, and there’s no way I’m touching these now.
![✨Looks To The Moon✨ [1/2]](https://64.media.tumblr.com/7217074bc04fbf14f9c736e361ec67e5/b43f6ed2c41a5d1f-98/s500x750/02db63d8269d5e91989886e7d82ce393ba743cb6.jpg)
Her. She is the central piece of my MOC after all. It took me a while to figure out the design (mostly the head), but I’m glad of how it turned out. It’s not perfect, of course, but I feel like it works well, both scale-wise and color wise. And there’s only one (two) illegal connections, for the antennas which I’m making using hands. It’s very tempting to draw her a face — I’ll probably consider it, at some point.
The arm behind is also relatively good, with loose cables hanging from it. Once again, ball and socket joints are here to save the day; although I do feel like some parts of it are a little bulky, and it doesn’t drop down low enough…
Additional details, the piles of debris.
![✨Looks To The Moon✨ [1/2]](https://64.media.tumblr.com/669c04363442a3247a589729a9662ce0/b43f6ed2c41a5d1f-b8/s500x750/6a07583141d576aa968ae6e966c49c008336bf10.jpg)
It’s…really difficult to make debris which don’t look purpose, and aren’t simply horrendous to look at. I tried to keep some grey tones, but also incorporated some brown, because it does actually bring some well needed contrast to the whole scene; and a few plants.
Speaking of plants, I’m no really liking these vines hanging from the ceiling (much thinner and darker in game), but as far as my expertise go, I dont see another way to get them here — and if there’s nothing at all, the whole piece suddenly gets really dull. Of course, there’s also the gap in the ceiling, with cables falling out; this, I will add more details to later on — and I have the hope to get a proper light source to go through it and act as a sun which will fall directly on my small LttM.
To conclude, here are final views of it, from further away, and with a brick separator from scale. It does look quite flimsy, doesn’t it ?
![✨Looks To The Moon✨ [1/2]](https://64.media.tumblr.com/d51f8a684b768c0a7223411e69dff690/b43f6ed2c41a5d1f-c8/s500x750/88d4ed5aa97df2a0f985dfbdd56187b5f046232e.jpg)
![✨Looks To The Moon✨ [1/2]](https://64.media.tumblr.com/f11171cfd8f3d6d55b2f41f46b2d7314/b43f6ed2c41a5d1f-5b/s500x750/69aeba2df224bab421ecb45cd578b90c68e1620c.jpg)
Oh, and, well. I’ve been messing with Dots recently. Figured this was worth including as a footer (probably on of the first achievements I unlocked — poor Moon~).
![✨Looks To The Moon✨ [1/2]](https://64.media.tumblr.com/2ed459bb6232038d802ac64afd31fe15/b43f6ed2c41a5d1f-77/s500x750/a88a5b9e2dfba1a119dd2d0ae623e595a0c06b84.jpg)

✨Space ships (and hangars, too !) !✨
(Or, last post for the space station)
<Previous< [4/4]
Under the cut are closeups of (practically) all ships and hangar from the station !
Before anything, the third post is somehow completely gone, even if I do have proofs that I did do it. Well, it was already posted late, and I don’t have the courage to do it again — and it’s not like people would care much anyway, so how this station is holding up will remain a mystery~
Anyway, closeups.
Hangars (groupes by similarities)


This first batch here contains the 'empty' hangars. Left is meant to be a closing/opening hangar, which I usually keep in the back because it's not the most interesting one; while the right one is the bare hangar. There are two of these across the ring, in which I sometimes pluck a ship, though it's hard to keep them in place because of the station's inclination.


Next is a batch of random boxes and other scifi-y grates and boxes. To keep the boxes in place, I use modified 1*1 bricks (because the floor is is made of horizontal pieces, aligned with the outer tiles). Minor variation are present in the middle hangar, where a third of the floor is composed of 1*2 modified bricks to add a tiny bit of texturing. While these might a tad repetitive displayed like above, they actually are separated by three other different hangars, so the repetition is barely visible.


A bit similar to the previous ones, these have (in my opinion) more interesting details. Left is two racks of large barrels, supposedly fuel. Middle had another barrel (made with flowers pieces) and a yellow cable, which was surprisingly hard to add because it pushed the back plate (which holds a lot of the hangar together). The last one is a stack of long crates, and an observation deck (I'm guessing the original sticker comes from a small star destroyer).


Last batch, and probably the best of all, the containers (scaling from not too crowded to very crowded). These are the same size as the big ship's. There are very few attachment points to the ground, as most of them are held by other containers above or bellow, although the middle hangar had two modified 1*4 bricks in the floor. The original plan was to get them all aligned, but it looked terrible, so I went for this more haphazard placement, which works better.
Ships


These first two are the smallest of my little fleet. The top one is two 2*1 plates held by black 1*1 mod plates. It's small, it's smooth, and it works quite well with the station. I'm probably gonna make other of these in different colours someday.
The next is one of the first I made, using some shiny pieces. The two chromatic studs on the reactors are differently shades of chroma silver on purpose because this is meant to be a much older ship (compared to other most of the other, smoother ships).


This is a much larger one. More of a military design, I mostly played with angles on that one (and added big reactors for fun purposes). The transparent light blue used here is the same as the fuel barrels of the station, and are the most used on the ships I have. Lore would say it's because it's the most common fuel used in the universe; pragmatism would say it's because it's the most common transparent colour in my boxes.


More blue reactors ! The top one is my one of my favorite. Only 7 pieces, including an old aquaraiders piece which I had to use as a ship the moment I found it. It's simply ship-shapes ! Given the colours, you could imagine it's an old model (not as old as the small one). The bottom one is a very thin one, with a Y piece which can allow for many cool shapes (like this one) !


Weird alien ships ! The first one is curvy~~ It's a nice concept which is quite common, but I really like the idea, and thus made one. Notice the green reactor this time, because alien fuel. Next one is more organic (or at least trying to), using mostly car pieces (and an orange reactor, wew !). It's also quite compact, with a single mod 1*1 brick as the core. The final one is by far my favorite (and not only because it has a purple trail). While hard to because of my lighting, the three main parts of the ship are separated by clear studs. I originally made it without the in-between studs, but then it fell the the floor, broke, and separated, and it looked much more futuristic. Consider this a very advanced ship of a peaceful species, or something like that.

✨Books !✨
A small gift made for a relative ! I’m not entirely happy with the result, because it feels a bit empty, but anything I tried to add did not help (such as plants, to get a result similar to this old MOC I made a while ago).
Anyway, other angles, because I like these small MOCs to be visible from all angles :


Also, if anyone like the design of these books, you might want to check what lies below~

Feel free to use this !
I made this because I did some tests virtually before actually building it, and although I slightly modified the design to stack them up, it’s pretty much the same~

✨Bionicle insect !✨
Yay, back to Bionicles MOCs !
I made fewer of these, but here is the first one (other images and additional details below the cut).
I’m still not entirely convinced of the edited photos, but given the size of these MOCs, I didn’t really have much choice but to do how I did. At least the ones with background give a few colours.
Anyway, photos of the left and underside !


This was really a fun one to work with, obviously largely inspired by the Visorak sets (I kept the head piece and the claws), but with more legs !
The claws are combined with feet to add some shape (the two pieces work quite well together) to the end of the legs, then I made of 4 joints articulations to give it a proper insect-like stance. The middle legs are slightly longer (using a long transparent blue piece, instead of the small dark one), which makes it less linear.
I kept the disc of the Visorak, held in place by…a broken Pirahka headpiece. Yes, I’m not exactly very original in my techniques, and I have a lot of these broken pieces. As you might see in the third picture, I have the secondary connectors of that piece attached to the belly of the beast, so to speak.
Although, speaking of techniques, the one I’m using for the 'tail' is not exactly recommendable. It’s a bit tough to see, but there is an elastic band attached to the foot used as a tail part on the third picture. It’s the only element which connects the end of the tail (shiny Visorak claw in second picture) to the rest of the body, which makes it wobbly but offers some interesting movements if needed.
Oh yeah, I also used Vakama’s disc launcher again, as mandibles this time. I originally tried to make a transparent blue disc (from all promotional sets) inside, but it doesn’t fit well enough).
I’m considering making another in another colour, but I’ll have to see if I even have enough ressources to do so~ Maybe green and silver, since these are pieces I have a bunch of, or black and silver…Only time will tell.

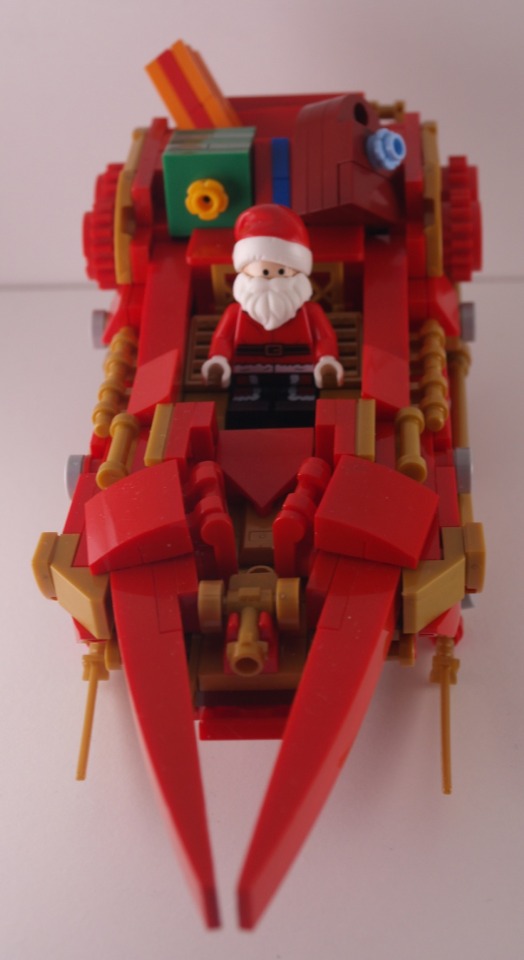
✨Santa’s sleigh !✨
I showed last week the Christmas tree I made last year, now is time for what I did for 2023 !
Closeups and commentaries beneath the cut !
Sleigh closeups :


Reindeers closeups :


Santa :

SO. Had a lot of fun with that one. The sleigh doesn’t have much exciting parts, except the blades, which are actual blades (Ninjago sabers, to be precise). The back is filled with presents from top to bottom, so they can be rearranged to give a different look each time it’s put together.
The part connecting the sledge to the reindeers probably could use the help of an iron wire to keep its shape (a neath technique I’ve used for a flower in another one of my builds to make the bendable pieces stronger), and the threads between the reindeers is a very cheap finition, but in my defence, I was on a time limit.
Reindeer-wise, I’ve hesitated whether to give them all a red nose, but they didn’t look nearly as cute without. And the antlers, I must admit, are very unsteady, because they’re illegally connected, but this was the best way to keep a small overall shape.
Finally, the Santa minifig was probably, and surprisingly, one of the hardest parts of this MOC, because the parts I stole borrowed to other minifigs were spread in multiple places, and I didn’t have one of the official Santa minifigs. So most of the piece come from different Star Wars advent calendars (mostly Darth Vader and C-3PO).
Hey I don't know if you saw my repost on your post but I would appreciate and would definitely built a brickheadz version of the boba fett prototype minifig that I have as my profile picture. Your post says feel free to request any more and I thought it was worth a shot even though I doubt he'd appeal to more people than me.


✨Boba Fett Prototype ! ✨
Hi ! This has been in my inbox for ages, I know. Finally had time to give it a try ! Had a lot of fun, actually, mandos have some really interesting shapes.
And, because it took me so long, I figured, I'd also give instructions, too. Some colours might not be available, though, but white should be pretty easy to find for the outside pieces.
Instructions can be found here !

✨Smol Five Pebbles !✨
In a box, to be studied like a bug.
It’s a bit sketchy, but I really like the idea of small boxes diorama, so that you can just pile them up (this one is roughly the same size as this other thingy I made .
(You can also check up my Moon design, while you’re here !)
I tried to cram as much stuff as possible in there (an overseer, pearls, the entrance tubes…), which is quite the challenge in a 6x6x6 cube. I also added a small rail for the arm to 'slide' on. The technic itself is not exactly difficult, although, once more, brick-textured bricks are here to save the day. As it is the only 'illegal' connection of the whole build (who could believe it, coming from me, uh ?), I’ve also been refining it in StudIO to possibly make other Iterators~


Everything is held together through these four black brackets on the back, which makes working on it ridiculously simple : I can simply clip off a panel to modify it. (Also featuring my hand, for scale and because I still can’t take photos properly, it seems.)
Speaking of, since you made it all the way down here…I’m also working on another Rain World MOC, just a tiiiiny bit bigger. So here’s a sneak peek~
[edit] : here it is !


✨Bouldering wall !✨
I reeeally wanted to make one of these at some point, but never took time. Incidentally, I got commissioned — is it even a commission if it’s for a relative and I’m not paid ? — so there is is !
Closeups and details under the cut, of course !
Closeups :


So ! This was a lot of fun to make, with some really interesting techniques. The first thing is that overhang with an increasing angle at the top. A large part of it is just a big plate connected to the base by hinges, while the second part is connected to the first one, instead of the based, to make sure that when something break, everything break only attach one plate to the base, to provide a thin finition. The holds have nothing particular, except perhaps that some start 'in' the wall while some are on it, which is here to pretend there are micro holds — possibly the worst invention of the story of bouldering/j. The top layer of the wall is finished by 1*1 held horizontally by the outside the plates. Speaking of, the triangular plates holding these 1*1 are not connected to the rest of the outside plates at all. Instead, they’re connected directly to the overhang, which keeps the plate at that approximative angle.
But of course, the most important detail : the minifig hanging with its bare hands ! I knew from the start that I wanted it to be in that type of position, and the choice of purple holds came easily (it’s defining one of the hardest level for the bouldering center we usually go to). Of course, I wasn’t in possession of any purple piece a minifig could grab, because that would have been way to easy. So instead, I used magic science a trick, which you might have seen if you pay close attention to the hands of the fig. The 'trick' in question is that I managed to get my hands on a thin elastic thread, which is around the fig’s wrist in a loop, and then is stuck between the purple stud and the round grey tile — which, by the way, makes for the second worst type of holds in bouldering : rings — and since these pieces are on the second overhang, the rest of the thread is hidden, and not stuck between two plates, unlike what I did in my Carrion MOC, which tends to dealign pieces, which leads to broken MOCs (not the Carrion one because there’s too much tension for it to break), which I don’t want because this is meant to end up as a gift for someone I won’t be able to visit often to make maintenance, so it has to be sturdy (and it is !).


✨Custom Bionicle !✨
Today (and next week, too) was a good excuse to get these out of their shelf and showcase them (and wipe the dust away, too.
These are my custom/modified Toa Ru-Fahi, which are a reeeally fun project.
Other angles and details under the cut !
Before going any further, I can’t not link this post, because I made the name of these customs out of it, and also because it’s just so good of a work. Just check it out.
Atuaga Ru-Fahi


The most custom of the ones I’ve made for this series, even if some might spot some inspiration from Kongu Mahri. It turned out to be more silver than black, but it nonetheless remains the Earth Toa. I’m quite happy of how it turned out, with the red accents to fit the weapons, and its overall shape. The contours of the body made with tubes are also something I had never done before. One of the techniques I use to get a thicker effect is to superpose two 'limb' pieces on top of each other; but I also have multiple usage of bohrok hand pieces to get rounder effets, with some texture.
The cable going through the mask is connected directly to the shoulders, and it has a purpose which will be explained somewhere underneath. Also, the Kanohi is Norik’s great Pehkui, which is probably one of the coolest of my (extensive) collection.
Gali Ru-Fahi


Have you recognised her ? Probably, I gave her name. Gali’s always been one of my favourites, so I had to include her. More specifically, this one is a modified version of Gali Mistika, because that whole set was already pretty good as is. Here again, probably went overboard with the silver pieces, but oh well. The tubes are connected to the top of the Kanohi, because there were already holes there. With this one, I used arm pieces to get the torso’s shape. The shoulder plates I have not touched, because they’re a nice unique part. The back piece is a Rahkshi’s foot (in shape, because there’s sadly no dark blue Rahkshi).
The weapons are just a long axe covered by a tube, and the heads are stolen from another Gali (the new gen ones).
Lore-wise, I don’t really have anything for these, except that this Toa team is made out of Toa from different teams (chosen arbitrarily for their look) and are fighting is space (hence the breathing tubes, which is the element I keep on all these customs (only two here, but I promise two more next week). If anyone has any idea, I’m open. Considering what else I’ve on my shelves, the bad guys could be giant bugs, but that’s as far as my ideas go.
See you next week :}
-
 aeramisu liked this · 1 year ago
 -
 chiefxthegreat liked this · 1 year ago
 -
 groovyplaidstudentbagel liked this · 1 year ago
 -
 leftysupremacy liked this · 1 year ago
 -
 valen-3o liked this · 1 year ago
 -
 sad-little-jester liked this · 1 year ago
 -
 nalamadinson liked this · 1 year ago
 -
 antrylis reblogged this · 1 year ago

They/them - AroaceLego MOCs and photography with a wide range of different characters and environments, every Wednesday (in theory-)
77 posts