✨Looks To The Moon✨ [1/2]
![✨Looks To The Moon✨ [1/2]](https://64.media.tumblr.com/8673892d6391d798d2e17a3d5ce540c4/b43f6ed2c41a5d1f-3b/s500x750/bc7b11f6b9448e7e96451100f0081125861f2c1f.jpg)
✨Looks To The Moon✨ [1/2]
Where do I even start with that ? Oh, yeah. It’s not done just yet (if that wasn’t obvious enough).
Though, I won’t have the opportunity to work on it for a while, so I figured I might as well share the progress.
Obviously, I’m missing the water; and an outside — as well as a few other things I’ll mention somewhere below (along with closeups and way too many details, as always).
If you don’t care about any of that, you could still check up my silly little FP there !
Lots, lots of things to talk about here…
(Structure first, feel free to skip to the first actual close up if you consider that as boring.)
First of all, here is an edited version of the first pic, with water :
![✨Looks To The Moon✨ [1/2]](https://64.media.tumblr.com/ea39d63ea2dcbb3bc92aa755b0d4d40c/b43f6ed2c41a5d1f-71/s500x750/61199b745c19b0917b1b6e8368b0c7546abaa1a8.jpg)
Looks much better already. And although it might prove complicated, I have a plan. Sort of. Because Lego has this really cool, transparent blue piece which they produced a lot of : folding garage doors. They’re everywhere on firefighter sets, and they’re really wide. With a few tricks, they might work.
As for the outside, well…I’m not there just yet. I’ll try to cover it up with some Iterator-esque pattern, I suppose.
I’m also missing a scug ! I absolutely want one, and given how I chose to represent the scene, it won’t be Saint nor Spears (shame). Rivulet is really tempting, but it might make too much blue; currently, my choice might be on Monk, to have sufficient contrast (and Monk is cute). Though I might change that, depending on how much small yellow pieces I have.
Now, before talking about the inside, let’s take a peek at the outside :
![✨Looks To The Moon✨ [1/2]](https://64.media.tumblr.com/871f4a5f0d56b953e8de148ff40a2c3c/b43f6ed2c41a5d1f-0a/s500x750/11b869101b74a3016e20b69dbf5ba74211c1b821.jpg)
Here it is (back side, specifically). It’s a bit of mess because of the technics im using — which I’ll come to in just a seconds — but I also find it oddly fitting with the Iterators theme. The blacks on each sides are holding the cube together, and the technic bars in the middle are ensuring everything is held together — and also compensating for the weight of the top plate, kind of like how I did with my Carrion MOC a while back.
Anyway, the Technic™️.
The one thing which I find striking in Iterators cans is the tiling (14x14 from my last count), and it’s not that easy to replicate through Lego. Either you have no gap at all, and you use only the tiles’ grove as a separation (which, here, is way too small) or you make them very far apart, which looks terrible here). However, my tiling technic here is (not entirely mine) usually something you’d see to make floors, especially castels.
Here, I have three layers : the dark grey layer, which is the base; the light gray, which is the tiles; and, in between, I have a layer of black dots forming a grid diagonally to the first layer, on which the tiles are placed. This diagonality explains why, on the pic above, my plates have so much spiky edges, and which I have to use this whole complicated system to hold everything together.
Of course, it gets worse ! Because the cans are not perfect cubes, the edges are bevelled. And so I bevelled. Now, with all these intricacies, there was no way any regular connection would keep these edges in place. You can also spot what I used instead, which is an awful lot of ball and socket joints (mixel style). Incredibly useful, those pieces.
Anyway, enough boring structural details, here come the fun part !
Small things first, here is a comparison of the first vs final design for the neuron flies :
![✨Looks To The Moon✨ [1/2]](https://64.media.tumblr.com/6fc18f71aa5a566f239a04658bdaa2b1/b43f6ed2c41a5d1f-d7/s500x750/8c00b65ae9ed9e3815a0dfa05afac4aef312f2c9.jpg)
![✨Looks To The Moon✨ [1/2]](https://64.media.tumblr.com/7aa3ed3889c2725fda3cb5707181c360/b43f6ed2c41a5d1f-00/s500x750/cf712d96ae5c58a6774642670aa9cc465c46911d.jpg)
I’m really glad I actually managed to do that — they’re an important element, and the conception had me worried for a little bit.
The first design is, in my opinion, the best one can make at this scale. Slight issue : it’s not actually physically possible to make it hold together. After a lot of different iterations (ah !) I’m came up with the design on the right. It’s a bit more square, but it has a distinct head and floppy tails, which was all I was asking for. Obviously, the two tooth pieces I’m using are hardly held at all (using a mod 1x1 joint piece). There’s also, behind, a white dot with a hole, which ensures that these can be connected to the background via the long, transparent bars. Wasn’t easy to stick them without breaking them, and there’s no way I’m touching these now.
![✨Looks To The Moon✨ [1/2]](https://64.media.tumblr.com/7217074bc04fbf14f9c736e361ec67e5/b43f6ed2c41a5d1f-98/s500x750/02db63d8269d5e91989886e7d82ce393ba743cb6.jpg)
Her. She is the central piece of my MOC after all. It took me a while to figure out the design (mostly the head), but I’m glad of how it turned out. It’s not perfect, of course, but I feel like it works well, both scale-wise and color wise. And there’s only one (two) illegal connections, for the antennas which I’m making using hands. It’s very tempting to draw her a face — I’ll probably consider it, at some point.
The arm behind is also relatively good, with loose cables hanging from it. Once again, ball and socket joints are here to save the day; although I do feel like some parts of it are a little bulky, and it doesn’t drop down low enough…
Additional details, the piles of debris.
![✨Looks To The Moon✨ [1/2]](https://64.media.tumblr.com/669c04363442a3247a589729a9662ce0/b43f6ed2c41a5d1f-b8/s500x750/6a07583141d576aa968ae6e966c49c008336bf10.jpg)
It’s…really difficult to make debris which don’t look purpose, and aren’t simply horrendous to look at. I tried to keep some grey tones, but also incorporated some brown, because it does actually bring some well needed contrast to the whole scene; and a few plants.
Speaking of plants, I’m no really liking these vines hanging from the ceiling (much thinner and darker in game), but as far as my expertise go, I dont see another way to get them here — and if there’s nothing at all, the whole piece suddenly gets really dull. Of course, there’s also the gap in the ceiling, with cables falling out; this, I will add more details to later on — and I have the hope to get a proper light source to go through it and act as a sun which will fall directly on my small LttM.
To conclude, here are final views of it, from further away, and with a brick separator from scale. It does look quite flimsy, doesn’t it ?
![✨Looks To The Moon✨ [1/2]](https://64.media.tumblr.com/d51f8a684b768c0a7223411e69dff690/b43f6ed2c41a5d1f-c8/s500x750/88d4ed5aa97df2a0f985dfbdd56187b5f046232e.jpg)
![✨Looks To The Moon✨ [1/2]](https://64.media.tumblr.com/f11171cfd8f3d6d55b2f41f46b2d7314/b43f6ed2c41a5d1f-5b/s500x750/69aeba2df224bab421ecb45cd578b90c68e1620c.jpg)
Oh, and, well. I’ve been messing with Dots recently. Figured this was worth including as a footer (probably on of the first achievements I unlocked — poor Moon~).
![✨Looks To The Moon✨ [1/2]](https://64.media.tumblr.com/2ed459bb6232038d802ac64afd31fe15/b43f6ed2c41a5d1f-77/s500x750/a88a5b9e2dfba1a119dd2d0ae623e595a0c06b84.jpg)
More Posts from Antrylis and Others

✨Quake and its pilot✨
Another one of my combat mechs ! (See previous here)
Same as last time, closeups and lore under the cut
Mech closeups


Minifig closeup :
So, mech lore !
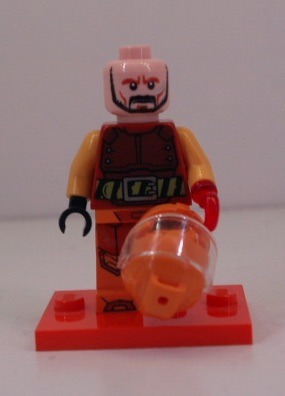
As I said in the previous post, mech battles happen some times after the third world war. Well, some of the veterans quickly took interest of this new sport, including today’s pilot. As you can see, sequels of the fights are still visible on his body, his hand being the most visible one. Of course, he could have had a normal hand, because it’s an easy thing, but he didn’t want to. He wanted to show what he had partook in, and this glowing hook was the coolest thing he found on the market.
At first, he didn’t really even watched mech fights, but eventually, some of his friends made during the war decided it would be fun to watch it together. And they enjoyed it. Enjoyed it so much, they decided they wanted to participate.
So, they did what any normal group of war veteran did : they looked for a place to scavenge spare parts and assemble a mech of their own, that would be out of the usual roaster of mark III and IV mechs. What they found was what was left of a large dig site, abandoned at some point in the past. Among the scraps, one of them found the large QUAKE panels. Probably the name of the company that used to be here. It would do the job.
It took some time for Quake to get into large-scale tournaments, because it usually fell apart quickly. With some experience, the team managed to get it in a usable state, and when it didn’t break down, the mech was doing some heavy damages. Don’t trust the electric panel on its back, it’s entirely coal-fuelled (coal which was provided by the dig site) and Quake is probably one of the only mechs powered by a thermal engine, but it gives it a powerful advantage : as long as it’s fuelled, it can deliver extremely powerful blows with its large arms, as well as it can withstand powerful attacks (that’s what the shoulder plates are for). With this mining equipment, Quake, after it began to be known, made itself quite of a name in the arena.
That’s it for this one, the next competitor, named Quetza, will be introduced next week :}
Also, I’m trying an old camera of mine to take pictures, because the lighting is better, although it’s less flexible than my phone’s. I’m still trying to get a good feeling as to what I’m preferring.
Random interesting thing to notice about the build itself : All articulations have different kinds of joints : bionicle ball-joints for the arms, technic pin for the hips, small ball joints to connect the legs and the body, old technic joints for the knees, and simple handle joints for the feet. It was accidental, but I think it fits well with the history of the mech.
Ah, I knew a special occasion would present itself that would be worthy of this cat !
Get booped
Get booped back ! Ah !
Oh, and have an actual (Lego) cat while I’m at it !


✨ Custom AT-TEs ! ✨
(Not entirely custom, actually, but more like a custom paint job / some tweaks)
These two pieces are part of a larger custom clone battalion, the 284th, that I’ll explain in detail in another post. In the mean time, these are already in use on a larger mix that doesn’t exactly fit in my small studio right now (I’m talking BIG moc)
Individual views :


The stickered plate, stolen from a Ninjago set, was awfully convenient, you may understand why here (not posted yet)

✨Bionicle…Rahi ?✨
Yeah, I’m not sure what that one exactly is…But I like it.
I don’t currently have any other Rahi in stock (well, I do have one but it’s terribly ugly), however I do have one in the making, which might be ready for next week. Else, I have a few other things I might get at (including a fancy idea since it’s pride month, which I’m hoping to manage to pull off…). Of course, if you have ideas, I’d gladly hear them !
Aaanyway, rant aside, building details under the cut !

For once, legs are utterly simple, since they’re all made of a single blade piece. Nevertheless, I had to use feet somewhere, so you might notice that the entire spine is made of feet piled on top of each other. They are only connected near the tail by a single socket.
Speaking of the tail, it’s made of a weapon piece of Nuju Metru, but the connector was all twisted so I couldn’t use it as a proper weapon. Well, it gives some movement to the beast, so it’s a great thing still.
Similarly, the tongue/flame (I’m still unsure of which it is meant to be) is a partially broken Tahu sword. It’s not actually held securely, because it’s inserted in the technic pin connector of the dark red shoulder blade I’m using as the face of the beast. On each side of this piece are silver Bohrok eyes as teeth, which themselves are partially covered with limb armor pieces.
The main body is not actually very complex, because I found a quite large red technic piece which looks somewhat like a throne and acts as a great base (if anyone has any idea where this piece comes from, based on this very unclear description, I’d like to know where it comes from); and four small blades placed horizontally to make the body slightly rounder.
You will notice this Rahi can actually more or less fit in my shelf studio, which is quite remarkable, because it means I don’t have to set up a temporary studio all over again. Might have to do it for the next build, though.
Also, I actually started my spreadsheet for bionicle gens ! (It incredibly tedious..)

I realised I’ve posted quite a lot of my MOCs on this blog, but any of my more 'photographic' works, yet, so here’s one of the first I made (we don’t talk about previous attempts), which still works quite well, although there are some things I would do differently, were I to do this again.
My process, and other details, below :}
So. The process I used to get this effect is not a really complicated one, but it still offers a more or less good render at the end, which is nice.
The blue guy has nothing special, but the red one I made float, but how ? The answer is not telekinesis, but superposition. Take a look at the images below :


Left one is the original, with no special effect (and no cropping, to offer a larger view), while the right one is the same, without the red minifig. By taking both photos without changing the camera angle (which is a painful thing to do with a phone, I would not recommend), and with a simple image editor, I put the 'empty' image (right) on a layer under the image I want to modify, and simply erase the supports.
It is important to note that if the erased bit casts a shadow, it’s better to also remove it, to avoid weird effects (here, there are no shadows because of the light source).
I’m also using an old set of blue LEDs inserted directly into Lego bricks to get this foggy aspect at the top, and to get a darker aspect to the blade of the red minifig, though there is also a desk lamp above providing some proper light, of the whole thing would be blue.
Last interesting point, this technic is the same I’ve used for the blog’s banner (but with proper lighting, for once). One might even recognise that the background for the two pictures is the same, because black was easily findable and gives quite the dramatic effect. The banner is, in fact, only half of my picture. Since you’ve made it here, I’ll offer another tiny bit of it here, as a treat :}

(And yes, I stole the characters from Star Wars sets, gave them light sabres even if they’re not meant to have one, and also added one of my cool cloaks, and made them fight. Don’t you dare judge my poor choices.)


✨Aroace Door Tag✨
‘Name' looks really terrible, but couldn’t just put my real name here-
In hindsight, Sample might have been better. Anyway, if you want to get something like that yourself and are struggling with the letters, my dms are open — or asks even, if you’re feeling bold-
And of course, studio closeups bellow the cut
With, and without 'name' (M is really a terrible letter because of how wide it is, though now that I’m writing this, I know how I could have done it better. Well, too late.)


✨More Clones Brickheadz !✨
Since I acquired the Small Cody (40675), I found that there was an untapped mine. Why would they only make one ? Well. I don't have an answer to that, but I decided to take matters into my own one; so behold : 11 more. I went mostly for commanders here, but then I went a bit astray and so I added some captains to the mix.
In order, row by row :
Tukk (Not cannon but the colours are so beautiful)/Vaungh (died too soon-)/Rex (obviously)/Fordo (I did Rex, so I had to)
Gree/Doom/Thorn/Neyo
Bly/Cody/Fox/Wolffe
It was a really fun project, and I hope to do more of them in the future - maybe even phase 1s, some day~); supposedly not commanders because I did most of them (except Bacara, I know...The helmet was too tough).
And because I really like challenges, if you want to see another clone turned into one of these (Be it cannon or one of your ocs) feel free to send requests in my aksbox !)
Anyway this post is already far too long for anyone's dashboard, so closeups and details will be under the cut !
Let's start with the easy ones : Cody, Doom, Fox, Thorn


Obviously, Cody was easy, I just rebuilt the original one virtually - Nothing too hard. The printed pieces here are not the right ones, because Cody's are not available on STUDio yet, but the storm trooper ones were relatively similar, so I used these for most of these models. Of course, it means I'm lacking the sun bands, and a few other distinctive elements, but it works well enough for now.
Now, Doom is essentially a colour variation (minus a few antennas). I also used an old space piece, which has this big yellow arrow printed on it. I's not exactly what Doom has, but I feel like it's close enough for a first attempt.
Then, Fox is relatively similar to Doom, but with two DC-17s. I also moved the printed torso brick up to get that red line he has.
Thorn works in a similar way to Cody too, except I removed both accessories on the side of the helmet. I also added this tile with diagonal lines to figure the wings he has. One day I'll slap some real wings on there, but I haven't found the right image yet. I also gave him a Z-6, obviously. I really like it, so I might actually make that one physically, because the way it's build (with old binocular pieces) is pretty nice; although I doubt the pieces are available in black.
Moving on to two captains : Vaughn and Tukk !


Admittedly, not really that different either, except for one thing : I learnt to do custom prints now ! Yay ! Well, these are really basic : the blue line for Vaughn, and some trapezoids for Tukk's helmet (which are, indeed, not visible here - shame, I spent so long making these fit). The Ahsoka pattern was already in STUDio (because Ahsoka already has her own brickheadz, which I'll get my hands on someday~)
I must also add that having some cyan in this whole thing added some much needed colours in here, I'm grateful some people give their clones amazing colours (If somehow someone doesn't know who Tukk is, well just check High Ground Animation. Right now. It's really cool, trust me). Anyway.
As for design changes, I modified the faces slightly by adding 1x1 tiles, to allow for different colours variations on the face. It makes them look slightly blockier, but given the overall size of the head, it doesn't do much.
I also gave Vaughn a DC-15A. It's a bit messy, but it works out well enough. Past me forgot to render it, so here is a raw, in-software picture of it (from Fordo(s hand, but it's the same design for both) :

BARC helmets ? Wolffe, Fordo, Neyo


As I've been told, these look a bit wonky, and I'll admit its wasn't exactly easy, but in my defence, it's relatively hard to get such round shapes with bricks (lego cheated by adding the visor). Anyway, given that doing that with a printed piece was out of the question, I tried to replicate the filter's shape with actual bricks, and I used a printed piece which, technically, is Lando's moustache, but downward. I'd say it does the job relatively well.
I also added a rangefinder to Wolffe, which is a little big compared to everyone else's antennas, but It's still relatively to scale with the head itself. No custom prints for him (not sure where I would find the correct pattern images ?), but I've done it for Fordo and Neyo. Fordo obviously has his well deserved Jaig eyes (and who knew it would be that difficult to find a picture of that on internet ?), and Neyo has his symbol on the helmet, chest plate, and the shoulder not shown here.
The really tinkered ones : Gree, Bly, Rex :


Here, it was a matter of trials and errors to figure out just how to get the shapes right.
I actually started with Bly, by removing the previous visor and adding the macrobinoculars first, then I tried to shape the helmet around. Truth is, it doesn't make sense technically : the two separated parts of the helmet do not connected at all, if you remove the equipment. Luckily, no one has to know that.
Next is Gree. It took me some time to figure out how to properly get a round feel, but I feel like it's as good as I can make it like this. Colour-wise, it was surprisingly difficult to find how to balance the different shades of green, and equally hard was to figure out which silvery colour would render well in STUDio. The answer lied, as it always does, in Bionicle. Of course, none of these pieces exist in this colour, but it's not really my main problem (because none of the coloured printed pieces exist either).
Finally, Rex...He gave me some trouble, I have to admit. Firstly, the part-designing software decided to have some trouble with custom prints, which was problematic, because I simply couldn't do Rex without jaig eyes (and Fordo already had his). Then, I started with Gree's base and tried to go from there to fit Rex's custom helmet. I ended up using Boba Fett's printed visor piece for Rex, because these were all triangles. I also got rid of the printed chest piece and used some black plates to simulate the pouch he has; while also adding a a few more custom printed pieces for the arms and pauldron (barely visible, but they're here. I'm not entirely happy with it, but I don't see much other solutions than more and more custom prints, which isn't my goal, so it'll stay like that for now.
Anyway, that's way too much rambling for one post, so I'll just end by saying that next week I'll post an alt version of this whole build [here !], with some 'slight' colour alterations. Definitely nothing big.


✨Another edited photo, yay !✨
This is an entire version of the blog’s banner, too !
Technic details under the cut !
So ! Looking through my archives, I found images for the process I described in my previous similar post, including my made up studio (and very messy desk…) :

As you can see, it’s not quite a professional set up..
To be more precise, this is three led bands hooked to a power bank, on top of which my phone is meant to be sitting to take two photos in a row. Obviously, there is also a desk lamp illuminating the scene, so here is a picture without it :

So, the way this is organised is that I have my black screen in the background which reflects the lights a little, but not the actual minifigs; the characters are held by transparent pieces connected to ball joints, so that I can have a steady but adjustable display. Light-wise, the two prominent led bands are colour-coded with the character’s color (kinda) to get them in opposition; the junction between the two is covered by some black bricks to create a darker area to offer more contrast; ans on top of the stage is help a (theoretically) white led with lesser intensity to make sure the scene stays lighted up properly, even if the light sources are from underneath. The red pieces I have used as frames are really good to hold these light bands, because I can have varied angles and heights plus a very solid structure, which is all I want.
Finally, to get the floating render, I take a first shot with the characters, then a second one at the same place without the characters :


And then, with a bit of editing magic and other simple image manipulations, you get the result I have at the top of the post ! I’d recommend trying it for yourself, because it can be a lot of fun !
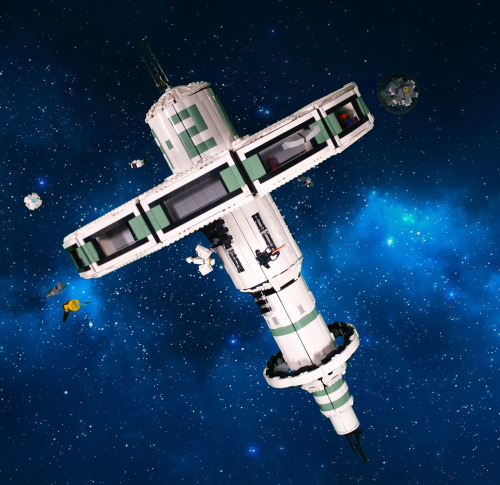
✨Trade Space Station !✨
[1/4] >Next>
Finally...More than 60 hours of work, I can present my masterpiece. I have been working and planning this project for a long time. Given the sheer amount of things to talk about, I will split all of my rambling in (at least) four posts : one about the concepts, ideas, and general aspect (you're here !); one about the technical side of things; one depicting how the project evolved (using pictures taken during the construction); and one dealing with all the smaller details, ships, and such.
Enough with planning, though. Explanations, other images and more explanations below the cut !
(less) edited picture of the build :

So. You might see, now that I got rid of all that pesky editing (or most of it) that there is a big arm holding the thing in place. It's easily a fifth of all the work of this build, because I absolutely wanted to hold this thing at an angle, and it's heavy, at around 15 kilograms (33 pounds). I'll talk about the technical difficulties of that in a later post, but it was important for it to be solid, because the station was the central piece of my second ever (very small) lego exhibition. AND it allowed me to meet the recruiter of a much larger exhibit. Long story short, in a month, I'm presenting this piece again (just before my exams, whoops-).
Anyway. Not only is it heavy, but it's also quite tall and wide. Around a meter at the highest point (tilted or not), while the diameter of the main ring is at around 0.75m. Quite a difficult thing to move around. Or is it ? Well, yes and no.

Here are all the main components (excluding the holding arm), when I move the piece around. Of course, all the ships are detachable (it allows me to move them around from one day to the other), but the dome carrying the antenna can also be removed, and then, the entire ring can be disconnected (that, too, was quite a challenge).
Removing the ring obviously makes it waaay easier to transport, because a single wooden plank can then be used (again, except for the arm, but that thing was made to be sturdy, so it can be transported with less care); and , once the dome is removed, I can just let the central cylinder stand upside-down (useful for storage). The only trouble I found with this system is that I once connected the ring the wrong way around, meaning everything in the small hangars was upside down. Quite an embarrassing moment.
Speaking of the hangars, I initially wanted to keep them all empty, to store ships inside, but it didn't really offer this piece the sparkle of life. Setting up these small decors inside most of them, with colors contrasting with the general theme of the build, was actually a really good addition.
The colour scheme as it is now is not exactly the one I had planned at the start of the project. I originally planned on using bright light orange (bricklink colour name) instead of sand green, but I found out that this colour was tough to find in large quantities, and I already had quite a bunch of the sand green, so this tragic decision was made. I think it would have offered a more vibrant colour to the build (resembling a Subnautica default palette, which I enjoy quite a lot), but in hindsight, the green works really well, appart from a small detail I'll expand on in a minute.
What's really funny for this project is that, when it started, I actually only wanted a nice way of showcasing all the little space ships that I tend to make whenever I have access to a small amount of cool pieces. Then came a long time where I only daydreamed about it and planned how I would want it to go, and only when I had a clear vision did I start the actual building process. So, taking all that into account, you can probably double the amount of time I spiritually spent on this project.
What I knew is that I wanted to get this huge ring held by beams to the station's body, which made the build both more interesting and more complicated that it would have been. But the challenge was appealing.
At first, the main body was completely flat and white, but I soon had to add texture, both because it was becoming ugly and because the 2*2 white curved slopes were starting to diminish fast. The first modifications I did were to add the sand green curved slopes instead to create stipes, then letters : the big A-2 you can easily spot. With the few bits of lore that I have created for this piece, you have to imagine that there are hundreds of these stations spread in the galaxy, which can be easily described through 3 criteria : the Letter, the Number, and the Colour. That would mean that, if you wanted to meet with someone at the exemplar I made, you would say something along the lines of 'Meet you at Sand Green A2'.
Texture-wise, the other element of the largest cylinder is the exposed bits of machinery, very classic in sci-fi, I know, but it does work well in this context. The second cylinder has much less textures, with only a few grates, and some 2*1 ingot pieces (because they look cool); but it also has its own, smaller ring (diameter slightly larger than the largest cylinder's).
Then come the smaller cylinders, which don't have much texture, except in their transition from one to another (barely visible in any of the pictures, but it exist).
Overall, I'm also really happy of how round it looks, given that circles are not my speciality.

Here is a completely unedited picture of the support arm (Lewa for scale), with a nice counterweight which might be necessary to hold the entire thing in place (it may not be, but I'm not trying to remove it. Bad idea.).
As you might notice, my studio is not a shelf anymore. I built something new from scratch with a green screen, because I thought it would make my editing job easier. And it would have, if I didn't use sand green in my build. Anyway, I'm keeping this for a few days, to snap some pictures of the MOCs which don't fit in my shelve (and are not green, meaning editing will be easier.
Here is the 'studio' from an outside point of view :

I know it's quite a mess outside of my clean perimeter, but I do as I can. You can see one light in the foreground, but there is also one (less visible in the background), symmetrical to the first one, and a third one behind and above the camera (outside of the picture).
You may also notice a lot of sorting boxes. Sorting pieces can greatly improve your productivity, if you label all your box correctly. Covered by the greenscreen is essentially a shelf full of these sorting boxes, labelled by colour and piece type, and it was really practical. Anyway. Thank you for reading until this point, I guess ? If you survived through all this rambling, you probably deserve something...
I mean- Have these pictures I took during the exhibition, I guess...


(You can notice that these are two different days because of the ships’ placement).
-
 antsfestival liked this · 2 weeks ago
 -
 universalldeergalaxy liked this · 2 months ago
 -
 systemschemistry reblogged this · 2 months ago
 -
 newnicemice liked this · 2 months ago
 -
 large-baguette-112 liked this · 2 months ago
 -
 mildateo reblogged this · 2 months ago
 -
mildateo liked this · 2 months ago
-
large-baguette-112 reblogged this · 2 months ago
-
 gibilisko liked this · 2 months ago
 -
 nyaington-brs liked this · 2 months ago
 -
 peridots-pixiwolf liked this · 2 months ago
 -
 magpie-name reblogged this · 2 months ago
 -
magpie-name liked this · 2 months ago
-
 viteryq1 liked this · 2 months ago
 -
 doodle-birdo reblogged this · 2 months ago
 -
 am0ngushappymea1 liked this · 2 months ago
 -
doodle-birdo liked this · 2 months ago
-
 jaredcarthaliontrueheir liked this · 2 months ago
 -
 wowitscoldout reblogged this · 2 months ago
 -
wowitscoldout liked this · 2 months ago
-
 ghoulwings reblogged this · 2 months ago
 -
 rotten-machinery liked this · 2 months ago
 -
 peacherweasel liked this · 2 months ago
 -
 antrylis reblogged this · 2 months ago

They/them - AroaceLego MOCs and photography with a wide range of different characters and environments, every Wednesday (in theory-)
77 posts