✨Another Edited Photo, Yay !✨

✨Another edited photo, yay !✨
This is an entire version of the blog’s banner, too !
Technic details under the cut !
So ! Looking through my archives, I found images for the process I described in my previous similar post, including my made up studio (and very messy desk…) :

As you can see, it’s not quite a professional set up..
To be more precise, this is three led bands hooked to a power bank, on top of which my phone is meant to be sitting to take two photos in a row. Obviously, there is also a desk lamp illuminating the scene, so here is a picture without it :

So, the way this is organised is that I have my black screen in the background which reflects the lights a little, but not the actual minifigs; the characters are held by transparent pieces connected to ball joints, so that I can have a steady but adjustable display. Light-wise, the two prominent led bands are colour-coded with the character’s color (kinda) to get them in opposition; the junction between the two is covered by some black bricks to create a darker area to offer more contrast; ans on top of the stage is help a (theoretically) white led with lesser intensity to make sure the scene stays lighted up properly, even if the light sources are from underneath. The red pieces I have used as frames are really good to hold these light bands, because I can have varied angles and heights plus a very solid structure, which is all I want.
Finally, to get the floating render, I take a first shot with the characters, then a second one at the same place without the characters :


And then, with a bit of editing magic and other simple image manipulations, you get the result I have at the top of the post ! I’d recommend trying it for yourself, because it can be a lot of fun !
More Posts from Antrylis and Others
Ah, I knew a special occasion would present itself that would be worthy of this cat !
Get booped
Get booped back ! Ah !
Oh, and have an actual (Lego) cat while I’m at it !


I realised I’ve posted quite a lot of my MOCs on this blog, but any of my more 'photographic' works, yet, so here’s one of the first I made (we don’t talk about previous attempts), which still works quite well, although there are some things I would do differently, were I to do this again.
My process, and other details, below :}
So. The process I used to get this effect is not a really complicated one, but it still offers a more or less good render at the end, which is nice.
The blue guy has nothing special, but the red one I made float, but how ? The answer is not telekinesis, but superposition. Take a look at the images below :


Left one is the original, with no special effect (and no cropping, to offer a larger view), while the right one is the same, without the red minifig. By taking both photos without changing the camera angle (which is a painful thing to do with a phone, I would not recommend), and with a simple image editor, I put the 'empty' image (right) on a layer under the image I want to modify, and simply erase the supports.
It is important to note that if the erased bit casts a shadow, it’s better to also remove it, to avoid weird effects (here, there are no shadows because of the light source).
I’m also using an old set of blue LEDs inserted directly into Lego bricks to get this foggy aspect at the top, and to get a darker aspect to the blade of the red minifig, though there is also a desk lamp above providing some proper light, of the whole thing would be blue.
Last interesting point, this technic is the same I’ve used for the blog’s banner (but with proper lighting, for once). One might even recognise that the background for the two pictures is the same, because black was easily findable and gives quite the dramatic effect. The banner is, in fact, only half of my picture. Since you’ve made it here, I’ll offer another tiny bit of it here, as a treat :}

(And yes, I stole the characters from Star Wars sets, gave them light sabres even if they’re not meant to have one, and also added one of my cool cloaks, and made them fight. Don’t you dare judge my poor choices.)

✨Bionicle Beetle !✨
Ah, another insect ! Check the other one here.
Does it ring a bell ? The head (and some of the brown parts) come directly and with very few modifications from the Jaller & Gukko set. I never managed to get Jaller, so instead, I turned Gukko into this nice, big Rahi.
Now, of course, detail and the other pictures below the cut !
Front, hind, and neath !


I’m absolutely delighted with how it turned out. First of all, I really like the head which has been intact for as long as I can remember, although I know that I’ll never complete the set because I don’t have Jaller’s Kanohi. What I have plenty of, however, are the pearl grey Rahkshi shells, so you can see that I’ve used three of them on top. Then, I have to find pieces with a good enough curvature. So the next piece is from a Toa torso (Hordika) and the next one is used as a wing/pauldron on different sets, which has a perfect shape. On the sides, I’m using practically only pieces from a brown Vahki.
The underside is quite simple, but I wanted to make sure the colours remained coherent with the head, so I kept this bright brown while trying to make it as light as possible (the six legs are already barely letting it stand).
Under the dual Rahkshi shells, I have a bit of space which could let me add a nice feature, although I don’t know what yet. I planned on making actual elytra, but that would have been too complex, so there is currently nothing.
There isn’t much left to add, since for once, I have made simple legs (only because the body was more complicated…), but I nevertheless want to point out how well the small arm pieces I used to connect body and feet are for insect-like shapes, while keeping it quite mechanical. Just the perfect balance.
Also. Would anyone happen to know if there is a spreadsheet referencing all Bionicle (bonkle ‽-) gens with images and additional infos ? I have done a tremendous amount of research because I can’t remember any of the names properly, and having a single spreadsheet would be easier. AND, if not, would anyone be interested in access in such a spreadsheet ? Because if I do end up making one, I would be happy to share !
Have a nice day :}

✨(Tiny) Agender pride flag✨
Want your flag to be made in Lego ? Simply ask (instructions can be provided if you ask nicely :} )
(See previous work here)

✨Aroace pride flag✨
Since I’m mostly doing these as room decoration for me, I’m slowly running out of idea, but I’m open to taking requests (potentially with instruction, if anyone is interested, simply ask me) :}
(See previous work here)


✨Custom technic vehicle !✨
Something which I had never really posted on before was that, although I enjoy bricks (or Bionicle parts) a lot, I also like to mess around with Technic, when I have the occasion to.
Most of this one is a bunch of additions made on top of the 42065 set, because it's an overall really fun set, with enough space inside to cram in some additional mechanisms.
Here is a video of that thing performing :
...And the remote !

Of course, details and close ups under the cut !
So, here is the (non exhaustive) list of what I added/changed :
Colours of the middle line and addition of some decorative tubes;
A fancy blade at the front;
Plenty of lights;
A turret.
I'll discuss all of these below (except for the first point, which is quite straight forward.
The front :

So, the main plate I used for the vehicle's blade is often used in large Technic cars, mostly for roofs; but used the other way around, it has a nice shape. It's not very functional, but it's aesthetic, and inside are two of the lights I have integrated (some of the cables are visible on the right).
The side :

From here, we can see my beautiful mess of cables (I forced the top open to show it, because it's not as opened at rest). Most of the large cables here are getting power from the battery to the RC receivers; while the small cables are all lights (I might have used too many-).
You might also notice the there are some bumps on the tread pieces : these are rubber grip pieces which I stole from a Nexo Knight Fortrex (it's doing fine without them). These make the plastic less slippery when on rock, but it does a poor job on grass (because grass blades get caught in the gaps of the treads pieces) - to fix that, I would use some of the old rubber treads, but they're way to small to be used as suchs. Instead, to remedy to the problem, I changed the original motors from the default PF M to PF L, which have more power and torque (and can thus reach their max speed even with the added mass). While the two motors have the same theoretical speed, this modified model drives faster than it's standard counter part (it's funny to take over other cars, don't judge).
Back view :

Here you can see the PF M I was talking about (bottom right, the second one is at the front of the vehicle). You may also notice that I have a second mess of cables , because my two receivers are here.
Two major problems with that :
The placement of the receivers makes it so that I can't control the vehicle, unless behind it (oops 1);
Because one of the receivers (on top) had bad wiring with one of the tread motors, the turret is heavily limited in its movements (oops 2).
Turret :

So ! That's the most interesting part of it (obviously).
Now, please note that it was my first time trying to do it, and plenty of my design choices were bad, but fixed in my V2 (will probably be posted next week~).
The way it works is actually quite simple : I have a motor underneath (PF M) positioned horizontally, which is connected directly to the light gray gear (just under the trans green piece on the left) which itself connects to the black base gear on which is mounted the turret. Because of the direct motor connection, the turrets is a nightmare to aim. Not good.
As for the cannon, it's just a servo and a spring cannon. When the servo is activated, the grey technic piece presses the projectile and it flies. Surprisingly simple. (It also lights up the green lights on the side, for fun).
Anyway, this is a fun project to play with. Next week, I might post the V2, which is...Quite different. You'll see :}
And bonus cat picture !


✨Another custom vehicle !✨
It has eyes !
This horrendous prototype is a follow up to this post.
Now here is a video of how it works (using the same remote from the other post, that thing is universal !). I wish I had a way to display the good all-terrain capacities of this vehicle (other than wood and seashells...
Details beneath !
Side view :

There are plenty of things here to discuss. Firstly, the suspensions ! Three spring pistons : one of the 'new' models, two much older ones (System, can you believe it ?). At rest, the two small white discs in the middle don't touch the tread, but as soon as an object pass underneath, they get involved. The advantage of this system is that, with every part mobile, the obstacles can be passed easily. And I added rubber grips too.
These treads are powered by PF XL motors. Very very heavy and big, they have the same speed as other motors but much more torque. We're talking of Mindstrom-level torque; this means that In theory, I can add as much weight as I want and keep it at a more than decent page.
You can also see that I fixed two of the biggest flaws from my previous model : firstly the RC receivers have been turned to get signals from multiple angles. Secondly, to rotate the tower, I used a worm gearbox with a PF M to really slow it down; and the wires have been fixed to have a broader angular range.
The turret ? The turret !

These eyes are the best addition to this MOC.
You might notice that I have a servo and a PF M on the turret. This is because the weapon here is a harpoon with a cable. And it has a winch ! All of that with only four controls : two for treads, one for rotation, and one to fire/retract cable.
How ? Well I'm glad you asked. The firing works just like in the previous vehicle : the servo's arm presses on the spring-powered projectile and it flies, along with the cable connected to the other motor.
As for the retraction, it's slightly more complex : on the remote, I press the firing lever the other way around : this causes the servo's arm to go on the winch and it fits nicely, so that when the PF M rotates, the thread can't escape the winch (a video will be in the reblogs, because Tumblr doesn't want me to upload two videos at once...)
Major problems here are the following :
the PF M often detaches itself from the turret
the harpoon often get stuck on the treads
the thread is too short (yeah...)

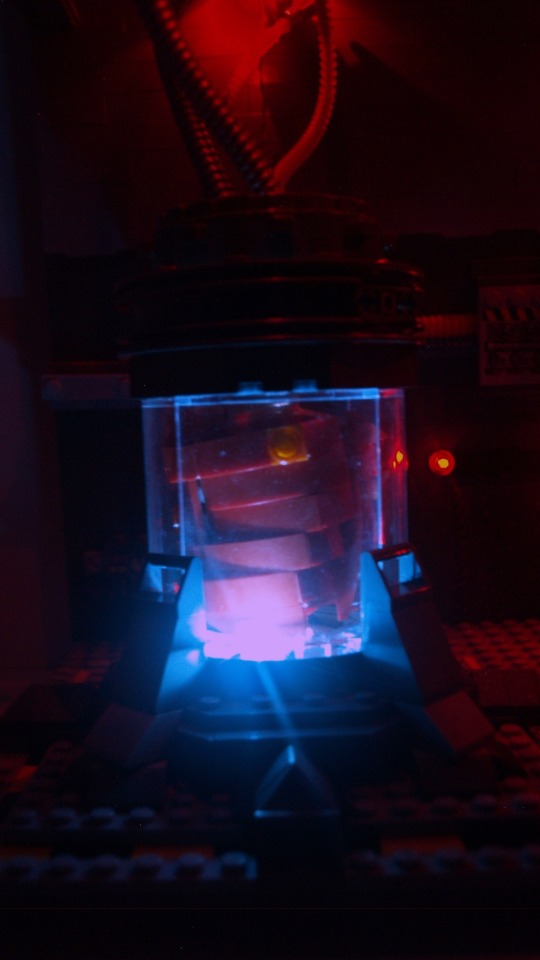
✨ Breach of containment ✨
This is the last I’ve been working on for the past few weeks, very, very inspired by the game Carrion (if you haven’t played it yet, you absolutely should !), which is made all the more special because I finally took time to use my lighting kit (seem below). Of course, closeups and commentaries below the cut

Left containment unit closeups :

Right containment unit closeups :


Top closeup :

Alt version (studio lights + in-built lights) :

This is one of the screenshots I’ve been working with (where the monster just breached containment) :

So, as I said previously, this piece is heavily inspired by Carrion. I tried to look up any previously made Lego thing related to the game, but all I could find were a few Reddit posts with (debatably) interesting takes on the monster. So, the good news is that this is most likely the most original piece I’ve made yet.
The original plan was to have only one container, and one monster, with left being the body inside and right being the outside part. However, placing Left in the middle of the transparent pieces made it mostly good on its own, so with some modifications, I made it work alone and expanded the outside part inward, and ended up with two of them.
Left is pretty okay from all angles, but Right is not necessarily as good from the back, and had a supplementary jaw on the side of the container which can’t be seen on the photos.
Getting back to comparing that to the game. I tried to stay close while adding my own little details. The wiring and cable system is from me, but the container is mostly inspired by the game, just like the electric box (middle) and the little informative display (under the electric box) which is…empty, yes.
Some details can’t be seen on the photos (or barely), which are mostly some filler sci-fi stuffs to make the wall less flat and less empty.
What also helped with breach the flatness of the wall is the switch from dark grey to light gray, using the awesome spring projectile launcher piece, which has this very nice shape which make the transition just a bit smoother.
So, let’s talk about whatever I’ve done with the lighting !
I’ve had this old lighting kit (originally designed for a car model) lying around for a long time, and finally got to use it ! It doesn’t look really good without my studio lights because my camera is not made for that (The effect in reality really gives escaping monstrosity a dark vibe which is not well depicted with my photos…). Another thing which is not noticeable with the photos is that the two red dots in the center are actually blinking lights (and somehow, they tend to desynchronise).
The choice of letting some of the wires out is debatable, but I think it adds to the vibe (and some of them would have been a pain to hide anyway). And sadly, the back is but a mess of wires, but I can’t actually do anything about that.
Speaking of the back, the whole thing is one dot large and completely flat, and the ceiling only hold without pillars because of the use of tension linking directly the baseplate and the roof through the use of technic bars; and probably because the ceiling itself is not that heavy. It is, in fact, only constitued of six old road pieces connected together and frames, which give the roof little weight and high sturdiness (and the shape on the side of the piece offers a nice sci-fi effect as a bonus).
The addition of tentacles in the vent (which hides the connection between road plates in the roof) is just another reminder of the game : you can’t be safe anywhere, if air flows~

✨Trans pride flag !✨
Had some inspiration and a nice motivation (here)
(See previous work here)
Alt version below the cut :
Pastel version ! It looks a bit bland because I didn’t have enough pieces to make enough variations (this type of pink is exactly what I needed, but also happens to be very hard to find). It’s probably more fitting for the actual flag compared to the one above, which is very neon-y (and I tuned it down a bit, it could be much worse brighter than it is now). But the above version looks better, I admit, and it give a bit of peps in the middle of all my other works, too, because of the unique colors.

-
 antrylis reblogged this · 1 year ago

They/them - AroaceLego MOCs and photography with a wide range of different characters and environments, every Wednesday (in theory-)
77 posts