✨(Tiny) Agender Pride Flag✨

✨(Tiny) Agender pride flag✨
Want your flag to be made in Lego ? Simply ask (instructions can be provided if you ask nicely :} )
(See previous work here)
More Posts from Antrylis and Others

✨Space ships (and hangars, too !) !✨
(Or, last post for the space station)
<Previous< [4/4]
Under the cut are closeups of (practically) all ships and hangar from the station !
Before anything, the third post is somehow completely gone, even if I do have proofs that I did do it. Well, it was already posted late, and I don’t have the courage to do it again — and it’s not like people would care much anyway, so how this station is holding up will remain a mystery~
Anyway, closeups.
Hangars (groupes by similarities)


This first batch here contains the 'empty' hangars. Left is meant to be a closing/opening hangar, which I usually keep in the back because it's not the most interesting one; while the right one is the bare hangar. There are two of these across the ring, in which I sometimes pluck a ship, though it's hard to keep them in place because of the station's inclination.


Next is a batch of random boxes and other scifi-y grates and boxes. To keep the boxes in place, I use modified 1*1 bricks (because the floor is is made of horizontal pieces, aligned with the outer tiles). Minor variation are present in the middle hangar, where a third of the floor is composed of 1*2 modified bricks to add a tiny bit of texturing. While these might a tad repetitive displayed like above, they actually are separated by three other different hangars, so the repetition is barely visible.


A bit similar to the previous ones, these have (in my opinion) more interesting details. Left is two racks of large barrels, supposedly fuel. Middle had another barrel (made with flowers pieces) and a yellow cable, which was surprisingly hard to add because it pushed the back plate (which holds a lot of the hangar together). The last one is a stack of long crates, and an observation deck (I'm guessing the original sticker comes from a small star destroyer).


Last batch, and probably the best of all, the containers (scaling from not too crowded to very crowded). These are the same size as the big ship's. There are very few attachment points to the ground, as most of them are held by other containers above or bellow, although the middle hangar had two modified 1*4 bricks in the floor. The original plan was to get them all aligned, but it looked terrible, so I went for this more haphazard placement, which works better.
Ships


These first two are the smallest of my little fleet. The top one is two 2*1 plates held by black 1*1 mod plates. It's small, it's smooth, and it works quite well with the station. I'm probably gonna make other of these in different colours someday.
The next is one of the first I made, using some shiny pieces. The two chromatic studs on the reactors are differently shades of chroma silver on purpose because this is meant to be a much older ship (compared to other most of the other, smoother ships).


This is a much larger one. More of a military design, I mostly played with angles on that one (and added big reactors for fun purposes). The transparent light blue used here is the same as the fuel barrels of the station, and are the most used on the ships I have. Lore would say it's because it's the most common fuel used in the universe; pragmatism would say it's because it's the most common transparent colour in my boxes.


More blue reactors ! The top one is my one of my favorite. Only 7 pieces, including an old aquaraiders piece which I had to use as a ship the moment I found it. It's simply ship-shapes ! Given the colours, you could imagine it's an old model (not as old as the small one). The bottom one is a very thin one, with a Y piece which can allow for many cool shapes (like this one) !


Weird alien ships ! The first one is curvy~~ It's a nice concept which is quite common, but I really like the idea, and thus made one. Notice the green reactor this time, because alien fuel. Next one is more organic (or at least trying to), using mostly car pieces (and an orange reactor, wew !). It's also quite compact, with a single mod 1*1 brick as the core. The final one is by far my favorite (and not only because it has a purple trail). While hard to because of my lighting, the three main parts of the ship are separated by clear studs. I originally made it without the in-between studs, but then it fell the the floor, broke, and separated, and it looked much more futuristic. Consider this a very advanced ship of a peaceful species, or something like that.

✨Another edited photo, yay !✨
This is an entire version of the blog’s banner, too !
Technic details under the cut !
So ! Looking through my archives, I found images for the process I described in my previous similar post, including my made up studio (and very messy desk…) :

As you can see, it’s not quite a professional set up..
To be more precise, this is three led bands hooked to a power bank, on top of which my phone is meant to be sitting to take two photos in a row. Obviously, there is also a desk lamp illuminating the scene, so here is a picture without it :

So, the way this is organised is that I have my black screen in the background which reflects the lights a little, but not the actual minifigs; the characters are held by transparent pieces connected to ball joints, so that I can have a steady but adjustable display. Light-wise, the two prominent led bands are colour-coded with the character’s color (kinda) to get them in opposition; the junction between the two is covered by some black bricks to create a darker area to offer more contrast; ans on top of the stage is help a (theoretically) white led with lesser intensity to make sure the scene stays lighted up properly, even if the light sources are from underneath. The red pieces I have used as frames are really good to hold these light bands, because I can have varied angles and heights plus a very solid structure, which is all I want.
Finally, to get the floating render, I take a first shot with the characters, then a second one at the same place without the characters :


And then, with a bit of editing magic and other simple image manipulations, you get the result I have at the top of the post ! I’d recommend trying it for yourself, because it can be a lot of fun !

✨Neon and its pilot !✨
Combat mech again ! Wew ! (See other works here)
Closeups and lore under the cut !
Mech :


Pilot :

Lore ! (Check the previous posts of this series if you want to find out more)
So, if Artefact was a first-gen, this mech, called Neon (for obvious reasons), is from the last gen of mass-product combat mechs. It isn’t really meant to get to high level competition, simply for amateurs wanting to give the sport a try. Yet, this pilot made it further than most. Just like their mech, they are one of the youngest in this tournament, but both mech and pilots already have claimed multiple battles.
Indeed, if one pays close attention, it’s easy to notice that some of the claws were replaced, and scratches can be founded in multiple places. The base mech has also been modified a bit, mostly with the addition of electric arc creators (at the top of the mech).
What’s more surprising is how powerful this 'beginner' mech is. Because it’s meant for amateurs, it is extremely sturdy, to make things interesting (because breaking down after only one hit would make a lot of people abandon immediately, which isn’t the point).
Last but not least, the large and broken metal beam carried Neon is a piece which belonged to the first mech which was defeated in a qualification match. The mech was so wrecked only beams were lefts.
Building notes ? Building notes.
The feet were a pain to make, and may fall apart at any moment. But it is necessary to get this shape without being very bulky. All of the joints on that one are small ball and sockets joints, appart from the waist one, which is a turntable. Pragmatically, the three 'replaced' claws are actually just me missing blue pieces. Moreover, the broken beam I had no idea how to use. I acquired it twisted, and it would hardly be used anywhere, and this mech didn’t really have any aggressive stance, so this did the trick.
The sticker plate in the middle is of Nexo Knight origine, and so are probably all the 'shield' pentagonal pieces (which are really good, I might be in love with these). It was also originally all solid blue and grey, but as I added the figure, I realised it needed a bit more energy, so I added the amber and neon pink pieces to give some sparkly accents, which somehow worked in the end
Finally, the (blurry) pilot : most of the pieces come from my random character mix, except the torso (minus the arms) which come from a funky Ninjago character sold in a polybag, and the helmet, which comes from Power Miners (hopefully I’ll have enough time to make a diorama for that theme one day~)
Also, I’m not sure what happened with these pictures, they’re more blurry than usual, yet they all were taken in a batch with previous pictures. I’m hoping the next one isn’t gonna be as blurry, or I’ll have to look into things further. I only have one more builds of these, but another idea is there, so maybe it won’t end with the next one. Who knows, really ?

✨Progress pride flag !✨
Yay ! Finally some colours ! This was definitely trickier to do, compared to all the other ones, because of the triangles, but I like how it looks !
See previous here.

✨More Clones Brickheadz !✨
Since I acquired the Small Cody (40675), I found that there was an untapped mine. Why would they only make one ? Well. I don't have an answer to that, but I decided to take matters into my own one; so behold : 11 more. I went mostly for commanders here, but then I went a bit astray and so I added some captains to the mix.
In order, row by row :
Tukk (Not cannon but the colours are so beautiful)/Vaungh (died too soon-)/Rex (obviously)/Fordo (I did Rex, so I had to)
Gree/Doom/Thorn/Neyo
Bly/Cody/Fox/Wolffe
It was a really fun project, and I hope to do more of them in the future - maybe even phase 1s, some day~); supposedly not commanders because I did most of them (except Bacara, I know...The helmet was too tough).
And because I really like challenges, if you want to see another clone turned into one of these (Be it cannon or one of your ocs) feel free to send requests in my aksbox !)
Anyway this post is already far too long for anyone's dashboard, so closeups and details will be under the cut !
Let's start with the easy ones : Cody, Doom, Fox, Thorn


Obviously, Cody was easy, I just rebuilt the original one virtually - Nothing too hard. The printed pieces here are not the right ones, because Cody's are not available on STUDio yet, but the storm trooper ones were relatively similar, so I used these for most of these models. Of course, it means I'm lacking the sun bands, and a few other distinctive elements, but it works well enough for now.
Now, Doom is essentially a colour variation (minus a few antennas). I also used an old space piece, which has this big yellow arrow printed on it. I's not exactly what Doom has, but I feel like it's close enough for a first attempt.
Then, Fox is relatively similar to Doom, but with two DC-17s. I also moved the printed torso brick up to get that red line he has.
Thorn works in a similar way to Cody too, except I removed both accessories on the side of the helmet. I also added this tile with diagonal lines to figure the wings he has. One day I'll slap some real wings on there, but I haven't found the right image yet. I also gave him a Z-6, obviously. I really like it, so I might actually make that one physically, because the way it's build (with old binocular pieces) is pretty nice; although I doubt the pieces are available in black.
Moving on to two captains : Vaughn and Tukk !


Admittedly, not really that different either, except for one thing : I learnt to do custom prints now ! Yay ! Well, these are really basic : the blue line for Vaughn, and some trapezoids for Tukk's helmet (which are, indeed, not visible here - shame, I spent so long making these fit). The Ahsoka pattern was already in STUDio (because Ahsoka already has her own brickheadz, which I'll get my hands on someday~)
I must also add that having some cyan in this whole thing added some much needed colours in here, I'm grateful some people give their clones amazing colours (If somehow someone doesn't know who Tukk is, well just check High Ground Animation. Right now. It's really cool, trust me). Anyway.
As for design changes, I modified the faces slightly by adding 1x1 tiles, to allow for different colours variations on the face. It makes them look slightly blockier, but given the overall size of the head, it doesn't do much.
I also gave Vaughn a DC-15A. It's a bit messy, but it works out well enough. Past me forgot to render it, so here is a raw, in-software picture of it (from Fordo(s hand, but it's the same design for both) :

BARC helmets ? Wolffe, Fordo, Neyo


As I've been told, these look a bit wonky, and I'll admit its wasn't exactly easy, but in my defence, it's relatively hard to get such round shapes with bricks (lego cheated by adding the visor). Anyway, given that doing that with a printed piece was out of the question, I tried to replicate the filter's shape with actual bricks, and I used a printed piece which, technically, is Lando's moustache, but downward. I'd say it does the job relatively well.
I also added a rangefinder to Wolffe, which is a little big compared to everyone else's antennas, but It's still relatively to scale with the head itself. No custom prints for him (not sure where I would find the correct pattern images ?), but I've done it for Fordo and Neyo. Fordo obviously has his well deserved Jaig eyes (and who knew it would be that difficult to find a picture of that on internet ?), and Neyo has his symbol on the helmet, chest plate, and the shoulder not shown here.
The really tinkered ones : Gree, Bly, Rex :


Here, it was a matter of trials and errors to figure out just how to get the shapes right.
I actually started with Bly, by removing the previous visor and adding the macrobinoculars first, then I tried to shape the helmet around. Truth is, it doesn't make sense technically : the two separated parts of the helmet do not connected at all, if you remove the equipment. Luckily, no one has to know that.
Next is Gree. It took me some time to figure out how to properly get a round feel, but I feel like it's as good as I can make it like this. Colour-wise, it was surprisingly difficult to find how to balance the different shades of green, and equally hard was to figure out which silvery colour would render well in STUDio. The answer lied, as it always does, in Bionicle. Of course, none of these pieces exist in this colour, but it's not really my main problem (because none of the coloured printed pieces exist either).
Finally, Rex...He gave me some trouble, I have to admit. Firstly, the part-designing software decided to have some trouble with custom prints, which was problematic, because I simply couldn't do Rex without jaig eyes (and Fordo already had his). Then, I started with Gree's base and tried to go from there to fit Rex's custom helmet. I ended up using Boba Fett's printed visor piece for Rex, because these were all triangles. I also got rid of the printed chest piece and used some black plates to simulate the pouch he has; while also adding a a few more custom printed pieces for the arms and pauldron (barely visible, but they're here. I'm not entirely happy with it, but I don't see much other solutions than more and more custom prints, which isn't my goal, so it'll stay like that for now.
Anyway, that's way too much rambling for one post, so I'll just end by saying that next week I'll post an alt version of this whole build [here !], with some 'slight' colour alterations. Definitely nothing big.

Here is a second batch of custom minfigs ! (Yes, these are Nexo knight based too. What can I say, the original designs are just too good.)
Closeups and commentaries underneath the cut !
Closeups are from left to right

So, starting with the pretty basic guy. Quite a mixup of different things : the helmet is modified from some type of samouraï thingy, the pauldron probably from clone wars, and the axe’s blade (beautifully chromatic bronze, so rare these days) come from an old castle set. Other than that, the base is mostly a basic evil guy starter set, but the armour details are really neat

This one ! Probable the most customised. Legs are from one of the cool original minifigs, torso is from the (meh looking) main antagonist, with both arms equalised with red color (the purple arms came handy for something else~). The armor piece is from a Ninjago skeleton, the head is also from Ninjago, but with a much later subtheme, and the bit of hair comes from the nice guys of Nexo knights. Sword comes from China Chima, and the shield ! The shell is made from an Hero Factory piece, and it looks pretty nice like that. And of course, I can’t not mention my favorite piece, the cloak, that I put literally everywhere, because it goes with a lot of things. It also comes from Chima.

Probably my favourite. It’s not really modified much from the original (ultimate) version because it is very, very cool. I did make some slight modifications on the blade to use shiny dark grey; and the armor piece + pauldron are just an addition to make him look more menacing. But it simply looks great as it is !

…Yes, the cloak is here again. Ignoring it, everything is recycled from somewhere in Nexo knights, here. The body is from the moltor guy, the head is, too, but with the back in front, framed by the helmet to make it an eye. And the two sword. These I can’t use as much as the cloak, but if I could, I certainly would. An awesome addition, really.

Finishing touch is quite simple. Most of the piece are from different characters of Nexo knight, mostly following a default character, and the two tridents are from Atlantis (a really really good Lego theme. One day I’ll have a diorama of these)
You’ve made it here ? We’ll be aware I have a batch of the blue ones that will arrive…at some point. Probably not next week, I’m hoping to have enough time to put my bionicle customs in my larger studio for next week.

✨Geonosis !✨
Ah, Geonosis. What a terrible place. But it’s aesthetically pleasing, so I did it anyway. And it was a good excuse to use the movie-accurate minfigs (a commander, a sergeant, and three shinies. I have a lot of other commanders, but I’ll figure what to do with them later).
Since I didn’t have much of these orange bricks, so most of them are sideways, with some modified bricks to keep the clones in place. Also, the bottom of the first spike is an old bionicle part I thought I’d never use, but it did a good job here.

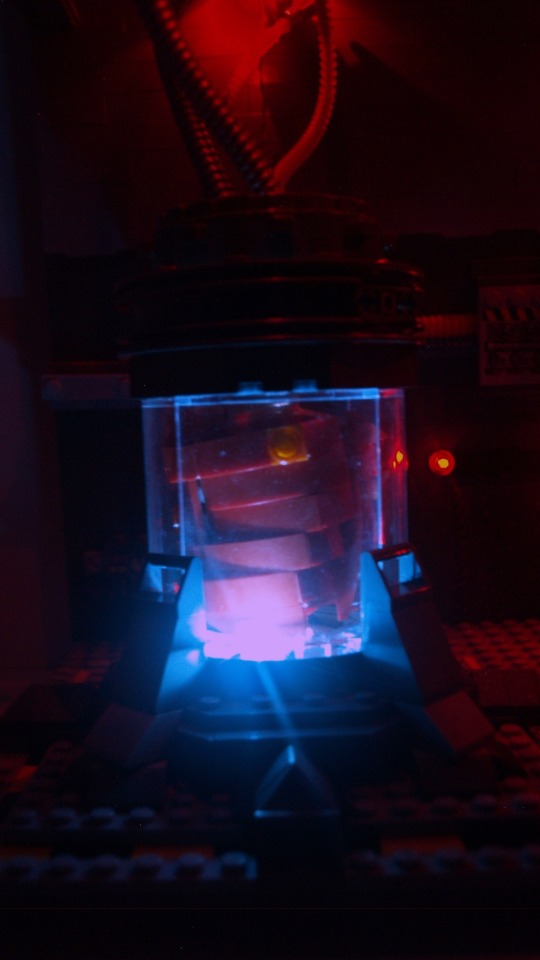
✨ Breach of containment ✨
This is the last I’ve been working on for the past few weeks, very, very inspired by the game Carrion (if you haven’t played it yet, you absolutely should !), which is made all the more special because I finally took time to use my lighting kit (seem below). Of course, closeups and commentaries below the cut

Left containment unit closeups :

Right containment unit closeups :


Top closeup :

Alt version (studio lights + in-built lights) :

This is one of the screenshots I’ve been working with (where the monster just breached containment) :

So, as I said previously, this piece is heavily inspired by Carrion. I tried to look up any previously made Lego thing related to the game, but all I could find were a few Reddit posts with (debatably) interesting takes on the monster. So, the good news is that this is most likely the most original piece I’ve made yet.
The original plan was to have only one container, and one monster, with left being the body inside and right being the outside part. However, placing Left in the middle of the transparent pieces made it mostly good on its own, so with some modifications, I made it work alone and expanded the outside part inward, and ended up with two of them.
Left is pretty okay from all angles, but Right is not necessarily as good from the back, and had a supplementary jaw on the side of the container which can’t be seen on the photos.
Getting back to comparing that to the game. I tried to stay close while adding my own little details. The wiring and cable system is from me, but the container is mostly inspired by the game, just like the electric box (middle) and the little informative display (under the electric box) which is…empty, yes.
Some details can’t be seen on the photos (or barely), which are mostly some filler sci-fi stuffs to make the wall less flat and less empty.
What also helped with breach the flatness of the wall is the switch from dark grey to light gray, using the awesome spring projectile launcher piece, which has this very nice shape which make the transition just a bit smoother.
So, let’s talk about whatever I’ve done with the lighting !
I’ve had this old lighting kit (originally designed for a car model) lying around for a long time, and finally got to use it ! It doesn’t look really good without my studio lights because my camera is not made for that (The effect in reality really gives escaping monstrosity a dark vibe which is not well depicted with my photos…). Another thing which is not noticeable with the photos is that the two red dots in the center are actually blinking lights (and somehow, they tend to desynchronise).
The choice of letting some of the wires out is debatable, but I think it adds to the vibe (and some of them would have been a pain to hide anyway). And sadly, the back is but a mess of wires, but I can’t actually do anything about that.
Speaking of the back, the whole thing is one dot large and completely flat, and the ceiling only hold without pillars because of the use of tension linking directly the baseplate and the roof through the use of technic bars; and probably because the ceiling itself is not that heavy. It is, in fact, only constitued of six old road pieces connected together and frames, which give the roof little weight and high sturdiness (and the shape on the side of the piece offers a nice sci-fi effect as a bonus).
The addition of tentacles in the vent (which hides the connection between road plates in the roof) is just another reminder of the game : you can’t be safe anywhere, if air flows~
Hey I don't know if you saw my repost on your post but I would appreciate and would definitely built a brickheadz version of the boba fett prototype minifig that I have as my profile picture. Your post says feel free to request any more and I thought it was worth a shot even though I doubt he'd appeal to more people than me.


✨Boba Fett Prototype ! ✨
Hi ! This has been in my inbox for ages, I know. Finally had time to give it a try ! Had a lot of fun, actually, mandos have some really interesting shapes.
And, because it took me so long, I figured, I'd also give instructions, too. Some colours might not be available, though, but white should be pretty easy to find for the outside pieces.
Instructions can be found here !

✨Bionicle Beetle !✨
Ah, another insect ! Check the other one here.
Does it ring a bell ? The head (and some of the brown parts) come directly and with very few modifications from the Jaller & Gukko set. I never managed to get Jaller, so instead, I turned Gukko into this nice, big Rahi.
Now, of course, detail and the other pictures below the cut !
Front, hind, and neath !


I’m absolutely delighted with how it turned out. First of all, I really like the head which has been intact for as long as I can remember, although I know that I’ll never complete the set because I don’t have Jaller’s Kanohi. What I have plenty of, however, are the pearl grey Rahkshi shells, so you can see that I’ve used three of them on top. Then, I have to find pieces with a good enough curvature. So the next piece is from a Toa torso (Hordika) and the next one is used as a wing/pauldron on different sets, which has a perfect shape. On the sides, I’m using practically only pieces from a brown Vahki.
The underside is quite simple, but I wanted to make sure the colours remained coherent with the head, so I kept this bright brown while trying to make it as light as possible (the six legs are already barely letting it stand).
Under the dual Rahkshi shells, I have a bit of space which could let me add a nice feature, although I don’t know what yet. I planned on making actual elytra, but that would have been too complex, so there is currently nothing.
There isn’t much left to add, since for once, I have made simple legs (only because the body was more complicated…), but I nevertheless want to point out how well the small arm pieces I used to connect body and feet are for insect-like shapes, while keeping it quite mechanical. Just the perfect balance.
Also. Would anyone happen to know if there is a spreadsheet referencing all Bionicle (bonkle ‽-) gens with images and additional infos ? I have done a tremendous amount of research because I can’t remember any of the names properly, and having a single spreadsheet would be easier. AND, if not, would anyone be interested in access in such a spreadsheet ? Because if I do end up making one, I would be happy to share !
Have a nice day :}
-
 obsidiandragongenderwhatgender liked this · 8 months ago
 -
 pumpkinthevixen liked this · 1 year ago
 -
 starinthegarden liked this · 1 year ago
 -
 aeramisu liked this · 1 year ago
 -
 antrylis reblogged this · 1 year ago

They/them - AroaceLego MOCs and photography with a wide range of different characters and environments, every Wednesday (in theory-)
77 posts