✨Aroace Pride Flag✨

✨Aroace pride flag✨
Since I’m mostly doing these as room decoration for me, I’m slowly running out of idea, but I’m open to taking requests (potentially with instruction, if anyone is interested, simply ask me) :}
(See previous work here)
More Posts from Antrylis and Others


✨The Kraken !✨
I’ve been messing around with water technics recently, and this was born. It certainly could be improved, but I like it like that.
There’s not much to mention about the build itself; except maybe the tentacles, which are only made out of the 1x1 round bricks, and nothing inside : they bend quite well and remain relatively sturdy when doing so.
As for the water technic I mentioned, the goal is to cover everything with tiles of one of two colours; and make a gradient underneath (see below). I also added some dark red into the mix to try and replicate the body of the thing underwater, with mitigated results.


✨Aroace Door Tag✨
‘Name' looks really terrible, but couldn’t just put my real name here-
In hindsight, Sample might have been better. Anyway, if you want to get something like that yourself and are struggling with the letters, my dms are open — or asks even, if you’re feeling bold-
And of course, studio closeups bellow the cut
With, and without 'name' (M is really a terrible letter because of how wide it is, though now that I’m writing this, I know how I could have done it better. Well, too late.)


✨41st Recon Squad Camp Site ! ✨
Closeups and other stuffs under the cut !
Backside :

Right scene closeup :


Campfire scene closeup :


Tomb scene closeup :


And finally, my personal favourite :

New lights, new camera settings, and a larger space…because this one didn’t fit the other one…Indeed, using shelves as a photo studio is not my brightest idea, but in my defence, it works.
This MOC has entirely been made because of the camouflage cloak I found in the bottom of a box. I don’t know where it’s from, but it looked very cool with that particular trooper, and thus I needed to show it off.
It was also helped because the large amount of olive green plants I received recently (those that are all over the place).
I tried something new, which is that I have not a rectangular base, but rather, three trapezoidal ones linked together to play with the shapes a little. Some parts were a pain to link together, but some tricks can help with that. The crates, for instance, are on top of a hole I couldn’t fill because of the odd shape.
The tombstone was actually the best idea I could get because I’m missing a trooper torso ! I can’t find it, and a pair of legs and a helmet are all I have left, and I might have watched Tales of the Jedi again recently, so that ended up being here.
The tent itself is made thanks to a fun discovery of mine, combining nets and my recent shipment of plants. I put a plant every three holes, in one line, and continue the pattern diagonally. In the back, to hold them in place, I used 1/2 technic bushes, which are quite convenient. And of course, this part is not connected to the poles at all, I case I want to add something in the tent.
Finally, some will notice the main incoherence of the thing : all the smaller wooden poles (tent and fire pit) are not birch-coloured. That’s mainly because finding the good pieces would have been a terrible hassle, and also because the campfire would really look weird in white.
Also, I might have spent an entire night on these trees to find what the colour balance and shape would look the more natural, I hope these are good.

✨Tragon !✨
Trans...dragon..It's funny, right ?- Also, I know it's a wyvern...Dragon sounds better...
It's pride month, so it was the perfect occasion to finally make a dragon, yay ! It's also my first time making something akin to a dragon (technically the second time,, but the first one is truly horrible), and even if the proportion are still a bit out of place, it could have been worse. It's also my first time doing custom wings, but I'll talk about that in more details beneath :}
Also, it needs a name ! I’m really bad with names, but I would gladly take suggestions ! (And here is an alt picture, in its natural habitat-)

Anyways, details/closeups under the cut !
None of these picture below are edited, because it's exam period- Enjoy the green backgrounds :}

I have to say, before any other comment, that I made the body way to heavy for the two poor sockets of the legs. The position above is the only one where it's actually standing upright. Also, my stock of pink and rightly-shaded blue was much smaller than originally anticipated, so I would have done a bunch of tings differently, if it wasn't for that. Still, I was lucky to have that many curved blue pieces for the top part. Well, all of the ones with purple diamonds on them have been forcefully taken from a small Elves dragon, but it was worth it (I also really enjoy the purple here, it contrasts nicely).
All of the joints are mixel socket joints, except for the knees, which are just hinges. It gives a lot of movements, from the tail to the jaw. Even if these are limited, it gives it a wide range of positions (even if, realistically, it won’t change it much from the one I gave it). Still, it can sit ! (Including small trans flag)

The pointy scales on the back are some of the only elements which aren’t directly attacked to the body : one 2*2 plate holds them down, and a modified 2*1 under the plates keeps it from sliding in any other direction, so even with little connections, it doesn’t budge. I really liked these angular pieces. To keep them from being too repetitive, they are only connected to each other by one stud, with a small angle, which gives them a slightly "round" effect.

The tail here is not really complicated, it's just a bunch of socket joints linked together with curved tiles on top (one of the sticker is backward, and it's unnerving, but it's not my fault and I can't risk changing it...), with white arch pieces underneath. Not sure of why I added these in the first place, but it looks cool. And of course, the end of the tail is a big heart, because it simply fits the vibe, doesn't it?
Of course, I can't forget what is the most important, and what makes this creature as cute as it is ! (It is cute, and if that is the hill I have to die on, I will.)


The green background doesn't show it well, but the flame offers a good contrats with the rest of the head, and brings the eyes there first (instead of all the mistakes present). Because there are a bunch of these.
I spent nearly as long on the head as all the other body parts cumulated (except for the wings), because making something detailed yet small enough to be a good head is tough. I actually started from the top (for the piece with the sticker, more exactly), instead of the bottom, like I usually do, in order to get an idea of scale (because I already knew I wanted the jaw to move, and for that I needed to see how big it would be). Then, I did the back to quickly have a neck connection point, to see if it would fit. Because the neck is larger under the connection sockets, the socket of the head is actually pretty high up, but the colours are practically aligned so it works well.
Then, the next thing was the eyes and the spikes. The spikes took me a hile to figure out, because without the rest of the head, they looked kinda dumb, but it does bring the head together when everything is in place. Then the eyes : on the small dragon I took apart, there were these blue tooth pieces which I used to get some texture above them, so that they don't look flat, and then, I connected them to the center connectors of a 2*4 plates. That works well in placement, but I ran into the issue of what would be around. If I didn't do anything, there would be two gaps, which would look terrible. Instead, I stuck two 1*4 tiles in these gaps, and since the tooth pieces are around either side, they don't move - well, not much, they still produce a shaking sound when I'm moving the head.
Then under these plates, I directly have 1*4 pink bricks, which stick out behind the head. At first, it was a problem, and I had nothing else to replace them; but they actually restrict and hold the neck, so that even if the head is technically a bit too heavy, it remains in place.
The actual teeth are modified 2*1 plates, four at the top and four at the bottom. To keep them with such a small gap (and to attach them to either sides of the jaw) I have use modified 1*1 plates with a ring. There is a single one at the bottom, and then underneath a few cut 2*1 and 2*2 curved tiles to make the jaw triangular; and two on top, one which connects it to the head and one with holds the snout (which is using a cheese piece and another one of the blue tooth).
So, custom wings ! It isn't actually complicated, if only a bit tedious. Here below is all that I needed to make them :

As you can see, it's not much. Most important, of course, is a good, solid sheet of paper, and a cutter (precision cutter is better, in my opinion, but anything works). To make things easy (or if, like me, you don't know how to draw properly), you can take a basic lego wing, and trace the outline and where the holes go. I would advise only doing a single, blank one, at first. Once you have your proto-wing, you can start to make the actual frame it will be attached on. I chose to use bricks above it to act as claws, but you can use socket joints, like in most sets. The advantage of using plates is that the overall look is better, but if you want overhangs like I did, you have to get the holes really close to the edge of the wing.
Once you have your frame, trace where the holes would go on it ! (if you used a wing model, it might be easier, but it could also not fit, which is why you make a prototype first). To make holes just the right size, I would advise first cutting squares (easier than circles) at just the right size, then scratching the edges with the blade of the cutter. Once it looks good, try to fit an axle inside. If it just about fits, and can rotate, it's good ! Otherwise, just remove it and scratch again.
When that's done, test if it can correctly fit on your frame. Once that's done, you can either make two wings with that pattern, or simply make another copy. I personally made two new from my first prototype because it took me a while to figure out exactly how to place the holes.
Finally, once you got two wings, you can finally add whatever you want on them (easier when they're not actually on the frame, although that should've been obvious), and you're done :}

I went for a really basic thing, but technically, any shape is possible. I'll likely use it again someday, because it's quite fun !
And of course, the bonus picture, since you’re here ! I like the symbolic of this (also don’t pay attention to the tentacles).

I actually really wanted to get rid of this castle (which was gifted, not exactly desired, although I must admit it’s really well designed), and well. Now, it’s gone, and in its place lies the dragon…and my horrendous crab, too.
![✨Looks To The Moon✨ [1/2]](https://64.media.tumblr.com/8673892d6391d798d2e17a3d5ce540c4/b43f6ed2c41a5d1f-3b/s500x750/bc7b11f6b9448e7e96451100f0081125861f2c1f.jpg)
✨Looks To The Moon✨ [1/2]
Where do I even start with that ? Oh, yeah. It’s not done just yet (if that wasn’t obvious enough).
Though, I won’t have the opportunity to work on it for a while, so I figured I might as well share the progress.
Obviously, I’m missing the water; and an outside — as well as a few other things I’ll mention somewhere below (along with closeups and way too many details, as always).
If you don’t care about any of that, you could still check up my silly little FP there !
Lots, lots of things to talk about here…
(Structure first, feel free to skip to the first actual close up if you consider that as boring.)
First of all, here is an edited version of the first pic, with water :
![✨Looks To The Moon✨ [1/2]](https://64.media.tumblr.com/ea39d63ea2dcbb3bc92aa755b0d4d40c/b43f6ed2c41a5d1f-71/s500x750/61199b745c19b0917b1b6e8368b0c7546abaa1a8.jpg)
Looks much better already. And although it might prove complicated, I have a plan. Sort of. Because Lego has this really cool, transparent blue piece which they produced a lot of : folding garage doors. They’re everywhere on firefighter sets, and they’re really wide. With a few tricks, they might work.
As for the outside, well…I’m not there just yet. I’ll try to cover it up with some Iterator-esque pattern, I suppose.
I’m also missing a scug ! I absolutely want one, and given how I chose to represent the scene, it won’t be Saint nor Spears (shame). Rivulet is really tempting, but it might make too much blue; currently, my choice might be on Monk, to have sufficient contrast (and Monk is cute). Though I might change that, depending on how much small yellow pieces I have.
Now, before talking about the inside, let’s take a peek at the outside :
![✨Looks To The Moon✨ [1/2]](https://64.media.tumblr.com/871f4a5f0d56b953e8de148ff40a2c3c/b43f6ed2c41a5d1f-0a/s500x750/11b869101b74a3016e20b69dbf5ba74211c1b821.jpg)
Here it is (back side, specifically). It’s a bit of mess because of the technics im using — which I’ll come to in just a seconds — but I also find it oddly fitting with the Iterators theme. The blacks on each sides are holding the cube together, and the technic bars in the middle are ensuring everything is held together — and also compensating for the weight of the top plate, kind of like how I did with my Carrion MOC a while back.
Anyway, the Technic™️.
The one thing which I find striking in Iterators cans is the tiling (14x14 from my last count), and it’s not that easy to replicate through Lego. Either you have no gap at all, and you use only the tiles’ grove as a separation (which, here, is way too small) or you make them very far apart, which looks terrible here). However, my tiling technic here is (not entirely mine) usually something you’d see to make floors, especially castels.
Here, I have three layers : the dark grey layer, which is the base; the light gray, which is the tiles; and, in between, I have a layer of black dots forming a grid diagonally to the first layer, on which the tiles are placed. This diagonality explains why, on the pic above, my plates have so much spiky edges, and which I have to use this whole complicated system to hold everything together.
Of course, it gets worse ! Because the cans are not perfect cubes, the edges are bevelled. And so I bevelled. Now, with all these intricacies, there was no way any regular connection would keep these edges in place. You can also spot what I used instead, which is an awful lot of ball and socket joints (mixel style). Incredibly useful, those pieces.
Anyway, enough boring structural details, here come the fun part !
Small things first, here is a comparison of the first vs final design for the neuron flies :
![✨Looks To The Moon✨ [1/2]](https://64.media.tumblr.com/6fc18f71aa5a566f239a04658bdaa2b1/b43f6ed2c41a5d1f-d7/s500x750/8c00b65ae9ed9e3815a0dfa05afac4aef312f2c9.jpg)
![✨Looks To The Moon✨ [1/2]](https://64.media.tumblr.com/7aa3ed3889c2725fda3cb5707181c360/b43f6ed2c41a5d1f-00/s500x750/cf712d96ae5c58a6774642670aa9cc465c46911d.jpg)
I’m really glad I actually managed to do that — they’re an important element, and the conception had me worried for a little bit.
The first design is, in my opinion, the best one can make at this scale. Slight issue : it’s not actually physically possible to make it hold together. After a lot of different iterations (ah !) I’m came up with the design on the right. It’s a bit more square, but it has a distinct head and floppy tails, which was all I was asking for. Obviously, the two tooth pieces I’m using are hardly held at all (using a mod 1x1 joint piece). There’s also, behind, a white dot with a hole, which ensures that these can be connected to the background via the long, transparent bars. Wasn’t easy to stick them without breaking them, and there’s no way I’m touching these now.
![✨Looks To The Moon✨ [1/2]](https://64.media.tumblr.com/7217074bc04fbf14f9c736e361ec67e5/b43f6ed2c41a5d1f-98/s500x750/02db63d8269d5e91989886e7d82ce393ba743cb6.jpg)
Her. She is the central piece of my MOC after all. It took me a while to figure out the design (mostly the head), but I’m glad of how it turned out. It’s not perfect, of course, but I feel like it works well, both scale-wise and color wise. And there’s only one (two) illegal connections, for the antennas which I’m making using hands. It’s very tempting to draw her a face — I’ll probably consider it, at some point.
The arm behind is also relatively good, with loose cables hanging from it. Once again, ball and socket joints are here to save the day; although I do feel like some parts of it are a little bulky, and it doesn’t drop down low enough…
Additional details, the piles of debris.
![✨Looks To The Moon✨ [1/2]](https://64.media.tumblr.com/669c04363442a3247a589729a9662ce0/b43f6ed2c41a5d1f-b8/s500x750/6a07583141d576aa968ae6e966c49c008336bf10.jpg)
It’s…really difficult to make debris which don’t look purpose, and aren’t simply horrendous to look at. I tried to keep some grey tones, but also incorporated some brown, because it does actually bring some well needed contrast to the whole scene; and a few plants.
Speaking of plants, I’m no really liking these vines hanging from the ceiling (much thinner and darker in game), but as far as my expertise go, I dont see another way to get them here — and if there’s nothing at all, the whole piece suddenly gets really dull. Of course, there’s also the gap in the ceiling, with cables falling out; this, I will add more details to later on — and I have the hope to get a proper light source to go through it and act as a sun which will fall directly on my small LttM.
To conclude, here are final views of it, from further away, and with a brick separator from scale. It does look quite flimsy, doesn’t it ?
![✨Looks To The Moon✨ [1/2]](https://64.media.tumblr.com/d51f8a684b768c0a7223411e69dff690/b43f6ed2c41a5d1f-c8/s500x750/88d4ed5aa97df2a0f985dfbdd56187b5f046232e.jpg)
![✨Looks To The Moon✨ [1/2]](https://64.media.tumblr.com/f11171cfd8f3d6d55b2f41f46b2d7314/b43f6ed2c41a5d1f-5b/s500x750/69aeba2df224bab421ecb45cd578b90c68e1620c.jpg)
Oh, and, well. I’ve been messing with Dots recently. Figured this was worth including as a footer (probably on of the first achievements I unlocked — poor Moon~).
![✨Looks To The Moon✨ [1/2]](https://64.media.tumblr.com/2ed459bb6232038d802ac64afd31fe15/b43f6ed2c41a5d1f-77/s500x750/a88a5b9e2dfba1a119dd2d0ae623e595a0c06b84.jpg)
I rarely, if ever, reblog things, but that’s just beautiful; Lego at its finest.
BESTIES BESTIES BESTIES

FOUND THIS SUCKER IN A LEGO STORE IN NYC
and the employees had pronoun pins as well!

✨Clone wars Scuba trooper !✨
A like to make custom clones only using official pieces, here is a scuba (because lego did not give us a Monnk...)
It's not really complicated, although trying to get a DC-12U was far from easy. It's still a bit bulky but I like how it turned out (and one day, I'll try to have multiple of these to get a small underwater diorama, that would be lovely).


✨ Custom AT-TEs ! ✨
(Not entirely custom, actually, but more like a custom paint job / some tweaks)
These two pieces are part of a larger custom clone battalion, the 284th, that I’ll explain in detail in another post. In the mean time, these are already in use on a larger mix that doesn’t exactly fit in my small studio right now (I’m talking BIG moc)
Individual views :


The stickered plate, stolen from a Ninjago set, was awfully convenient, you may understand why here (not posted yet)

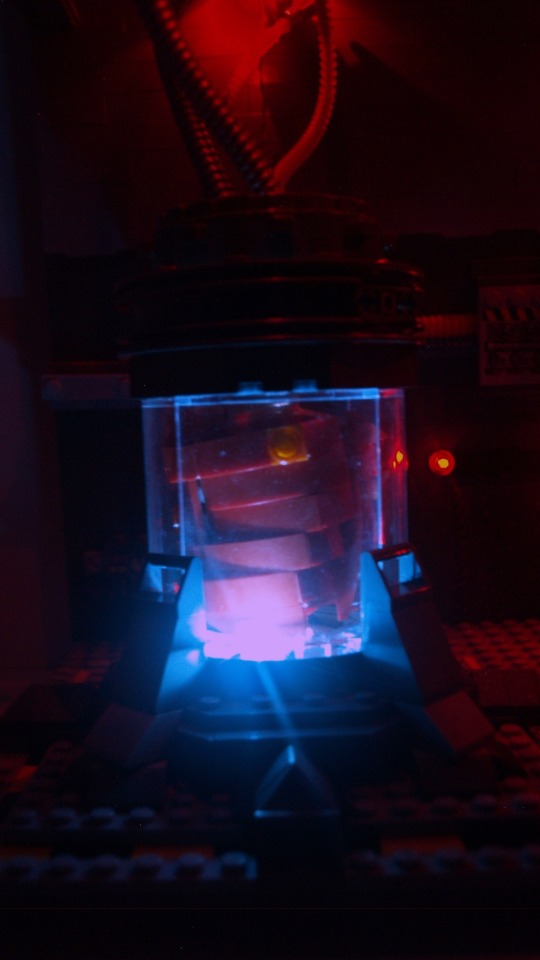
✨ Breach of containment ✨
This is the last I’ve been working on for the past few weeks, very, very inspired by the game Carrion (if you haven’t played it yet, you absolutely should !), which is made all the more special because I finally took time to use my lighting kit (seem below). Of course, closeups and commentaries below the cut

Left containment unit closeups :

Right containment unit closeups :


Top closeup :

Alt version (studio lights + in-built lights) :

This is one of the screenshots I’ve been working with (where the monster just breached containment) :

So, as I said previously, this piece is heavily inspired by Carrion. I tried to look up any previously made Lego thing related to the game, but all I could find were a few Reddit posts with (debatably) interesting takes on the monster. So, the good news is that this is most likely the most original piece I’ve made yet.
The original plan was to have only one container, and one monster, with left being the body inside and right being the outside part. However, placing Left in the middle of the transparent pieces made it mostly good on its own, so with some modifications, I made it work alone and expanded the outside part inward, and ended up with two of them.
Left is pretty okay from all angles, but Right is not necessarily as good from the back, and had a supplementary jaw on the side of the container which can’t be seen on the photos.
Getting back to comparing that to the game. I tried to stay close while adding my own little details. The wiring and cable system is from me, but the container is mostly inspired by the game, just like the electric box (middle) and the little informative display (under the electric box) which is…empty, yes.
Some details can’t be seen on the photos (or barely), which are mostly some filler sci-fi stuffs to make the wall less flat and less empty.
What also helped with breach the flatness of the wall is the switch from dark grey to light gray, using the awesome spring projectile launcher piece, which has this very nice shape which make the transition just a bit smoother.
So, let’s talk about whatever I’ve done with the lighting !
I’ve had this old lighting kit (originally designed for a car model) lying around for a long time, and finally got to use it ! It doesn’t look really good without my studio lights because my camera is not made for that (The effect in reality really gives escaping monstrosity a dark vibe which is not well depicted with my photos…). Another thing which is not noticeable with the photos is that the two red dots in the center are actually blinking lights (and somehow, they tend to desynchronise).
The choice of letting some of the wires out is debatable, but I think it adds to the vibe (and some of them would have been a pain to hide anyway). And sadly, the back is but a mess of wires, but I can’t actually do anything about that.
Speaking of the back, the whole thing is one dot large and completely flat, and the ceiling only hold without pillars because of the use of tension linking directly the baseplate and the roof through the use of technic bars; and probably because the ceiling itself is not that heavy. It is, in fact, only constitued of six old road pieces connected together and frames, which give the roof little weight and high sturdiness (and the shape on the side of the piece offers a nice sci-fi effect as a bonus).
The addition of tentacles in the vent (which hides the connection between road plates in the roof) is just another reminder of the game : you can’t be safe anywhere, if air flows~
-
 obsidiandragongenderwhatgender liked this · 8 months ago
 -
 keeperofthebees liked this · 1 year ago
 -
 hienopolis liked this · 1 year ago
 -
 aeramisu liked this · 1 year ago
 -
 pinkfestivalpeanuttree liked this · 1 year ago
 -
 gloweyeyesgobrrrrrrr reblogged this · 1 year ago
 -
 wouldnt-ya-like-to-know liked this · 1 year ago
 -
 immortally-aro reblogged this · 1 year ago
 -
 emy-he-him liked this · 1 year ago
 -
 und3rta13tra5h liked this · 1 year ago
 -
 l3eches liked this · 1 year ago
 -
 sir-lavender reblogged this · 1 year ago
 -
 pathopunk reblogged this · 1 year ago
 -
pathopunk liked this · 1 year ago
-
 orion-truly liked this · 1 year ago
 -
 galvanic-ghoul liked this · 1 year ago
 -
 downsideupsnake liked this · 1 year ago
 -
 besaidcafe liked this · 1 year ago
 -
 canine-t33th reblogged this · 1 year ago
 -
canine-t33th liked this · 1 year ago
-
 shinekittenace reblogged this · 1 year ago
 -
shinekittenace liked this · 1 year ago
-
 deer-intelligence liked this · 1 year ago
 -
 the-pink-mug-introvert liked this · 1 year ago
 -
 the-land-of-dreams liked this · 1 year ago
 -
 elytran101 reblogged this · 1 year ago
 -
 wellidontknowatall reblogged this · 1 year ago
 -
wellidontknowatall liked this · 1 year ago
-
 maburp liked this · 1 year ago
 -
 greenthistle liked this · 1 year ago
 -
 worm-priest liked this · 1 year ago
 -
 auggator reblogged this · 1 year ago
 -
 fullmetalatlas-blog-blog liked this · 1 year ago
 -
 roadkilltbh reblogged this · 1 year ago
 -
roadkilltbh liked this · 1 year ago
-
 taylordeerskull liked this · 1 year ago
 -
 gliophorus-psittacinus liked this · 1 year ago
 -
 lakewaterduck liked this · 1 year ago
 -
 soullesssinews reblogged this · 1 year ago
 -
soullesssinews liked this · 1 year ago
-
 somewhat-very-insane liked this · 1 year ago
 -
 bluestpapercrane liked this · 1 year ago
 -
 m0n0-t0n3 reblogged this · 1 year ago
 -
m0n0-t0n3 liked this · 1 year ago

They/them - AroaceLego MOCs and photography with a wide range of different characters and environments, every Wednesday (in theory-)
77 posts