✨Clone Wars Scuba Trooper !✨

✨Clone wars Scuba trooper !✨
A like to make custom clones only using official pieces, here is a scuba (because lego did not give us a Monnk...)
It's not really complicated, although trying to get a DC-12U was far from easy. It's still a bit bulky but I like how it turned out (and one day, I'll try to have multiple of these to get a small underwater diorama, that would be lovely).


More Posts from Antrylis and Others

✨Books !✨
A small gift made for a relative ! I’m not entirely happy with the result, because it feels a bit empty, but anything I tried to add did not help (such as plants, to get a result similar to this old MOC I made a while ago).
Anyway, other angles, because I like these small MOCs to be visible from all angles :


Also, if anyone like the design of these books, you might want to check what lies below~

Feel free to use this !
I made this because I did some tests virtually before actually building it, and although I slightly modified the design to stack them up, it’s pretty much the same~

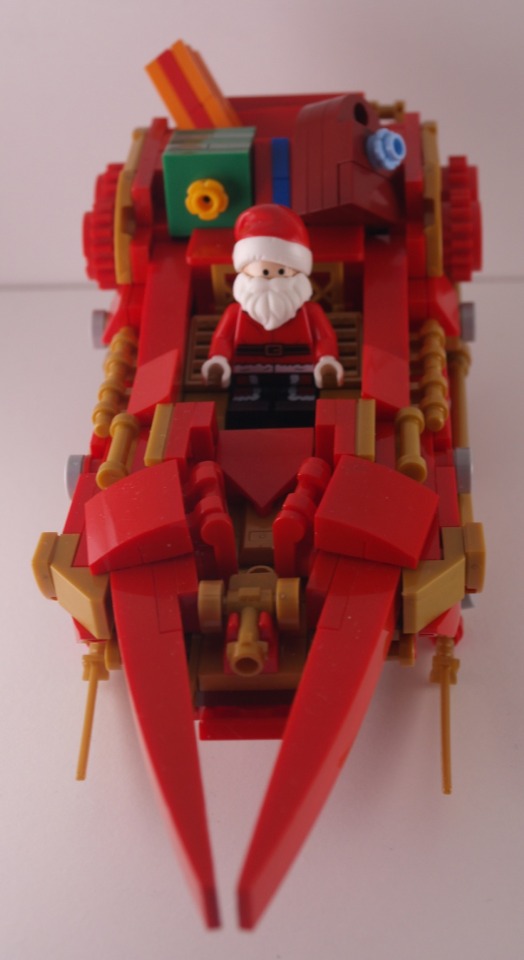
✨Santa’s sleigh !✨
I showed last week the Christmas tree I made last year, now is time for what I did for 2023 !
Closeups and commentaries beneath the cut !
Sleigh closeups :


Reindeers closeups :


Santa :

SO. Had a lot of fun with that one. The sleigh doesn’t have much exciting parts, except the blades, which are actual blades (Ninjago sabers, to be precise). The back is filled with presents from top to bottom, so they can be rearranged to give a different look each time it’s put together.
The part connecting the sledge to the reindeers probably could use the help of an iron wire to keep its shape (a neath technique I’ve used for a flower in another one of my builds to make the bendable pieces stronger), and the threads between the reindeers is a very cheap finition, but in my defence, I was on a time limit.
Reindeer-wise, I’ve hesitated whether to give them all a red nose, but they didn’t look nearly as cute without. And the antlers, I must admit, are very unsteady, because they’re illegally connected, but this was the best way to keep a small overall shape.
Finally, the Santa minifig was probably, and surprisingly, one of the hardest parts of this MOC, because the parts I stole borrowed to other minifigs were spread in multiple places, and I didn’t have one of the official Santa minifigs. So most of the piece come from different Star Wars advent calendars (mostly Darth Vader and C-3PO).


✨Custom fire Toa !✨
Yay, yet another custom bionicle ! And a big one this time !
Details below the cut !
Front/side views :


I’m using Vakama Metru’s kanohi for that one, as it’s pretty good shape-wise and there are few dark-red kanohis anyway.
Anyway, this was a lot of fun to make, and this time starting with absolutely nothing. Most of the bright red pieces were added at the end to give a bit of contrast. You might recognise some Stars elements, as well as some Bohrok elements from an unknown set, and even a very old piece from the precursors of Bionicle.
If you pay attention to proportions, the legs are completely messed up (bottom part too small, higher part far too long). It’s fixed on all the others of this series, luckily. Given it still works visually, I kept it that way.
The weapon is a mix of a cool disc launcher, with the flame sword from Stars set, to make…what you want it to be. I initially said it was some type of crossbow, but to be fair, it doesn’t look like anything at all.
Just like the others I have shared so far, I am doubling some limb pieces to quickly give some thickness. On the higher part of the legs, though, I have used the body
Most of this is quite experimental, from the feet to the higher parts of the legs using Vakama Metru’s body piece (it’s a fun one to work with).
And, yes, maybe I will be spreading this over 6 weeks to get enough time to finish my current project (currently waiting for important parts to arrive…), and because I am running out of content faster than I can make it, but well.
To pardon me, take this picture I took to see if the articulations had a good enough range :


✨Aroace pride flag✨
Since I’m mostly doing these as room decoration for me, I’m slowly running out of idea, but I’m open to taking requests (potentially with instruction, if anyone is interested, simply ask me) :}
(See previous work here)

✨41st Recon Squad Camp Site ! ✨
Closeups and other stuffs under the cut !
Backside :

Right scene closeup :


Campfire scene closeup :


Tomb scene closeup :


And finally, my personal favourite :

New lights, new camera settings, and a larger space…because this one didn’t fit the other one…Indeed, using shelves as a photo studio is not my brightest idea, but in my defence, it works.
This MOC has entirely been made because of the camouflage cloak I found in the bottom of a box. I don’t know where it’s from, but it looked very cool with that particular trooper, and thus I needed to show it off.
It was also helped because the large amount of olive green plants I received recently (those that are all over the place).
I tried something new, which is that I have not a rectangular base, but rather, three trapezoidal ones linked together to play with the shapes a little. Some parts were a pain to link together, but some tricks can help with that. The crates, for instance, are on top of a hole I couldn’t fill because of the odd shape.
The tombstone was actually the best idea I could get because I’m missing a trooper torso ! I can’t find it, and a pair of legs and a helmet are all I have left, and I might have watched Tales of the Jedi again recently, so that ended up being here.
The tent itself is made thanks to a fun discovery of mine, combining nets and my recent shipment of plants. I put a plant every three holes, in one line, and continue the pattern diagonally. In the back, to hold them in place, I used 1/2 technic bushes, which are quite convenient. And of course, this part is not connected to the poles at all, I case I want to add something in the tent.
Finally, some will notice the main incoherence of the thing : all the smaller wooden poles (tent and fire pit) are not birch-coloured. That’s mainly because finding the good pieces would have been a terrible hassle, and also because the campfire would really look weird in white.
Also, I might have spent an entire night on these trees to find what the colour balance and shape would look the more natural, I hope these are good.

✨Bionicle crab !✨
It was, originally, meant to be just another arthropod. However, someone reblogged my previous rahi, along with this comment :

Well, guess what ? Yes, absolutely. I’m glad I saw it because it gave me the inspiration for this monstrosity (and it made me laugh more than I would admit, too). Thanks.
I must recognise that if I compare my rahis, there is a clear pipeline. I don’t think it can go much further in this direction.
Anyways, details/closeups/weird illegal technic I just found out, below the cut !
Front (smol Visorak for scale) :

Because it’s really big. It’s also a good excuse to show off my really fancy and glittery Kanohi. No clue where it comes from but it’s beautiful !
I’m really happy with how mean this things looks, overall. It’s most definitely the bad guy for Toas to fight. It has a really good scale to work with my larger customer Toas [here], but it could also act as a really large rahi for my smaller space-based Toas [here]. Why a large crab stealing Kanohis in space, you may ask ? No idea. I’d have to actually think out a lore for that.
I started the conception with the frame (which does make sense, in theory), then the legs, and finally the shell. This was only partially smart, because that meant I did not account for the shell's mass when building the legs. Essentially, this poor thing can't stand on it's own, so I'm using two technic bars underneath to keep it up right (which are hidden in editing, of course).
Top/Hind (shell) :


I think the shell was pretty decent. I tried to use as little pieces as possible to keep it light, but it's still a lot. Among these pieces can be found one Visorak claw and three Mantax feet, which have a nice texture for organic feet. There is also another foot at the front which comes from an Inika set which I can't seem to find. I'm also using some of these large technic panels, which cover a lot of surface without being too much of a pain to set up (still quite a lot, since they're connected to the feet at at an angle, feet which which are also connected to the frame at an odd angle...) Speaking of Mantax, I alsu used the black-pearl shells, because these, too, have a really organic vibe, and it gave a small touch of pearl which was missing on the body.
I tried to keep the back relatively slick, to avoid something similar to an abdomen since it's not a spider. Still I had to extend it a little bit using the rounded cubical cover, to hide some socket joints, but it's okay-ish.
Neath :

Truly a mess, I must admit. As I started with each side separately, I tried to somehow connect them with the large grey technic frame (in the middle). On either sides, I have a whole bunch of axle connectors, both standard and angled, which allow for the thing to appear rounder than it could have been. The two leg sockets peices at the front are used for the eyes, and the pieces abov (barley visible) is a classic Bionicle shoulders piece clipped backward as a base for the pincers arms.
Pincer :

Or mandatory unusual feet usage. These really works well as any kind of claw or armor, in my opinion. The black arm pieces used here (Hordika leg piece) were particularly good for the job as they technic pin holes in there allowed me to add ad additional socket practically at the same level at the original one (even if I would rather have used black technic bars instead of the light grey ones, but i couldn't find any in my supplies... It's likely the Space station's fault.
Legs :

Or equally mandatory foot out of not foot pieces. Here is a cursed homebrew way to make legs : one Bohrok head part (bricklink call these shoulders ?) to display the piston-like element and serve as structure, linked with Toa Metru legs (which slots above nicely. And then comes the magic trick, for the Rahkshi shells (silveragain, because I have many of these) have a small attachment point toward the end, that is meant to hold the back blades in place; but it also perfectly fits right on the small ledge in the middle of the leg piece ! Granted, it's not a very secure connection, but these two pieces don't need anything else but that to hold. I actually loved this one so much, you can notice two additional Rahkshi shells held similarly on the tope of the crab's shell.
In order to connect the legs individually to the frame, I am using Vahki legs for the exterior limbs, and Pihraka arms for the central ones (these arms have the particular property of having the restrictive sockets on either sides, which makes it good to keep the leg's shape.
The middle sections are made using two simple axle-socket pieces connected by old plates, usually found in technic sets predating the Bionicle them.
…And obviously, I had to make another makeshift studio (I actually really like this one). Have a look at all these terribly assembled elements !


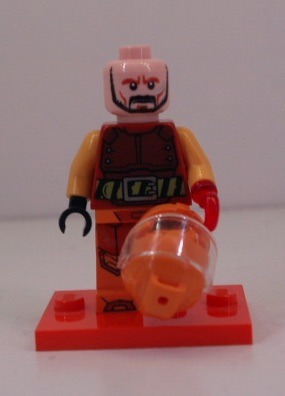
✨Quake and its pilot✨
Another one of my combat mechs ! (See previous here)
Same as last time, closeups and lore under the cut
Mech closeups


Minifig closeup :
So, mech lore !
As I said in the previous post, mech battles happen some times after the third world war. Well, some of the veterans quickly took interest of this new sport, including today’s pilot. As you can see, sequels of the fights are still visible on his body, his hand being the most visible one. Of course, he could have had a normal hand, because it’s an easy thing, but he didn’t want to. He wanted to show what he had partook in, and this glowing hook was the coolest thing he found on the market.
At first, he didn’t really even watched mech fights, but eventually, some of his friends made during the war decided it would be fun to watch it together. And they enjoyed it. Enjoyed it so much, they decided they wanted to participate.
So, they did what any normal group of war veteran did : they looked for a place to scavenge spare parts and assemble a mech of their own, that would be out of the usual roaster of mark III and IV mechs. What they found was what was left of a large dig site, abandoned at some point in the past. Among the scraps, one of them found the large QUAKE panels. Probably the name of the company that used to be here. It would do the job.
It took some time for Quake to get into large-scale tournaments, because it usually fell apart quickly. With some experience, the team managed to get it in a usable state, and when it didn’t break down, the mech was doing some heavy damages. Don’t trust the electric panel on its back, it’s entirely coal-fuelled (coal which was provided by the dig site) and Quake is probably one of the only mechs powered by a thermal engine, but it gives it a powerful advantage : as long as it’s fuelled, it can deliver extremely powerful blows with its large arms, as well as it can withstand powerful attacks (that’s what the shoulder plates are for). With this mining equipment, Quake, after it began to be known, made itself quite of a name in the arena.
That’s it for this one, the next competitor, named Quetza, will be introduced next week :}
Also, I’m trying an old camera of mine to take pictures, because the lighting is better, although it’s less flexible than my phone’s. I’m still trying to get a good feeling as to what I’m preferring.
Random interesting thing to notice about the build itself : All articulations have different kinds of joints : bionicle ball-joints for the arms, technic pin for the hips, small ball joints to connect the legs and the body, old technic joints for the knees, and simple handle joints for the feet. It was accidental, but I think it fits well with the history of the mech.

✨Custom ice Toa !✨
And another one ! If the others were already experimental, this one is much, much more-
Closeups under the cut !
Front/back views :


That one was a lot of fun ! But it’s also not really stable, considering there are some weird piece combinations. This one also has disproportionate legs, compared to the rest of the body, but it’s alright.
With that one, I really tried to remain within Kopaka’s spirit (notice the ski blades and the Kanohi). The bow and arrow (which doubles down as a lance, and is using one of Kopaka’s blades), is a weapon I don’t think has been used before in the original bionicles (correct me if I’m wrong).
The arms/hands are using Pridak’s feet, because it works well and still allows for large movements.
I used some darker white pieces on the back and shoulders to get some slight contrats, and used technic pieces on the chest to get a proper body shape, with a leg piece underneath.
Legs :

(Too) Many details on the legs ! The blades under the feet are a combination of Kopaka Nuva’s blades and Glatoran blades, which also hold a shoulder piece used as a supplementary leg pieces.
Now is the here we enter the mess : all of the ankle sockets you can see are not used for the articulations, and are only here to keep the back piece in place (Star leg), while the actual socket is behind the technic gear plate. Then there is a socket which doesn’t even have a ball, it is directly stacked on top of another socket, and I use multiple feet to cover the leg areas which would expose how terrible the inside is. At the front, you might also notice a 1*2 curved slope tile held by two technic pins. It’s floppy, and it looks weird from the side, but the front appearance makes it worth it. Finally, at the front, I also use part of a Vahki’s head as a final plate, before we finally reach the connection between the legs and the body. As I said, that whole part is a mess.
Head :

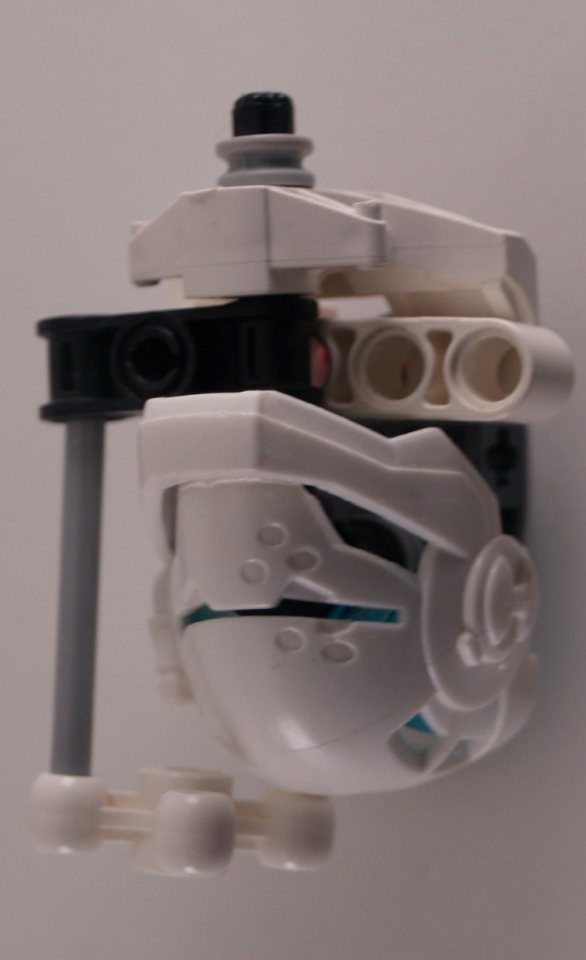
Tried to remain close to Kopaka’s appearance here too, by adding a X-ray vision thing, but the most important part is that the Kanohi is Hero Factory Stormer’s mask, but sideways. The trans blue pieces are Borhok eyes, which fit perfectly, and I managed to cram a socket connector inside, making the head quite mobile and sturdy.
Next week is another one ! Not sure which of the three it will be, but I haven’t decided which one yet (tell me if you have a preference~).
I also finally received my new parts, meaning I can get back to working on my big project, yay !

✨Trans pride flag !✨
Had some inspiration and a nice motivation (here)
(See previous work here)
Alt version below the cut :
Pastel version ! It looks a bit bland because I didn’t have enough pieces to make enough variations (this type of pink is exactly what I needed, but also happens to be very hard to find). It’s probably more fitting for the actual flag compared to the one above, which is very neon-y (and I tuned it down a bit, it could be much worse brighter than it is now). But the above version looks better, I admit, and it give a bit of peps in the middle of all my other works, too, because of the unique colors.

-
 bobombbb liked this · 7 months ago
 -
 aeramisu liked this · 7 months ago
 -
 shadowsaur liked this · 8 months ago
 -
 niobiumao3 reblogged this · 8 months ago
 -
 staypuftmarshmallowqueen liked this · 8 months ago
 -
 rachelamorph reblogged this · 8 months ago
 -
rachelamorph liked this · 8 months ago
-
 apocalyp-tech-a liked this · 8 months ago
 -
 feltpool reblogged this · 8 months ago
 -
feltpool liked this · 8 months ago
-
 antrylis reblogged this · 8 months ago

They/them - AroaceLego MOCs and photography with a wide range of different characters and environments, every Wednesday (in theory-)
77 posts