✨Bionicle Crab !✨

✨Bionicle crab !✨
It was, originally, meant to be just another arthropod. However, someone reblogged my previous rahi, along with this comment :

Well, guess what ? Yes, absolutely. I’m glad I saw it because it gave me the inspiration for this monstrosity (and it made me laugh more than I would admit, too). Thanks.
I must recognise that if I compare my rahis, there is a clear pipeline. I don’t think it can go much further in this direction.
Anyways, details/closeups/weird illegal technic I just found out, below the cut !
Front (smol Visorak for scale) :

Because it’s really big. It’s also a good excuse to show off my really fancy and glittery Kanohi. No clue where it comes from but it’s beautiful !
I’m really happy with how mean this things looks, overall. It’s most definitely the bad guy for Toas to fight. It has a really good scale to work with my larger customer Toas [here], but it could also act as a really large rahi for my smaller space-based Toas [here]. Why a large crab stealing Kanohis in space, you may ask ? No idea. I’d have to actually think out a lore for that.
I started the conception with the frame (which does make sense, in theory), then the legs, and finally the shell. This was only partially smart, because that meant I did not account for the shell's mass when building the legs. Essentially, this poor thing can't stand on it's own, so I'm using two technic bars underneath to keep it up right (which are hidden in editing, of course).
Top/Hind (shell) :


I think the shell was pretty decent. I tried to use as little pieces as possible to keep it light, but it's still a lot. Among these pieces can be found one Visorak claw and three Mantax feet, which have a nice texture for organic feet. There is also another foot at the front which comes from an Inika set which I can't seem to find. I'm also using some of these large technic panels, which cover a lot of surface without being too much of a pain to set up (still quite a lot, since they're connected to the feet at at an angle, feet which which are also connected to the frame at an odd angle...) Speaking of Mantax, I alsu used the black-pearl shells, because these, too, have a really organic vibe, and it gave a small touch of pearl which was missing on the body.
I tried to keep the back relatively slick, to avoid something similar to an abdomen since it's not a spider. Still I had to extend it a little bit using the rounded cubical cover, to hide some socket joints, but it's okay-ish.
Neath :

Truly a mess, I must admit. As I started with each side separately, I tried to somehow connect them with the large grey technic frame (in the middle). On either sides, I have a whole bunch of axle connectors, both standard and angled, which allow for the thing to appear rounder than it could have been. The two leg sockets peices at the front are used for the eyes, and the pieces abov (barley visible) is a classic Bionicle shoulders piece clipped backward as a base for the pincers arms.
Pincer :

Or mandatory unusual feet usage. These really works well as any kind of claw or armor, in my opinion. The black arm pieces used here (Hordika leg piece) were particularly good for the job as they technic pin holes in there allowed me to add ad additional socket practically at the same level at the original one (even if I would rather have used black technic bars instead of the light grey ones, but i couldn't find any in my supplies... It's likely the Space station's fault.
Legs :

Or equally mandatory foot out of not foot pieces. Here is a cursed homebrew way to make legs : one Bohrok head part (bricklink call these shoulders ?) to display the piston-like element and serve as structure, linked with Toa Metru legs (which slots above nicely. And then comes the magic trick, for the Rahkshi shells (silveragain, because I have many of these) have a small attachment point toward the end, that is meant to hold the back blades in place; but it also perfectly fits right on the small ledge in the middle of the leg piece ! Granted, it's not a very secure connection, but these two pieces don't need anything else but that to hold. I actually loved this one so much, you can notice two additional Rahkshi shells held similarly on the tope of the crab's shell.
In order to connect the legs individually to the frame, I am using Vahki legs for the exterior limbs, and Pihraka arms for the central ones (these arms have the particular property of having the restrictive sockets on either sides, which makes it good to keep the leg's shape.
The middle sections are made using two simple axle-socket pieces connected by old plates, usually found in technic sets predating the Bionicle them.
…And obviously, I had to make another makeshift studio (I actually really like this one). Have a look at all these terribly assembled elements !

More Posts from Antrylis and Others

✨Combat mech and pilot ! ✨
Closeups and lore under the cut !
Side and back closeups :


Minfig closeup :

So, lore I said.
Welcome on Earth, in a nearish future. WW3 happened, but after that, everything is going absolutely fine ! Lot of tasks are automated, no one had to work anymore, and thus, humanity worldwide become a society of entertainment. Films, videos, games, you name it. But of course, games are not 'real' enough, so some streaming platforms organised life-sized fighting games with giant machines. That couldn’t go wrong, right ? Right, in fact, a world-wide tournament was made, with always much complete arenas, and billions of watchers.
So, about this mech — and its pilot, too. This one is part of the original cast of the mech battles, a beautiful Mark One. All of them were the same, originally, with only colours to distinguish them.
Its pilot, skilled as he was, won the first season. Survived the second. And the third. And so, eventually, this one became the last one of the Mark Ones. And it won again, awarding enough of a prize for the pilot to upgrade it. It was also renamed Relic by the crowd.
Fully reworked, for the next season, Relic has been updated with a plasma beam and a heavy rotator cannon, fuelled by a large tank located on its back — if any other competitors ever attain this place.
With this upgrade, the commands, too, have been updated, with controllers now having holo-projections, and a much faster update rate. One has to imagine that these mechs were originally controlled in large rooms (similar to Jaeger command centers), but have been rendered light enough to be added to a living room, for amateurs. The pilot, however, did not change his original headset and suit, which is full of old equipments and souvenirs.
That’s it for this one, expect one of Relic’s competitors next week : Quake !

A tangent about hexagons
Because the project I’m working on brought it, I found it interesting, and I thought some people might need it.
So, as I’m working on a quite large project (hopefully done by next week, although I have doubts on that), and the base structure of it is more or less hexagonal. Anyway, here are some of my tips to get good hexagonal shapes.
The easiest way to do this is obviously with hinges and plates, like that :

While not necessarily accurate, it’s cheap and efficient, albeit squishy, and can be expanded to any size.
Instead, we can go the technical way, and use maths, by considering that a hexagon is the combination of 6 equilateral triangles. We end up with this :

Practically unbreakable, very stable, and can be made with as much technical bricks as possible, so it is easily expandable, but it’s harder to attach it to classic bricks.
So, none of these two designs are really good alone, whether on pure usability, or on durability. Alone, that is. Now, here is the fun part : thanks to the way Lego works…


…they work together ! And, with some modified 2*2 plates, they mostly hold to one another ! Isn’t that awesome ? What’s more is that, while I’m using 2*4 plates and a 7 holes technic bars, that also works with 2*6 and 11 holes bars, which is good.
Now, let’s apply this knowledge to make a solid prism with an hexagonal base :

By using a bunch of plate and two of these hexagonal bases, we get a hollow tube, which is solid through the hexagons, but can still break because of a diagonal force. To fix that, we need to add supports between the supports, like so :
This also means that this design becomes stackable. Congrats, you made a long hexagon tube ! It can also be round, with the right modifications, notably with 2*2 curved tiles :

It fits perfectly, and it’s good to make solid near-circles !
Sorry for the photos’ quality !- They were taken quite late with my phone, and without proper lighting.
Your lego pride flags are so cool! I love them! <3
I’m very late because I didn’t see this before (I’m not sure of how, but well…), but thanks a lot ! I will definitely continue to make some of these, and I do have some potential inspiration for one very soon~
Hey I don't know if you saw my repost on your post but I would appreciate and would definitely built a brickheadz version of the boba fett prototype minifig that I have as my profile picture. Your post says feel free to request any more and I thought it was worth a shot even though I doubt he'd appeal to more people than me.


✨Boba Fett Prototype ! ✨
Hi ! This has been in my inbox for ages, I know. Finally had time to give it a try ! Had a lot of fun, actually, mandos have some really interesting shapes.
And, because it took me so long, I figured, I'd also give instructions, too. Some colours might not be available, though, but white should be pretty easy to find for the outside pieces.
Instructions can be found here !
✨I made a carrd✨
A friend of mine said I could use it — they were right !
Essentially, I now have all of my published MOCs sorted by theme in a single place (as well as a few unpublished ones !)
Here it is : https://enteroctoups-darkysils.carrd.co/ !

It also feature some none-Lego photographs, too, feel free to take a look.
Small, unnecessary update bellow the cut :
I’m gonna have to remove the 'one post every Wednesday', for multiple reasons : firstly, I’m gonna start a long maths cursus which won’t leave me much time to build — or even to post; and, beside that, I’m running out of MOCs ! I still have a few, which I will probably work on and queue so that they appear semi-regularly. I received just earlier today part of the pieces I’ll need for my final(?) MOC. And it’s a big one. Well anyway, I’ll be off to work on it now ! Thanks for reading this far~

✨Trade space station !✨
<Previous< [2/4] >Next>
Today’s gonna be about the progress of the build in time, which allows me to ramble about the building process. Yay !

Before actually commenting the build. You may notice chocolate and my (empty) tea mug. They should be apparent in most of the earliest pictures (there was not enough space on the table for them at the end of the project, sadly~
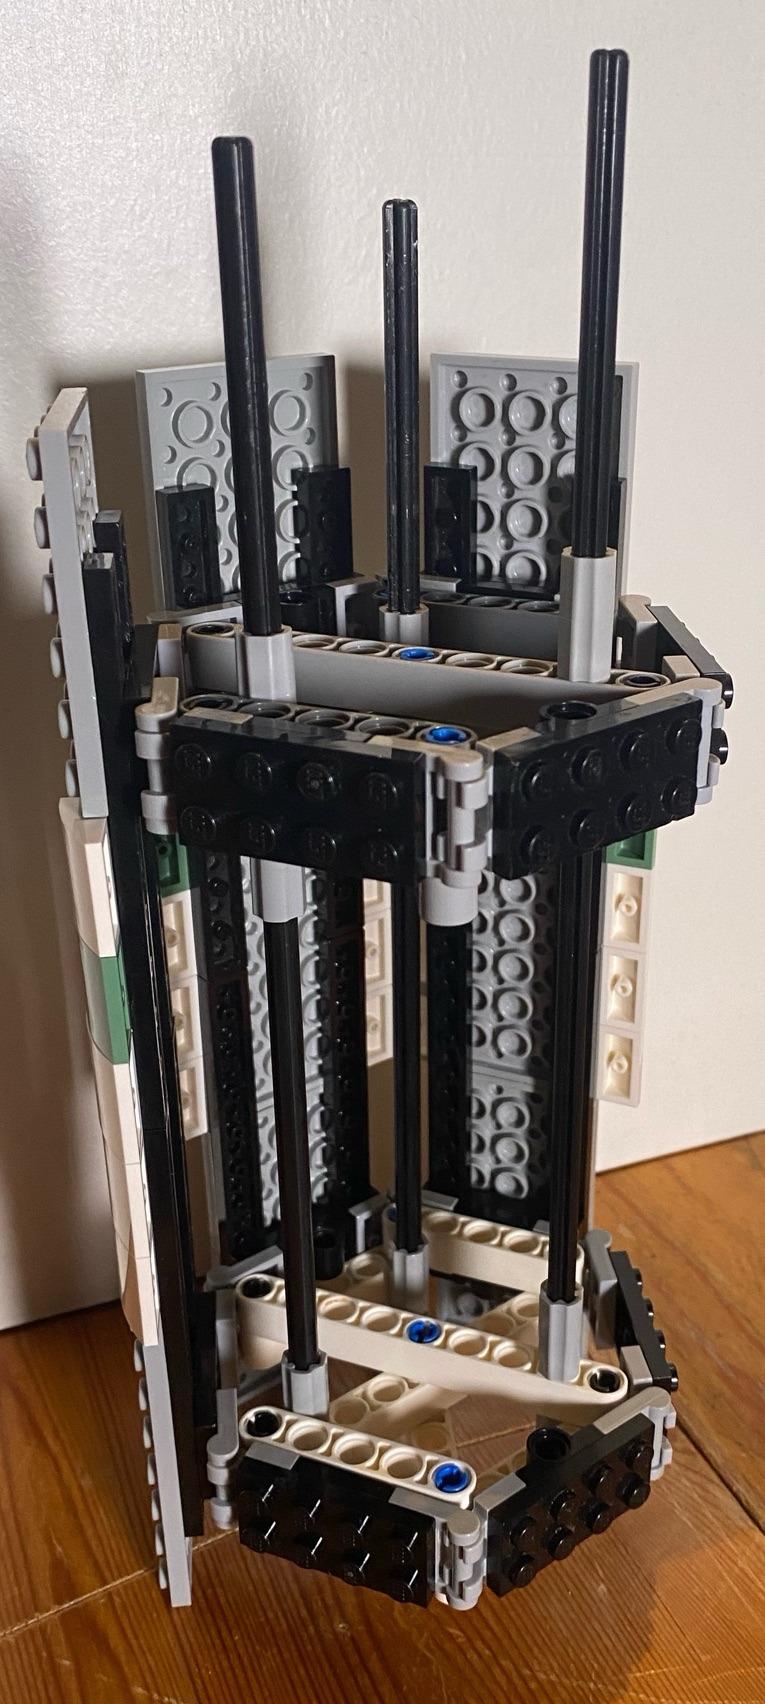
So, here, you can see that my first step was to see the scale of my project. The template of the large ring to see how much space it would take, and the small ring to see how round I could make it (and at the bottom, you can see the white curved pieces. Enjoy this view, it won’t last.)
You can also notice above that I already stared making some small ships.

The next day ! You can see on the left my long rod. This was the ideal height for the central cylinder. I also created the first core of the build (replaced later because too fragile), and the first arms to hold the ring (too fragile too).

Progress ! This is the moment I realised my original color scheme would not work (you can see orange and bright green on the side, which I tried before the sand green).
I had half of the big cylinder added (you can see the slots left for the additional details) and another naked half on the right side. And my collection of boxes on the table is growing. It’s only getting worse after that.

See ? More boxes (and pieces) scattered all around. And a hammer, too. I at this point mostly finished the big cylinder (or so I thought, some reinforcements were necessary), started the smaller cylinder, and realised white pieces were running out. I also still haven’t touch the ring yet, as I wanted to stay focused on one bit.

Mostly done with the cylinders at the point (you can even see the start of the smallest one on the right side). Agin the boxes grow ominously.
Since it was time to start the ring, I created a replica of a sixth of it. Given that there were twelve sections, I wanted to be sure of the design before starting to build them all, starting with the facade. It took some fiddling around (you can see these aren’t symmetrical, as I was trying out different designs). Really, if you have this kind of things to do, try to make it in a vacuum first, you’ll gain a lot of time later, once the prototype has every problem answered (mine were mostly the curve, and the link between each plates (solved with mod 1*2 black plates).

See ? After the prototype was done, I simply built all of the facades and attached them (you can see my 1*4 curved pieces were all missing at the time though).
I kept the prototype on the side, because I’ll still need it later. I also am missing half of the ring (the part above, since there is only a structure below), because I was not sure of how everything would fit, and I waited until these parts were assembled before making it, in case adjustments were needed.

Here is the top part ! And all the hangars done, too. It took me a surprising amount of time to do all twelve of them…

Huge progress ! There is no more room on the table for the boxes, but you can see them…on the floor, on the left…Lot was done, from the bottom cylinder now finished along with its ring, the covering pieces of the big ring (except the internal faces), the hat of the station, and a huge reinforcement for the six arms, which was done separately). At this point, except for a few details, the station itself is finished.

And there is a picture taken moments before disaster. The station is done (ignoring the transitions between cylinders) the arm…supposedly, too.
Sadly, the arm wasn’t, in fact, finished. If you read the first post, you will notice it isn’t as bulky, and isn’t attached on baseplates yet.
Well, guess what ? When I finally tried to see if the arm would hold onto the station, it broke. Rather, two pieces broke, then the rest came down, and so did the station, which shattered on the floor below. Luckily for me, the main cylinder was so dense it practically completely survived. Most of the hangars of the rings only broke section per section, so it only took a few hours to get it back together, but much more time to make the arm solid. And now, it can hold the station for ten hours without flinching ! So, here is a lesson. If something you do fails when you do it with your heart, let the rage flow through you and build it back out of spite. It works* !
*don’t hold me accountable for any failure using that method


✨Custom clones !✨
I really like messing around with minifigs, and I had recently got my hand on a 501st battle pack, which meant I had some spare accessories !
Of course, custom weapons, else it would be no fun, and of course of of them use illegal technic, because it's kind of my signature at that point. I really like how they all turned out - including the Dimension plates which are a really nice display base.
The most interesting piece it the small cloak piece I used on the sword one (Nexo Knight sword obviously !), because, first of all, it's blue, and it comes from some Marvel sets, which isn't a theme I manipulate often - which is a shame, there are some really cool pieces in there.
Also, these need names, but I did not find any yet...

✨Another edited photo, yay !✨
This is an entire version of the blog’s banner, too !
Technic details under the cut !
So ! Looking through my archives, I found images for the process I described in my previous similar post, including my made up studio (and very messy desk…) :

As you can see, it’s not quite a professional set up..
To be more precise, this is three led bands hooked to a power bank, on top of which my phone is meant to be sitting to take two photos in a row. Obviously, there is also a desk lamp illuminating the scene, so here is a picture without it :

So, the way this is organised is that I have my black screen in the background which reflects the lights a little, but not the actual minifigs; the characters are held by transparent pieces connected to ball joints, so that I can have a steady but adjustable display. Light-wise, the two prominent led bands are colour-coded with the character’s color (kinda) to get them in opposition; the junction between the two is covered by some black bricks to create a darker area to offer more contrast; ans on top of the stage is help a (theoretically) white led with lesser intensity to make sure the scene stays lighted up properly, even if the light sources are from underneath. The red pieces I have used as frames are really good to hold these light bands, because I can have varied angles and heights plus a very solid structure, which is all I want.
Finally, to get the floating render, I take a first shot with the characters, then a second one at the same place without the characters :


And then, with a bit of editing magic and other simple image manipulations, you get the result I have at the top of the post ! I’d recommend trying it for yourself, because it can be a lot of fun !

✨Bouldering wall !✨
I reeeally wanted to make one of these at some point, but never took time. Incidentally, I got commissioned — is it even a commission if it’s for a relative and I’m not paid ? — so there is is !
Closeups and details under the cut, of course !
Closeups :


So ! This was a lot of fun to make, with some really interesting techniques. The first thing is that overhang with an increasing angle at the top. A large part of it is just a big plate connected to the base by hinges, while the second part is connected to the first one, instead of the based, to make sure that when something break, everything break only attach one plate to the base, to provide a thin finition. The holds have nothing particular, except perhaps that some start 'in' the wall while some are on it, which is here to pretend there are micro holds — possibly the worst invention of the story of bouldering/j. The top layer of the wall is finished by 1*1 held horizontally by the outside the plates. Speaking of, the triangular plates holding these 1*1 are not connected to the rest of the outside plates at all. Instead, they’re connected directly to the overhang, which keeps the plate at that approximative angle.
But of course, the most important detail : the minifig hanging with its bare hands ! I knew from the start that I wanted it to be in that type of position, and the choice of purple holds came easily (it’s defining one of the hardest level for the bouldering center we usually go to). Of course, I wasn’t in possession of any purple piece a minifig could grab, because that would have been way to easy. So instead, I used magic science a trick, which you might have seen if you pay close attention to the hands of the fig. The 'trick' in question is that I managed to get my hands on a thin elastic thread, which is around the fig’s wrist in a loop, and then is stuck between the purple stud and the round grey tile — which, by the way, makes for the second worst type of holds in bouldering : rings — and since these pieces are on the second overhang, the rest of the thread is hidden, and not stuck between two plates, unlike what I did in my Carrion MOC, which tends to dealign pieces, which leads to broken MOCs (not the Carrion one because there’s too much tension for it to break), which I don’t want because this is meant to end up as a gift for someone I won’t be able to visit often to make maintenance, so it has to be sturdy (and it is !).

✨(Tiny) Agender pride flag✨
Want your flag to be made in Lego ? Simply ask (instructions can be provided if you ask nicely :} )
(See previous work here)
-
 thetruecommander-blog liked this · 5 months ago
 -
 obsidiandragongenderwhatgender liked this · 6 months ago
 -
 aeramisu liked this · 10 months ago
 -
 cosmicfanatic liked this · 10 months ago
 -
 veesjan liked this · 11 months ago
 -
 happyfreshvegatables reblogged this · 11 months ago
 -
happyfreshvegatables liked this · 11 months ago
-
 i-am-the-shadowstorm liked this · 11 months ago
 -
 antisocial-entomancer reblogged this · 11 months ago
 -
antisocial-entomancer liked this · 11 months ago
-
 tracey-cauchemar liked this · 11 months ago
 -
 riderdee reblogged this · 11 months ago
 -
riderdee liked this · 11 months ago
-
 thelegohobo liked this · 11 months ago
 -
 ffoxer reblogged this · 11 months ago
 -
 drscallywag liked this · 11 months ago
 -
 opercot liked this · 11 months ago
 -
 achi-baba-wbo reblogged this · 11 months ago
 -
achi-baba-wbo liked this · 11 months ago
-
 bat-anon liked this · 11 months ago
 -
 barbelo-babe liked this · 11 months ago
 -
 lyxert liked this · 11 months ago
 -
 mxballerrs liked this · 11 months ago
 -
 anasianfriend reblogged this · 11 months ago
 -
anasianfriend liked this · 11 months ago
-
 rampantmuffins liked this · 11 months ago
 -
 nickpeppermint liked this · 11 months ago
 -
 sundae-bestmatch reblogged this · 11 months ago
 -
sundae-bestmatch liked this · 11 months ago
-
 xehanxyz liked this · 11 months ago
 -
 mardrfish liked this · 11 months ago
 -
 sherriff-obrien-posting liked this · 11 months ago
 -
 ventxekart liked this · 11 months ago
 -
 gaelic-galpal reblogged this · 11 months ago
 -
 ham-and-cheese-studios reblogged this · 11 months ago
 -
ham-and-cheese-studios liked this · 11 months ago
-
 thewayofthebionicle reblogged this · 11 months ago
 -
 a-whole-lotta-bunkum liked this · 11 months ago
 -
 lee-the-yeen liked this · 11 months ago
 -
 furychromthereddeath13 liked this · 11 months ago
 -
 highevolutionary1106 liked this · 11 months ago
 -
 airworkswf liked this · 11 months ago
 -
 origsmocs reblogged this · 11 months ago
 -
 origulator liked this · 11 months ago
 -
 weedthestampede reblogged this · 11 months ago
 -
weedthestampede liked this · 11 months ago
-
 digitizedskeleton liked this · 11 months ago
 -
 sepublic liked this · 11 months ago
 -
 narnianwanderer reblogged this · 11 months ago
 -
narnianwanderer liked this · 11 months ago

They/them - AroaceLego MOCs and photography with a wide range of different characters and environments, every Wednesday (in theory-)
77 posts