✨I Made A Carrd✨
✨I made a carrd✨
A friend of mine said I could use it — they were right !
Essentially, I now have all of my published MOCs sorted by theme in a single place (as well as a few unpublished ones !)
Here it is : https://enteroctoups-darkysils.carrd.co/ !

It also feature some none-Lego photographs, too, feel free to take a look.
Small, unnecessary update bellow the cut :
I’m gonna have to remove the 'one post every Wednesday', for multiple reasons : firstly, I’m gonna start a long maths cursus which won’t leave me much time to build — or even to post; and, beside that, I’m running out of MOCs ! I still have a few, which I will probably work on and queue so that they appear semi-regularly. I received just earlier today part of the pieces I’ll need for my final(?) MOC. And it’s a big one. Well anyway, I’ll be off to work on it now ! Thanks for reading this far~
More Posts from Antrylis and Others
A tangent about hexagons
Because the project I’m working on brought it, I found it interesting, and I thought some people might need it.
So, as I’m working on a quite large project (hopefully done by next week, although I have doubts on that), and the base structure of it is more or less hexagonal. Anyway, here are some of my tips to get good hexagonal shapes.
The easiest way to do this is obviously with hinges and plates, like that :

While not necessarily accurate, it’s cheap and efficient, albeit squishy, and can be expanded to any size.
Instead, we can go the technical way, and use maths, by considering that a hexagon is the combination of 6 equilateral triangles. We end up with this :

Practically unbreakable, very stable, and can be made with as much technical bricks as possible, so it is easily expandable, but it’s harder to attach it to classic bricks.
So, none of these two designs are really good alone, whether on pure usability, or on durability. Alone, that is. Now, here is the fun part : thanks to the way Lego works…


…they work together ! And, with some modified 2*2 plates, they mostly hold to one another ! Isn’t that awesome ? What’s more is that, while I’m using 2*4 plates and a 7 holes technic bars, that also works with 2*6 and 11 holes bars, which is good.
Now, let’s apply this knowledge to make a solid prism with an hexagonal base :

By using a bunch of plate and two of these hexagonal bases, we get a hollow tube, which is solid through the hexagons, but can still break because of a diagonal force. To fix that, we need to add supports between the supports, like so :
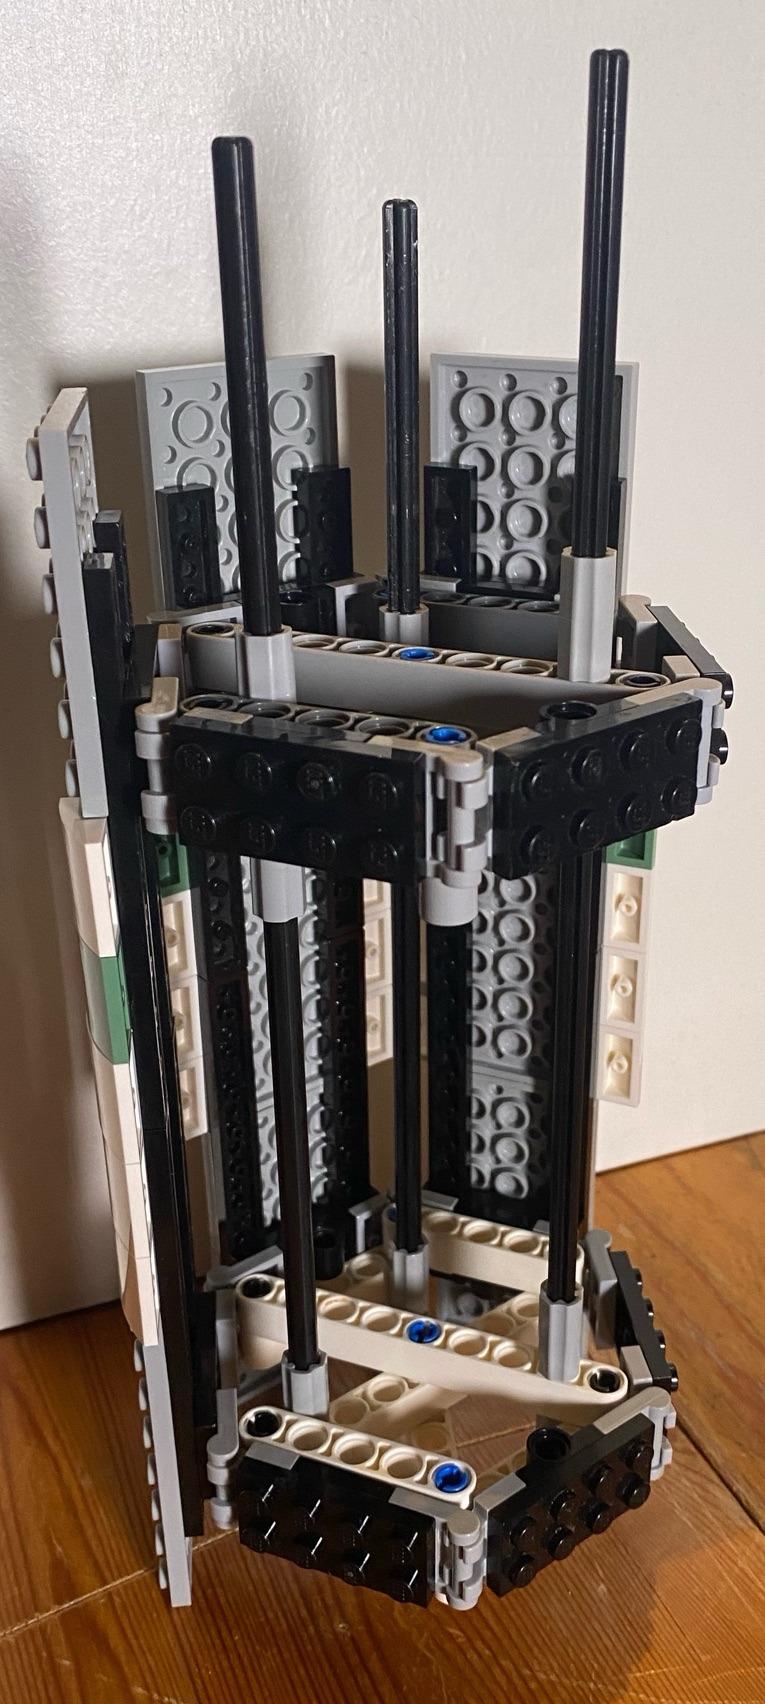
This also means that this design becomes stackable. Congrats, you made a long hexagon tube ! It can also be round, with the right modifications, notably with 2*2 curved tiles :

It fits perfectly, and it’s good to make solid near-circles !
Sorry for the photos’ quality !- They were taken quite late with my phone, and without proper lighting.

✨ Small lego diorama of some ARFs of the 91st ! ✨
This is of course from the Clone Wars — expect much more of these in the upcoming weeks, it’s one of my favourite themes :}
(Closeups, commentaries and complaints under the cut)


These trees are pretty experimental, I usually use classic leaves rather than plain plates, but these were interesting, and were a pretty fun challenge (I like making trees a lot, so there are usually some in most of my dioramas). This is supposedly based on Kashyyk, but most of the trees there are waaay too big for me; however I found some nice pieces for the roots (the large ones in the middle, which are not really visible, are using Lego Elves’ dragon horns; and there are also some old palm trees trunks, which are really awesome pieces to use.)
This is probably gonna be the only one for the 91st though, because I don’t have much more of these. The only other possibility of that would be Neyo’s execution of o66 (not fun~).
Also, the night effect on the closeups is due purely to one of my led lighting dying in my hands, which wasn’t exactly practical.

✨Clone wars Scuba trooper !✨
A like to make custom clones only using official pieces, here is a scuba (because lego did not give us a Monnk...)
It's not really complicated, although trying to get a DC-12U was far from easy. It's still a bit bulky but I like how it turned out (and one day, I'll try to have multiple of these to get a small underwater diorama, that would be lovely).


✨Bouldering wall !✨
I reeeally wanted to make one of these at some point, but never took time. Incidentally, I got commissioned — is it even a commission if it’s for a relative and I’m not paid ? — so there is is !
Closeups and details under the cut, of course !
Closeups :


So ! This was a lot of fun to make, with some really interesting techniques. The first thing is that overhang with an increasing angle at the top. A large part of it is just a big plate connected to the base by hinges, while the second part is connected to the first one, instead of the based, to make sure that when something break, everything break only attach one plate to the base, to provide a thin finition. The holds have nothing particular, except perhaps that some start 'in' the wall while some are on it, which is here to pretend there are micro holds — possibly the worst invention of the story of bouldering/j. The top layer of the wall is finished by 1*1 held horizontally by the outside the plates. Speaking of, the triangular plates holding these 1*1 are not connected to the rest of the outside plates at all. Instead, they’re connected directly to the overhang, which keeps the plate at that approximative angle.
But of course, the most important detail : the minifig hanging with its bare hands ! I knew from the start that I wanted it to be in that type of position, and the choice of purple holds came easily (it’s defining one of the hardest level for the bouldering center we usually go to). Of course, I wasn’t in possession of any purple piece a minifig could grab, because that would have been way to easy. So instead, I used magic science a trick, which you might have seen if you pay close attention to the hands of the fig. The 'trick' in question is that I managed to get my hands on a thin elastic thread, which is around the fig’s wrist in a loop, and then is stuck between the purple stud and the round grey tile — which, by the way, makes for the second worst type of holds in bouldering : rings — and since these pieces are on the second overhang, the rest of the thread is hidden, and not stuck between two plates, unlike what I did in my Carrion MOC, which tends to dealign pieces, which leads to broken MOCs (not the Carrion one because there’s too much tension for it to break), which I don’t want because this is meant to end up as a gift for someone I won’t be able to visit often to make maintenance, so it has to be sturdy (and it is !).

✨Christmas tree !✨
…Yes, it’s a very tall picture…So tall, in fact, that you can actually see the top of my shelf studio. I made this last year, and I think it’s about the time to showcase it, along with this year’s project, which I’ll post next week !
Fun fact : the top of the tree isn’t connected at all to the rest, it’s only held in place without any stud. I also couldn’t find a neat star for the top of the tree, so I opted for another shiny pointy thing instead-


✨Custom Bionicle !✨
Today (and next week, too) was a good excuse to get these out of their shelf and showcase them (and wipe the dust away, too.
These are my custom/modified Toa Ru-Fahi, which are a reeeally fun project.
Other angles and details under the cut !
Before going any further, I can’t not link this post, because I made the name of these customs out of it, and also because it’s just so good of a work. Just check it out.
Atuaga Ru-Fahi


The most custom of the ones I’ve made for this series, even if some might spot some inspiration from Kongu Mahri. It turned out to be more silver than black, but it nonetheless remains the Earth Toa. I’m quite happy of how it turned out, with the red accents to fit the weapons, and its overall shape. The contours of the body made with tubes are also something I had never done before. One of the techniques I use to get a thicker effect is to superpose two 'limb' pieces on top of each other; but I also have multiple usage of bohrok hand pieces to get rounder effets, with some texture.
The cable going through the mask is connected directly to the shoulders, and it has a purpose which will be explained somewhere underneath. Also, the Kanohi is Norik’s great Pehkui, which is probably one of the coolest of my (extensive) collection.
Gali Ru-Fahi


Have you recognised her ? Probably, I gave her name. Gali’s always been one of my favourites, so I had to include her. More specifically, this one is a modified version of Gali Mistika, because that whole set was already pretty good as is. Here again, probably went overboard with the silver pieces, but oh well. The tubes are connected to the top of the Kanohi, because there were already holes there. With this one, I used arm pieces to get the torso’s shape. The shoulder plates I have not touched, because they’re a nice unique part. The back piece is a Rahkshi’s foot (in shape, because there’s sadly no dark blue Rahkshi).
The weapons are just a long axe covered by a tube, and the heads are stolen from another Gali (the new gen ones).
Lore-wise, I don’t really have anything for these, except that this Toa team is made out of Toa from different teams (chosen arbitrarily for their look) and are fighting is space (hence the breathing tubes, which is the element I keep on all these customs (only two here, but I promise two more next week). If anyone has any idea, I’m open. Considering what else I’ve on my shelves, the bad guys could be giant bugs, but that’s as far as my ideas go.
See you next week :}

✨Yet another combat mech !✨
A bit of laziness here, I couldn’t bring myself to get proper pictures, so I got old ones from when one of my LEDs broke, hence the blueish lighting-
Lore and closeups below, and previous work here !
Mech closeups :


Pilot closeup :

Lore time (world explanation in previous works..) !
So, Scorcher (the mech) is terrifyingly large, next to most others, which is already impressive, but it’s also one of the most equipped ones on the field : large circular saw, flamethrower, integrated calculation computer, you named it. The only real weak point is the reservoir in the back, which is what the flamethrower is powered by, and it’s hard to reach because one has to get behind Scorcher to get it.
The pilot is well equipped too, with last gen holographic equipment and a powerful high resolution display helmet, under which he somehow manages to fit all his hair. But he’s not alone, since he also have an entire team behind him (called Dragon, for obvious reasons), which helps him during and outside of combats, making this make one of the bests there are.
Unrelated to the lore, the large dome used for the head falls off every time I try to move something. It may have plot armor in the lore, but in real life I think a fly could beat it. Most of these joints are rigid, except at the waist, which is a mistake I probably won’t make ever again, it’s terrible. I’m also glad I stole the arms of another minifig for this one, because it was quite bland with purely red arms.
Nice LEGO work! Glad to see MOCs are still shared by folks.
Thank you very much !
And as a proper answer, here is a little silly thing I made recently !
Still working on making it reliable, but’s a fun little project on the side of other things I have going on !

Here’s my take on a batch of custom Nexo Knights minifigs !
Closeups and thoughts under the cut
So, in no particular order, the closeups, with comments and comparisons with the actual characters from the original Lego theme (also, because of Tumblr’s image limits, I had to badly stitch together my pictures, sorry-)
1) Mace

Pretty cool one, and the only girl in the team in the original cast, who also happen to have troubles because her dad is the king. But eh, none of that here, so she get the cool cloak I assign to any cool red character I can find (yes, you’ll see it again many times in the future). The overall design is pretty nice (mostly this face, the other one on the brick is not as good; the printed armor, which is from season 4, is pretty nice, and does a nice job with the large dark piece (coming from later Hero Factory sets). The weapons are from the Chima theme (and so is the cloak !). The hairs are from the only Tron set, which should have been continued as whole theme but eh-
2) Axel

Stupid and muscular originally. Well, now he’s got a Large Axe (Bionicle) to stand to his name. The helmet is all Nexo, but with some custom brew of mine, and so is the shield. Also, the custom arm was possible because the large chest has a technic pin.
3) Clay(more)

Not room much modifications on the base character (s1). The sword is from a season four version of the character, the shield is homemade with some fun pieces I had lying around. The two arms are modified from the Ultimate set. …which I transformed in guns…Yeah.
4) Aaron

Green ! Always had a cooler weapon. The armor is from the mech set, the chest piece is from s3-4, the Google’s are from the Ultimate set, and the shoulder thingy is from Boba Fett. I kept the original shield with some added pieces, which is made to fly (like with the original al character) but changed the face to give him a more serious expression. The weapon is mostly from the original crossbow, with some nice twists (the beam on the first image is from a ninjago sword).
5) Lance Whatever their name is now

Really a bad character : rich, 'very pretty', egocentric. So, well…I took the armor and made an entire new one. I really like them, but it might be because it took an awful lot of time to figure out the weapon (transparent white piece similar to the green beam mentioned above). Armor-wise, it’s s1 body, with a grey pauldron (Clone Wars) and a light grey kama (…Also Clone Wars). The hairs are a really cool piece from a Ninjago set, and the head…Come from a City ski set. But the orange visor makes it work !
6) Never remembered the name of that one

Original character is a very smart kid with not much development in the show. Well, firstly I made him an adult (legs are from a black widow figure), and then I decided to push the technical side a little. So, full suit with crystal swords, which works ! Most pieces are actually from the theme, except the red dots (Ninjago again), the crystals in the back (Power Mine [really a cool theme !]), and the helmet (City firefighters + Ninjago…again). It was the first one I made, which made me do the others.
I might get them in a diorama at some point, to set them against the very many custom monsters from the same theme (which were already much cooler than the original minifigs). In fact, most of the theme was really cool, the two sad points are that it was discontinued, and the TV show was…Well, it didn’t push much sci-fi nor fantasy, so I had to do the job.
Now, with that post I have finally revealed my three favorites things to do with legos : Dioramas, Big Mechs, and Custom minifigures (plus any Clone Wars related stuff, but it’s probably just as much because of the fandom aspect as it is the Lego aspect). One day perhaps, I’ll get all three of these aspects in one epic scene, but I have no idea of how for now, so maybe later~

I realised I’ve posted quite a lot of my MOCs on this blog, but any of my more 'photographic' works, yet, so here’s one of the first I made (we don’t talk about previous attempts), which still works quite well, although there are some things I would do differently, were I to do this again.
My process, and other details, below :}
So. The process I used to get this effect is not a really complicated one, but it still offers a more or less good render at the end, which is nice.
The blue guy has nothing special, but the red one I made float, but how ? The answer is not telekinesis, but superposition. Take a look at the images below :


Left one is the original, with no special effect (and no cropping, to offer a larger view), while the right one is the same, without the red minifig. By taking both photos without changing the camera angle (which is a painful thing to do with a phone, I would not recommend), and with a simple image editor, I put the 'empty' image (right) on a layer under the image I want to modify, and simply erase the supports.
It is important to note that if the erased bit casts a shadow, it’s better to also remove it, to avoid weird effects (here, there are no shadows because of the light source).
I’m also using an old set of blue LEDs inserted directly into Lego bricks to get this foggy aspect at the top, and to get a darker aspect to the blade of the red minifig, though there is also a desk lamp above providing some proper light, of the whole thing would be blue.
Last interesting point, this technic is the same I’ve used for the blog’s banner (but with proper lighting, for once). One might even recognise that the background for the two pictures is the same, because black was easily findable and gives quite the dramatic effect. The banner is, in fact, only half of my picture. Since you’ve made it here, I’ll offer another tiny bit of it here, as a treat :}

(And yes, I stole the characters from Star Wars sets, gave them light sabres even if they’re not meant to have one, and also added one of my cool cloaks, and made them fight. Don’t you dare judge my poor choices.)
-
 nasthesilly liked this · 6 months ago
 -
 aeramisu liked this · 8 months ago
 -
 antrylis reblogged this · 11 months ago

They/them - AroaceLego MOCs and photography with a wide range of different characters and environments, every Wednesday (in theory-)
77 posts