✨ Small Lego Diorama Of Some ARFs Of The 91st ! ✨

✨ Small lego diorama of some ARFs of the 91st ! ✨
This is of course from the Clone Wars — expect much more of these in the upcoming weeks, it’s one of my favourite themes :}
(Closeups, commentaries and complaints under the cut)


These trees are pretty experimental, I usually use classic leaves rather than plain plates, but these were interesting, and were a pretty fun challenge (I like making trees a lot, so there are usually some in most of my dioramas). This is supposedly based on Kashyyk, but most of the trees there are waaay too big for me; however I found some nice pieces for the roots (the large ones in the middle, which are not really visible, are using Lego Elves’ dragon horns; and there are also some old palm trees trunks, which are really awesome pieces to use.)
This is probably gonna be the only one for the 91st though, because I don’t have much more of these. The only other possibility of that would be Neyo’s execution of o66 (not fun~).
Also, the night effect on the closeups is due purely to one of my led lighting dying in my hands, which wasn’t exactly practical.
More Posts from Antrylis and Others

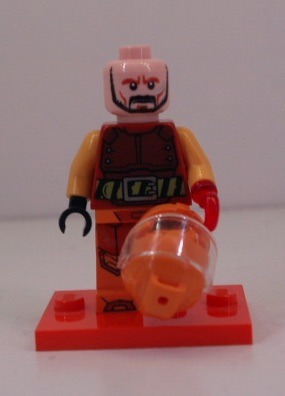
✨Quake and its pilot✨
Another one of my combat mechs ! (See previous here)
Same as last time, closeups and lore under the cut
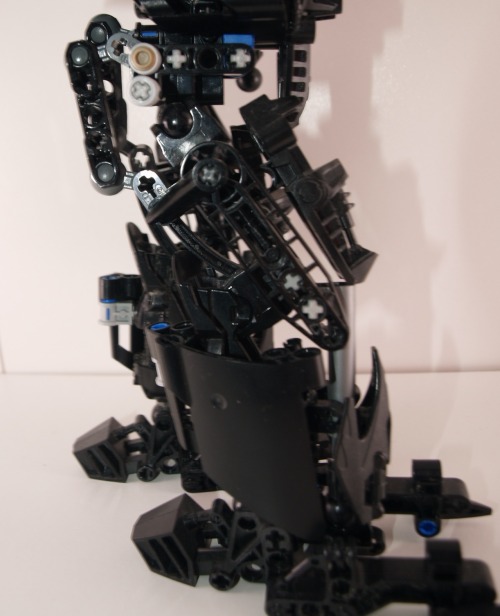
Mech closeups


Minifig closeup :
So, mech lore !
As I said in the previous post, mech battles happen some times after the third world war. Well, some of the veterans quickly took interest of this new sport, including today’s pilot. As you can see, sequels of the fights are still visible on his body, his hand being the most visible one. Of course, he could have had a normal hand, because it’s an easy thing, but he didn’t want to. He wanted to show what he had partook in, and this glowing hook was the coolest thing he found on the market.
At first, he didn’t really even watched mech fights, but eventually, some of his friends made during the war decided it would be fun to watch it together. And they enjoyed it. Enjoyed it so much, they decided they wanted to participate.
So, they did what any normal group of war veteran did : they looked for a place to scavenge spare parts and assemble a mech of their own, that would be out of the usual roaster of mark III and IV mechs. What they found was what was left of a large dig site, abandoned at some point in the past. Among the scraps, one of them found the large QUAKE panels. Probably the name of the company that used to be here. It would do the job.
It took some time for Quake to get into large-scale tournaments, because it usually fell apart quickly. With some experience, the team managed to get it in a usable state, and when it didn’t break down, the mech was doing some heavy damages. Don’t trust the electric panel on its back, it’s entirely coal-fuelled (coal which was provided by the dig site) and Quake is probably one of the only mechs powered by a thermal engine, but it gives it a powerful advantage : as long as it’s fuelled, it can deliver extremely powerful blows with its large arms, as well as it can withstand powerful attacks (that’s what the shoulder plates are for). With this mining equipment, Quake, after it began to be known, made itself quite of a name in the arena.
That’s it for this one, the next competitor, named Quetza, will be introduced next week :}
Also, I’m trying an old camera of mine to take pictures, because the lighting is better, although it’s less flexible than my phone’s. I’m still trying to get a good feeling as to what I’m preferring.
Random interesting thing to notice about the build itself : All articulations have different kinds of joints : bionicle ball-joints for the arms, technic pin for the hips, small ball joints to connect the legs and the body, old technic joints for the knees, and simple handle joints for the feet. It was accidental, but I think it fits well with the history of the mech.

✨Space ships (and hangars, too !) !✨
(Or, last post for the space station)
<Previous< [4/4]
Under the cut are closeups of (practically) all ships and hangar from the station !
Before anything, the third post is somehow completely gone, even if I do have proofs that I did do it. Well, it was already posted late, and I don’t have the courage to do it again — and it’s not like people would care much anyway, so how this station is holding up will remain a mystery~
Anyway, closeups.
Hangars (groupes by similarities)


This first batch here contains the 'empty' hangars. Left is meant to be a closing/opening hangar, which I usually keep in the back because it's not the most interesting one; while the right one is the bare hangar. There are two of these across the ring, in which I sometimes pluck a ship, though it's hard to keep them in place because of the station's inclination.


Next is a batch of random boxes and other scifi-y grates and boxes. To keep the boxes in place, I use modified 1*1 bricks (because the floor is is made of horizontal pieces, aligned with the outer tiles). Minor variation are present in the middle hangar, where a third of the floor is composed of 1*2 modified bricks to add a tiny bit of texturing. While these might a tad repetitive displayed like above, they actually are separated by three other different hangars, so the repetition is barely visible.


A bit similar to the previous ones, these have (in my opinion) more interesting details. Left is two racks of large barrels, supposedly fuel. Middle had another barrel (made with flowers pieces) and a yellow cable, which was surprisingly hard to add because it pushed the back plate (which holds a lot of the hangar together). The last one is a stack of long crates, and an observation deck (I'm guessing the original sticker comes from a small star destroyer).


Last batch, and probably the best of all, the containers (scaling from not too crowded to very crowded). These are the same size as the big ship's. There are very few attachment points to the ground, as most of them are held by other containers above or bellow, although the middle hangar had two modified 1*4 bricks in the floor. The original plan was to get them all aligned, but it looked terrible, so I went for this more haphazard placement, which works better.
Ships


These first two are the smallest of my little fleet. The top one is two 2*1 plates held by black 1*1 mod plates. It's small, it's smooth, and it works quite well with the station. I'm probably gonna make other of these in different colours someday.
The next is one of the first I made, using some shiny pieces. The two chromatic studs on the reactors are differently shades of chroma silver on purpose because this is meant to be a much older ship (compared to other most of the other, smoother ships).


This is a much larger one. More of a military design, I mostly played with angles on that one (and added big reactors for fun purposes). The transparent light blue used here is the same as the fuel barrels of the station, and are the most used on the ships I have. Lore would say it's because it's the most common fuel used in the universe; pragmatism would say it's because it's the most common transparent colour in my boxes.


More blue reactors ! The top one is my one of my favorite. Only 7 pieces, including an old aquaraiders piece which I had to use as a ship the moment I found it. It's simply ship-shapes ! Given the colours, you could imagine it's an old model (not as old as the small one). The bottom one is a very thin one, with a Y piece which can allow for many cool shapes (like this one) !


Weird alien ships ! The first one is curvy~~ It's a nice concept which is quite common, but I really like the idea, and thus made one. Notice the green reactor this time, because alien fuel. Next one is more organic (or at least trying to), using mostly car pieces (and an orange reactor, wew !). It's also quite compact, with a single mod 1*1 brick as the core. The final one is by far my favorite (and not only because it has a purple trail). While hard to because of my lighting, the three main parts of the ship are separated by clear studs. I originally made it without the in-between studs, but then it fell the the floor, broke, and separated, and it looked much more futuristic. Consider this a very advanced ship of a peaceful species, or something like that.

✨Clone wars Scuba trooper !✨
A like to make custom clones only using official pieces, here is a scuba (because lego did not give us a Monnk...)
It's not really complicated, although trying to get a DC-12U was far from easy. It's still a bit bulky but I like how it turned out (and one day, I'll try to have multiple of these to get a small underwater diorama, that would be lovely).


✨Tragon !✨
Trans...dragon..It's funny, right ?- Also, I know it's a wyvern...Dragon sounds better...
It's pride month, so it was the perfect occasion to finally make a dragon, yay ! It's also my first time making something akin to a dragon (technically the second time,, but the first one is truly horrible), and even if the proportion are still a bit out of place, it could have been worse. It's also my first time doing custom wings, but I'll talk about that in more details beneath :}
Also, it needs a name ! I’m really bad with names, but I would gladly take suggestions ! (And here is an alt picture, in its natural habitat-)

Anyways, details/closeups under the cut !
None of these picture below are edited, because it's exam period- Enjoy the green backgrounds :}

I have to say, before any other comment, that I made the body way to heavy for the two poor sockets of the legs. The position above is the only one where it's actually standing upright. Also, my stock of pink and rightly-shaded blue was much smaller than originally anticipated, so I would have done a bunch of tings differently, if it wasn't for that. Still, I was lucky to have that many curved blue pieces for the top part. Well, all of the ones with purple diamonds on them have been forcefully taken from a small Elves dragon, but it was worth it (I also really enjoy the purple here, it contrasts nicely).
All of the joints are mixel socket joints, except for the knees, which are just hinges. It gives a lot of movements, from the tail to the jaw. Even if these are limited, it gives it a wide range of positions (even if, realistically, it won’t change it much from the one I gave it). Still, it can sit ! (Including small trans flag)

The pointy scales on the back are some of the only elements which aren’t directly attacked to the body : one 2*2 plate holds them down, and a modified 2*1 under the plates keeps it from sliding in any other direction, so even with little connections, it doesn’t budge. I really liked these angular pieces. To keep them from being too repetitive, they are only connected to each other by one stud, with a small angle, which gives them a slightly "round" effect.

The tail here is not really complicated, it's just a bunch of socket joints linked together with curved tiles on top (one of the sticker is backward, and it's unnerving, but it's not my fault and I can't risk changing it...), with white arch pieces underneath. Not sure of why I added these in the first place, but it looks cool. And of course, the end of the tail is a big heart, because it simply fits the vibe, doesn't it?
Of course, I can't forget what is the most important, and what makes this creature as cute as it is ! (It is cute, and if that is the hill I have to die on, I will.)


The green background doesn't show it well, but the flame offers a good contrats with the rest of the head, and brings the eyes there first (instead of all the mistakes present). Because there are a bunch of these.
I spent nearly as long on the head as all the other body parts cumulated (except for the wings), because making something detailed yet small enough to be a good head is tough. I actually started from the top (for the piece with the sticker, more exactly), instead of the bottom, like I usually do, in order to get an idea of scale (because I already knew I wanted the jaw to move, and for that I needed to see how big it would be). Then, I did the back to quickly have a neck connection point, to see if it would fit. Because the neck is larger under the connection sockets, the socket of the head is actually pretty high up, but the colours are practically aligned so it works well.
Then, the next thing was the eyes and the spikes. The spikes took me a hile to figure out, because without the rest of the head, they looked kinda dumb, but it does bring the head together when everything is in place. Then the eyes : on the small dragon I took apart, there were these blue tooth pieces which I used to get some texture above them, so that they don't look flat, and then, I connected them to the center connectors of a 2*4 plates. That works well in placement, but I ran into the issue of what would be around. If I didn't do anything, there would be two gaps, which would look terrible. Instead, I stuck two 1*4 tiles in these gaps, and since the tooth pieces are around either side, they don't move - well, not much, they still produce a shaking sound when I'm moving the head.
Then under these plates, I directly have 1*4 pink bricks, which stick out behind the head. At first, it was a problem, and I had nothing else to replace them; but they actually restrict and hold the neck, so that even if the head is technically a bit too heavy, it remains in place.
The actual teeth are modified 2*1 plates, four at the top and four at the bottom. To keep them with such a small gap (and to attach them to either sides of the jaw) I have use modified 1*1 plates with a ring. There is a single one at the bottom, and then underneath a few cut 2*1 and 2*2 curved tiles to make the jaw triangular; and two on top, one which connects it to the head and one with holds the snout (which is using a cheese piece and another one of the blue tooth).
So, custom wings ! It isn't actually complicated, if only a bit tedious. Here below is all that I needed to make them :

As you can see, it's not much. Most important, of course, is a good, solid sheet of paper, and a cutter (precision cutter is better, in my opinion, but anything works). To make things easy (or if, like me, you don't know how to draw properly), you can take a basic lego wing, and trace the outline and where the holes go. I would advise only doing a single, blank one, at first. Once you have your proto-wing, you can start to make the actual frame it will be attached on. I chose to use bricks above it to act as claws, but you can use socket joints, like in most sets. The advantage of using plates is that the overall look is better, but if you want overhangs like I did, you have to get the holes really close to the edge of the wing.
Once you have your frame, trace where the holes would go on it ! (if you used a wing model, it might be easier, but it could also not fit, which is why you make a prototype first). To make holes just the right size, I would advise first cutting squares (easier than circles) at just the right size, then scratching the edges with the blade of the cutter. Once it looks good, try to fit an axle inside. If it just about fits, and can rotate, it's good ! Otherwise, just remove it and scratch again.
When that's done, test if it can correctly fit on your frame. Once that's done, you can either make two wings with that pattern, or simply make another copy. I personally made two new from my first prototype because it took me a while to figure out exactly how to place the holes.
Finally, once you got two wings, you can finally add whatever you want on them (easier when they're not actually on the frame, although that should've been obvious), and you're done :}

I went for a really basic thing, but technically, any shape is possible. I'll likely use it again someday, because it's quite fun !
And of course, the bonus picture, since you’re here ! I like the symbolic of this (also don’t pay attention to the tentacles).

I actually really wanted to get rid of this castle (which was gifted, not exactly desired, although I must admit it’s really well designed), and well. Now, it’s gone, and in its place lies the dragon…and my horrendous crab, too.

✨Trade space station !✨
<Previous< [2/4] >Next>
Today’s gonna be about the progress of the build in time, which allows me to ramble about the building process. Yay !

Before actually commenting the build. You may notice chocolate and my (empty) tea mug. They should be apparent in most of the earliest pictures (there was not enough space on the table for them at the end of the project, sadly~
So, here, you can see that my first step was to see the scale of my project. The template of the large ring to see how much space it would take, and the small ring to see how round I could make it (and at the bottom, you can see the white curved pieces. Enjoy this view, it won’t last.)
You can also notice above that I already stared making some small ships.

The next day ! You can see on the left my long rod. This was the ideal height for the central cylinder. I also created the first core of the build (replaced later because too fragile), and the first arms to hold the ring (too fragile too).

Progress ! This is the moment I realised my original color scheme would not work (you can see orange and bright green on the side, which I tried before the sand green).
I had half of the big cylinder added (you can see the slots left for the additional details) and another naked half on the right side. And my collection of boxes on the table is growing. It’s only getting worse after that.

See ? More boxes (and pieces) scattered all around. And a hammer, too. I at this point mostly finished the big cylinder (or so I thought, some reinforcements were necessary), started the smaller cylinder, and realised white pieces were running out. I also still haven’t touch the ring yet, as I wanted to stay focused on one bit.

Mostly done with the cylinders at the point (you can even see the start of the smallest one on the right side). Agin the boxes grow ominously.
Since it was time to start the ring, I created a replica of a sixth of it. Given that there were twelve sections, I wanted to be sure of the design before starting to build them all, starting with the facade. It took some fiddling around (you can see these aren’t symmetrical, as I was trying out different designs). Really, if you have this kind of things to do, try to make it in a vacuum first, you’ll gain a lot of time later, once the prototype has every problem answered (mine were mostly the curve, and the link between each plates (solved with mod 1*2 black plates).

See ? After the prototype was done, I simply built all of the facades and attached them (you can see my 1*4 curved pieces were all missing at the time though).
I kept the prototype on the side, because I’ll still need it later. I also am missing half of the ring (the part above, since there is only a structure below), because I was not sure of how everything would fit, and I waited until these parts were assembled before making it, in case adjustments were needed.

Here is the top part ! And all the hangars done, too. It took me a surprising amount of time to do all twelve of them…

Huge progress ! There is no more room on the table for the boxes, but you can see them…on the floor, on the left…Lot was done, from the bottom cylinder now finished along with its ring, the covering pieces of the big ring (except the internal faces), the hat of the station, and a huge reinforcement for the six arms, which was done separately). At this point, except for a few details, the station itself is finished.

And there is a picture taken moments before disaster. The station is done (ignoring the transitions between cylinders) the arm…supposedly, too.
Sadly, the arm wasn’t, in fact, finished. If you read the first post, you will notice it isn’t as bulky, and isn’t attached on baseplates yet.
Well, guess what ? When I finally tried to see if the arm would hold onto the station, it broke. Rather, two pieces broke, then the rest came down, and so did the station, which shattered on the floor below. Luckily for me, the main cylinder was so dense it practically completely survived. Most of the hangars of the rings only broke section per section, so it only took a few hours to get it back together, but much more time to make the arm solid. And now, it can hold the station for ten hours without flinching ! So, here is a lesson. If something you do fails when you do it with your heart, let the rage flow through you and build it back out of spite. It works* !
*don’t hold me accountable for any failure using that method


✨Custom earth Toa !✨
It’s spiky ! And we’re now at 5/6 !
More below !
Front/back :


He’s spiky ! Some might have already noticed I took for base the old Von Nebula set, because I acquired it recently and it worked well, plus the joints are interesting. Pretty much everything else was change, though I kept the mask, sphere, and spiky plates. These were nice, and even if stone colours are usually black and purple, but blue works well too.
I relocated the sphere directly in the thorax so that it looks like some kind of core. The back is mostly composed of two large car pieces.
The hands are using black pieces to make them larger, which works well with the blue blades (which supposedly come from either Chima or Hero Factory, I can’t remember).
Leg :
Another type of Bohrok piece to act as feet ? Yes. These are the head pieces, and they work well with a classic foot as a back piece. The piston in the leg was there originally, but I covered it with these large technic panels and some other technic pieces.
There is also an interesting mechanism to stop the legs from doing too odd moves on top, which can have some interesting applications. Here, I’m wondering about removing them to gain a larger range of movements though.
Head :

Kept the original mask and teeth, but with a cable and a spider’s claw to elongate it.
This picture also allows for a clear view of how much dust has accumulated. Don’t judge me, these are on a top shelf which isn’t the easiest to clean…
Also, my project is now finished (officially) ! I went to a small exhibition with it this weekend actually, and…a recruiter from a much larger exhibition found it good enough to offer me a place next month (I’ll post it here once the bionicle series is done) ! I also brought some of my pride flags, which seemed to be doing their effect, so I’ll bring more next time. So overall, yay !

✨Geonosis !✨
Ah, Geonosis. What a terrible place. But it’s aesthetically pleasing, so I did it anyway. And it was a good excuse to use the movie-accurate minfigs (a commander, a sergeant, and three shinies. I have a lot of other commanders, but I’ll figure what to do with them later).
Since I didn’t have much of these orange bricks, so most of them are sideways, with some modified bricks to keep the clones in place. Also, the bottom of the first spike is an old bionicle part I thought I’d never use, but it did a good job here.
Ah, I knew a special occasion would present itself that would be worthy of this cat !
Get booped
Get booped back ! Ah !
Oh, and have an actual (Lego) cat while I’m at it !


✨Brick separators !✨
Run, they have teeth now !
This is a silly project I did ages ago; given that I've officially been posting for a year straight each week (ignoring my disappearing space station post, ahem), I thought it would be nice to post that little guy whose view welcomes me every morning.
And, sure, it's not my finest work, by far, albeit I could go on a rant about the many fun technics I used (look at the horn !). But that's alright !Why ? Because the main goal of legos is not to build extravagant looking buildings, or ships, and landscapes. I don't even need to give a profound answer to what it's meant to be; everything is in the title :
"The name 'LEGO' is an abbreviation of the two Danish words “leg godt”, meaning “play well”. It's our name and it's our ideal." - Lego.com 'About Us' page
In the end, it's just a toy, and what you build with it is not important, as long as you had fun making it ! The pieces I enjoy the most are the one that come to me as a vision that I develop, and I appreciate them much better than some of my (arguably better) commissions I get (because, yes, that somehow happens), because commissions are not spontaneous.
The morale of the story, I guess, is that you don't have to hesitate if you want to build something, no matter how silly it is, no matter it's your first or hundredth moc; and you should be proud of it, no matter how it turns out, if you had fun with it.
-
 sad-melted-sapphic liked this · 1 year ago
 -
 starinthegarden liked this · 1 year ago
 -
 aeramisu liked this · 1 year ago
 -
 antrylis reblogged this · 1 year ago

They/them - AroaceLego MOCs and photography with a wide range of different characters and environments, every Wednesday (in theory-)
77 posts