A Tangent About Hexagons
A tangent about hexagons
Because the project I’m working on brought it, I found it interesting, and I thought some people might need it.
So, as I’m working on a quite large project (hopefully done by next week, although I have doubts on that), and the base structure of it is more or less hexagonal. Anyway, here are some of my tips to get good hexagonal shapes.
The easiest way to do this is obviously with hinges and plates, like that :

While not necessarily accurate, it’s cheap and efficient, albeit squishy, and can be expanded to any size.
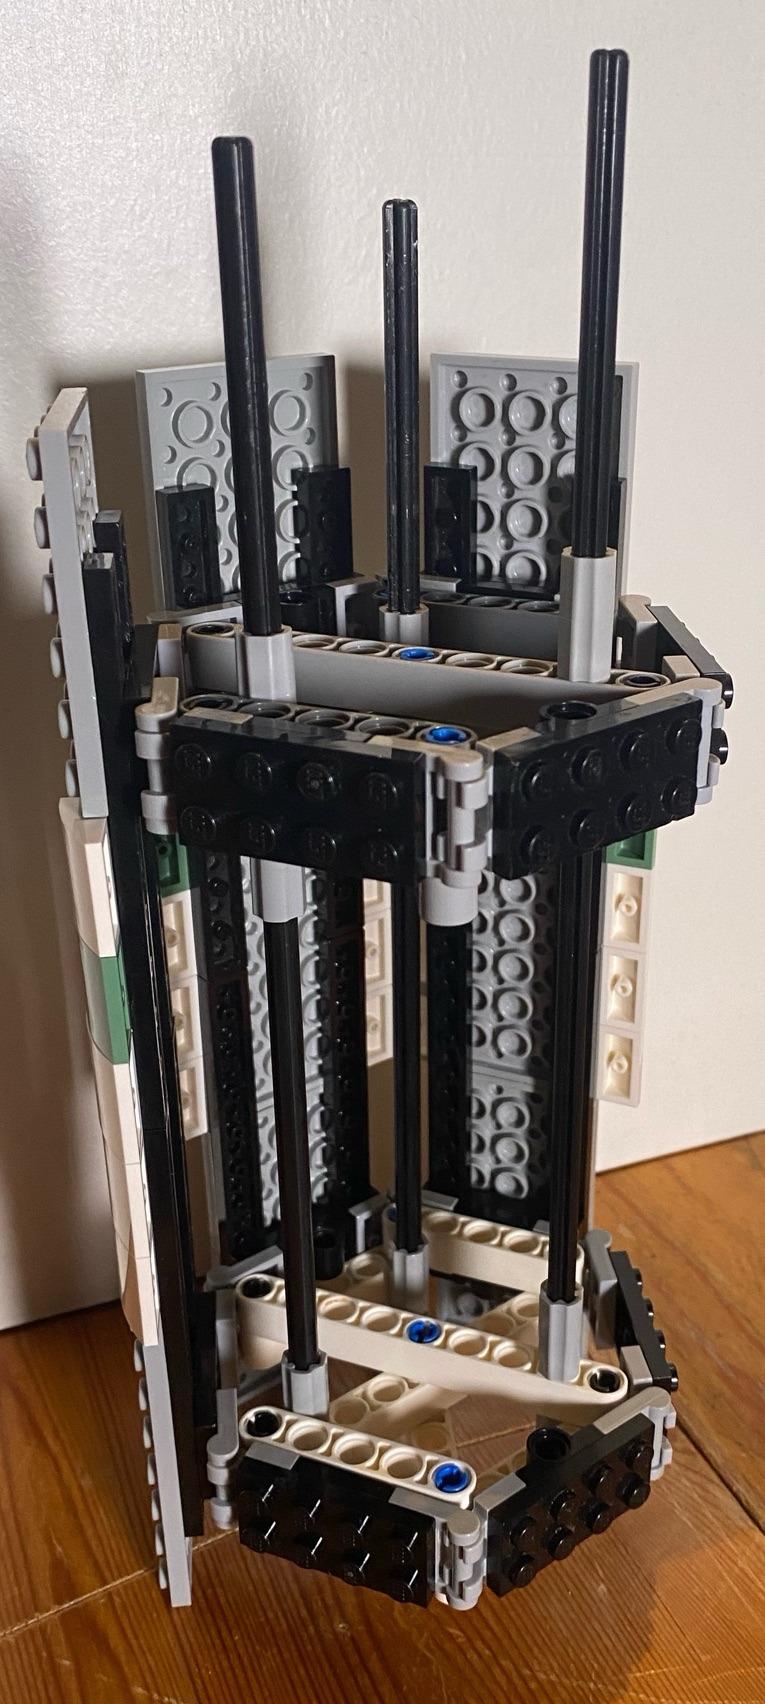
Instead, we can go the technical way, and use maths, by considering that a hexagon is the combination of 6 equilateral triangles. We end up with this :

Practically unbreakable, very stable, and can be made with as much technical bricks as possible, so it is easily expandable, but it’s harder to attach it to classic bricks.
So, none of these two designs are really good alone, whether on pure usability, or on durability. Alone, that is. Now, here is the fun part : thanks to the way Lego works…


…they work together ! And, with some modified 2*2 plates, they mostly hold to one another ! Isn’t that awesome ? What’s more is that, while I’m using 2*4 plates and a 7 holes technic bars, that also works with 2*6 and 11 holes bars, which is good.
Now, let’s apply this knowledge to make a solid prism with an hexagonal base :

By using a bunch of plate and two of these hexagonal bases, we get a hollow tube, which is solid through the hexagons, but can still break because of a diagonal force. To fix that, we need to add supports between the supports, like so :
This also means that this design becomes stackable. Congrats, you made a long hexagon tube ! It can also be round, with the right modifications, notably with 2*2 curved tiles :

It fits perfectly, and it’s good to make solid near-circles !
Sorry for the photos’ quality !- They were taken quite late with my phone, and without proper lighting.
More Posts from Antrylis and Others

✨Progress pride flag !✨
Yay ! Finally some colours ! This was definitely trickier to do, compared to all the other ones, because of the triangles, but I like how it looks !
See previous here.

✨Snowman !✨
Couldn’t miss this year’s Christmas-themed MOC, of course ! Although it certainly is way less 'christmasy' than the previous ones (here and here) and more of a general winter decoration, it fits well.
There’s not a lot of technical work here, the spheres are classic designs which I tweaked a little, the arms are quite simple, the scarf has nothing complicated either; the only interesting bit might be the hat, because I used a really old technic piece — can’t find its id on bricklink… — with some other gears and such.
Anyway, merry Christmas to those who celebrate, and good day to everyone else !
Also, sorry for the terrible pic quality, I don’t have any proper set up; and I know I have a few things sitting in my inbox, I’ll get to it I swear.

✨ Small lego diorama of some ARFs of the 91st ! ✨
This is of course from the Clone Wars — expect much more of these in the upcoming weeks, it’s one of my favourite themes :}
(Closeups, commentaries and complaints under the cut)


These trees are pretty experimental, I usually use classic leaves rather than plain plates, but these were interesting, and were a pretty fun challenge (I like making trees a lot, so there are usually some in most of my dioramas). This is supposedly based on Kashyyk, but most of the trees there are waaay too big for me; however I found some nice pieces for the roots (the large ones in the middle, which are not really visible, are using Lego Elves’ dragon horns; and there are also some old palm trees trunks, which are really awesome pieces to use.)
This is probably gonna be the only one for the 91st though, because I don’t have much more of these. The only other possibility of that would be Neyo’s execution of o66 (not fun~).
Also, the night effect on the closeups is due purely to one of my led lighting dying in my hands, which wasn’t exactly practical.

✨More Clones Brickheadz !✨
Since I acquired the Small Cody (40675), I found that there was an untapped mine. Why would they only make one ? Well. I don't have an answer to that, but I decided to take matters into my own one; so behold : 11 more. I went mostly for commanders here, but then I went a bit astray and so I added some captains to the mix.
In order, row by row :
Tukk (Not cannon but the colours are so beautiful)/Vaungh (died too soon-)/Rex (obviously)/Fordo (I did Rex, so I had to)
Gree/Doom/Thorn/Neyo
Bly/Cody/Fox/Wolffe
It was a really fun project, and I hope to do more of them in the future - maybe even phase 1s, some day~); supposedly not commanders because I did most of them (except Bacara, I know...The helmet was too tough).
And because I really like challenges, if you want to see another clone turned into one of these (Be it cannon or one of your ocs) feel free to send requests in my aksbox !)
Anyway this post is already far too long for anyone's dashboard, so closeups and details will be under the cut !
Let's start with the easy ones : Cody, Doom, Fox, Thorn


Obviously, Cody was easy, I just rebuilt the original one virtually - Nothing too hard. The printed pieces here are not the right ones, because Cody's are not available on STUDio yet, but the storm trooper ones were relatively similar, so I used these for most of these models. Of course, it means I'm lacking the sun bands, and a few other distinctive elements, but it works well enough for now.
Now, Doom is essentially a colour variation (minus a few antennas). I also used an old space piece, which has this big yellow arrow printed on it. I's not exactly what Doom has, but I feel like it's close enough for a first attempt.
Then, Fox is relatively similar to Doom, but with two DC-17s. I also moved the printed torso brick up to get that red line he has.
Thorn works in a similar way to Cody too, except I removed both accessories on the side of the helmet. I also added this tile with diagonal lines to figure the wings he has. One day I'll slap some real wings on there, but I haven't found the right image yet. I also gave him a Z-6, obviously. I really like it, so I might actually make that one physically, because the way it's build (with old binocular pieces) is pretty nice; although I doubt the pieces are available in black.
Moving on to two captains : Vaughn and Tukk !


Admittedly, not really that different either, except for one thing : I learnt to do custom prints now ! Yay ! Well, these are really basic : the blue line for Vaughn, and some trapezoids for Tukk's helmet (which are, indeed, not visible here - shame, I spent so long making these fit). The Ahsoka pattern was already in STUDio (because Ahsoka already has her own brickheadz, which I'll get my hands on someday~)
I must also add that having some cyan in this whole thing added some much needed colours in here, I'm grateful some people give their clones amazing colours (If somehow someone doesn't know who Tukk is, well just check High Ground Animation. Right now. It's really cool, trust me). Anyway.
As for design changes, I modified the faces slightly by adding 1x1 tiles, to allow for different colours variations on the face. It makes them look slightly blockier, but given the overall size of the head, it doesn't do much.
I also gave Vaughn a DC-15A. It's a bit messy, but it works out well enough. Past me forgot to render it, so here is a raw, in-software picture of it (from Fordo(s hand, but it's the same design for both) :

BARC helmets ? Wolffe, Fordo, Neyo


As I've been told, these look a bit wonky, and I'll admit its wasn't exactly easy, but in my defence, it's relatively hard to get such round shapes with bricks (lego cheated by adding the visor). Anyway, given that doing that with a printed piece was out of the question, I tried to replicate the filter's shape with actual bricks, and I used a printed piece which, technically, is Lando's moustache, but downward. I'd say it does the job relatively well.
I also added a rangefinder to Wolffe, which is a little big compared to everyone else's antennas, but It's still relatively to scale with the head itself. No custom prints for him (not sure where I would find the correct pattern images ?), but I've done it for Fordo and Neyo. Fordo obviously has his well deserved Jaig eyes (and who knew it would be that difficult to find a picture of that on internet ?), and Neyo has his symbol on the helmet, chest plate, and the shoulder not shown here.
The really tinkered ones : Gree, Bly, Rex :


Here, it was a matter of trials and errors to figure out just how to get the shapes right.
I actually started with Bly, by removing the previous visor and adding the macrobinoculars first, then I tried to shape the helmet around. Truth is, it doesn't make sense technically : the two separated parts of the helmet do not connected at all, if you remove the equipment. Luckily, no one has to know that.
Next is Gree. It took me some time to figure out how to properly get a round feel, but I feel like it's as good as I can make it like this. Colour-wise, it was surprisingly difficult to find how to balance the different shades of green, and equally hard was to figure out which silvery colour would render well in STUDio. The answer lied, as it always does, in Bionicle. Of course, none of these pieces exist in this colour, but it's not really my main problem (because none of the coloured printed pieces exist either).
Finally, Rex...He gave me some trouble, I have to admit. Firstly, the part-designing software decided to have some trouble with custom prints, which was problematic, because I simply couldn't do Rex without jaig eyes (and Fordo already had his). Then, I started with Gree's base and tried to go from there to fit Rex's custom helmet. I ended up using Boba Fett's printed visor piece for Rex, because these were all triangles. I also got rid of the printed chest piece and used some black plates to simulate the pouch he has; while also adding a a few more custom printed pieces for the arms and pauldron (barely visible, but they're here. I'm not entirely happy with it, but I don't see much other solutions than more and more custom prints, which isn't my goal, so it'll stay like that for now.
Anyway, that's way too much rambling for one post, so I'll just end by saying that next week I'll post an alt version of this whole build [here !], with some 'slight' colour alterations. Definitely nothing big.

Following in my pride flag series :
✨Ace pride flag✨
(Previous work here !)


✨Custom bionicle (again) !✨
Two more from my Ru-Fahi series !
Details and rambling below !
Jaller Ru-Fahi


…Because I couldn’t not include him. Realistically, all Toa Mahri a good to some extent, but this is peak Toa material right here. One of the first I acquired, one of the best looking ones, too. The base body is practically the same as the original, with some twists, but I mostly made him thicker and upgraded his sword, which is better with a guard and a proper handle. Well, that, and the Hannah, obviously. Sure, the original one was cute, but here me out :


Look at it, and behold ! It might be slightly bigger than the original, have only four legs, and need a larger chain (which I found just earlier in a box of misc Hero Factory pieces, and is better than a basic Lego chain), but doesn’t it look very cute and wholesome and dangerous ? Also, I gave it actual joints, because it deserves it, and removed the Kordak blaster because it didn’t need it anymore. I really love making arthropods with bionicle (I have more for later~).
Pohatu Ru-Fahi


Definitely looks awesome. The original is Pohatu Phantoka from the Rockoh T3 set (because I have one and a half of this set). It is the coolest version of Pohatu (because orange>brown, obviously). Lot of modifications on that one, from the custom jet pack to the arms and the legs. The arc pieces for the front arms are more or less of placeholders because I was niece a good piece to make the arms larger, but it turned out alright. The blades are also stolen from the half Rockoh, and the piece underneath, if anyone recognises it, is from Pohatu Nuva, because it’s a neat reference. And the tube is somehow remaining in the Kanohi, despot the fact that there is not any proper connection for it tand hold onto.

Also, can we talk about this leg ? If you ignore how incredibly illegal this whole piece is (ball joint stuck by the light grey part and small black and grey piece not completely connected to the rest), I think that’s the best shape I managed to get so far, and it reflects nicely what I have envisioned (Pohatu being able to run/jump easily because of the shape). And, it had the added advantage of fitting perfectly with the orange piece above when the knee bends.
Last but not least, I also have started a potential candidate for Toa of air, despite a lack of proper Kanohi, even with my extensive collection. My first candidate would have been Lewa Phantoka from the Axalara T9, but this one has a special place in my heart, so won’t be touching it and it will proudly remain in his shelf (along with the untouched Pohatu). So, maybe another of this series soon ! But probably not. And if I miss posting custom bionicle too much, I have a (complete) collection of entirely custom Toa, but I’m afraid they won’t fit in my studio (they’re big, too big).

✨Small theatre !✨
A small but really fun build made for a relative’s birthday.
While there isn’t much to mention build-wise, a few details are interesting :


Firstly, I managed to get the effect of multiple curtains in a row by making 'banners' which are directly connected to the ground.
The base is partially empty, and behind the gold details are 1*4 black tiles on snots which give a pretty nice black aspect (although now that I think back on it, 1*4 bricks would have done the job.
Finally, the floor is a single, large door from a castle set ! I really like the way it’s shaped and likely will reuse that technic again someday.

✨41st Recon Squad Camp Site ! ✨
Closeups and other stuffs under the cut !
Backside :

Right scene closeup :


Campfire scene closeup :


Tomb scene closeup :


And finally, my personal favourite :

New lights, new camera settings, and a larger space…because this one didn’t fit the other one…Indeed, using shelves as a photo studio is not my brightest idea, but in my defence, it works.
This MOC has entirely been made because of the camouflage cloak I found in the bottom of a box. I don’t know where it’s from, but it looked very cool with that particular trooper, and thus I needed to show it off.
It was also helped because the large amount of olive green plants I received recently (those that are all over the place).
I tried something new, which is that I have not a rectangular base, but rather, three trapezoidal ones linked together to play with the shapes a little. Some parts were a pain to link together, but some tricks can help with that. The crates, for instance, are on top of a hole I couldn’t fill because of the odd shape.
The tombstone was actually the best idea I could get because I’m missing a trooper torso ! I can’t find it, and a pair of legs and a helmet are all I have left, and I might have watched Tales of the Jedi again recently, so that ended up being here.
The tent itself is made thanks to a fun discovery of mine, combining nets and my recent shipment of plants. I put a plant every three holes, in one line, and continue the pattern diagonally. In the back, to hold them in place, I used 1/2 technic bushes, which are quite convenient. And of course, this part is not connected to the poles at all, I case I want to add something in the tent.
Finally, some will notice the main incoherence of the thing : all the smaller wooden poles (tent and fire pit) are not birch-coloured. That’s mainly because finding the good pieces would have been a terrible hassle, and also because the campfire would really look weird in white.
Also, I might have spent an entire night on these trees to find what the colour balance and shape would look the more natural, I hope these are good.

✨ Custom AT-TEs ! ✨
(Not entirely custom, actually, but more like a custom paint job / some tweaks)
These two pieces are part of a larger custom clone battalion, the 284th, that I’ll explain in detail in another post. In the mean time, these are already in use on a larger mix that doesn’t exactly fit in my small studio right now (I’m talking BIG moc)
Individual views :


The stickered plate, stolen from a Ninjago set, was awfully convenient, you may understand why here (not posted yet)

-
 mitchell-nihil liked this · 1 year ago
 -
 antrylis reblogged this · 1 year ago

They/them - AroaceLego MOCs and photography with a wide range of different characters and environments, every Wednesday (in theory-)
77 posts