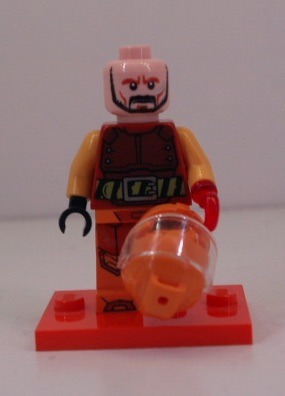
✨Custom Fire Toa !✨

✨Custom fire Toa !✨
Yay, yet another custom bionicle ! And a big one this time !
Details below the cut !
Front/side views :


I’m using Vakama Metru’s kanohi for that one, as it’s pretty good shape-wise and there are few dark-red kanohis anyway.
Anyway, this was a lot of fun to make, and this time starting with absolutely nothing. Most of the bright red pieces were added at the end to give a bit of contrast. You might recognise some Stars elements, as well as some Bohrok elements from an unknown set, and even a very old piece from the precursors of Bionicle.
If you pay attention to proportions, the legs are completely messed up (bottom part too small, higher part far too long). It’s fixed on all the others of this series, luckily. Given it still works visually, I kept it that way.
The weapon is a mix of a cool disc launcher, with the flame sword from Stars set, to make…what you want it to be. I initially said it was some type of crossbow, but to be fair, it doesn’t look like anything at all.
Just like the others I have shared so far, I am doubling some limb pieces to quickly give some thickness. On the higher part of the legs, though, I have used the body
Most of this is quite experimental, from the feet to the higher parts of the legs using Vakama Metru’s body piece (it’s a fun one to work with).
And, yes, maybe I will be spreading this over 6 weeks to get enough time to finish my current project (currently waiting for important parts to arrive…), and because I am running out of content faster than I can make it, but well.
To pardon me, take this picture I took to see if the articulations had a good enough range :

More Posts from Antrylis and Others

✨Quake and its pilot✨
Another one of my combat mechs ! (See previous here)
Same as last time, closeups and lore under the cut
Mech closeups


Minifig closeup :
So, mech lore !
As I said in the previous post, mech battles happen some times after the third world war. Well, some of the veterans quickly took interest of this new sport, including today’s pilot. As you can see, sequels of the fights are still visible on his body, his hand being the most visible one. Of course, he could have had a normal hand, because it’s an easy thing, but he didn’t want to. He wanted to show what he had partook in, and this glowing hook was the coolest thing he found on the market.
At first, he didn’t really even watched mech fights, but eventually, some of his friends made during the war decided it would be fun to watch it together. And they enjoyed it. Enjoyed it so much, they decided they wanted to participate.
So, they did what any normal group of war veteran did : they looked for a place to scavenge spare parts and assemble a mech of their own, that would be out of the usual roaster of mark III and IV mechs. What they found was what was left of a large dig site, abandoned at some point in the past. Among the scraps, one of them found the large QUAKE panels. Probably the name of the company that used to be here. It would do the job.
It took some time for Quake to get into large-scale tournaments, because it usually fell apart quickly. With some experience, the team managed to get it in a usable state, and when it didn’t break down, the mech was doing some heavy damages. Don’t trust the electric panel on its back, it’s entirely coal-fuelled (coal which was provided by the dig site) and Quake is probably one of the only mechs powered by a thermal engine, but it gives it a powerful advantage : as long as it’s fuelled, it can deliver extremely powerful blows with its large arms, as well as it can withstand powerful attacks (that’s what the shoulder plates are for). With this mining equipment, Quake, after it began to be known, made itself quite of a name in the arena.
That’s it for this one, the next competitor, named Quetza, will be introduced next week :}
Also, I’m trying an old camera of mine to take pictures, because the lighting is better, although it’s less flexible than my phone’s. I’m still trying to get a good feeling as to what I’m preferring.
Random interesting thing to notice about the build itself : All articulations have different kinds of joints : bionicle ball-joints for the arms, technic pin for the hips, small ball joints to connect the legs and the body, old technic joints for the knees, and simple handle joints for the feet. It was accidental, but I think it fits well with the history of the mech.

✨Another custom vehicle !✨
It has eyes !
This horrendous prototype is a follow up to this post.
Now here is a video of how it works (using the same remote from the other post, that thing is universal !). I wish I had a way to display the good all-terrain capacities of this vehicle (other than wood and seashells...
Details beneath !
Side view :

There are plenty of things here to discuss. Firstly, the suspensions ! Three spring pistons : one of the 'new' models, two much older ones (System, can you believe it ?). At rest, the two small white discs in the middle don't touch the tread, but as soon as an object pass underneath, they get involved. The advantage of this system is that, with every part mobile, the obstacles can be passed easily. And I added rubber grips too.
These treads are powered by PF XL motors. Very very heavy and big, they have the same speed as other motors but much more torque. We're talking of Mindstrom-level torque; this means that In theory, I can add as much weight as I want and keep it at a more than decent page.
You can also see that I fixed two of the biggest flaws from my previous model : firstly the RC receivers have been turned to get signals from multiple angles. Secondly, to rotate the tower, I used a worm gearbox with a PF M to really slow it down; and the wires have been fixed to have a broader angular range.
The turret ? The turret !

These eyes are the best addition to this MOC.
You might notice that I have a servo and a PF M on the turret. This is because the weapon here is a harpoon with a cable. And it has a winch ! All of that with only four controls : two for treads, one for rotation, and one to fire/retract cable.
How ? Well I'm glad you asked. The firing works just like in the previous vehicle : the servo's arm presses on the spring-powered projectile and it flies, along with the cable connected to the other motor.
As for the retraction, it's slightly more complex : on the remote, I press the firing lever the other way around : this causes the servo's arm to go on the winch and it fits nicely, so that when the PF M rotates, the thread can't escape the winch (a video will be in the reblogs, because Tumblr doesn't want me to upload two videos at once...)
Major problems here are the following :
the PF M often detaches itself from the turret
the harpoon often get stuck on the treads
the thread is too short (yeah...)
So, uhm. I wanted to post something a bit different here today. Behold a short thing I did a while ago (I'm actually posting it because I found it while cleaning some files). I'll admit, the quality of both the image and whatever I was trying to tell is pretty low. But I think overall, it's still surprisingly decent, for what it's supposed to be.
I did a lot of these some time ago, but it's terribly time-consuming, so I've had to stop. Hopefully, next break, I'll have the occasion to do these again (now with better image quality, and even proper MOCs to use). I miss doing stop-motion a lot-
I sadly don't have much of that project left (images, bits of the background...), though strangely enough, I still have some of the characters. Though I know why the lighting is so bad : at that point, I only had a set of blue lights, which caused this blue filter all over it (it looked really nice, though. Without any camera...)
I won't point out all of the weird details, but I am still quite proud of that odd use of a hair piece as a broom. Some pieces certainly have some unexpected uses.
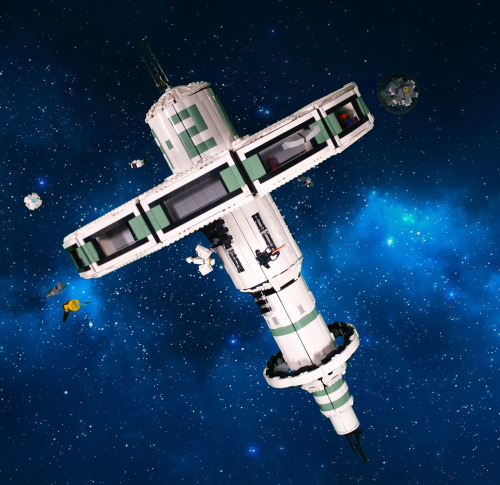
✨Trade Space Station !✨
[1/4] >Next>
Finally...More than 60 hours of work, I can present my masterpiece. I have been working and planning this project for a long time. Given the sheer amount of things to talk about, I will split all of my rambling in (at least) four posts : one about the concepts, ideas, and general aspect (you're here !); one about the technical side of things; one depicting how the project evolved (using pictures taken during the construction); and one dealing with all the smaller details, ships, and such.
Enough with planning, though. Explanations, other images and more explanations below the cut !
(less) edited picture of the build :

So. You might see, now that I got rid of all that pesky editing (or most of it) that there is a big arm holding the thing in place. It's easily a fifth of all the work of this build, because I absolutely wanted to hold this thing at an angle, and it's heavy, at around 15 kilograms (33 pounds). I'll talk about the technical difficulties of that in a later post, but it was important for it to be solid, because the station was the central piece of my second ever (very small) lego exhibition. AND it allowed me to meet the recruiter of a much larger exhibit. Long story short, in a month, I'm presenting this piece again (just before my exams, whoops-).
Anyway. Not only is it heavy, but it's also quite tall and wide. Around a meter at the highest point (tilted or not), while the diameter of the main ring is at around 0.75m. Quite a difficult thing to move around. Or is it ? Well, yes and no.

Here are all the main components (excluding the holding arm), when I move the piece around. Of course, all the ships are detachable (it allows me to move them around from one day to the other), but the dome carrying the antenna can also be removed, and then, the entire ring can be disconnected (that, too, was quite a challenge).
Removing the ring obviously makes it waaay easier to transport, because a single wooden plank can then be used (again, except for the arm, but that thing was made to be sturdy, so it can be transported with less care); and , once the dome is removed, I can just let the central cylinder stand upside-down (useful for storage). The only trouble I found with this system is that I once connected the ring the wrong way around, meaning everything in the small hangars was upside down. Quite an embarrassing moment.
Speaking of the hangars, I initially wanted to keep them all empty, to store ships inside, but it didn't really offer this piece the sparkle of life. Setting up these small decors inside most of them, with colors contrasting with the general theme of the build, was actually a really good addition.
The colour scheme as it is now is not exactly the one I had planned at the start of the project. I originally planned on using bright light orange (bricklink colour name) instead of sand green, but I found out that this colour was tough to find in large quantities, and I already had quite a bunch of the sand green, so this tragic decision was made. I think it would have offered a more vibrant colour to the build (resembling a Subnautica default palette, which I enjoy quite a lot), but in hindsight, the green works really well, appart from a small detail I'll expand on in a minute.
What's really funny for this project is that, when it started, I actually only wanted a nice way of showcasing all the little space ships that I tend to make whenever I have access to a small amount of cool pieces. Then came a long time where I only daydreamed about it and planned how I would want it to go, and only when I had a clear vision did I start the actual building process. So, taking all that into account, you can probably double the amount of time I spiritually spent on this project.
What I knew is that I wanted to get this huge ring held by beams to the station's body, which made the build both more interesting and more complicated that it would have been. But the challenge was appealing.
At first, the main body was completely flat and white, but I soon had to add texture, both because it was becoming ugly and because the 2*2 white curved slopes were starting to diminish fast. The first modifications I did were to add the sand green curved slopes instead to create stipes, then letters : the big A-2 you can easily spot. With the few bits of lore that I have created for this piece, you have to imagine that there are hundreds of these stations spread in the galaxy, which can be easily described through 3 criteria : the Letter, the Number, and the Colour. That would mean that, if you wanted to meet with someone at the exemplar I made, you would say something along the lines of 'Meet you at Sand Green A2'.
Texture-wise, the other element of the largest cylinder is the exposed bits of machinery, very classic in sci-fi, I know, but it does work well in this context. The second cylinder has much less textures, with only a few grates, and some 2*1 ingot pieces (because they look cool); but it also has its own, smaller ring (diameter slightly larger than the largest cylinder's).
Then come the smaller cylinders, which don't have much texture, except in their transition from one to another (barely visible in any of the pictures, but it exist).
Overall, I'm also really happy of how round it looks, given that circles are not my speciality.

Here is a completely unedited picture of the support arm (Lewa for scale), with a nice counterweight which might be necessary to hold the entire thing in place (it may not be, but I'm not trying to remove it. Bad idea.).
As you might notice, my studio is not a shelf anymore. I built something new from scratch with a green screen, because I thought it would make my editing job easier. And it would have, if I didn't use sand green in my build. Anyway, I'm keeping this for a few days, to snap some pictures of the MOCs which don't fit in my shelve (and are not green, meaning editing will be easier.
Here is the 'studio' from an outside point of view :

I know it's quite a mess outside of my clean perimeter, but I do as I can. You can see one light in the foreground, but there is also one (less visible in the background), symmetrical to the first one, and a third one behind and above the camera (outside of the picture).
You may also notice a lot of sorting boxes. Sorting pieces can greatly improve your productivity, if you label all your box correctly. Covered by the greenscreen is essentially a shelf full of these sorting boxes, labelled by colour and piece type, and it was really practical. Anyway. Thank you for reading until this point, I guess ? If you survived through all this rambling, you probably deserve something...
I mean- Have these pictures I took during the exhibition, I guess...


(You can notice that these are two different days because of the ships’ placement).

✨Yet another combat mech !✨
A bit of laziness here, I couldn’t bring myself to get proper pictures, so I got old ones from when one of my LEDs broke, hence the blueish lighting-
Lore and closeups below, and previous work here !
Mech closeups :


Pilot closeup :

Lore time (world explanation in previous works..) !
So, Scorcher (the mech) is terrifyingly large, next to most others, which is already impressive, but it’s also one of the most equipped ones on the field : large circular saw, flamethrower, integrated calculation computer, you named it. The only real weak point is the reservoir in the back, which is what the flamethrower is powered by, and it’s hard to reach because one has to get behind Scorcher to get it.
The pilot is well equipped too, with last gen holographic equipment and a powerful high resolution display helmet, under which he somehow manages to fit all his hair. But he’s not alone, since he also have an entire team behind him (called Dragon, for obvious reasons), which helps him during and outside of combats, making this make one of the bests there are.
Unrelated to the lore, the large dome used for the head falls off every time I try to move something. It may have plot armor in the lore, but in real life I think a fly could beat it. Most of these joints are rigid, except at the waist, which is a mistake I probably won’t make ever again, it’s terrible. I’m also glad I stole the arms of another minifig for this one, because it was quite bland with purely red arms.
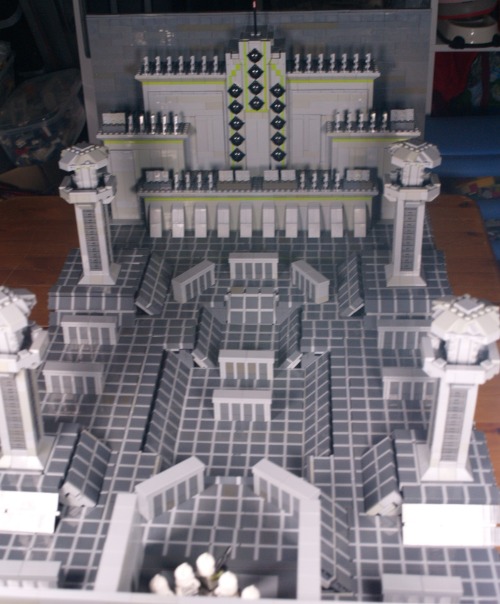
✨Kamino’s citadel challenge !✨
I am…very excited about this one. I’ve had this vision for a long time, and I’m so happy it’s ended up looking like that.
Now, there are a lot of things I’ll go into details along close ups under the cut; the only thing I’ll mention above is that I’m very grateful for TCW’s episode guides’ artworks, without which this would have been quite a hassle.

Okay ! Before diving into all the details and things, here is a view from above, to really display how big it is. Dimension-wise, the plank I built it on is around 110*70cm.

Now of course, the first detail which is noticeable is the floor, because, well, it’s everywhere.

This was probably the most challenging part of the build, because making a grid out of Lego is tough. Most of it is rows and rows of dark square, light lines, separated by 1*n tiles. It was the easiest way to get this pattern with as if it were just tiles; because this is one of the objectives I had here : most of this MOC is smooth, except for a few zones (usually voluntarily).
The fact I used this technic means that the floor in most place isn’t very stable, but it actually holds up pretty well because of some hidden connection points with the foundations underneath, which are mostly hidden under the cover blocks.

Here for instance, I’m using modified 1*2 bricks with a Technic hole : it hold the cover block, and it also attaches the floor to the foundation.
Of course, another problem I ran into were slopes. Much harder to get a smooth effect with the technic I’ve used, so it’s a bit wonky and unstable. Also, most them are not aligned properly, which is visible in the picture above (and some area have some really big misalignments because of a few problems I probably won’t bore anyone reading this with).
Now, since they’re also here, I can deal with the cover blocks. These were, among the details, the hardest to figure out, to get a good size while keeping some texture. Eventually I came up with this design, which, ironically enough, uses the same technic the floor uses, in a different orientation.
Another detail : the miradors :

This is one of the first elements I had in place, because I needed them to get a good sense of scale (and was made better by an existing concept art of a tower alone). Most of it does not have anything noteworthy, except for one illegal technic I used (can you spot it ?)
The pillar holding the roof of the mirador is using a technic I had in my toolbox for a long time, but had never had the occasion to use : if you take two 'brick' bricks and attach them perpendicularly on a snot brick, the small space separating the lines of 'bricks' align to let a 1*n tile in. It’s somewhat reliable (for an illegal technic) and an easy way to get octogonal shapes.
Now, before looking at the Citadel itself, let’s turn around for a minute.

This point of view obviously isn’t the intended one, but it’s still worth noting, if only for some composition.
Notice that the wall here is quite small (smaller than the miradors, even), and light gray; it’s in contrast with the towering dark gray wall on the other side, behind the citadel, which technically should give at least some impressions even to the people who never saw TCW.
Anyway, it’s also on this view that we can see most of my slope struggles, including the central one, which is the biggest I had to do.
And I can’t not mention the most important element :

What would be the challenge without a squad of clones to take it on ? These clones (4 privates and a sergent) are ready to fight ! Well. Kinda. I wish I could have actual cadets, but they are not part of the Lego universe (and the floor was enough of a fee, I can’t afford to get customs figures too). I wish I had the Dominos though. I have TBB Echo, and I plan to get my hands on Fives at some point, but they wouldn’t fit here, sadly, so instead I used some movie accurate clones (because all the others are used for a project I still haven’t posted..maybe later…)
Notably, I at some point tried to get the elevator to work - needless to say it was a disaster (it’s too close to the plate underneath to make something working).
Now, without further ado. The citadel.

I’m very proud of it. I got the proportions just right (I actually made some measurements to make sure of it), and there is just enough texture to not make it bland while leaving it as artificial. This alone took roughly 8-10h (which were all spent during an accidental all nighter, whoops), but it was worth it. It’s completely empty inside, and, in fact, the wall behind it isn’t full as well, anything behind the citadel is opened. The spikes are simple 1*3 angle plates illegally connected, and the walls’ small details were made with a bunch of modified 1*2 plates, there isn’t anything really special in it.
The only really complicated zone was the middle tower, because I had to put all the cannons while keeping it clean and smooth, and including the vertical lime lines. It was a fun challenge. And I included the 'flag' At the top, too, just a red transparent cone on a stick (there’s no need for more), which peeks above the gray wall (for composition and because of a lack of pieces).
Anyway, such a long project deserves one behind the scene photo :

Yes, my desk is messy (and include my mandatory tea cup).
On the left, you can see my remaining floor tiles, which have not been used yet; and just under the citadel, you might notice the foundations visible; it’s a checker of 2*2 tiles which gives my floor a good base to be fixed on. There are also some slopes which haven’t been placed yet (in front of the background miradors), and at this steps, there were no cover blocks or walls yet.
As far as my tools go, you might notice brick separators scattered all around my work environment (I never have enough of those), as well as a tablet in the bottom right hand corner (which i use to check and measure concept arts), and in the middle, the red triangle is an official (albeit old) Lego measurement tool which counts in stud, Lego bar holes and axe length.
Also visible, finally, is the bottom of the foundations, which are stacks of 1*2 bricks (each of the three floor layer is separated by a height of 3 bricks), which means that looking directly under it can lead to watching the dark basement of my build (which isn’t aesthetic…).
Anyway, if you read until here, thanks, I guess ? I still have a few TCW related stuff (a small one next week, some other in the foreseeable feature), so feel free to stick around and maybe leave a note, if you feel like it ? That’s it, bye !

✨Pride clones !✨
As I mentioned somewhere in my previous post (I think ?) I found my clones missing colours. So I did a rainbow Cody, and things went downhill from here.
There's not much to say about it built-wise that I haven't already said, but a few mentions of my colour palette might be interesting, notably some shade of 'rubber' materials, for a few of the purples. Also, there aren't nearly enough blue-green shades to satisfy my needs, but I can't do much about it.
You may also ask for other flags, who knows how they'll look...
Speaking of, the flags here have nothing to do with any headcannons or whatnot, they're purely aesthetic - or practical, since some colour subdivisions are easier to represent on some models than on others.

✨Assault on the droid factory (P1) !✨
A decently-sized MOC I've been working on for the past few weeks. These is the landing platform of the factory, and, hopefully, I will take some time to make the actual factory inside, which is nothing more than an idea, at the moment.
Closeups and details under the cut !
The door :

I have a lot of fun with the mountainside of this MOC : It's been a while since I last did rocky terrain (or any terrain at all), and it is an enjoyable process. Most of the bottom is supported by large rock pieces (for structural integrity), but anything around and above the door is meticulously hand crafted from slopes. I also added some little plants here and there to break the dull grey, including some weird spiralling plants, because alien environment.
The door itself is just a bunch of slopes, and then two black sections. It's not moving and will remain in this half-opened state indefinitely.
The bridge :

Really the heart of the MOC, both visually and structurally. While it's covered everywhere, there are technic bars running under the large plates, and that's what allows everything to stay together. Just below the landing platform, you might spot one small antenna acting as a pillar. It's only there to keep the bridge in this position, as most of the charge is held by the mountain. It was a bit dull at first, so I added the cable running under it, and the small barriers, which fit the aesthetic without being overwhelming.
As for the action, here is a brief summary of what story I'm trying to tell : a squad of ARC are infiltrating a droid to destroy it, using a stolen CIS ship. Upon their arrival, they face heavy resistance.
Trying to breath life in these scenes is really fun, and it uses multiple tricks, from the droid falling off the bridge to the one being pushed by the shield, plus the clone jumping on a droid to stab it. Speaking of, here they are !
The clones :
MOC postures :


Rest postures :


Custom clones ! I absolutely love making these, and I still have a lot of similarly customised ones on my shelves. The ARCs from the battle pack look awesome, and even if they all have the same prints and color, it doesn't take much to change their appearance.
Sadly, I couldn't find enough kamas for all of the, so only the first and third ones have one. Same goes for the pauldron, so only the three first have one (plus the fifth, but it's a different kind which, I think, comes from a mando). For visors and rangefinders, the choice was mostly arbitrary, because I have a lot of each, so I tried to guess who of the clones would need them, according to their roles (because they have roles. And names, too ! From left to right : Orders, Surge, Bacta, Gears, and Stalker.) I also used the kneeling posture, which is, essentially, in half my TCW MOCs (just check out this one if you're doubting me. Or if you want to see a really cool thing, too.)
A lot of weapons are at least partially custom too :the left clone's weapon (hands can be attached at the bottom of the weapons as a grip); the Z-6 for the next one (would be better if Lego had black versions of the grey pieces, but alas, they don't exist as of yet), the shield (held together by an actual 2*3 shield piece, and the printed GAR cog is just the perfect piece to go with it), the rocket launcher (as screen accurate as I could do, which is to say not much). I also used a fancy silver knife as a vibroknife, because why not, after all ?
Another worthy addition :

While Lego's default ARC backpacks are pretty cool, I find this technic really nice to add a proper communication antenna : one lever attached to the side of a minifig roller skate piece. The connection is not very secure, but since it's only used for display, it's alright.
The ship :


As some might have seen already, this is a variation of the 8036 separatist shuttle. It is a bit longer than the original, and have more details on top. I changed the original antenna for a fencing sword piece, which looks better, and adjusted the dorsal wing a wing, as well as the side, to add the CIS-stickered pieces.
Mostly, this version has so much more playability than the original : it was only made to accommodate a droid pilot and one passenger. This version can fit : one pilot and one astromech in the front, plus a whole bunch of minifigs in the back; and the two parts are connected. Ironically, it won't ever be seen, but it still is a nice thing to know.
You're still here ? Well, I guess you enjoyed this MOC then. If it is the case, stay tuned, because I still have one big TCW diorama which I need to figure how to showcase, and another one in the making, which will also be terribly hard to showcase, but that will be a problem for later me !
Hey I don't know if you saw my repost on your post but I would appreciate and would definitely built a brickheadz version of the boba fett prototype minifig that I have as my profile picture. Your post says feel free to request any more and I thought it was worth a shot even though I doubt he'd appeal to more people than me.


✨Boba Fett Prototype ! ✨
Hi ! This has been in my inbox for ages, I know. Finally had time to give it a try ! Had a lot of fun, actually, mandos have some really interesting shapes.
And, because it took me so long, I figured, I'd also give instructions, too. Some colours might not be available, though, but white should be pretty easy to find for the outside pieces.
Instructions can be found here !

I realised I’ve posted quite a lot of my MOCs on this blog, but any of my more 'photographic' works, yet, so here’s one of the first I made (we don’t talk about previous attempts), which still works quite well, although there are some things I would do differently, were I to do this again.
My process, and other details, below :}
So. The process I used to get this effect is not a really complicated one, but it still offers a more or less good render at the end, which is nice.
The blue guy has nothing special, but the red one I made float, but how ? The answer is not telekinesis, but superposition. Take a look at the images below :


Left one is the original, with no special effect (and no cropping, to offer a larger view), while the right one is the same, without the red minifig. By taking both photos without changing the camera angle (which is a painful thing to do with a phone, I would not recommend), and with a simple image editor, I put the 'empty' image (right) on a layer under the image I want to modify, and simply erase the supports.
It is important to note that if the erased bit casts a shadow, it’s better to also remove it, to avoid weird effects (here, there are no shadows because of the light source).
I’m also using an old set of blue LEDs inserted directly into Lego bricks to get this foggy aspect at the top, and to get a darker aspect to the blade of the red minifig, though there is also a desk lamp above providing some proper light, of the whole thing would be blue.
Last interesting point, this technic is the same I’ve used for the blog’s banner (but with proper lighting, for once). One might even recognise that the background for the two pictures is the same, because black was easily findable and gives quite the dramatic effect. The banner is, in fact, only half of my picture. Since you’ve made it here, I’ll offer another tiny bit of it here, as a treat :}

(And yes, I stole the characters from Star Wars sets, gave them light sabres even if they’re not meant to have one, and also added one of my cool cloaks, and made them fight. Don’t you dare judge my poor choices.)
-
 redbee2000 liked this · 1 year ago
 -
 s4intjimmy liked this · 1 year ago
 -
 anasianfriend reblogged this · 1 year ago
 -
anasianfriend liked this · 1 year ago
-
 doyouneedmedicalwesistance liked this · 1 year ago
 -
 tamarack-on-track reblogged this · 1 year ago
 -
tamarack-on-track liked this · 1 year ago
-
 chaos-posting reblogged this · 1 year ago
 -
 origulator liked this · 1 year ago
 -
 origsmocs reblogged this · 1 year ago
 -
 low-po1y-princess liked this · 1 year ago
 -
 mardrfish liked this · 1 year ago
 -
 the-kickster reblogged this · 1 year ago
 -
 antrylis reblogged this · 1 year ago

They/them - AroaceLego MOCs and photography with a wide range of different characters and environments, every Wednesday (in theory-)
77 posts