✨Trade Space Station !✨
✨Trade Space Station !✨
[1/4] >Next>
Finally...More than 60 hours of work, I can present my masterpiece. I have been working and planning this project for a long time. Given the sheer amount of things to talk about, I will split all of my rambling in (at least) four posts : one about the concepts, ideas, and general aspect (you're here !); one about the technical side of things; one depicting how the project evolved (using pictures taken during the construction); and one dealing with all the smaller details, ships, and such.
Enough with planning, though. Explanations, other images and more explanations below the cut !
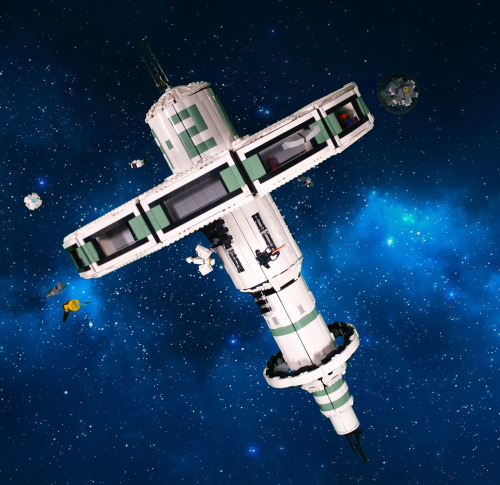
(less) edited picture of the build :

So. You might see, now that I got rid of all that pesky editing (or most of it) that there is a big arm holding the thing in place. It's easily a fifth of all the work of this build, because I absolutely wanted to hold this thing at an angle, and it's heavy, at around 15 kilograms (33 pounds). I'll talk about the technical difficulties of that in a later post, but it was important for it to be solid, because the station was the central piece of my second ever (very small) lego exhibition. AND it allowed me to meet the recruiter of a much larger exhibit. Long story short, in a month, I'm presenting this piece again (just before my exams, whoops-).
Anyway. Not only is it heavy, but it's also quite tall and wide. Around a meter at the highest point (tilted or not), while the diameter of the main ring is at around 0.75m. Quite a difficult thing to move around. Or is it ? Well, yes and no.

Here are all the main components (excluding the holding arm), when I move the piece around. Of course, all the ships are detachable (it allows me to move them around from one day to the other), but the dome carrying the antenna can also be removed, and then, the entire ring can be disconnected (that, too, was quite a challenge).
Removing the ring obviously makes it waaay easier to transport, because a single wooden plank can then be used (again, except for the arm, but that thing was made to be sturdy, so it can be transported with less care); and , once the dome is removed, I can just let the central cylinder stand upside-down (useful for storage). The only trouble I found with this system is that I once connected the ring the wrong way around, meaning everything in the small hangars was upside down. Quite an embarrassing moment.
Speaking of the hangars, I initially wanted to keep them all empty, to store ships inside, but it didn't really offer this piece the sparkle of life. Setting up these small decors inside most of them, with colors contrasting with the general theme of the build, was actually a really good addition.
The colour scheme as it is now is not exactly the one I had planned at the start of the project. I originally planned on using bright light orange (bricklink colour name) instead of sand green, but I found out that this colour was tough to find in large quantities, and I already had quite a bunch of the sand green, so this tragic decision was made. I think it would have offered a more vibrant colour to the build (resembling a Subnautica default palette, which I enjoy quite a lot), but in hindsight, the green works really well, appart from a small detail I'll expand on in a minute.
What's really funny for this project is that, when it started, I actually only wanted a nice way of showcasing all the little space ships that I tend to make whenever I have access to a small amount of cool pieces. Then came a long time where I only daydreamed about it and planned how I would want it to go, and only when I had a clear vision did I start the actual building process. So, taking all that into account, you can probably double the amount of time I spiritually spent on this project.
What I knew is that I wanted to get this huge ring held by beams to the station's body, which made the build both more interesting and more complicated that it would have been. But the challenge was appealing.
At first, the main body was completely flat and white, but I soon had to add texture, both because it was becoming ugly and because the 2*2 white curved slopes were starting to diminish fast. The first modifications I did were to add the sand green curved slopes instead to create stipes, then letters : the big A-2 you can easily spot. With the few bits of lore that I have created for this piece, you have to imagine that there are hundreds of these stations spread in the galaxy, which can be easily described through 3 criteria : the Letter, the Number, and the Colour. That would mean that, if you wanted to meet with someone at the exemplar I made, you would say something along the lines of 'Meet you at Sand Green A2'.
Texture-wise, the other element of the largest cylinder is the exposed bits of machinery, very classic in sci-fi, I know, but it does work well in this context. The second cylinder has much less textures, with only a few grates, and some 2*1 ingot pieces (because they look cool); but it also has its own, smaller ring (diameter slightly larger than the largest cylinder's).
Then come the smaller cylinders, which don't have much texture, except in their transition from one to another (barely visible in any of the pictures, but it exist).
Overall, I'm also really happy of how round it looks, given that circles are not my speciality.

Here is a completely unedited picture of the support arm (Lewa for scale), with a nice counterweight which might be necessary to hold the entire thing in place (it may not be, but I'm not trying to remove it. Bad idea.).
As you might notice, my studio is not a shelf anymore. I built something new from scratch with a green screen, because I thought it would make my editing job easier. And it would have, if I didn't use sand green in my build. Anyway, I'm keeping this for a few days, to snap some pictures of the MOCs which don't fit in my shelve (and are not green, meaning editing will be easier.
Here is the 'studio' from an outside point of view :

I know it's quite a mess outside of my clean perimeter, but I do as I can. You can see one light in the foreground, but there is also one (less visible in the background), symmetrical to the first one, and a third one behind and above the camera (outside of the picture).
You may also notice a lot of sorting boxes. Sorting pieces can greatly improve your productivity, if you label all your box correctly. Covered by the greenscreen is essentially a shelf full of these sorting boxes, labelled by colour and piece type, and it was really practical. Anyway. Thank you for reading until this point, I guess ? If you survived through all this rambling, you probably deserve something...
I mean- Have these pictures I took during the exhibition, I guess...


(You can notice that these are two different days because of the ships’ placement).
More Posts from Antrylis and Others

✨Custom technic vehicle !✨
Something which I had never really posted on before was that, although I enjoy bricks (or Bionicle parts) a lot, I also like to mess around with Technic, when I have the occasion to.
Most of this one is a bunch of additions made on top of the 42065 set, because it's an overall really fun set, with enough space inside to cram in some additional mechanisms.
Here is a video of that thing performing :
...And the remote !

Of course, details and close ups under the cut !
So, here is the (non exhaustive) list of what I added/changed :
Colours of the middle line and addition of some decorative tubes;
A fancy blade at the front;
Plenty of lights;
A turret.
I'll discuss all of these below (except for the first point, which is quite straight forward.
The front :

So, the main plate I used for the vehicle's blade is often used in large Technic cars, mostly for roofs; but used the other way around, it has a nice shape. It's not very functional, but it's aesthetic, and inside are two of the lights I have integrated (some of the cables are visible on the right).
The side :

From here, we can see my beautiful mess of cables (I forced the top open to show it, because it's not as opened at rest). Most of the large cables here are getting power from the battery to the RC receivers; while the small cables are all lights (I might have used too many-).
You might also notice the there are some bumps on the tread pieces : these are rubber grip pieces which I stole from a Nexo Knight Fortrex (it's doing fine without them). These make the plastic less slippery when on rock, but it does a poor job on grass (because grass blades get caught in the gaps of the treads pieces) - to fix that, I would use some of the old rubber treads, but they're way to small to be used as suchs. Instead, to remedy to the problem, I changed the original motors from the default PF M to PF L, which have more power and torque (and can thus reach their max speed even with the added mass). While the two motors have the same theoretical speed, this modified model drives faster than it's standard counter part (it's funny to take over other cars, don't judge).
Back view :

Here you can see the PF M I was talking about (bottom right, the second one is at the front of the vehicle). You may also notice that I have a second mess of cables , because my two receivers are here.
Two major problems with that :
The placement of the receivers makes it so that I can't control the vehicle, unless behind it (oops 1);
Because one of the receivers (on top) had bad wiring with one of the tread motors, the turret is heavily limited in its movements (oops 2).
Turret :

So ! That's the most interesting part of it (obviously).
Now, please note that it was my first time trying to do it, and plenty of my design choices were bad, but fixed in my V2 (will probably be posted next week~).
The way it works is actually quite simple : I have a motor underneath (PF M) positioned horizontally, which is connected directly to the light gray gear (just under the trans green piece on the left) which itself connects to the black base gear on which is mounted the turret. Because of the direct motor connection, the turrets is a nightmare to aim. Not good.
As for the cannon, it's just a servo and a spring cannon. When the servo is activated, the grey technic piece presses the projectile and it flies. Surprisingly simple. (It also lights up the green lights on the side, for fun).
Anyway, this is a fun project to play with. Next week, I might post the V2, which is...Quite different. You'll see :}
And bonus cat picture !


✨Another custom vehicle !✨
It has eyes !
This horrendous prototype is a follow up to this post.
Now here is a video of how it works (using the same remote from the other post, that thing is universal !). I wish I had a way to display the good all-terrain capacities of this vehicle (other than wood and seashells...
Details beneath !
Side view :

There are plenty of things here to discuss. Firstly, the suspensions ! Three spring pistons : one of the 'new' models, two much older ones (System, can you believe it ?). At rest, the two small white discs in the middle don't touch the tread, but as soon as an object pass underneath, they get involved. The advantage of this system is that, with every part mobile, the obstacles can be passed easily. And I added rubber grips too.
These treads are powered by PF XL motors. Very very heavy and big, they have the same speed as other motors but much more torque. We're talking of Mindstrom-level torque; this means that In theory, I can add as much weight as I want and keep it at a more than decent page.
You can also see that I fixed two of the biggest flaws from my previous model : firstly the RC receivers have been turned to get signals from multiple angles. Secondly, to rotate the tower, I used a worm gearbox with a PF M to really slow it down; and the wires have been fixed to have a broader angular range.
The turret ? The turret !

These eyes are the best addition to this MOC.
You might notice that I have a servo and a PF M on the turret. This is because the weapon here is a harpoon with a cable. And it has a winch ! All of that with only four controls : two for treads, one for rotation, and one to fire/retract cable.
How ? Well I'm glad you asked. The firing works just like in the previous vehicle : the servo's arm presses on the spring-powered projectile and it flies, along with the cable connected to the other motor.
As for the retraction, it's slightly more complex : on the remote, I press the firing lever the other way around : this causes the servo's arm to go on the winch and it fits nicely, so that when the PF M rotates, the thread can't escape the winch (a video will be in the reblogs, because Tumblr doesn't want me to upload two videos at once...)
Major problems here are the following :
the PF M often detaches itself from the turret
the harpoon often get stuck on the treads
the thread is too short (yeah...)


✨Aroace Door Tag✨
‘Name' looks really terrible, but couldn’t just put my real name here-
In hindsight, Sample might have been better. Anyway, if you want to get something like that yourself and are struggling with the letters, my dms are open — or asks even, if you’re feeling bold-
And of course, studio closeups bellow the cut
With, and without 'name' (M is really a terrible letter because of how wide it is, though now that I’m writing this, I know how I could have done it better. Well, too late.)


✨Bouldering wall !✨
I reeeally wanted to make one of these at some point, but never took time. Incidentally, I got commissioned — is it even a commission if it’s for a relative and I’m not paid ? — so there is is !
Closeups and details under the cut, of course !
Closeups :


So ! This was a lot of fun to make, with some really interesting techniques. The first thing is that overhang with an increasing angle at the top. A large part of it is just a big plate connected to the base by hinges, while the second part is connected to the first one, instead of the based, to make sure that when something break, everything break only attach one plate to the base, to provide a thin finition. The holds have nothing particular, except perhaps that some start 'in' the wall while some are on it, which is here to pretend there are micro holds — possibly the worst invention of the story of bouldering/j. The top layer of the wall is finished by 1*1 held horizontally by the outside the plates. Speaking of, the triangular plates holding these 1*1 are not connected to the rest of the outside plates at all. Instead, they’re connected directly to the overhang, which keeps the plate at that approximative angle.
But of course, the most important detail : the minifig hanging with its bare hands ! I knew from the start that I wanted it to be in that type of position, and the choice of purple holds came easily (it’s defining one of the hardest level for the bouldering center we usually go to). Of course, I wasn’t in possession of any purple piece a minifig could grab, because that would have been way to easy. So instead, I used magic science a trick, which you might have seen if you pay close attention to the hands of the fig. The 'trick' in question is that I managed to get my hands on a thin elastic thread, which is around the fig’s wrist in a loop, and then is stuck between the purple stud and the round grey tile — which, by the way, makes for the second worst type of holds in bouldering : rings — and since these pieces are on the second overhang, the rest of the thread is hidden, and not stuck between two plates, unlike what I did in my Carrion MOC, which tends to dealign pieces, which leads to broken MOCs (not the Carrion one because there’s too much tension for it to break), which I don’t want because this is meant to end up as a gift for someone I won’t be able to visit often to make maintenance, so it has to be sturdy (and it is !).

✨Tragon !✨
Trans...dragon..It's funny, right ?- Also, I know it's a wyvern...Dragon sounds better...
It's pride month, so it was the perfect occasion to finally make a dragon, yay ! It's also my first time making something akin to a dragon (technically the second time,, but the first one is truly horrible), and even if the proportion are still a bit out of place, it could have been worse. It's also my first time doing custom wings, but I'll talk about that in more details beneath :}
Also, it needs a name ! I’m really bad with names, but I would gladly take suggestions ! (And here is an alt picture, in its natural habitat-)

Anyways, details/closeups under the cut !
None of these picture below are edited, because it's exam period- Enjoy the green backgrounds :}

I have to say, before any other comment, that I made the body way to heavy for the two poor sockets of the legs. The position above is the only one where it's actually standing upright. Also, my stock of pink and rightly-shaded blue was much smaller than originally anticipated, so I would have done a bunch of tings differently, if it wasn't for that. Still, I was lucky to have that many curved blue pieces for the top part. Well, all of the ones with purple diamonds on them have been forcefully taken from a small Elves dragon, but it was worth it (I also really enjoy the purple here, it contrasts nicely).
All of the joints are mixel socket joints, except for the knees, which are just hinges. It gives a lot of movements, from the tail to the jaw. Even if these are limited, it gives it a wide range of positions (even if, realistically, it won’t change it much from the one I gave it). Still, it can sit ! (Including small trans flag)

The pointy scales on the back are some of the only elements which aren’t directly attacked to the body : one 2*2 plate holds them down, and a modified 2*1 under the plates keeps it from sliding in any other direction, so even with little connections, it doesn’t budge. I really liked these angular pieces. To keep them from being too repetitive, they are only connected to each other by one stud, with a small angle, which gives them a slightly "round" effect.

The tail here is not really complicated, it's just a bunch of socket joints linked together with curved tiles on top (one of the sticker is backward, and it's unnerving, but it's not my fault and I can't risk changing it...), with white arch pieces underneath. Not sure of why I added these in the first place, but it looks cool. And of course, the end of the tail is a big heart, because it simply fits the vibe, doesn't it?
Of course, I can't forget what is the most important, and what makes this creature as cute as it is ! (It is cute, and if that is the hill I have to die on, I will.)


The green background doesn't show it well, but the flame offers a good contrats with the rest of the head, and brings the eyes there first (instead of all the mistakes present). Because there are a bunch of these.
I spent nearly as long on the head as all the other body parts cumulated (except for the wings), because making something detailed yet small enough to be a good head is tough. I actually started from the top (for the piece with the sticker, more exactly), instead of the bottom, like I usually do, in order to get an idea of scale (because I already knew I wanted the jaw to move, and for that I needed to see how big it would be). Then, I did the back to quickly have a neck connection point, to see if it would fit. Because the neck is larger under the connection sockets, the socket of the head is actually pretty high up, but the colours are practically aligned so it works well.
Then, the next thing was the eyes and the spikes. The spikes took me a hile to figure out, because without the rest of the head, they looked kinda dumb, but it does bring the head together when everything is in place. Then the eyes : on the small dragon I took apart, there were these blue tooth pieces which I used to get some texture above them, so that they don't look flat, and then, I connected them to the center connectors of a 2*4 plates. That works well in placement, but I ran into the issue of what would be around. If I didn't do anything, there would be two gaps, which would look terrible. Instead, I stuck two 1*4 tiles in these gaps, and since the tooth pieces are around either side, they don't move - well, not much, they still produce a shaking sound when I'm moving the head.
Then under these plates, I directly have 1*4 pink bricks, which stick out behind the head. At first, it was a problem, and I had nothing else to replace them; but they actually restrict and hold the neck, so that even if the head is technically a bit too heavy, it remains in place.
The actual teeth are modified 2*1 plates, four at the top and four at the bottom. To keep them with such a small gap (and to attach them to either sides of the jaw) I have use modified 1*1 plates with a ring. There is a single one at the bottom, and then underneath a few cut 2*1 and 2*2 curved tiles to make the jaw triangular; and two on top, one which connects it to the head and one with holds the snout (which is using a cheese piece and another one of the blue tooth).
So, custom wings ! It isn't actually complicated, if only a bit tedious. Here below is all that I needed to make them :

As you can see, it's not much. Most important, of course, is a good, solid sheet of paper, and a cutter (precision cutter is better, in my opinion, but anything works). To make things easy (or if, like me, you don't know how to draw properly), you can take a basic lego wing, and trace the outline and where the holes go. I would advise only doing a single, blank one, at first. Once you have your proto-wing, you can start to make the actual frame it will be attached on. I chose to use bricks above it to act as claws, but you can use socket joints, like in most sets. The advantage of using plates is that the overall look is better, but if you want overhangs like I did, you have to get the holes really close to the edge of the wing.
Once you have your frame, trace where the holes would go on it ! (if you used a wing model, it might be easier, but it could also not fit, which is why you make a prototype first). To make holes just the right size, I would advise first cutting squares (easier than circles) at just the right size, then scratching the edges with the blade of the cutter. Once it looks good, try to fit an axle inside. If it just about fits, and can rotate, it's good ! Otherwise, just remove it and scratch again.
When that's done, test if it can correctly fit on your frame. Once that's done, you can either make two wings with that pattern, or simply make another copy. I personally made two new from my first prototype because it took me a while to figure out exactly how to place the holes.
Finally, once you got two wings, you can finally add whatever you want on them (easier when they're not actually on the frame, although that should've been obvious), and you're done :}

I went for a really basic thing, but technically, any shape is possible. I'll likely use it again someday, because it's quite fun !
And of course, the bonus picture, since you’re here ! I like the symbolic of this (also don’t pay attention to the tentacles).

I actually really wanted to get rid of this castle (which was gifted, not exactly desired, although I must admit it’s really well designed), and well. Now, it’s gone, and in its place lies the dragon…and my horrendous crab, too.


✨Custom bionicle (again) !✨
Two more from my Ru-Fahi series !
Details and rambling below !
Jaller Ru-Fahi


…Because I couldn’t not include him. Realistically, all Toa Mahri a good to some extent, but this is peak Toa material right here. One of the first I acquired, one of the best looking ones, too. The base body is practically the same as the original, with some twists, but I mostly made him thicker and upgraded his sword, which is better with a guard and a proper handle. Well, that, and the Hannah, obviously. Sure, the original one was cute, but here me out :


Look at it, and behold ! It might be slightly bigger than the original, have only four legs, and need a larger chain (which I found just earlier in a box of misc Hero Factory pieces, and is better than a basic Lego chain), but doesn’t it look very cute and wholesome and dangerous ? Also, I gave it actual joints, because it deserves it, and removed the Kordak blaster because it didn’t need it anymore. I really love making arthropods with bionicle (I have more for later~).
Pohatu Ru-Fahi


Definitely looks awesome. The original is Pohatu Phantoka from the Rockoh T3 set (because I have one and a half of this set). It is the coolest version of Pohatu (because orange>brown, obviously). Lot of modifications on that one, from the custom jet pack to the arms and the legs. The arc pieces for the front arms are more or less of placeholders because I was niece a good piece to make the arms larger, but it turned out alright. The blades are also stolen from the half Rockoh, and the piece underneath, if anyone recognises it, is from Pohatu Nuva, because it’s a neat reference. And the tube is somehow remaining in the Kanohi, despot the fact that there is not any proper connection for it tand hold onto.

Also, can we talk about this leg ? If you ignore how incredibly illegal this whole piece is (ball joint stuck by the light grey part and small black and grey piece not completely connected to the rest), I think that’s the best shape I managed to get so far, and it reflects nicely what I have envisioned (Pohatu being able to run/jump easily because of the shape). And, it had the added advantage of fitting perfectly with the orange piece above when the knee bends.
Last but not least, I also have started a potential candidate for Toa of air, despite a lack of proper Kanohi, even with my extensive collection. My first candidate would have been Lewa Phantoka from the Axalara T9, but this one has a special place in my heart, so won’t be touching it and it will proudly remain in his shelf (along with the untouched Pohatu). So, maybe another of this series soon ! But probably not. And if I miss posting custom bionicle too much, I have a (complete) collection of entirely custom Toa, but I’m afraid they won’t fit in my studio (they’re big, too big).

✨Assault on the droid factory (P1) !✨
A decently-sized MOC I've been working on for the past few weeks. These is the landing platform of the factory, and, hopefully, I will take some time to make the actual factory inside, which is nothing more than an idea, at the moment.
Closeups and details under the cut !
The door :

I have a lot of fun with the mountainside of this MOC : It's been a while since I last did rocky terrain (or any terrain at all), and it is an enjoyable process. Most of the bottom is supported by large rock pieces (for structural integrity), but anything around and above the door is meticulously hand crafted from slopes. I also added some little plants here and there to break the dull grey, including some weird spiralling plants, because alien environment.
The door itself is just a bunch of slopes, and then two black sections. It's not moving and will remain in this half-opened state indefinitely.
The bridge :

Really the heart of the MOC, both visually and structurally. While it's covered everywhere, there are technic bars running under the large plates, and that's what allows everything to stay together. Just below the landing platform, you might spot one small antenna acting as a pillar. It's only there to keep the bridge in this position, as most of the charge is held by the mountain. It was a bit dull at first, so I added the cable running under it, and the small barriers, which fit the aesthetic without being overwhelming.
As for the action, here is a brief summary of what story I'm trying to tell : a squad of ARC are infiltrating a droid to destroy it, using a stolen CIS ship. Upon their arrival, they face heavy resistance.
Trying to breath life in these scenes is really fun, and it uses multiple tricks, from the droid falling off the bridge to the one being pushed by the shield, plus the clone jumping on a droid to stab it. Speaking of, here they are !
The clones :
MOC postures :


Rest postures :


Custom clones ! I absolutely love making these, and I still have a lot of similarly customised ones on my shelves. The ARCs from the battle pack look awesome, and even if they all have the same prints and color, it doesn't take much to change their appearance.
Sadly, I couldn't find enough kamas for all of the, so only the first and third ones have one. Same goes for the pauldron, so only the three first have one (plus the fifth, but it's a different kind which, I think, comes from a mando). For visors and rangefinders, the choice was mostly arbitrary, because I have a lot of each, so I tried to guess who of the clones would need them, according to their roles (because they have roles. And names, too ! From left to right : Orders, Surge, Bacta, Gears, and Stalker.) I also used the kneeling posture, which is, essentially, in half my TCW MOCs (just check out this one if you're doubting me. Or if you want to see a really cool thing, too.)
A lot of weapons are at least partially custom too :the left clone's weapon (hands can be attached at the bottom of the weapons as a grip); the Z-6 for the next one (would be better if Lego had black versions of the grey pieces, but alas, they don't exist as of yet), the shield (held together by an actual 2*3 shield piece, and the printed GAR cog is just the perfect piece to go with it), the rocket launcher (as screen accurate as I could do, which is to say not much). I also used a fancy silver knife as a vibroknife, because why not, after all ?
Another worthy addition :

While Lego's default ARC backpacks are pretty cool, I find this technic really nice to add a proper communication antenna : one lever attached to the side of a minifig roller skate piece. The connection is not very secure, but since it's only used for display, it's alright.
The ship :


As some might have seen already, this is a variation of the 8036 separatist shuttle. It is a bit longer than the original, and have more details on top. I changed the original antenna for a fencing sword piece, which looks better, and adjusted the dorsal wing a wing, as well as the side, to add the CIS-stickered pieces.
Mostly, this version has so much more playability than the original : it was only made to accommodate a droid pilot and one passenger. This version can fit : one pilot and one astromech in the front, plus a whole bunch of minifigs in the back; and the two parts are connected. Ironically, it won't ever be seen, but it still is a nice thing to know.
You're still here ? Well, I guess you enjoyed this MOC then. If it is the case, stay tuned, because I still have one big TCW diorama which I need to figure how to showcase, and another one in the making, which will also be terribly hard to showcase, but that will be a problem for later me !

✨Christmas tree !✨
…Yes, it’s a very tall picture…So tall, in fact, that you can actually see the top of my shelf studio. I made this last year, and I think it’s about the time to showcase it, along with this year’s project, which I’ll post next week !
Fun fact : the top of the tree isn’t connected at all to the rest, it’s only held in place without any stud. I also couldn’t find a neat star for the top of the tree, so I opted for another shiny pointy thing instead-

Here’s my take on a batch of custom Nexo Knights minifigs !
Closeups and thoughts under the cut
So, in no particular order, the closeups, with comments and comparisons with the actual characters from the original Lego theme (also, because of Tumblr’s image limits, I had to badly stitch together my pictures, sorry-)
1) Mace

Pretty cool one, and the only girl in the team in the original cast, who also happen to have troubles because her dad is the king. But eh, none of that here, so she get the cool cloak I assign to any cool red character I can find (yes, you’ll see it again many times in the future). The overall design is pretty nice (mostly this face, the other one on the brick is not as good; the printed armor, which is from season 4, is pretty nice, and does a nice job with the large dark piece (coming from later Hero Factory sets). The weapons are from the Chima theme (and so is the cloak !). The hairs are from the only Tron set, which should have been continued as whole theme but eh-
2) Axel

Stupid and muscular originally. Well, now he’s got a Large Axe (Bionicle) to stand to his name. The helmet is all Nexo, but with some custom brew of mine, and so is the shield. Also, the custom arm was possible because the large chest has a technic pin.
3) Clay(more)

Not room much modifications on the base character (s1). The sword is from a season four version of the character, the shield is homemade with some fun pieces I had lying around. The two arms are modified from the Ultimate set. …which I transformed in guns…Yeah.
4) Aaron

Green ! Always had a cooler weapon. The armor is from the mech set, the chest piece is from s3-4, the Google’s are from the Ultimate set, and the shoulder thingy is from Boba Fett. I kept the original shield with some added pieces, which is made to fly (like with the original al character) but changed the face to give him a more serious expression. The weapon is mostly from the original crossbow, with some nice twists (the beam on the first image is from a ninjago sword).
5) Lance Whatever their name is now

Really a bad character : rich, 'very pretty', egocentric. So, well…I took the armor and made an entire new one. I really like them, but it might be because it took an awful lot of time to figure out the weapon (transparent white piece similar to the green beam mentioned above). Armor-wise, it’s s1 body, with a grey pauldron (Clone Wars) and a light grey kama (…Also Clone Wars). The hairs are a really cool piece from a Ninjago set, and the head…Come from a City ski set. But the orange visor makes it work !
6) Never remembered the name of that one

Original character is a very smart kid with not much development in the show. Well, firstly I made him an adult (legs are from a black widow figure), and then I decided to push the technical side a little. So, full suit with crystal swords, which works ! Most pieces are actually from the theme, except the red dots (Ninjago again), the crystals in the back (Power Mine [really a cool theme !]), and the helmet (City firefighters + Ninjago…again). It was the first one I made, which made me do the others.
I might get them in a diorama at some point, to set them against the very many custom monsters from the same theme (which were already much cooler than the original minifigs). In fact, most of the theme was really cool, the two sad points are that it was discontinued, and the TV show was…Well, it didn’t push much sci-fi nor fantasy, so I had to do the job.
Now, with that post I have finally revealed my three favorites things to do with legos : Dioramas, Big Mechs, and Custom minifigures (plus any Clone Wars related stuff, but it’s probably just as much because of the fandom aspect as it is the Lego aspect). One day perhaps, I’ll get all three of these aspects in one epic scene, but I have no idea of how for now, so maybe later~
✨I made a carrd✨
A friend of mine said I could use it — they were right !
Essentially, I now have all of my published MOCs sorted by theme in a single place (as well as a few unpublished ones !)
Here it is : https://enteroctoups-darkysils.carrd.co/ !

It also feature some none-Lego photographs, too, feel free to take a look.
Small, unnecessary update bellow the cut :
I’m gonna have to remove the 'one post every Wednesday', for multiple reasons : firstly, I’m gonna start a long maths cursus which won’t leave me much time to build — or even to post; and, beside that, I’m running out of MOCs ! I still have a few, which I will probably work on and queue so that they appear semi-regularly. I received just earlier today part of the pieces I’ll need for my final(?) MOC. And it’s a big one. Well anyway, I’ll be off to work on it now ! Thanks for reading this far~
-
 obsidiandragongenderwhatgender liked this · 6 months ago
 -
 brandstifter31 liked this · 10 months ago
 -
 aeramisu liked this · 10 months ago
 -
 mrmrsdarklordjrthethird liked this · 11 months ago
 -
 trans-bright-green-machine reblogged this · 1 year ago
 -
 antrylis reblogged this · 1 year ago

They/them - AroaceLego MOCs and photography with a wide range of different characters and environments, every Wednesday (in theory-)
77 posts