MALE HEAD LIGHT REFERENCE TOOL By William Nguyen
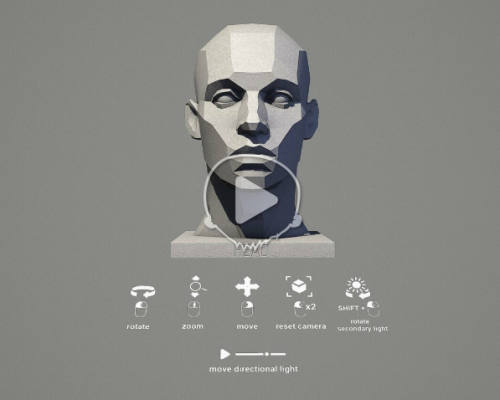
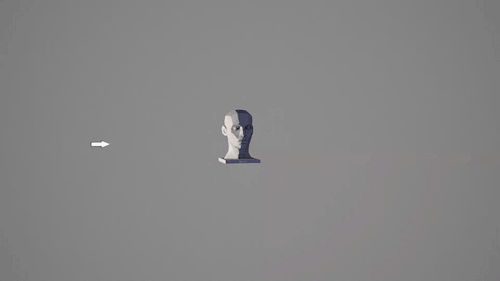

MALE HEAD LIGHT REFERENCE TOOL by William Nguyen
Click here to use the interactive reference!
More Posts from Aether1984 and Others
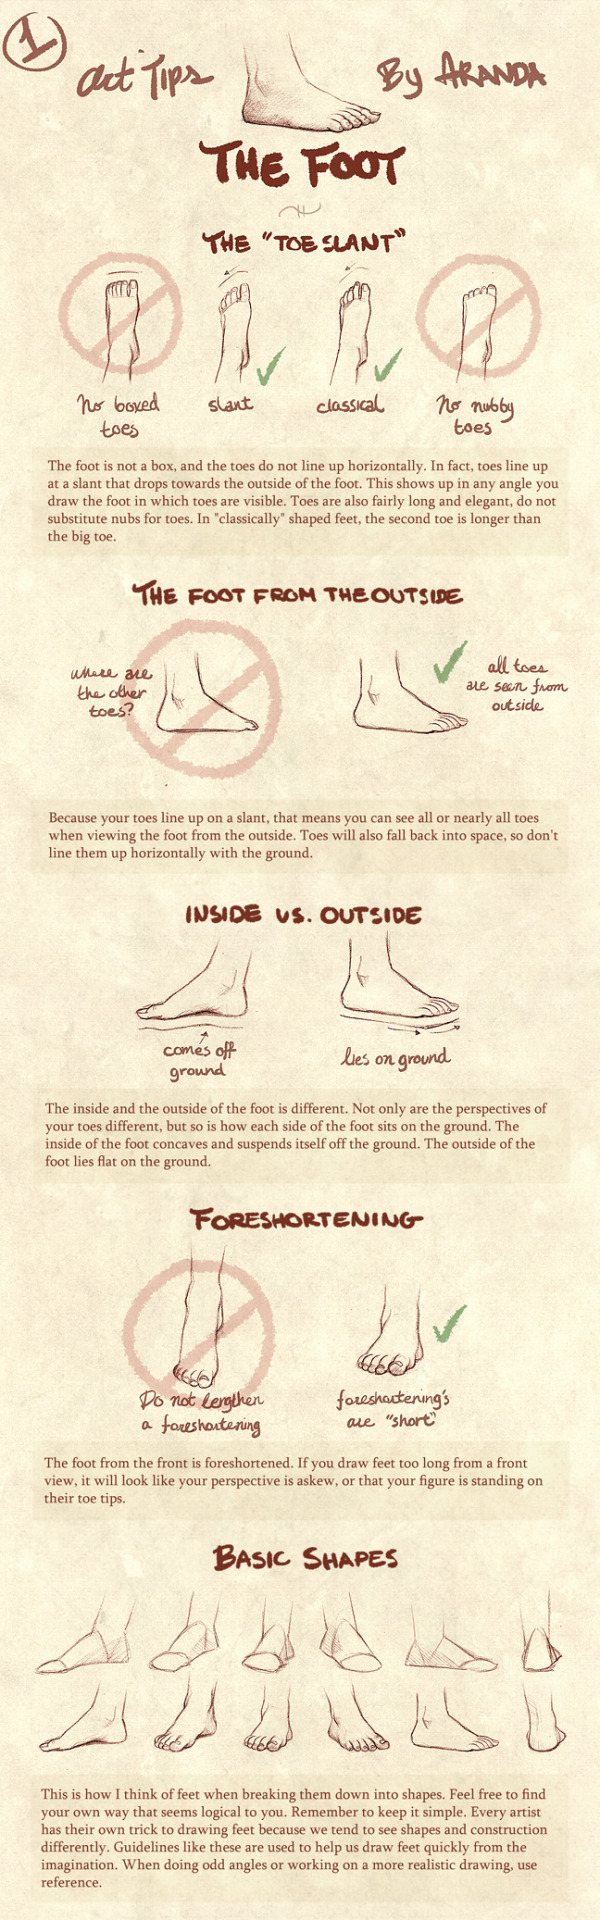
DeviantART – ArandaDill
How do you draw unkempt hair in a more simple style? I have a character who the most he does is probably brush his fingers through it but I can't draw him not looking like he has nicely styled wavy locks.
Using a variety of hair textures and abstract hair shapes can help create the messy effect you want;
Here’s an example for hair textures, The left is a full head of curly hair; on the right I made some generals shapes on the base to guide where the textures would change, this could be as smile and complex as you want!


If your character reference doesn’t allow for different hair textures, you can always try building abstract or conflicting shapes out of the hair itself. Long hair which is messy generally has lots of fly-aways you can shape, as well as crude edges or bunching together at random. Short hair is more diverse in my opinion, it depends on the texture and the cut, but I would try to group part of the hair together at random, and direct the shapes to give a sense of asymmetry to the silhouette. The simpler your style needs to be, the fewer general the shapes you may want to build into the body of the hair.

I hope this gives you some fun ideas!
(With Love from Mod Koikro55)
im sorry to ask, but i was wondering if you may show us how to draw abs please?
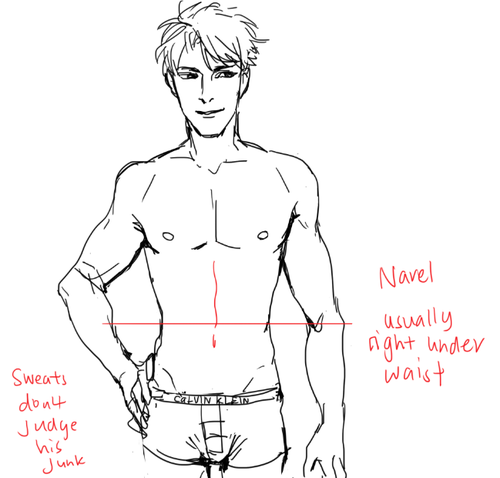
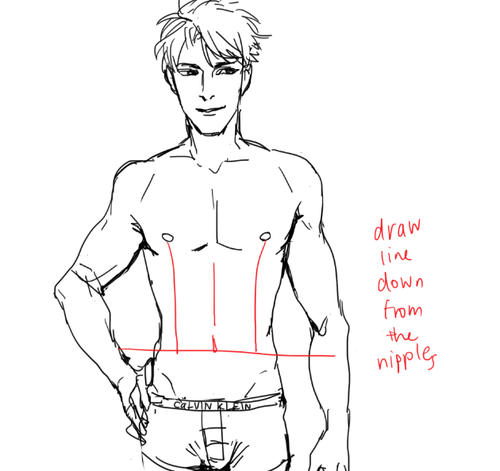
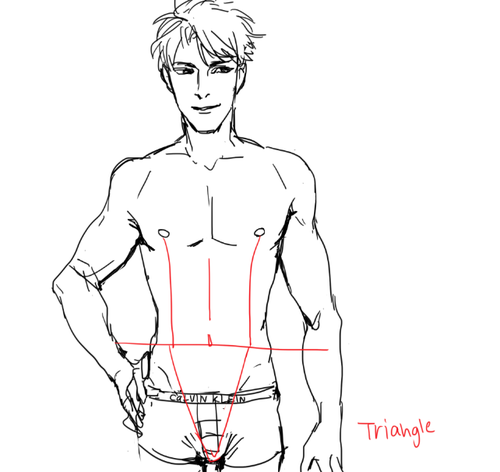
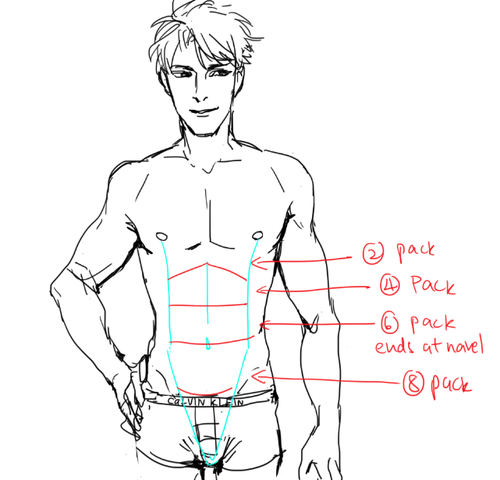
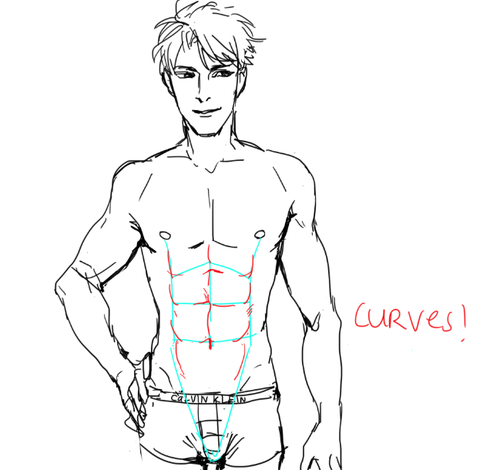
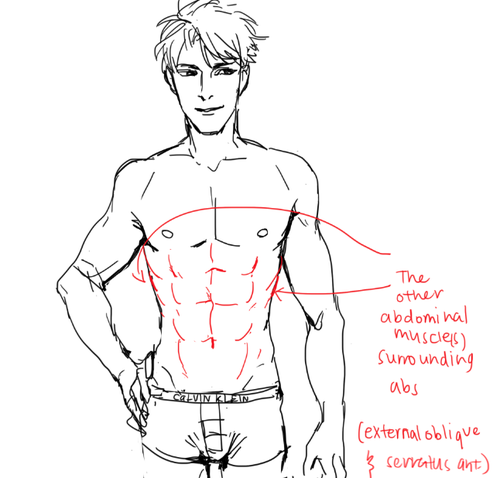

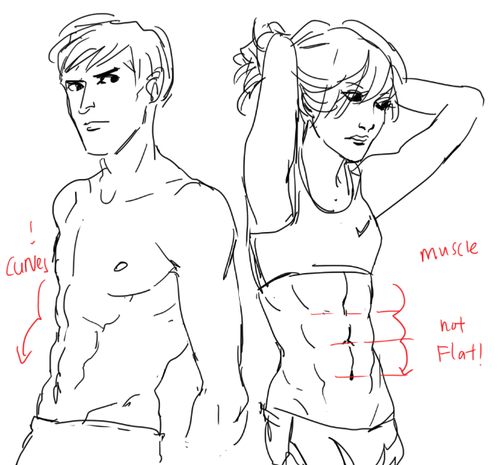
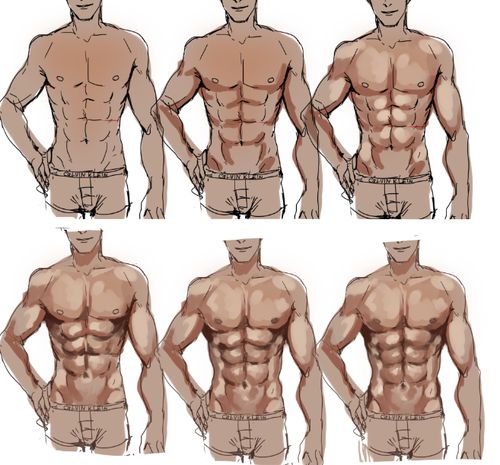
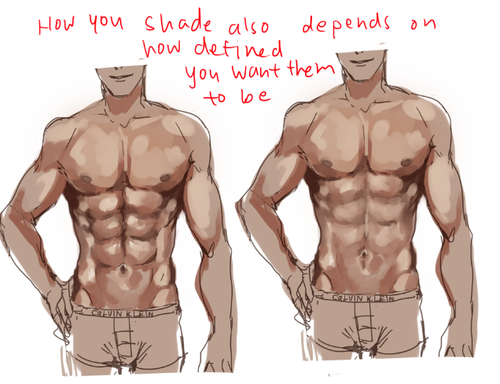
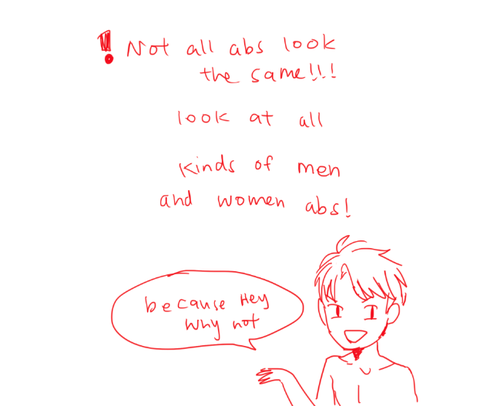
I STILL TAKE A LONG TIME TO DRAW OK looking abs HHahA SOBS AND LIES DOWN but yeah!! GO LOOK AND Some real life abs i promise you it’ll be ten times more helpful than my crude doodles!!
PLS TAKE THIS WITH A GRAIN OF ASALT AND Hope this helps u out a little!!
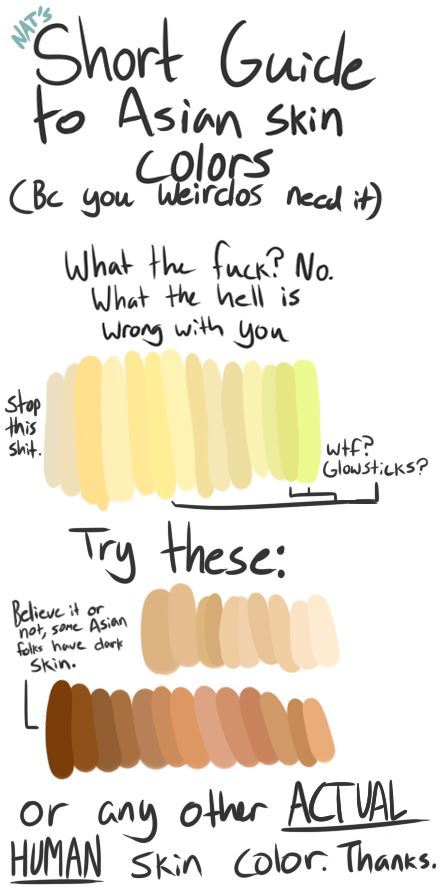
Hi! Made an incredibly quick and easy to comprehend guide because you freaks need it tbh. Image quality kinda sucks but whatever, you get it. Stop putting yellowface on my dash.
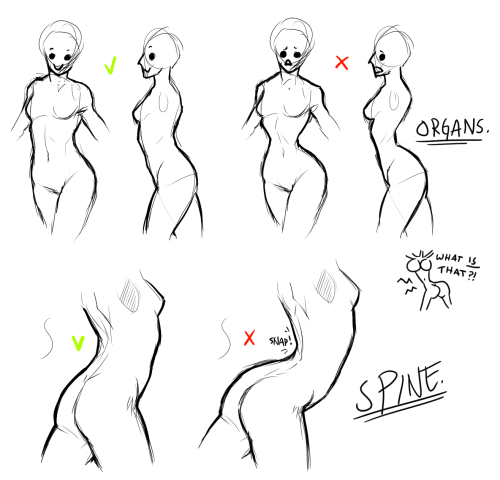

I don’t really think I’m that good at anatomy (or females) but this is quite a popular request so… I’m making a tutorial, and this is the part to show you what NOT to do with your fellow humans. More coming… eventually.
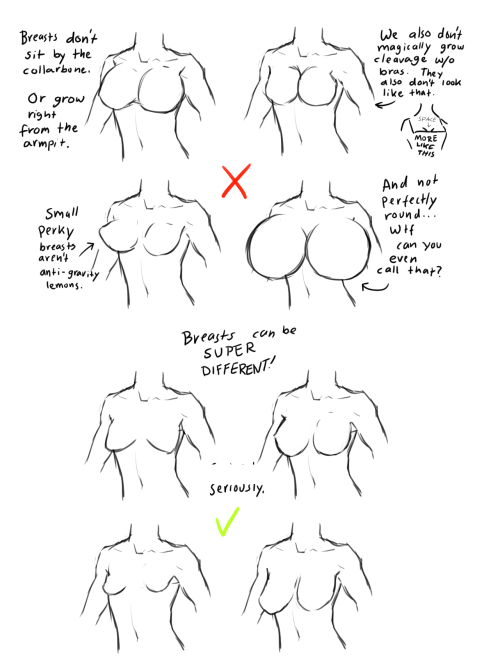
I suck at breast variations, but I try; see this page for awesome references: x
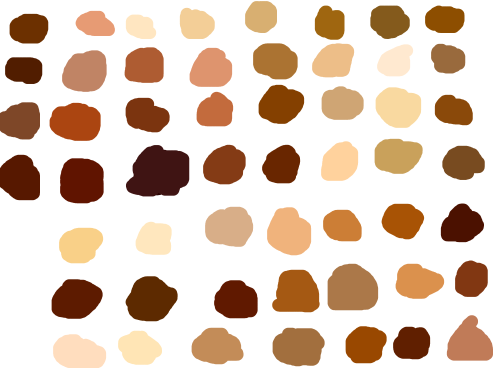
skin color ref because some of yall non-black poc and whites keep fucking up as if yall don’t know there’s other shades of brown when u racebend for woke points or something
(non-black artists please reblog)
✧ simple tips for how I draw full beards ✧

[ I don’t take tutorial requests, so please don’t ask for more! ]
Keep reading
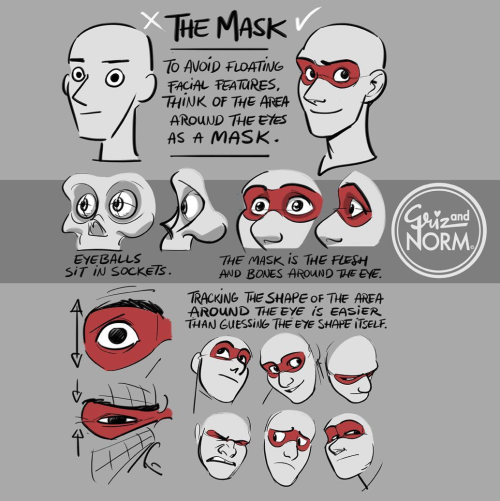
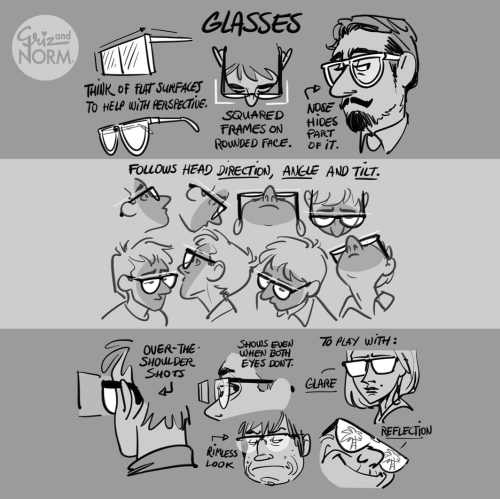
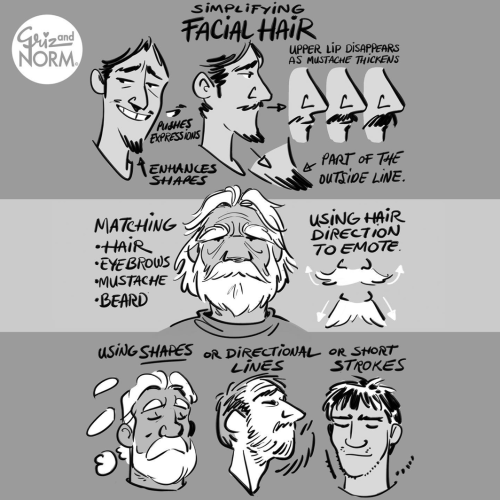
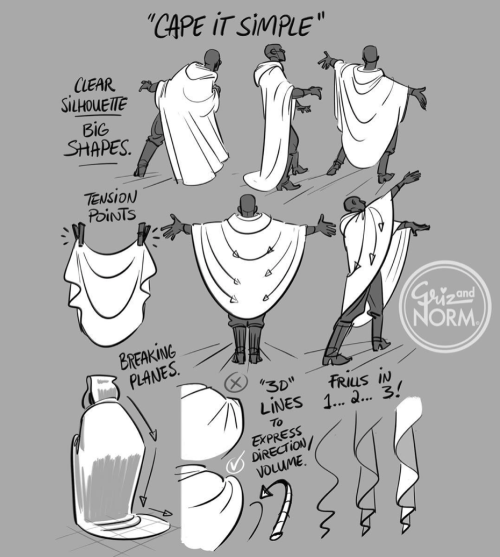
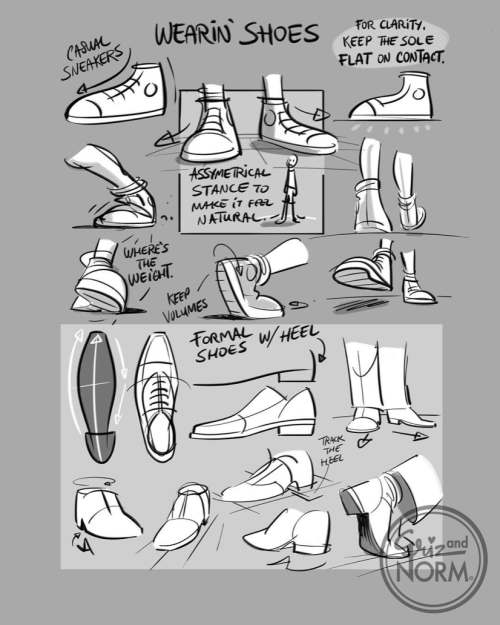
Drawing tips by Disney artists Griz and Norm Lemay
I struggle INSANELY with doing 3/4 view art. Do you have any tips? I've found a couple guides on pinterest but I'm still having a little trouble.
Hi Anon! So sorry to hear you’re struggling. 3/4th is my favorite comfort zone, but I don’t know how well I can walk you through it any better than the many tutorials out there. There are plenty that do tutorials much better than me and they all kind of follow the same format for 3/4th view, but I’ll try my best to break down my method as understandably as possible!
1: I always start with my eye and middle line guide in whatever direction I want them facing. The middle one is more important than the original eye line.

2: Next I’ll do my head circle to keep my skull guideline and connect it to the bottom of my middle guideline to make the jaw. You’ll want to be kind of careful about this part and not just draw a gigantic circle or one that’s too small. Try to keep it about the size you want your actual head.
Don’t worry too much about the eye line at this point as you’re mostly getting the general shape of your head at this point. You can always edit your eye line later and adjust it to where you need it to be.
If you’re doing a character that has defined cheek bones (Like Vaard who has CHEEK BONES) you can do a line from the side of the head to the side of the chin like I did here that always acts as a great guide to the general area if you’re going to define it.
Make sure this step is on its own layer separate from the rest of your lines.

3: Now using your line and circle guide, go ahead and fill out the far side in whatever shape your character’s face is (angular, round ect.). It’s easiest starting from the top of your brow bone. Keep in mind your center line as this is your direct center of the face.
Vaard’s got a pretty basic, generic face shape as a base. It’s very sharp and square so I did a lot of straight lines with little to no curves to them.
At this point, it’s best to have a reference of a face in the shape you’re going for if you struggle with this step. References are your friend when stepping into unknown territory and angles.
You can also add your hair line guide as well to make sure it’s not too high or too low.
See how the circle we started with now becomes the full skull and makes up the back? This is why we want to be careful about the placement earlier and not go way out of the anatomy you’re going for.

4: Ok now for the fun part. What I like to do, is draw little Star Trek badges under the highest point of the brow you’re going for and on the far side, connect it to the cheek. This becomes your brow/cheekbone on the far side, and your inner eye socket guide on the inside. Don’t worry if they’re too big, you can always erase them later but we’ll come back to these in a bit. You just want the top to be fairly even with each other.

5: So to help line up your eyes in ¾ths view, you can draw a line from each side of the chin or nose. The inner corner of the eyes will usually sit near or close to the same line as the nostril or chin edges. (unless you’re drawing a very narrow or very wide nose, then go with the chin guide lines instead).
My original eye line didn’t quite line up with were I wanted to actually put my eyes but it pretty much lined up with the bottom inside corners so I kept it where it was.
Using the outside ‘Star Trek Badge’ just carry that top line on down and bam, nose bridge perspective!

6: Now using those badge shapes still, you can go ahead and curve your eyebrows right on top of the lines and you have your brows! This really only works if you’re going for a neutral expression though with little to no brow movement or expression.

7: From this point, it’s just a matter of adding your details! You already have a fairly solid base and anything at this point is very easily tweaked or shifted.

8: At this point you can erase all of your guide lines (which should be on a separate layer from your actual face outlines.) and if you happen to have a character with fairly deep set eyes, you can use those badge guides again to shade the eye sockets. Just shade inside them and you have some decent shadow guides.

I hope this helped some! Sorry if it looks like most other tutorials and guides out there, but I did my best. Remember, references are your friend when doing angles you’re not familiar with, even if it’s taking a picture of your own face just to see where shadows fall or how the nose looks at that angle! (The other eye is also the worst. I am in no position to give tips on the other eye, sometimes I don’t even draw it lol).
Best wishes and wishing you the best of luck as you learn to draw in ¾ths! It’s one of the most fun angles to draw once you get the hang of it!
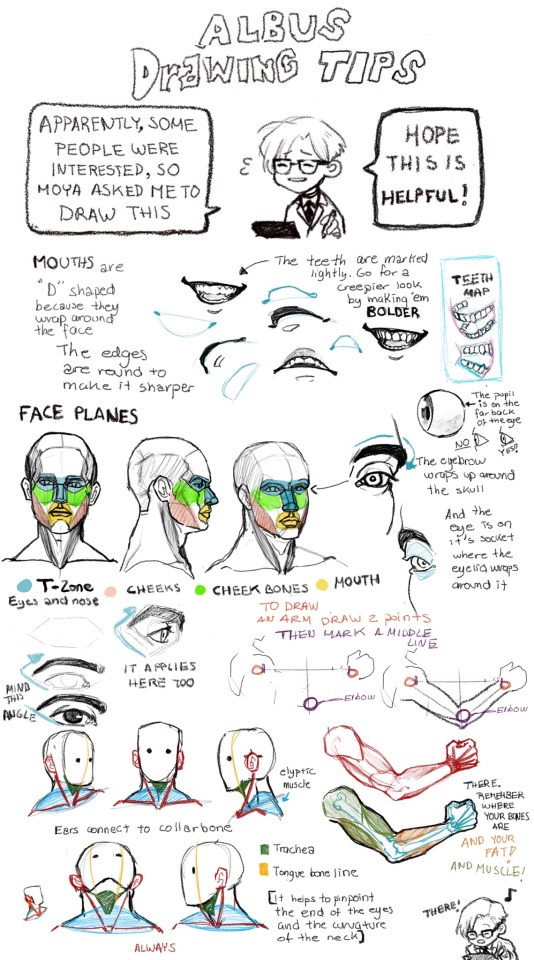
Some drawing tips I was asked for. I might draw later how to draw expressions and hands, but for now, here, thanks for the interest! And hope this is useful!
-
 xxxeinsamxengelxxx reblogged this · 1 month ago
 -
 one-eyed-imp liked this · 2 months ago
 -
 thebrofriends liked this · 3 months ago
 -
 printsarchive reblogged this · 3 months ago
 -
 5firin liked this · 4 months ago
 -
 crookednerddream liked this · 4 months ago
 -
 dontworryaboutitbae liked this · 4 months ago
 -
 crowleyssunshine liked this · 4 months ago
 -
 blueeco-aurath liked this · 4 months ago
 -
 syrreevi reblogged this · 4 months ago
 -
syrreevi liked this · 4 months ago
-
 itsonlyanapple liked this · 4 months ago
 -
 goldghoti liked this · 4 months ago
 -
 soraiku reblogged this · 5 months ago
 -
 inspectorcrayon liked this · 5 months ago
 -
 idk-ace123 liked this · 5 months ago
 -
 cryptidsoulart reblogged this · 5 months ago
 -
cryptidsoulart liked this · 5 months ago
-
 love-laugh-lobotomy reblogged this · 5 months ago
 -
love-laugh-lobotomy liked this · 5 months ago
-
 sunegami liked this · 6 months ago
 -
 scythemage liked this · 6 months ago
 -
 cremebrulee-69 reblogged this · 6 months ago
 -
 artking-4 reblogged this · 6 months ago
 -
 pinkpileofshit liked this · 6 months ago
 -
 musingsofagloomywitch reblogged this · 6 months ago
 -
 kelpiwren liked this · 6 months ago
 -
 weirdbeancurd liked this · 7 months ago
 -
 whatshehassaid reblogged this · 7 months ago
 -
whatshehassaid liked this · 7 months ago
-
 certified-monster-fucker reblogged this · 7 months ago
 -
 sweetlyminiaturesublime liked this · 8 months ago
 -
 sillyghostboi liked this · 8 months ago
 -
 bbromeus liked this · 8 months ago
 -
 eclecticcosmonaut liked this · 8 months ago
 -
 bpdvulpine liked this · 9 months ago
 -
 cringeisdeadandsoami liked this · 9 months ago
 -
 qvert liked this · 9 months ago
 -
 followingthefanfiction reblogged this · 9 months ago
 -
followingthefanfiction reblogged this · 9 months ago
-
followingthefanfiction liked this · 9 months ago
-
 thefancywerewolf liked this · 10 months ago
 -
 kaiartx liked this · 10 months ago
 -
 averagegremlin liked this · 10 months ago
 -
 mcdonalds-us reblogged this · 10 months ago
 -
 un1-un1corn reblogged this · 10 months ago