✧ Simple Tips For How I Draw Full Beards ✧
✧ simple tips for how I draw full beards ✧

[ I don’t take tutorial requests, so please don’t ask for more! ]
Keep reading
More Posts from Aether1984 and Others
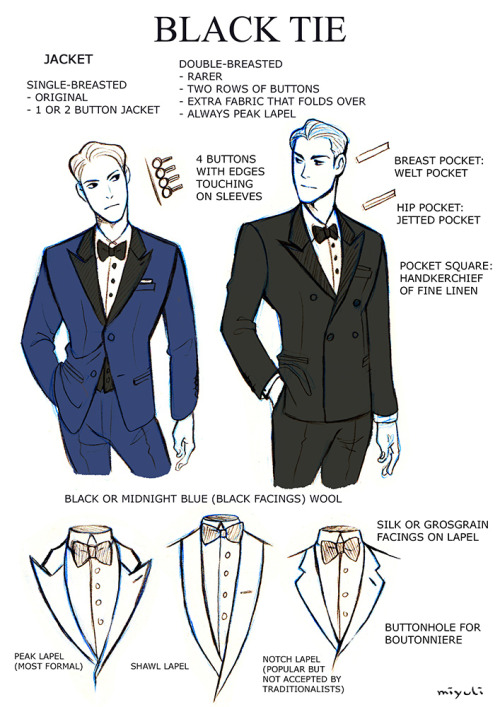
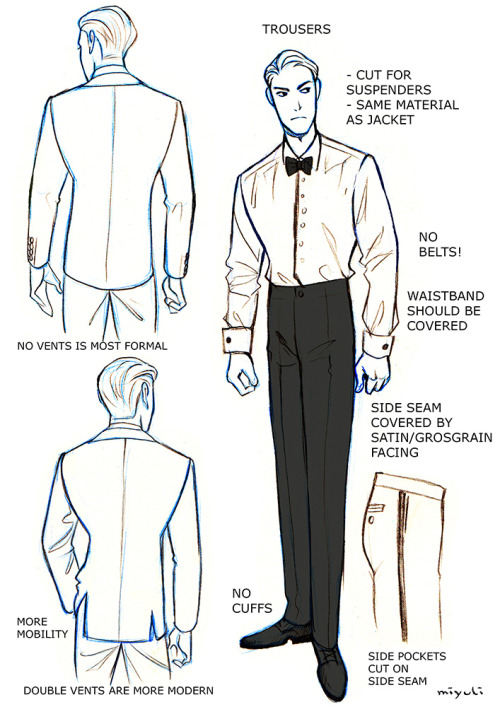

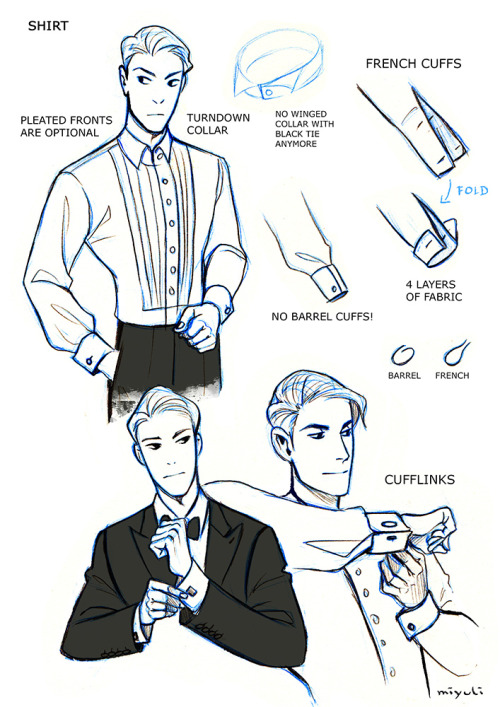
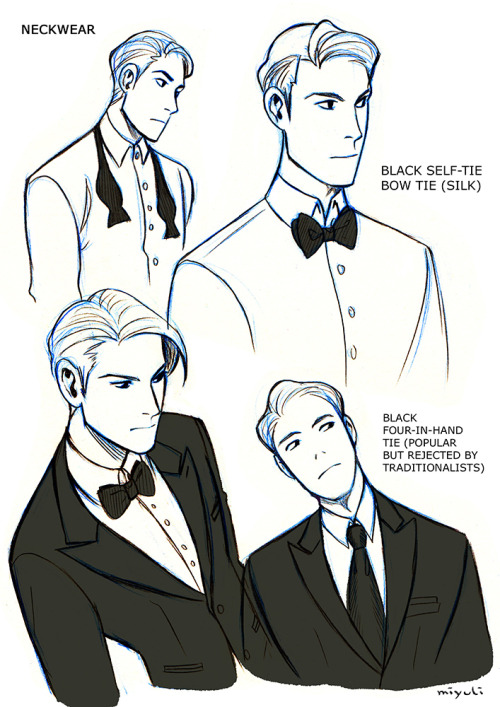
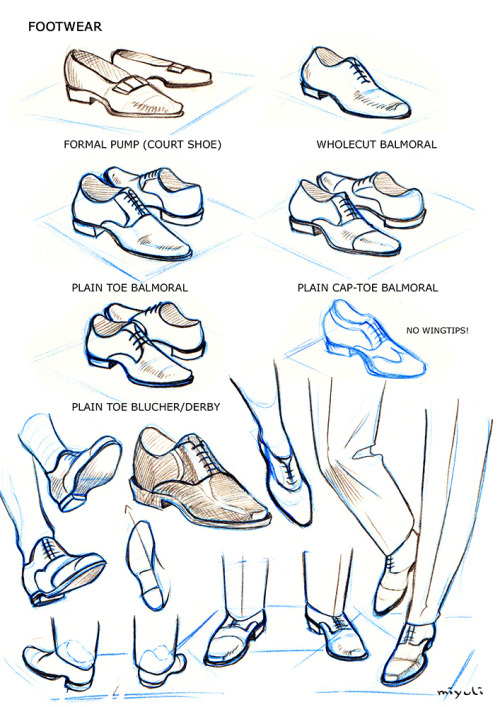
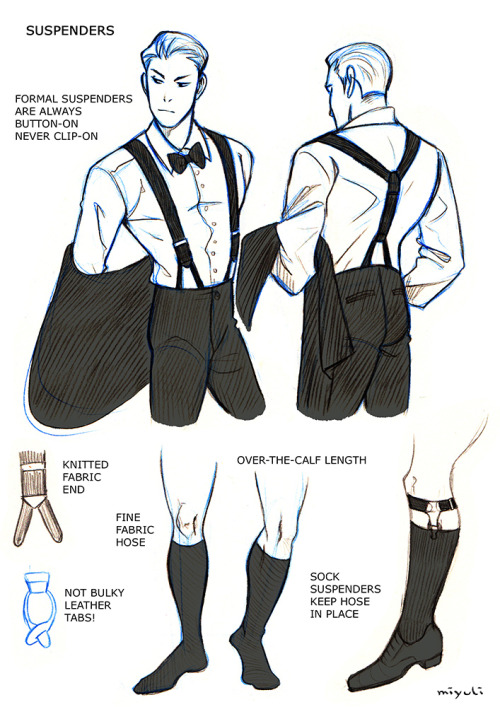
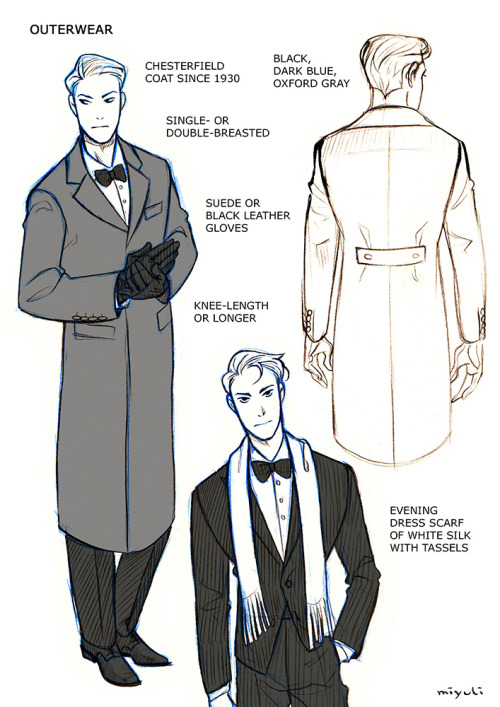
I’ve been studying the classic black tie dress code (mainly from here) so I thought I could share my notes. Maybe they can be helpful to someone else, too. If I made any mistakes or things are really confusing please tell me. I also have some notes on white tie which I could share as well…


E.J Sue’s “Mechaforce” is one of the few “How to Draw” books I would point newbies looking to get into drawing robots to. It emphasises knowing the basics (Very difficult to draw a robot properly if you can’t use perspective) and fundamental shapes and even arm techniques, and gives a neat insight into how mechanical forms work in art.
These are just a few of the examples from the anatomy section of the book. It’s currently on sale on Amazon and worth checking out, though I will note it is not a “be all end all” resource, thankfully you can fill in your knowledge gaps elsewhere.
hey! can i please get good references of like, simplifications of leg muscles and i guess legs in general? probably the pelvis too, the lower body is just killing me right now. (i mean in art, my own legs are fine =P)
No problem, anon! Here are some notes on legs that I’ve picked up, but there are probably some more thorough ones (with actual muscle names lol) floating around the web if you want to check those out as well. Just remember to balance curve/straight on either side.

***EDIT: The stick figure thing is called “crickets” by the creator because they look like cricket legs. I just remembered that.***
Here are some of my favorite guides to muscle simplifications by Will Weston and Sycra Yasin:

(Source: Will Weston on Instagram)
(Source: Sycra Yasin)
And for good measure, here’s some refresher on more gestural ways of looking at limbs:

^ Leg examples by George Brigman
-Mod Future (ko-fi)


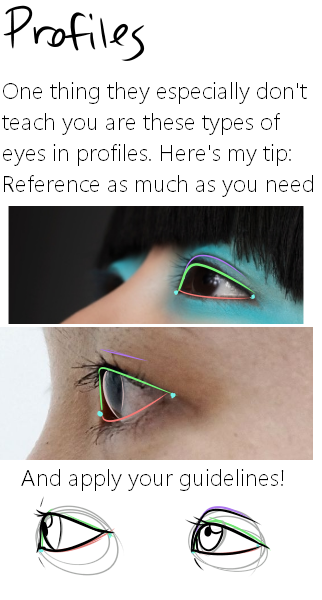
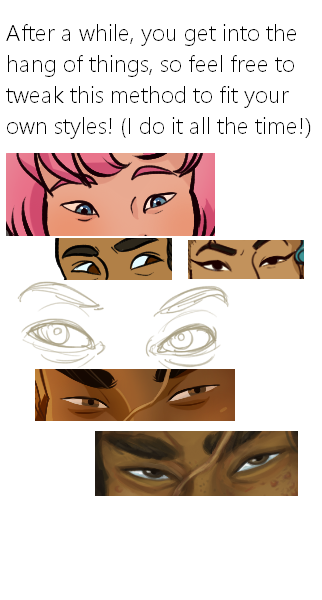
Here it is, my long winded tutorial, complete with some step by step action. I see a lot of people talk about wanting to diversify their artwork but not knowing how. This is my help to you. You really should take the time to invest in learning diverse eye shapes as diverse artwork always makes you a better artist. And frankly I’m really tired of drawing tutorials that talk up character diversity but only have the stereotypical “one Asian eye”.
I did some step by steps for those three diagrams, but I actually got them from this blog which has 14 of those examples! (Bonus: it’s a makeup blog so if you need help with that or want some idea of how to shade these eyes, there ya go)
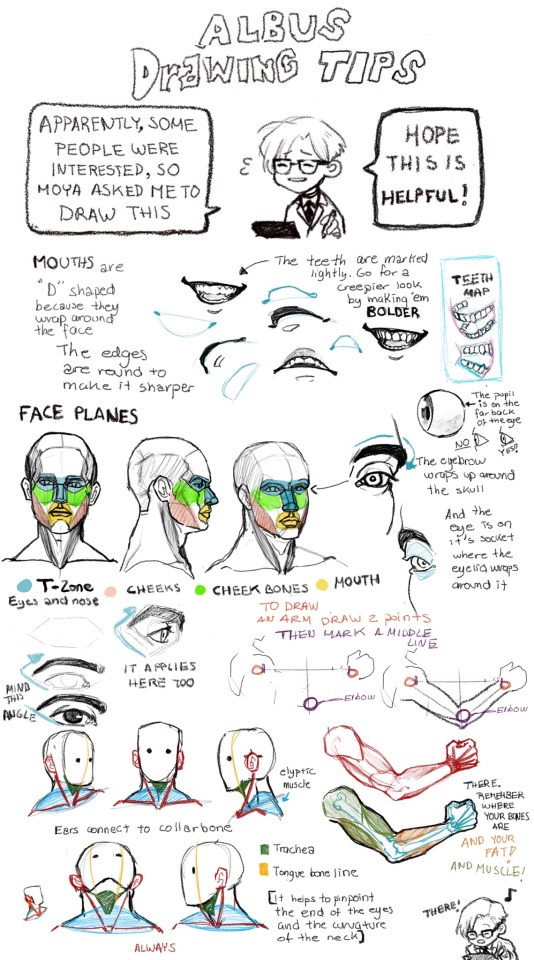
Some drawing tips I was asked for. I might draw later how to draw expressions and hands, but for now, here, thanks for the interest! And hope this is useful!
Drawing Heads and Faces: Cheekbones

I’ve found that drawing the head starts to make a lot more sense once you start thinking about cheekbones and cheeks, and how the fit into the head structure.
You might be aware of the Mysterious Indent that Looks Good Next to the Outer Part of the Eye, or the Mystery Indent for short.
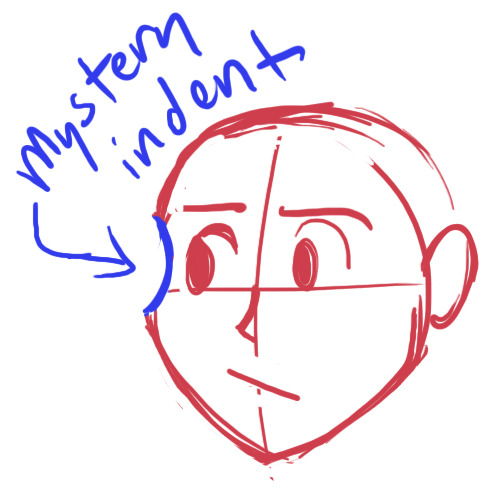
Drawing a Mystery Indent may serve you fine if you only draw the head from flat angles, but it falls apart when you get adventurous.

Why isn’t this making sense anymore?
Drawing a ‘Mystery Indent’ is an attempt to imply cheekbones without knowing how they actually incorporate into the skull, and this is why it looks so unconvincing when you use it to draw the head in anything other than ¾ view.
The cheekbones wrap around the head and eye sockets from above the bridge of the nose. The concave you draw if you draw the ‘Mystery Indent’ is a misunderstanding. There is no concave. You should instead be thinking of this as where the eye socket/brow overlaps the (convex!) cheekbone.


Compare the cheekbones on both sides for placement. They should match up and correspond with each other.
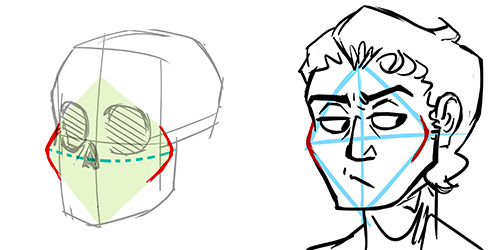
(Knowing cheekbone structure helps when drawing gaunt characters, because their cheekbones may stick out. Remember to compare the cheekbone placement on both sides!)

* This is part of a much larger tutorial I’m working on about head, face, and facial feature structure. Hopefully more to come eventually?
Could you please show us how to draw faces with nice fangs please.

Hope this is helpful!


I have to draw a lot of gold and metal for my work, but wasn't happy with any of the metal tutorials i could find around. I prefer really specific instruction, so after some research i put together what i think works as a generalist's guide/tutorial. Not perfectly accurate, but i hope it's helpful!


disclaimer: I am east asian. if anyone who is not white sees anything wrong with my phrasing, inaccuracies, or insensitivity, or something I missed, please feel free to add on. I’m just one person with one perspective; none of what I say should be taken as The Singular way to draw an Asian character. if you havent done so already, please take the effort to expand your view of Asian culture outside this one tutorial.
if a white person reblogs this and adds something stupid I’m going to bite and kick you like a wild animal
Can you give any tips on how to draw big bulky people like Hazel/Muriel/Gretchen?
I hope this can be helpful to you!

I don’t really think about how I draw characters with different body types at this point because I’ve practiced it so much but these are some rough notes on what I do.
The core of it is to just draw using thicker shapes. Don’t worry too much about exaggeration as it’ll help get you out of the mould of drawing smaller characters by default. The neck, the arms, the torso, the legs, just draw them thicker.
Study references of fat or muscular to see how the definition changes but in principle, it isn’t that much different to drawing any body type.
I draw Hazel and Gretchen to be quite bulky but because they’re teenagers when I draw them, they’re still quite soft and lack extreme definition or sharp lines, unlike when I draw Muriel who’s meant to be extreme and musclebound. Changing how soft you draw the character or how much detail you draw changes whether they look bulky from fat or muscle.
-
 vampirthedarkone liked this · 1 month ago
 -
 applejuicedragons liked this · 1 month ago
 -
 nikkilbook liked this · 1 month ago
 -
 nutmegpirate reblogged this · 1 month ago
 -
nutmegpirate liked this · 1 month ago
-
 sareybwrites liked this · 1 month ago
 -
 superotakugirl1993 reblogged this · 2 months ago
 -
 stabby-crabby-ricky liked this · 2 months ago
 -
 lenasall liked this · 2 months ago
 -
 okoyoko liked this · 2 months ago
 -
 enlad liked this · 2 months ago
 -
 loganismybodyguard liked this · 2 months ago
 -
 revengexmason liked this · 2 months ago
 -
 mistermegee liked this · 3 months ago
 -
 ardalinea liked this · 3 months ago
 -
 asexual-cat-furry liked this · 3 months ago
 -
 vnomsnakes reblogged this · 4 months ago
 -
vnomsnakes liked this · 4 months ago
-
 cin-midnight liked this · 4 months ago
 -
 feehaw liked this · 4 months ago
 -
 nickolox reblogged this · 5 months ago
 -
nickolox liked this · 5 months ago
-
 fatenpara liked this · 6 months ago
 -
 lavendermoomoo liked this · 6 months ago
 -
 fear1ing liked this · 6 months ago
 -
 zombvibes liked this · 6 months ago
 -
 sayuniart liked this · 6 months ago
 -
 beneaththeshadows liked this · 6 months ago
 -
 joancrawsford reblogged this · 6 months ago
 -
 cicadafooled liked this · 6 months ago
 -
 barovianbunny liked this · 6 months ago
 -
 greyauras reblogged this · 7 months ago
 -
 cruzificez liked this · 7 months ago
 -
 willispsychotic liked this · 7 months ago
 -
 thrawn1800 liked this · 7 months ago
 -
 orientorigami liked this · 7 months ago
 -
 artcollectorsblog liked this · 7 months ago
 -
 laing-caster reblogged this · 7 months ago
 -
laing-caster liked this · 7 months ago
-
 cicyi liked this · 7 months ago
 -
 zombiehearts2007 liked this · 7 months ago
 -
 scoopaspoonful liked this · 7 months ago
 -
 violetixdigo liked this · 8 months ago
 -
 awesomestdork liked this · 8 months ago
 -
 chayteaz liked this · 8 months ago
 -
 rockstar80s liked this · 8 months ago
 -
 novakaosart liked this · 8 months ago
 -
 oluartz liked this · 8 months ago