I Struggle INSANELY With Doing 3/4 View Art. Do You Have Any Tips? I've Found A Couple Guides On Pinterest
I struggle INSANELY with doing 3/4 view art. Do you have any tips? I've found a couple guides on pinterest but I'm still having a little trouble.
Hi Anon! So sorry to hear you’re struggling. 3/4th is my favorite comfort zone, but I don’t know how well I can walk you through it any better than the many tutorials out there. There are plenty that do tutorials much better than me and they all kind of follow the same format for 3/4th view, but I’ll try my best to break down my method as understandably as possible!
1: I always start with my eye and middle line guide in whatever direction I want them facing. The middle one is more important than the original eye line.

2: Next I’ll do my head circle to keep my skull guideline and connect it to the bottom of my middle guideline to make the jaw. You’ll want to be kind of careful about this part and not just draw a gigantic circle or one that’s too small. Try to keep it about the size you want your actual head.
Don’t worry too much about the eye line at this point as you’re mostly getting the general shape of your head at this point. You can always edit your eye line later and adjust it to where you need it to be.
If you’re doing a character that has defined cheek bones (Like Vaard who has CHEEK BONES) you can do a line from the side of the head to the side of the chin like I did here that always acts as a great guide to the general area if you’re going to define it.
Make sure this step is on its own layer separate from the rest of your lines.

3: Now using your line and circle guide, go ahead and fill out the far side in whatever shape your character’s face is (angular, round ect.). It’s easiest starting from the top of your brow bone. Keep in mind your center line as this is your direct center of the face.
Vaard’s got a pretty basic, generic face shape as a base. It’s very sharp and square so I did a lot of straight lines with little to no curves to them.
At this point, it’s best to have a reference of a face in the shape you’re going for if you struggle with this step. References are your friend when stepping into unknown territory and angles.
You can also add your hair line guide as well to make sure it’s not too high or too low.
See how the circle we started with now becomes the full skull and makes up the back? This is why we want to be careful about the placement earlier and not go way out of the anatomy you’re going for.

4: Ok now for the fun part. What I like to do, is draw little Star Trek badges under the highest point of the brow you’re going for and on the far side, connect it to the cheek. This becomes your brow/cheekbone on the far side, and your inner eye socket guide on the inside. Don’t worry if they’re too big, you can always erase them later but we’ll come back to these in a bit. You just want the top to be fairly even with each other.

5: So to help line up your eyes in ¾ths view, you can draw a line from each side of the chin or nose. The inner corner of the eyes will usually sit near or close to the same line as the nostril or chin edges. (unless you’re drawing a very narrow or very wide nose, then go with the chin guide lines instead).
My original eye line didn’t quite line up with were I wanted to actually put my eyes but it pretty much lined up with the bottom inside corners so I kept it where it was.
Using the outside ‘Star Trek Badge’ just carry that top line on down and bam, nose bridge perspective!

6: Now using those badge shapes still, you can go ahead and curve your eyebrows right on top of the lines and you have your brows! This really only works if you’re going for a neutral expression though with little to no brow movement or expression.

7: From this point, it’s just a matter of adding your details! You already have a fairly solid base and anything at this point is very easily tweaked or shifted.

8: At this point you can erase all of your guide lines (which should be on a separate layer from your actual face outlines.) and if you happen to have a character with fairly deep set eyes, you can use those badge guides again to shade the eye sockets. Just shade inside them and you have some decent shadow guides.

I hope this helped some! Sorry if it looks like most other tutorials and guides out there, but I did my best. Remember, references are your friend when doing angles you’re not familiar with, even if it’s taking a picture of your own face just to see where shadows fall or how the nose looks at that angle! (The other eye is also the worst. I am in no position to give tips on the other eye, sometimes I don’t even draw it lol).
Best wishes and wishing you the best of luck as you learn to draw in ¾ths! It’s one of the most fun angles to draw once you get the hang of it!
More Posts from Aether1984 and Others
hope this isn't too annoying but you do have any tips for drawing teeth? i l o v e the way you draw them but i can't seem to draw fangs that well :/

I've seen some amazing tutorials for teeth which explain much more about how teeth fit in the skill, which is very useful! But this is a very quick explanation of how I do Teeth! I don't often outline teeth too hard, unless I'm doing tusks, since the gums and teeth edges suggest pretty well without em!
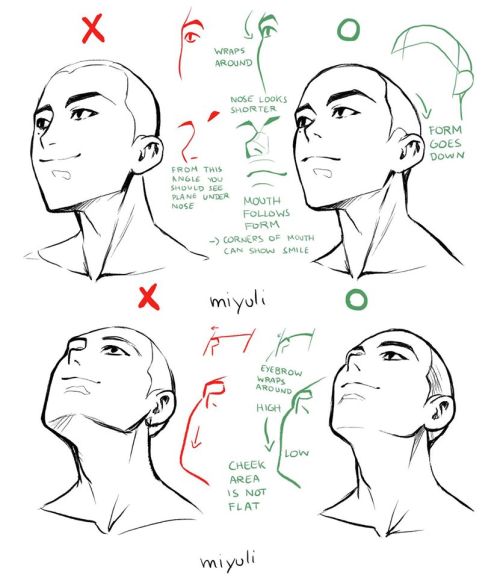

Some head related art notes. I hope some of these are a bit helpful. Patreon / Gumroad


Masters of Anatomy


Very happy to finally post my second tutorial ! You guys have been so kind the last time and I really hope this helps some of you in your art path 🙇♀️
hi! umm pls pls PLS if you have the time, do a thingy on arms when you get the chance, they are so hard i could almost cry aslkdjaskjsas, i keep forgetting how many curves an arm should have/how long it should be (in diff positions/when it's not resting at the hips) etc etc etc ahhh omg please!! thank you sosososo much, i l♡ve all of your art and i hope you have a nice day!! ✧ ㅠㅠ ✧


I don’t want to go into detail in terms of muscles, but I’m sure you can find them if you google arm muscles! Hope this helps u out a little!


i want to tell you something and i hope it helps


Simple to Complex by Anatomy For Sculptors
Support the artist and check out their Kickstarter!


Body Block art refs.
Hey! So I made these for friends but I also thought I would share them here! Please don’t remove my credits pls I don’t wanna have to watermark my work :(
Feel free to save. Please don’t respost, if you do ONLY on Instagram and credit me: jentaculargums
If you post it on Instagram you HAVE TO TAG ME and or put my name in the bio of the post. If you don’t I will report you and send my fucking goons to get that shit taken down, be respectful.
Enjoy! If this goes over well I’ll post some more like legs, arms, hands and feet ref sheet, perspective ect.

Les’ get organic, cuz bones should be insects.
Also , hip dips <3
How do I choose which details to draw in non-photorealistic art? I feel so tempted to try and draw everything, but then it looks too busy and cluttered. So many illustrators seem to have a balance of realistic proportions and stuff but not as many details
In semi-realistic styles, you have to choose what to keep and what to simplify. My advice would be to keep detail in the areas of focus (the face and the hands are good points of focus). Within the face, you also have smaller areas of focus, such as the eyes, nose, and mouth.
If you’re having trouble with drawing TOO much detail, try this exercise:
1) Try to draw the body/object/face in as few lines as possible while still looking like the original.
2) Then, figure out which parts look weird without the detail (the face, and eyes especially, will probably look flat or fake) and add in as much as needed.

Also! Don’t be afraid to look at those illustrators you think are doing this well and studying where they put how much detail in their drawings. You can learn a lot from observing other artists!
-Mod Future (ko-fi)
-
 kaja-gmbh reblogged this · 7 months ago
 -
 brightest-soul liked this · 9 months ago
 -
 chimeragonz liked this · 11 months ago
 -
 mantaray8448 liked this · 1 year ago
 -
 reviewcycle liked this · 1 year ago
 -
 certified-monster-fucker reblogged this · 1 year ago
 -
 art-emissss liked this · 1 year ago
 -
 deadelfdiary liked this · 2 years ago
 -
 darastrrix liked this · 3 years ago
 -
 tayaintshit reblogged this · 3 years ago
 -
 ksamcantdraw reblogged this · 3 years ago
 -
ksamcantdraw liked this · 3 years ago
-
 motherlesschild12 liked this · 3 years ago
 -
 spid3rman reblogged this · 3 years ago
 -
 kryehavocsblog liked this · 3 years ago
 -
 filkovaariik liked this · 3 years ago
 -
 idk-maybeperhaps liked this · 3 years ago
 -
 rouroboros liked this · 3 years ago