The Way You Draw Men Is Really Good, I Noticed In Your Post Where You Drew Some Of The Trolls As Gems.
The way you draw men is really good, I noticed in your post where you drew some of the trolls as gems. How do you go about constructing a male body? What's your sketching process? You also give Eridan an interesting face shape to accommodate his glasses. I'm very curious about your sketch process and your art in general!
Thank you!
I scribbled a quick thing to show you how I generally think when I draw… Disclaimer, my style is quite stylized, so in no way is my art accurate to real life nor should be used as a source material for accurate anatomy. 😂 Rather, this is a tutorial on how I conceptualize the human body when I draw it…
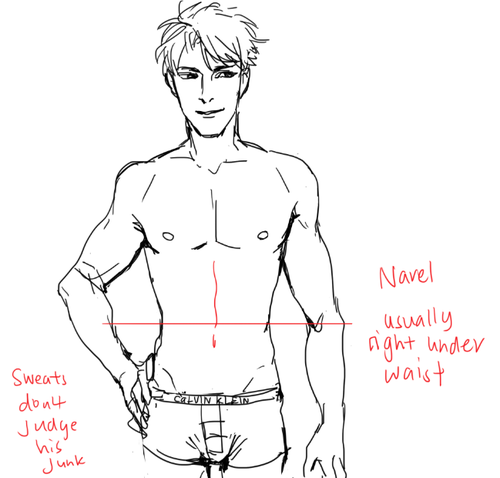
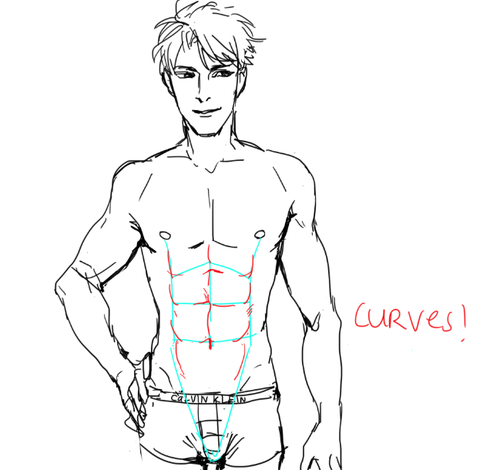
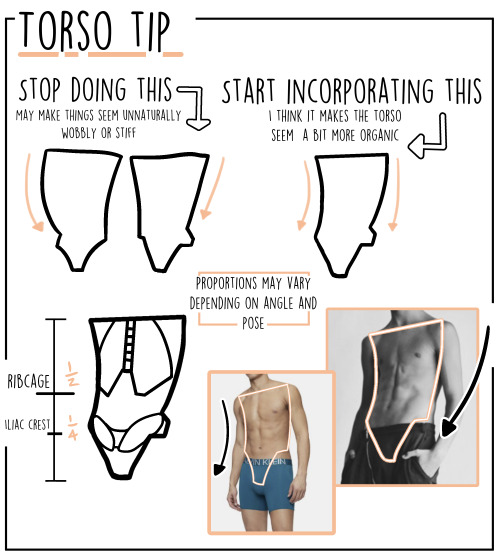
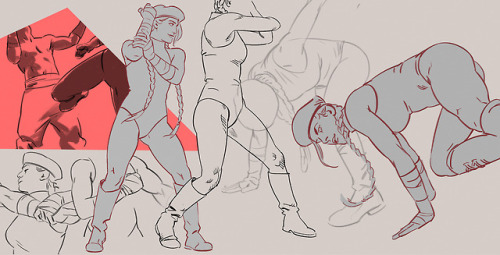
Usually when i draw bodies (not just masculine types), I usually conceptualize the torso into three “chunks.” What’s important about how to conceptualize these though, is understanding the volumetric shapes these take on and also where these chunks “end.”
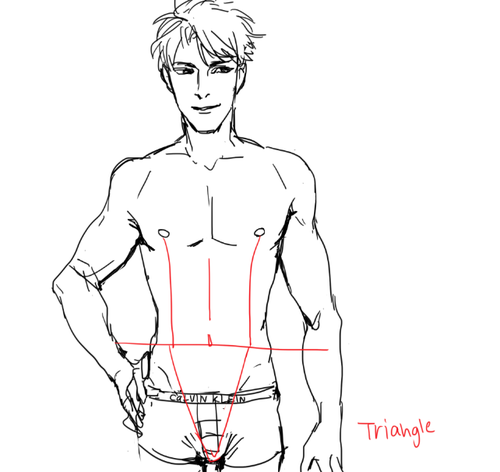
Below is an example of my take of a muscular body type with a strong triangular silhouette. The goal below was to emphasize on a strong, confident, and yet also appealing stature. I also put my emphasis on things I find personally attractive lol \o/

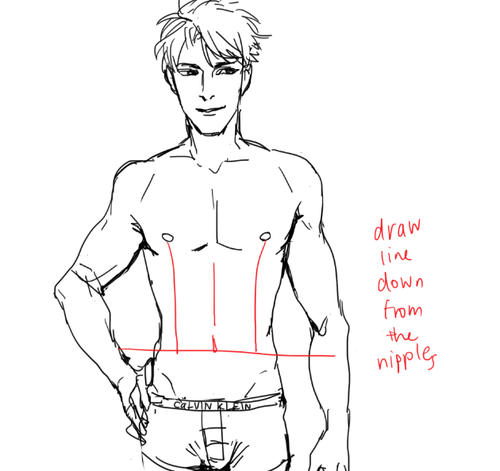
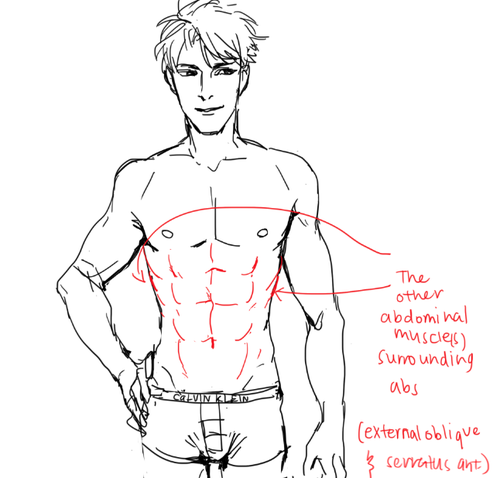
The red area encompasses the general shoulder and breast area.
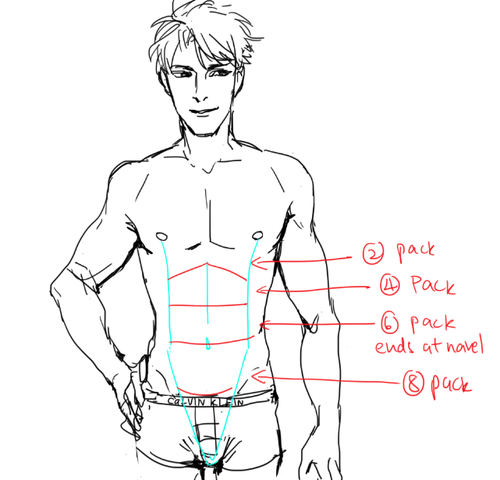
The green area is an indicator for the rib cage. (In some instances it would be better to draw the rib cage first because breasts overlap the ribcage.)
The blue area encompasses the rest of the stomach area. Technically the pelvic bone rises a bit higher into this area too, but for the sake of simplification to understand the basic shapes didn’t draw it in the above example.
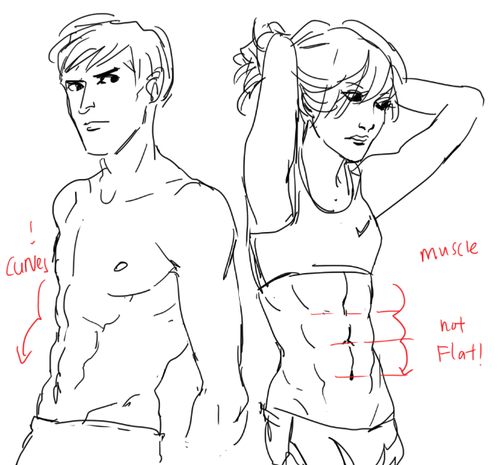
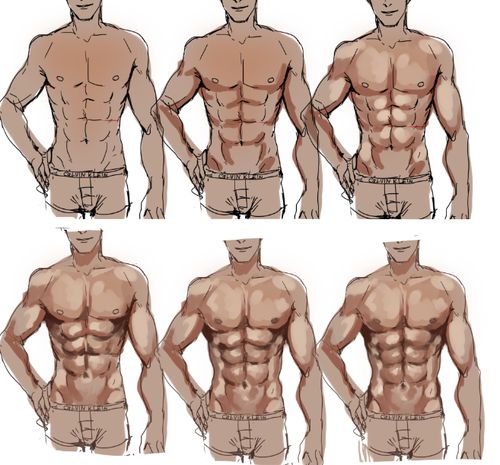
Here’s how it generally applies to some other body types!

I don’t always draw like this sometimes, but i think it’s a good start on how to conceptualize the body into simpler shapes.
Also, for much more lanky body types, I tend to simplify them moreso since they don’t need as much definition on muscle structure.

Please do remember it’s better to understand how to simplify the human body after doing studies of anatomy from real life!! I can’t emphasize enough how important studies are
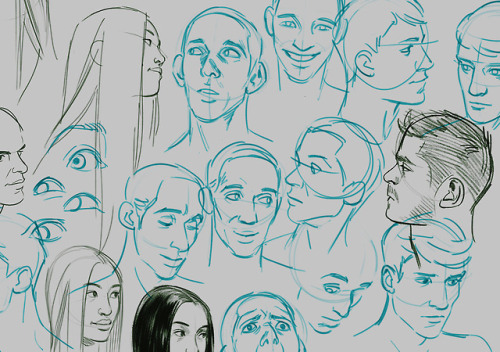
As for how I draw faces, I’ll save that for topic for a rainy day 😂 Hope this helps!
More Posts from Aether1984 and Others
hi! umm pls pls PLS if you have the time, do a thingy on arms when you get the chance, they are so hard i could almost cry aslkdjaskjsas, i keep forgetting how many curves an arm should have/how long it should be (in diff positions/when it's not resting at the hips) etc etc etc ahhh omg please!! thank you sosososo much, i l♡ve all of your art and i hope you have a nice day!! ✧ ㅠㅠ ✧


I don’t want to go into detail in terms of muscles, but I’m sure you can find them if you google arm muscles! Hope this helps u out a little!
im sorry to ask, but i was wondering if you may show us how to draw abs please?

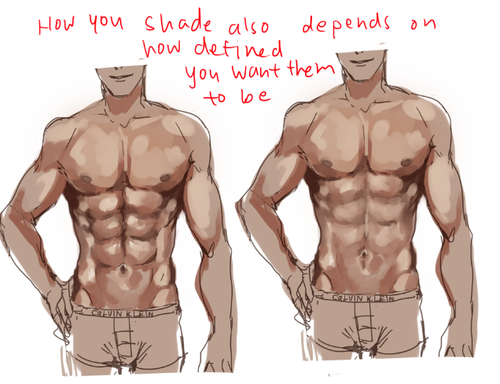
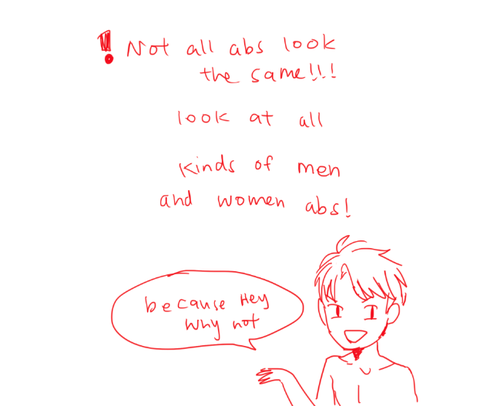
I STILL TAKE A LONG TIME TO DRAW OK looking abs HHahA SOBS AND LIES DOWN but yeah!! GO LOOK AND Some real life abs i promise you it’ll be ten times more helpful than my crude doodles!!
PLS TAKE THIS WITH A GRAIN OF ASALT AND Hope this helps u out a little!!
Eh, just a lil’ something.
“ Where we’re going we don’t need proper proportions “
So my friend Night expressed a general desire for help with profiles, and I figured I’d go ahead and whip this up! I’m no anatomy master or anything, but this is stuff that helps me quite a bit, so I figured I’d share… even if I have no idea how helpful it actually is. Writing tutorials is hard! Ah well, I hope it can be of some use.
Can you give any tips on how to draw big bulky people like Hazel/Muriel/Gretchen?
I hope this can be helpful to you!

I don’t really think about how I draw characters with different body types at this point because I’ve practiced it so much but these are some rough notes on what I do.
The core of it is to just draw using thicker shapes. Don’t worry too much about exaggeration as it’ll help get you out of the mould of drawing smaller characters by default. The neck, the arms, the torso, the legs, just draw them thicker.
Study references of fat or muscular to see how the definition changes but in principle, it isn’t that much different to drawing any body type.
I draw Hazel and Gretchen to be quite bulky but because they’re teenagers when I draw them, they’re still quite soft and lack extreme definition or sharp lines, unlike when I draw Muriel who’s meant to be extreme and musclebound. Changing how soft you draw the character or how much detail you draw changes whether they look bulky from fat or muscle.
Love your artwork!! :) as a professional illustrator, would you tell me some advice on developing potrait? im always mess up when it comes to potrait drawing. i really dont know how artist like you can be so precise in developing value for face. Thank you very much :)
Hello and Thank You :)
The first thing if You want to do portraits is to know anatomy. Start with learning what is under the skin and understand how it affects the face. When You got that covered You must know how face is structured. That will give You the knowledge how to light head. Head is a cube-like object. (yea! NOT sphere!) On face we have other little cube-like object (nose).
A great exercise is to find photos of a face and draw structure lines over it.
Example:
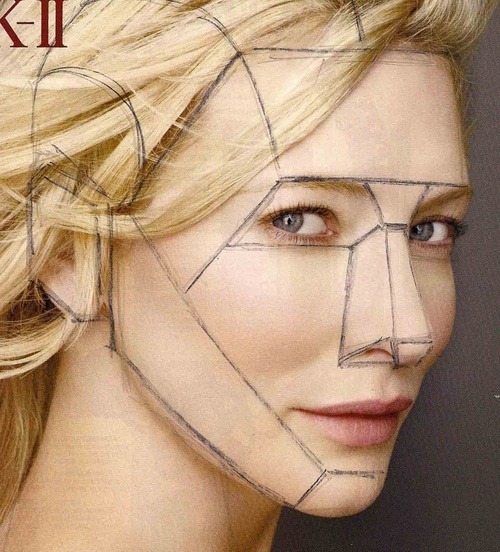
You see clearly now? The structure of a nose, where cheeks are, forehead etc.
After doing this You will be able to create the face from a memory using these helping lines.
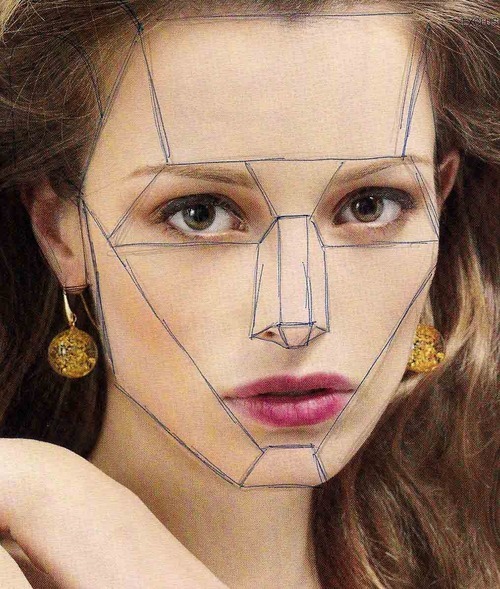
Like here. This is Michael Hampton exercise:

You see how everything fits thanks to the structure lines?
Drawing a face requires TONS of practice. Find thousand photo references and practice.
Understand the anatomy and face structure first. It’s basic.That would be the things I would recommend for everyone who start drawing faces :)
I hope it helps a little!

I’ve been thinking about it for a while and I finally had the time to work on a really simple walkthrough of my design process for armors! Hope it can be useful :D
Before designing the attire I like to define first who this character is going to be, based on their alignment, their role, job and so on. I used a random dnd character generator and found a simple but cool prompt:

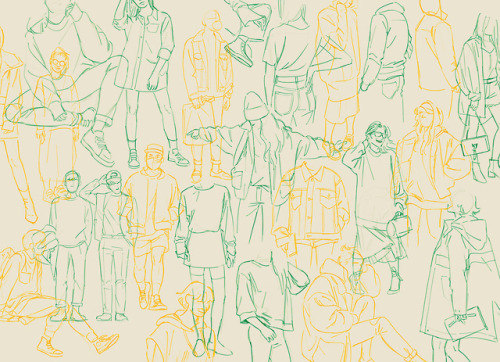
Based on this brief description the first step to take is to get a good silhouette and pose. Figure drawing and silhouette studies are a good method of exercise: they train you to think without any sort of detail. The pose alone should convey the whole mood. I wanted my human paladin to be an aged veteran knight in medium build, ready to strike and prepared to carry her weight in battle with two swords.

Armor is a tricky subject but only when you don’t know it. I study a lot from real traditional armor, because before designing something I have to figure out how it actually works in real life. I could recommend lots of book to buy but Pinterest does an amazing job in providing you with an endless stream of inspiration and photos/illustrations to study (Osprey Publishing has fantastic books about armor, weapons and military from 10th century and before to 20th century). I believe in functionality over beauty but with a middle ground that makes both aspects look good together instead of clashing (I’m looking at you, Korean concept artists): it’s my job to find a compromise between them. A good example to study is something like this:

Simple, readable, every rivet shown makes it understandable to know how to move into an armor like this. I also take lots of inspiration from fashion design but it’s another whole world lol, https://www.vogue.com/fashion-shows is pretty much the Bible for that since there’s a complete list of every season of pret-a-porter and couture from 1990 to the present day. It’s a fun game to play!
Question yourself when you design, “can I wear this? How? If I were to make a cosplay of this, how would I layer everything?”, if you’re aiming for realism you have to follow certain rules and guidelines. Speaking of guidelines, this is a simplification of the parts of the armor I want for this character.

You can call it a day and be done with it by refining the sketch a bit now. This is a good design, boring but functional. How do we make it more interesting? By using shapes and patterns to create a general theme, adding cloth parts like a cape and undershirt and all the elements needed like belts, chain mail and so on. Rectangles? Amazing. Circles into rectangles?? Beautiful craftsmanship (go wild)

This is looking like a real character now, congrats! Here’s where the fun really begins though: details. Once the silhouette is defined you can customize the character all the way and make it look like there’s a story to be told even in the armor. I like to think of a theme and apply it to pretty much everything, it’s usually animals or flowers because often times knights had themes like those. This woman is a fierce, fearless mom figure, tired but wise, willing to help the young adventurers to see them leave the nest and fly on their own… like a bird… but like, a cool bird? Like a cool bird often associated with freedom?

Eagle theme are all over the armor: it intrigues the viewer and makes the design look complex enough to be interesting on its own. The knee and elbow parts are wings now, one of the pauldrons has a raging eagle coming out of it (asymmetrical details are cool!), the important parts connecting the armor are shown with little details that make it look like a custom made set. At this point I’m satisfied and can go onto colors, then rendering.
Colors take a big part into the character design but it’s not something I feel good enough to cover lol, the only advice I can share regarding this is to have in mind the materials of the outfit. Right now the breastplate is in a grey zone: a slight change in material can turn a decorated breastplate into a half coat. Defining material when you’re sketching is a neat way to save yourself some time and get a bit less stressed when you get to painting.

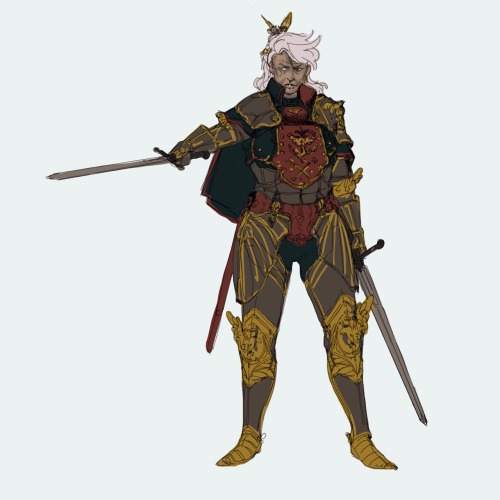
And it’s done! Hope it was helpful!
I just realized how terribly short her right arm is LOL please don’t shame me
A Tutorial Masterpost
I said that I’d show some tutorials I have saved up to someone, but decided that I’d just go ahead and post most of what I have stored away and create a sort of masterpost out of it. (I figure it’ll help me just as much since, as of now, they’re all pretty scattered between my Tumblr and bookmarks)
A lot of these are hosted on my personal Tumblr, but I don’t change my url so it’s pretty safe to bookmark them there (and not have to worry about the url changing) if you don’t wish to reblog them yourself for whatever reason.
Feline tutorials:
Basic domesticated cat tutorial
The domestic cat body
Improving upon (lion) anatomy
Realistic lion faces tips
Big cat paw tips
Canine vs. feline - paws and legs
Beginner feline tutorial
Guide to big cats
Feline comparison
Canine vs. feline - facial anatomy
Canine vs. feline - chest anatomy
Guide to little cats
Big cat eyes (could work for other eyes)
Canine tutorials:
Basic wolf anatomy
Skeleton notes on wolf legs
The wolf skeleton as a whole
The wolf skull and teeth
Wolf paw tips
Basic canine poses
Canine ears and chest
Drawing realistic wolves
Basic wolf tutorial
Wolf paw tutorial
Paw pad tips
Wolf skeleton and muscles
Wolf fur direction
Canine vs. feline - paws and legs
Canine vs. feline - facial anatomy
Canine vs. feline - chest anatomy
And this is just an excellent DA for wolf reference images
Avian tutorials:
Bird wing anatomy applied on humanoids
Bird wing tutorial (lots of underrated tips)
Varying bird wing structure
Basic owl anatomy
Bird wing vs. bat wing vs. pterodactyl wing vs. human arm
Bird wings and flight
Various bird wings
Human(oid) tutorials:
Hand tips and reference
Simplifying human anatomy
Feet and shoes tutorial
Bird wing anatomy applied on humanoids
A guide to movement: flexibility
A male shoulder study
Altalamatox face tutorial
Male legs reference
The human hand
Male vs. female waist
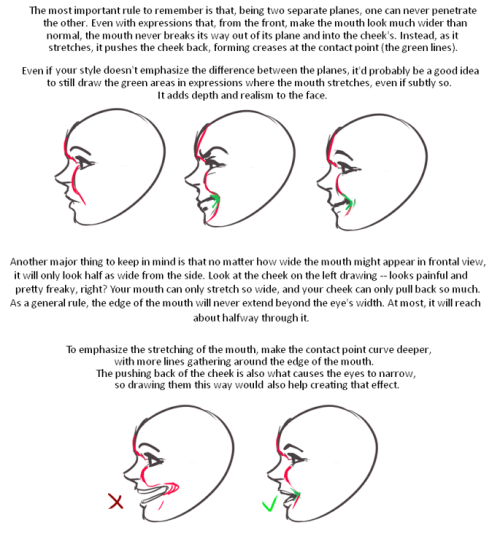
Excellent expressions tut
Understanding anatomy part 1 (follow desc. links for more)
Painting skin
Simplifying hands
More simplified hands
Pose tutorial
Varying the female figure
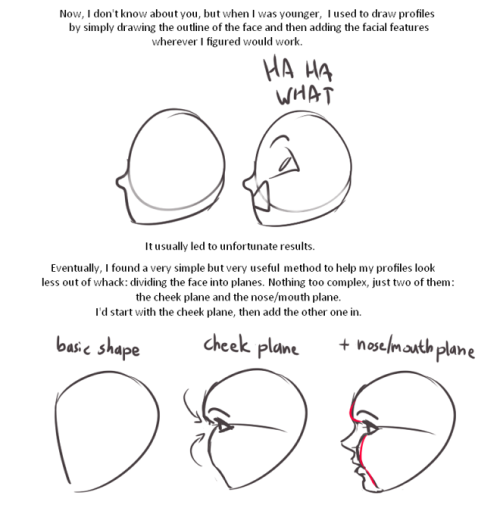
Profile proportions
Expression tutorial
Virtual lighting studio
Breaking up the male torso
Male torso anatomy in use
Simplifying the human foot
Various facial and body shapes reference
Drawing the nose
Female anatomy patterns
Human mouths
Breaking down the human nose
How to draw the ear
More hand(y) tips
Neck and torso tut
Jawline and kissing tip
Yet another hands tutorial
Male torso in motion
The human head at various angles
Variation of colour throughout the skin
Excellent action and couple references
Advice on eyes
Feet reference drawings
Nose shapes
The human skull and face
Facial features
Portrait lighting cheat sheet
Animating dialogue (mouth movement)
A kissing tutorial
The fist
Various athletic builds
Various types of hair
Proportional height of different positions
Expressions photo references
The hand in motion
Skintone palettes
Semi-realistic eye tutorial
Male muscle reference
The human body in perspective
The human head at various angles
Painting a realistic eye
Arm shape and muscles
Animal feet on a human figure
Hand poses
The face in profile
Skin tutorial
Body type diversity
Drawing hair
Muscles in the neck and face
A beginner’s guide to knees
Another ladies tutorial
Breakdown of lips
Blocked out human faces
Practice figure drawing (animals as well)
A neat arm trick
Excellent ear anatomy tutorial
Fullbody proportions tutorial
Over the shoulder poses
Male torso photo reference
Detailed arm muscle drawings
Guide to human types
Dragon tutorials (and bat wings):
Anatomy of the Western dragon
Dragon wing tips
Dragon wing tutorial
Dragon anatomy
Dragon tutorial
Equine tutorials:
Basic horse (back) reference
The equine skeleton
Horse anatomy and pointers
A good, large collection of horse stock references
Skeleton of a horse and its rider
Horse hooves
Cervine tutorials:
Basic deer anatomy
Deer skeleton drawing
Deer skull reference
Deer musculature
Deer skeleton
Ursine tutorials:
Fantastic bear anatomy/poses references
Basic bear structure
Bear anatomy tutorial
Miscellaneous animal tutorials:
Sheep vs. goats
Background and objects tutorials:
Griffsnuff background tut part 1 (second in desc.)
Tree tutorial
Realistic gems tut
Water tutorial
General water tutorial
Drawing crystals
Drawing bows
Painting rocks
Clothing tutorials:
Fabric tutorial
Clothing folds part 1 (second in desc.)
Drawing hoods
Drawing jeans
Hat on human figure reference
Armor
More hat on figure references
Different shirt collars
Colour palette turtles
General painting, drawing, and style tips:
Altalamatox digital painting walkthrough
Simple fur tutorial
Realism painting tutorial (human subject)
Excellent colour tutorial
Painting a wolf (good fur painting visual)
Photoshop brushes tut
Basics of Photoshop tutorial
Another digital painting tutorial
Common digital painting mistakes
Colour and light
Soft cel-shading tutorial
Various types of hair
Colour tips and the mood it expresses
Composition tips
Lighting and colour tips
Shadows
Another composition tut
Simple colouring via overlay
From paper to digital
Painting gold
Hope these help!
I struggle INSANELY with doing 3/4 view art. Do you have any tips? I've found a couple guides on pinterest but I'm still having a little trouble.
Hi Anon! So sorry to hear you’re struggling. 3/4th is my favorite comfort zone, but I don’t know how well I can walk you through it any better than the many tutorials out there. There are plenty that do tutorials much better than me and they all kind of follow the same format for 3/4th view, but I’ll try my best to break down my method as understandably as possible!
1: I always start with my eye and middle line guide in whatever direction I want them facing. The middle one is more important than the original eye line.

2: Next I’ll do my head circle to keep my skull guideline and connect it to the bottom of my middle guideline to make the jaw. You’ll want to be kind of careful about this part and not just draw a gigantic circle or one that’s too small. Try to keep it about the size you want your actual head.
Don’t worry too much about the eye line at this point as you’re mostly getting the general shape of your head at this point. You can always edit your eye line later and adjust it to where you need it to be.
If you’re doing a character that has defined cheek bones (Like Vaard who has CHEEK BONES) you can do a line from the side of the head to the side of the chin like I did here that always acts as a great guide to the general area if you’re going to define it.
Make sure this step is on its own layer separate from the rest of your lines.

3: Now using your line and circle guide, go ahead and fill out the far side in whatever shape your character’s face is (angular, round ect.). It’s easiest starting from the top of your brow bone. Keep in mind your center line as this is your direct center of the face.
Vaard’s got a pretty basic, generic face shape as a base. It’s very sharp and square so I did a lot of straight lines with little to no curves to them.
At this point, it’s best to have a reference of a face in the shape you’re going for if you struggle with this step. References are your friend when stepping into unknown territory and angles.
You can also add your hair line guide as well to make sure it’s not too high or too low.
See how the circle we started with now becomes the full skull and makes up the back? This is why we want to be careful about the placement earlier and not go way out of the anatomy you’re going for.

4: Ok now for the fun part. What I like to do, is draw little Star Trek badges under the highest point of the brow you’re going for and on the far side, connect it to the cheek. This becomes your brow/cheekbone on the far side, and your inner eye socket guide on the inside. Don’t worry if they’re too big, you can always erase them later but we’ll come back to these in a bit. You just want the top to be fairly even with each other.

5: So to help line up your eyes in ¾ths view, you can draw a line from each side of the chin or nose. The inner corner of the eyes will usually sit near or close to the same line as the nostril or chin edges. (unless you’re drawing a very narrow or very wide nose, then go with the chin guide lines instead).
My original eye line didn’t quite line up with were I wanted to actually put my eyes but it pretty much lined up with the bottom inside corners so I kept it where it was.
Using the outside ‘Star Trek Badge’ just carry that top line on down and bam, nose bridge perspective!

6: Now using those badge shapes still, you can go ahead and curve your eyebrows right on top of the lines and you have your brows! This really only works if you’re going for a neutral expression though with little to no brow movement or expression.

7: From this point, it’s just a matter of adding your details! You already have a fairly solid base and anything at this point is very easily tweaked or shifted.

8: At this point you can erase all of your guide lines (which should be on a separate layer from your actual face outlines.) and if you happen to have a character with fairly deep set eyes, you can use those badge guides again to shade the eye sockets. Just shade inside them and you have some decent shadow guides.

I hope this helped some! Sorry if it looks like most other tutorials and guides out there, but I did my best. Remember, references are your friend when doing angles you’re not familiar with, even if it’s taking a picture of your own face just to see where shadows fall or how the nose looks at that angle! (The other eye is also the worst. I am in no position to give tips on the other eye, sometimes I don’t even draw it lol).
Best wishes and wishing you the best of luck as you learn to draw in ¾ths! It’s one of the most fun angles to draw once you get the hang of it!
-
 heartz4korii liked this · 2 months ago
 -
 casadastra liked this · 4 months ago
 -
 spiltsoup liked this · 6 months ago
 -
 elpisbloom liked this · 9 months ago
 -
 krowspiracyanon liked this · 9 months ago
 -
 twadi-gurl reblogged this · 10 months ago
 -
 mintersy liked this · 1 year ago
 -
 gornackeaterofworlds liked this · 1 year ago
 -
 pencil-cat-studios liked this · 1 year ago
 -
 nettleparade liked this · 1 year ago
 -
 beetle-ze-bub liked this · 1 year ago
 -
 velomono liked this · 1 year ago
 -
 honycafebaby reblogged this · 2 years ago
 -
 ineed-moresleep liked this · 2 years ago
 -
 babybirbb liked this · 2 years ago
 -
 lemons42 liked this · 2 years ago
 -
 motel-hario reblogged this · 2 years ago
 -
motel-hario liked this · 2 years ago
-
 dieidieidieidieidie liked this · 2 years ago
 -
 archerar liked this · 2 years ago
 -
 mashadialotos liked this · 2 years ago
 -
 hoppingcrow liked this · 2 years ago
 -
 vivariumglass reblogged this · 2 years ago
 -
vivariumglass liked this · 2 years ago
-
 pierriots liked this · 2 years ago
 -
 efin liked this · 2 years ago
 -
 ecruteakfreak liked this · 2 years ago
 -
 tomichisky liked this · 3 years ago
 -
 short-and-ugly liked this · 3 years ago
 -
 shaddymoddels liked this · 3 years ago
 -
 bewitchingxtheatre liked this · 3 years ago
 -
 katchu-art liked this · 3 years ago
 -
 sporemiette liked this · 3 years ago
 -
 juney-of-the-valley liked this · 3 years ago
 -
 cutiemarker reblogged this · 3 years ago
 -
cutiemarker liked this · 3 years ago
-
 tomorrowsprotagonist reblogged this · 3 years ago
 -
 0kvas0 liked this · 3 years ago
 -
 raetreader liked this · 3 years ago
 -
 temporacidal reblogged this · 3 years ago
 -
 octav0h liked this · 3 years ago
 -
 ricephobic liked this · 3 years ago
 -
 talkless-eatmore reblogged this · 3 years ago
 -
 knaw-only liked this · 3 years ago
 -
 giest-library reblogged this · 3 years ago