✨Custom Water Toa !✨

✨Custom water Toa !✨
Another one ! (Slightly less giant)
Details below the cut !
Front/back views


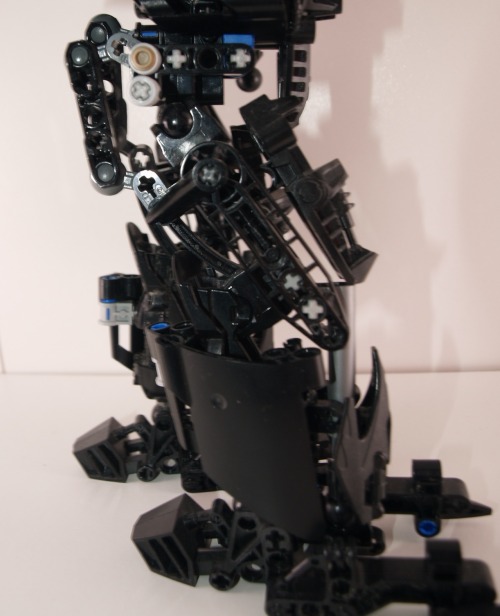
That one, too, is experimental, albeit in another style. I tried to remain closer to actual Bionicle size this time. Many fun details and technics here, so we’ll go from the feet all the way toward the head.
So, starting with the feet ! I have a complex of normal feet and Visorak legs held by a single connector. They have a wide angular range, but given that the connector connecting the socket to the feet is alone, a foot can also have a 360 rotation angle horizontally (not natural-)
The legs don’t have much special traits, except the upper legs using two socket with axle holes on top and a silver foot as armor on the side.
The body is where things get interesting. The Rahkshi silver shell is held by the silver claw above it at a chest plate, while part of the back is hidden behind a Rahkshi foot. The body is very triangular because it’s framed by these sockets with a silver piece in the middle, which gives it a nice aesthetic. The arms are an equivalent, with some tubes directly in the shoulders to offer a flexible piece which also limits the movements.
Finally, the head is not a head. I’ve made it like that because of the translucent Kanohi, that way it looks brighter, the inconvenient being that the backside of the head is quite literally an empty shell.

Now for the lower part of the arms : no socketed hand because who needs hands when you have a trident (bident ?) ! The main piece obviously comes from a Rahkshi, and the magic is wishing the silver connector. It used to be a lightsaber hilt from the larger Star Wars figs, but it looks good practically everywhere, including here !
Also, here below is a picture of the angle range of the arms (not much, oops).

More Posts from Antrylis and Others

✨Aroace pride flag✨
Since I’m mostly doing these as room decoration for me, I’m slowly running out of idea, but I’m open to taking requests (potentially with instruction, if anyone is interested, simply ask me) :}
(See previous work here)

✨Combat mech and pilot ! ✨
Closeups and lore under the cut !
Side and back closeups :


Minfig closeup :

So, lore I said.
Welcome on Earth, in a nearish future. WW3 happened, but after that, everything is going absolutely fine ! Lot of tasks are automated, no one had to work anymore, and thus, humanity worldwide become a society of entertainment. Films, videos, games, you name it. But of course, games are not 'real' enough, so some streaming platforms organised life-sized fighting games with giant machines. That couldn’t go wrong, right ? Right, in fact, a world-wide tournament was made, with always much complete arenas, and billions of watchers.
So, about this mech — and its pilot, too. This one is part of the original cast of the mech battles, a beautiful Mark One. All of them were the same, originally, with only colours to distinguish them.
Its pilot, skilled as he was, won the first season. Survived the second. And the third. And so, eventually, this one became the last one of the Mark Ones. And it won again, awarding enough of a prize for the pilot to upgrade it. It was also renamed Relic by the crowd.
Fully reworked, for the next season, Relic has been updated with a plasma beam and a heavy rotator cannon, fuelled by a large tank located on its back — if any other competitors ever attain this place.
With this upgrade, the commands, too, have been updated, with controllers now having holo-projections, and a much faster update rate. One has to imagine that these mechs were originally controlled in large rooms (similar to Jaeger command centers), but have been rendered light enough to be added to a living room, for amateurs. The pilot, however, did not change his original headset and suit, which is full of old equipments and souvenirs.
That’s it for this one, expect one of Relic’s competitors next week : Quake !


✨ Small lego diorama of some ARFs of the 91st ! ✨
This is of course from the Clone Wars — expect much more of these in the upcoming weeks, it’s one of my favourite themes :}
(Closeups, commentaries and complaints under the cut)


These trees are pretty experimental, I usually use classic leaves rather than plain plates, but these were interesting, and were a pretty fun challenge (I like making trees a lot, so there are usually some in most of my dioramas). This is supposedly based on Kashyyk, but most of the trees there are waaay too big for me; however I found some nice pieces for the roots (the large ones in the middle, which are not really visible, are using Lego Elves’ dragon horns; and there are also some old palm trees trunks, which are really awesome pieces to use.)
This is probably gonna be the only one for the 91st though, because I don’t have much more of these. The only other possibility of that would be Neyo’s execution of o66 (not fun~).
Also, the night effect on the closeups is due purely to one of my led lighting dying in my hands, which wasn’t exactly practical.

✨Custom earth Toa !✨
It’s spiky ! And we’re now at 5/6 !
More below !
Front/back :


He’s spiky ! Some might have already noticed I took for base the old Von Nebula set, because I acquired it recently and it worked well, plus the joints are interesting. Pretty much everything else was change, though I kept the mask, sphere, and spiky plates. These were nice, and even if stone colours are usually black and purple, but blue works well too.
I relocated the sphere directly in the thorax so that it looks like some kind of core. The back is mostly composed of two large car pieces.
The hands are using black pieces to make them larger, which works well with the blue blades (which supposedly come from either Chima or Hero Factory, I can’t remember).
Leg :
Another type of Bohrok piece to act as feet ? Yes. These are the head pieces, and they work well with a classic foot as a back piece. The piston in the leg was there originally, but I covered it with these large technic panels and some other technic pieces.
There is also an interesting mechanism to stop the legs from doing too odd moves on top, which can have some interesting applications. Here, I’m wondering about removing them to gain a larger range of movements though.
Head :

Kept the original mask and teeth, but with a cable and a spider’s claw to elongate it.
This picture also allows for a clear view of how much dust has accumulated. Don’t judge me, these are on a top shelf which isn’t the easiest to clean…
Also, my project is now finished (officially) ! I went to a small exhibition with it this weekend actually, and…a recruiter from a much larger exhibition found it good enough to offer me a place next month (I’ll post it here once the bionicle series is done) ! I also brought some of my pride flags, which seemed to be doing their effect, so I’ll bring more next time. So overall, yay !

✨Cargo starship ! ✨
A 'little' part of a larger idea I’m developing~
Right under the cut, closeups and some explanations !
Tiny container carrier :


It’s small, it’s adorable, and I still haven’t figured to how the container will be properly held, so the entire system underneath is improvised and will be subject to changes, hopefully.
Cargo closeups :


Lot more to say about this ! Firstly, that the support I gave it is very unstable, but that should be fixed later.
I was playing around with the idea of a small ship with six rows of container in an hexagon, and ended using a combination of 3-branched crossed around a technic axe to do that. Then, one thing following an other, I needed up with two sections connected by one of these large rings like you see in some movies for gravitational purposes. The entirety of this piece, at the exception of the very beginning of it, it held by a single long technic axe. Obviously, large transparent-blue rods to make reactor trails and truncated cones as the reactor bases. The ring is held by rods, too, with an upside down tread — getting them to have a proper circular shape was a complicated journey.
The colourful containers were another fun thing to do : firstly, getting all the right pieces and make the pattern not too regular. And to pretend they’re all connected by nothing, they’re only partially connected, and 'held' by an electromagnetic field figured by the transparent blue pieces on each side of the container rows, which would then be picked by the small container carrier above.
And now, the most important thing : the reason of why I absolutely needed to make this cargo, instead of anything else. It’s quite simple, actually. I needed to get the scale of these containers. Because. Because I had this idea to make a large, large trading spare station with a ring around a large axis, which would be the perfect excuse to make an awful lot of small spaceships. And for that, I needed something for scale, and since it’s a trading station, a container was my best bet. So I have a plan, which I’ll elaborate on probably next week, along a batch of my small ships.

✨Smol Five Pebbles !✨
In a box, to be studied like a bug.
It’s a bit sketchy, but I really like the idea of small boxes diorama, so that you can just pile them up (this one is roughly the same size as this other thingy I made .
(You can also check up my Moon design, while you’re here !)
I tried to cram as much stuff as possible in there (an overseer, pearls, the entrance tubes…), which is quite the challenge in a 6x6x6 cube. I also added a small rail for the arm to 'slide' on. The technic itself is not exactly difficult, although, once more, brick-textured bricks are here to save the day. As it is the only 'illegal' connection of the whole build (who could believe it, coming from me, uh ?), I’ve also been refining it in StudIO to possibly make other Iterators~


Everything is held together through these four black brackets on the back, which makes working on it ridiculously simple : I can simply clip off a panel to modify it. (Also featuring my hand, for scale and because I still can’t take photos properly, it seems.)
Speaking of, since you made it all the way down here…I’m also working on another Rain World MOC, just a tiiiiny bit bigger. So here’s a sneak peek~
[edit] : here it is !


✨41st Recon Squad Camp Site ! ✨
Closeups and other stuffs under the cut !
Backside :

Right scene closeup :


Campfire scene closeup :


Tomb scene closeup :


And finally, my personal favourite :

New lights, new camera settings, and a larger space…because this one didn’t fit the other one…Indeed, using shelves as a photo studio is not my brightest idea, but in my defence, it works.
This MOC has entirely been made because of the camouflage cloak I found in the bottom of a box. I don’t know where it’s from, but it looked very cool with that particular trooper, and thus I needed to show it off.
It was also helped because the large amount of olive green plants I received recently (those that are all over the place).
I tried something new, which is that I have not a rectangular base, but rather, three trapezoidal ones linked together to play with the shapes a little. Some parts were a pain to link together, but some tricks can help with that. The crates, for instance, are on top of a hole I couldn’t fill because of the odd shape.
The tombstone was actually the best idea I could get because I’m missing a trooper torso ! I can’t find it, and a pair of legs and a helmet are all I have left, and I might have watched Tales of the Jedi again recently, so that ended up being here.
The tent itself is made thanks to a fun discovery of mine, combining nets and my recent shipment of plants. I put a plant every three holes, in one line, and continue the pattern diagonally. In the back, to hold them in place, I used 1/2 technic bushes, which are quite convenient. And of course, this part is not connected to the poles at all, I case I want to add something in the tent.
Finally, some will notice the main incoherence of the thing : all the smaller wooden poles (tent and fire pit) are not birch-coloured. That’s mainly because finding the good pieces would have been a terrible hassle, and also because the campfire would really look weird in white.
Also, I might have spent an entire night on these trees to find what the colour balance and shape would look the more natural, I hope these are good.

I realised I’ve posted quite a lot of my MOCs on this blog, but any of my more 'photographic' works, yet, so here’s one of the first I made (we don’t talk about previous attempts), which still works quite well, although there are some things I would do differently, were I to do this again.
My process, and other details, below :}
So. The process I used to get this effect is not a really complicated one, but it still offers a more or less good render at the end, which is nice.
The blue guy has nothing special, but the red one I made float, but how ? The answer is not telekinesis, but superposition. Take a look at the images below :


Left one is the original, with no special effect (and no cropping, to offer a larger view), while the right one is the same, without the red minifig. By taking both photos without changing the camera angle (which is a painful thing to do with a phone, I would not recommend), and with a simple image editor, I put the 'empty' image (right) on a layer under the image I want to modify, and simply erase the supports.
It is important to note that if the erased bit casts a shadow, it’s better to also remove it, to avoid weird effects (here, there are no shadows because of the light source).
I’m also using an old set of blue LEDs inserted directly into Lego bricks to get this foggy aspect at the top, and to get a darker aspect to the blade of the red minifig, though there is also a desk lamp above providing some proper light, of the whole thing would be blue.
Last interesting point, this technic is the same I’ve used for the blog’s banner (but with proper lighting, for once). One might even recognise that the background for the two pictures is the same, because black was easily findable and gives quite the dramatic effect. The banner is, in fact, only half of my picture. Since you’ve made it here, I’ll offer another tiny bit of it here, as a treat :}

(And yes, I stole the characters from Star Wars sets, gave them light sabres even if they’re not meant to have one, and also added one of my cool cloaks, and made them fight. Don’t you dare judge my poor choices.)

✨Assault on the droid factory (P1) !✨
A decently-sized MOC I've been working on for the past few weeks. These is the landing platform of the factory, and, hopefully, I will take some time to make the actual factory inside, which is nothing more than an idea, at the moment.
Closeups and details under the cut !
The door :

I have a lot of fun with the mountainside of this MOC : It's been a while since I last did rocky terrain (or any terrain at all), and it is an enjoyable process. Most of the bottom is supported by large rock pieces (for structural integrity), but anything around and above the door is meticulously hand crafted from slopes. I also added some little plants here and there to break the dull grey, including some weird spiralling plants, because alien environment.
The door itself is just a bunch of slopes, and then two black sections. It's not moving and will remain in this half-opened state indefinitely.
The bridge :

Really the heart of the MOC, both visually and structurally. While it's covered everywhere, there are technic bars running under the large plates, and that's what allows everything to stay together. Just below the landing platform, you might spot one small antenna acting as a pillar. It's only there to keep the bridge in this position, as most of the charge is held by the mountain. It was a bit dull at first, so I added the cable running under it, and the small barriers, which fit the aesthetic without being overwhelming.
As for the action, here is a brief summary of what story I'm trying to tell : a squad of ARC are infiltrating a droid to destroy it, using a stolen CIS ship. Upon their arrival, they face heavy resistance.
Trying to breath life in these scenes is really fun, and it uses multiple tricks, from the droid falling off the bridge to the one being pushed by the shield, plus the clone jumping on a droid to stab it. Speaking of, here they are !
The clones :
MOC postures :


Rest postures :


Custom clones ! I absolutely love making these, and I still have a lot of similarly customised ones on my shelves. The ARCs from the battle pack look awesome, and even if they all have the same prints and color, it doesn't take much to change their appearance.
Sadly, I couldn't find enough kamas for all of the, so only the first and third ones have one. Same goes for the pauldron, so only the three first have one (plus the fifth, but it's a different kind which, I think, comes from a mando). For visors and rangefinders, the choice was mostly arbitrary, because I have a lot of each, so I tried to guess who of the clones would need them, according to their roles (because they have roles. And names, too ! From left to right : Orders, Surge, Bacta, Gears, and Stalker.) I also used the kneeling posture, which is, essentially, in half my TCW MOCs (just check out this one if you're doubting me. Or if you want to see a really cool thing, too.)
A lot of weapons are at least partially custom too :the left clone's weapon (hands can be attached at the bottom of the weapons as a grip); the Z-6 for the next one (would be better if Lego had black versions of the grey pieces, but alas, they don't exist as of yet), the shield (held together by an actual 2*3 shield piece, and the printed GAR cog is just the perfect piece to go with it), the rocket launcher (as screen accurate as I could do, which is to say not much). I also used a fancy silver knife as a vibroknife, because why not, after all ?
Another worthy addition :

While Lego's default ARC backpacks are pretty cool, I find this technic really nice to add a proper communication antenna : one lever attached to the side of a minifig roller skate piece. The connection is not very secure, but since it's only used for display, it's alright.
The ship :


As some might have seen already, this is a variation of the 8036 separatist shuttle. It is a bit longer than the original, and have more details on top. I changed the original antenna for a fencing sword piece, which looks better, and adjusted the dorsal wing a wing, as well as the side, to add the CIS-stickered pieces.
Mostly, this version has so much more playability than the original : it was only made to accommodate a droid pilot and one passenger. This version can fit : one pilot and one astromech in the front, plus a whole bunch of minifigs in the back; and the two parts are connected. Ironically, it won't ever be seen, but it still is a nice thing to know.
You're still here ? Well, I guess you enjoyed this MOC then. If it is the case, stay tuned, because I still have one big TCW diorama which I need to figure how to showcase, and another one in the making, which will also be terribly hard to showcase, but that will be a problem for later me !
-
 no-04s-slowly-collapsing-life reblogged this · 1 year ago
 -
 lekorojams reblogged this · 1 year ago
 -
 gryphongirl liked this · 1 year ago
 -
 mask-of-prime reblogged this · 1 year ago
 -
mask-of-prime liked this · 1 year ago
-
 ihavegoodfeeling liked this · 1 year ago
 -
 mystery-incorporated-whore liked this · 1 year ago
 -
 scalesthegecko liked this · 1 year ago
 -
 0m3g45n1p3r4lph4 liked this · 1 year ago
 -
 janoha liked this · 1 year ago
 -
 ghost-mantis reblogged this · 1 year ago
 -
ghost-mantis liked this · 1 year ago
-
 backsideways4514 liked this · 1 year ago
 -
 zovis reblogged this · 1 year ago
 -
 thewayofthebionicle reblogged this · 1 year ago
 -
 bionyx64 reblogged this · 1 year ago
 -
 anasianfriend reblogged this · 1 year ago
 -
anasianfriend liked this · 1 year ago
-
 katakuna23 liked this · 1 year ago
 -
 herora-nuva liked this · 1 year ago
 -
 toaofconfusion reblogged this · 1 year ago
 -
toaofconfusion liked this · 1 year ago
-
 antrylis reblogged this · 1 year ago

They/them - AroaceLego MOCs and photography with a wide range of different characters and environments, every Wednesday (in theory-)
77 posts