Here’s A Little Art Tip About A Very Specific Part Of The Body. Pop A Squat And See How It Looks On
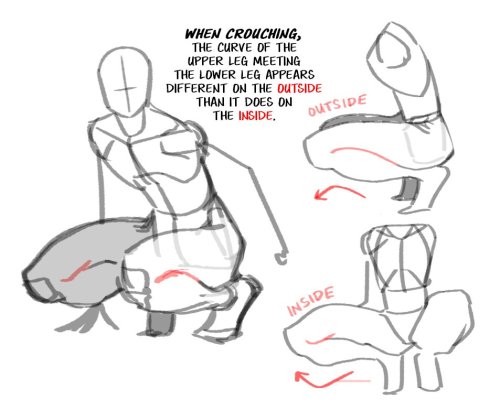
Here’s a little Art Tip about a very specific part of the body. Pop a squat and see how it looks on you.
More Posts from Aether1984 and Others
Sorry for the disorder, but I wanted to ask if you could do a tutorial on lineless art! By the way, nice art!!!
thanks! lineless art it is, then
i start with the sketch, obviously. since you won’t have the lineart to guide you later, a clean and detailed sketch is pretty important

then i make it transparent enough so that i could focus on the shapes, but was also able to tell the details of the sketch, and pick some background color

then i slap on the colors i wanna use. the accuracy of these splotches of color depends on my mood and patience and the amount of details in the drawing (lol), so it’s fairly arbitrary i guess
the more accurate it is, the less it takes to clean it up later, but the opposite sometimes adds life to the drawing and welcomes the experiments with the colors and shapes
if there’s something that needs extra accuracy (like the earring here) or i just don’t feel like cleaning it up again later, i use several layers (face, hair, etc) or add the details later. but i love using one single layer whenever possible

aaand then i just start erasing / adding stuff to make it all nice and crispy!
there isn’t really a certain point when i start doing it. like, here i added those light hair streaks before defining the shape of her head, so that i could erase the messy parts altogether, but i could also clean up the head first, then lock the layer and add the streaks

when i decide that it’s comprehensible enough for me to work without the sketch, i hide its layer. you could continue working with it, of course, but i find it distracting. it’s nice to take a fresh look and figure out what it’s gonna look like in the end

details time! i enjoy adding lines here a lot, it’s really not the same as creating the lineart beforehand. there’s something comfy and lively about this process, because you compliment the shapes, silhouettes and color rather than just redrawing the empty carcass of a sketch. besides, it adds more definition and movement to the shapes

hope that helps!
yesterday i reblogged a drawing resource that included how to draw hijabs - and it honestly wasn’t the best advice i’ve seen out there
now, i’m not an artist. but what i saw was a video that included hijab styles most of us don’t really wear and incorrect terminology surrounding niqabs and burqas (yes, there is a difference between the two)
so, i went searching and found a tutorial that i felt was better! these drawing guides and examples come from @/winchestermeg on twitter, and i think they’re really great 💕


this has more relevant examples and correct terminologies, and is drawn by a muslim woman
enjoy, artists of tumblr!
I struggle INSANELY with doing 3/4 view art. Do you have any tips? I've found a couple guides on pinterest but I'm still having a little trouble.
Hi Anon! So sorry to hear you’re struggling. 3/4th is my favorite comfort zone, but I don’t know how well I can walk you through it any better than the many tutorials out there. There are plenty that do tutorials much better than me and they all kind of follow the same format for 3/4th view, but I’ll try my best to break down my method as understandably as possible!
1: I always start with my eye and middle line guide in whatever direction I want them facing. The middle one is more important than the original eye line.

2: Next I’ll do my head circle to keep my skull guideline and connect it to the bottom of my middle guideline to make the jaw. You’ll want to be kind of careful about this part and not just draw a gigantic circle or one that’s too small. Try to keep it about the size you want your actual head.
Don’t worry too much about the eye line at this point as you’re mostly getting the general shape of your head at this point. You can always edit your eye line later and adjust it to where you need it to be.
If you’re doing a character that has defined cheek bones (Like Vaard who has CHEEK BONES) you can do a line from the side of the head to the side of the chin like I did here that always acts as a great guide to the general area if you’re going to define it.
Make sure this step is on its own layer separate from the rest of your lines.

3: Now using your line and circle guide, go ahead and fill out the far side in whatever shape your character’s face is (angular, round ect.). It’s easiest starting from the top of your brow bone. Keep in mind your center line as this is your direct center of the face.
Vaard’s got a pretty basic, generic face shape as a base. It’s very sharp and square so I did a lot of straight lines with little to no curves to them.
At this point, it’s best to have a reference of a face in the shape you’re going for if you struggle with this step. References are your friend when stepping into unknown territory and angles.
You can also add your hair line guide as well to make sure it’s not too high or too low.
See how the circle we started with now becomes the full skull and makes up the back? This is why we want to be careful about the placement earlier and not go way out of the anatomy you’re going for.

4: Ok now for the fun part. What I like to do, is draw little Star Trek badges under the highest point of the brow you’re going for and on the far side, connect it to the cheek. This becomes your brow/cheekbone on the far side, and your inner eye socket guide on the inside. Don’t worry if they’re too big, you can always erase them later but we’ll come back to these in a bit. You just want the top to be fairly even with each other.

5: So to help line up your eyes in ¾ths view, you can draw a line from each side of the chin or nose. The inner corner of the eyes will usually sit near or close to the same line as the nostril or chin edges. (unless you’re drawing a very narrow or very wide nose, then go with the chin guide lines instead).
My original eye line didn’t quite line up with were I wanted to actually put my eyes but it pretty much lined up with the bottom inside corners so I kept it where it was.
Using the outside ‘Star Trek Badge’ just carry that top line on down and bam, nose bridge perspective!

6: Now using those badge shapes still, you can go ahead and curve your eyebrows right on top of the lines and you have your brows! This really only works if you’re going for a neutral expression though with little to no brow movement or expression.

7: From this point, it’s just a matter of adding your details! You already have a fairly solid base and anything at this point is very easily tweaked or shifted.

8: At this point you can erase all of your guide lines (which should be on a separate layer from your actual face outlines.) and if you happen to have a character with fairly deep set eyes, you can use those badge guides again to shade the eye sockets. Just shade inside them and you have some decent shadow guides.

I hope this helped some! Sorry if it looks like most other tutorials and guides out there, but I did my best. Remember, references are your friend when doing angles you’re not familiar with, even if it’s taking a picture of your own face just to see where shadows fall or how the nose looks at that angle! (The other eye is also the worst. I am in no position to give tips on the other eye, sometimes I don’t even draw it lol).
Best wishes and wishing you the best of luck as you learn to draw in ¾ths! It’s one of the most fun angles to draw once you get the hang of it!
DeviantART – ArandaDill


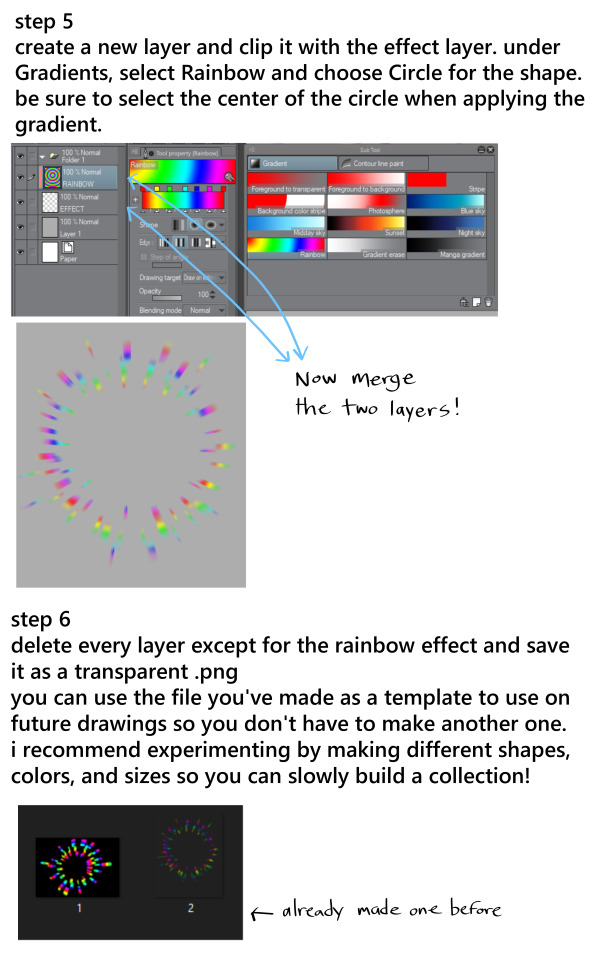
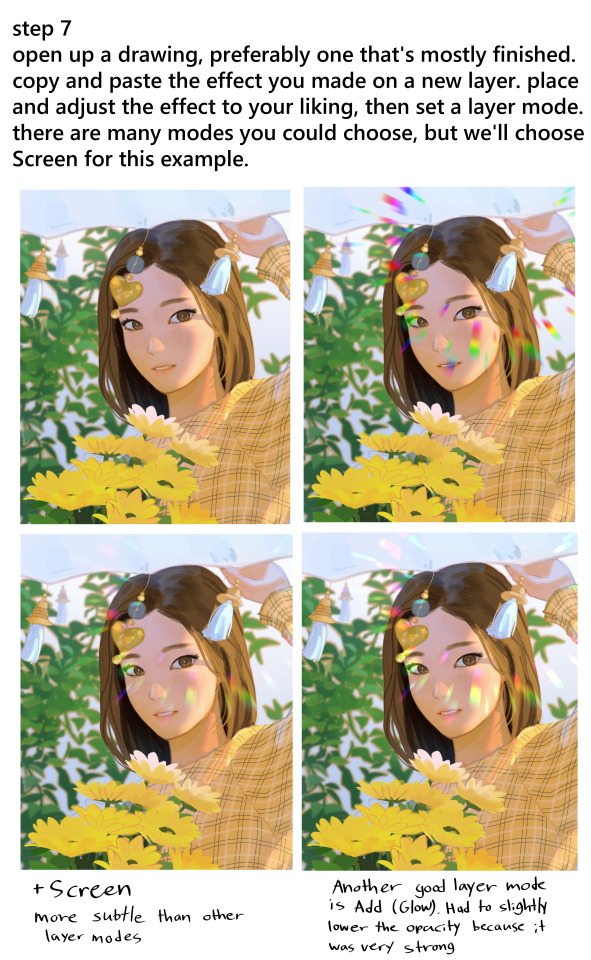
another art tutorial post :) this time it’s for rainbow effects
Hello? Im getting into drawing and you leg so well? Any advice?
YES! Ok so disclaimer, I did not make this technique. The technique I use i learnt from Sycra on Youtube, please go check out their videos cause they are super detailed and excellent. I also learned my colour theory from their videos, seriousy good stuff. Ok so I usually start out with a hip box. How this is shaped depends on how you want ur character to look i guess but it’s roughly up turned isosceles trapezium.

from here the basic measurements are about halves not including the hip box. I tend to make the thighs the same height as the torso.

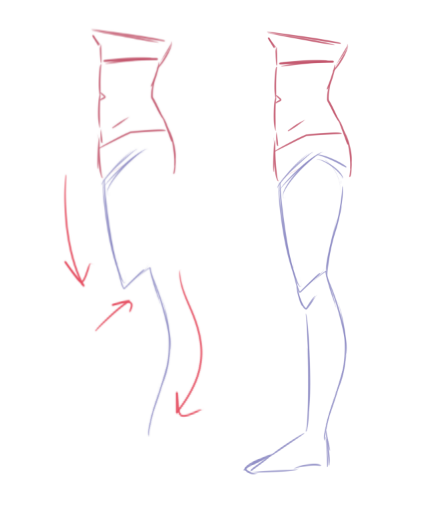
Ok so here is where Sycra’s technique comes in. They call it the lightning technique i think?? you essentially draw a curvy lightning bolt then connect it up.
line over top and adjust + feet
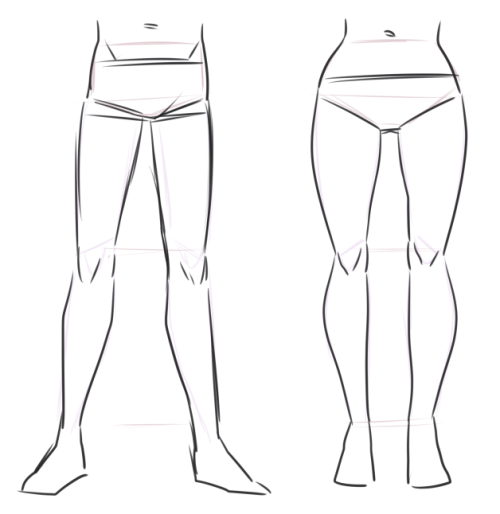
the actual composition of the leg i like to think of as tubes with one end smaller than the other. So the thighs are larger at the top and thinner towards the knee. The shin is a more pronounced curve though. You can also cross two lines over as shown and use that as a guideline.

I always use the lightning technique for legs from profile since it works best. The back of the shin is curved while the front is straight unlike the thigh which seems to be soft and curvy all over aha
I hope this makes some kind of sense??????


i made a head chart for myself today and thought i’d share & throw in a lil process thing too
you’re welcome to use it as a ref but like keep in mind it’s not 100% accurate :-)

I’m creating the world’s first true ENCYCLOPEDIA of drawing tutorials under the hashtag #howtoTHINKwhenyouDRAW, all of which is FREE for EVERYONE, FOREVER - you can see EVERY TUTORIAL on OUR MASSIVE INSTAGRAM HERE and OUR GIANT TWITTER HERE! PLUS! CLICK HERE for 300 EXTRA FREE TUTORIALS! Lorenzo!
ahh im sorry if youve gotten this before but could you do a tutorial on how the head connects to the neck/neck connects to the shoulders?? i saw a small tutorial on shoulders but it was more about how to draw than than how to connect them to the head and the rest of the body u_u

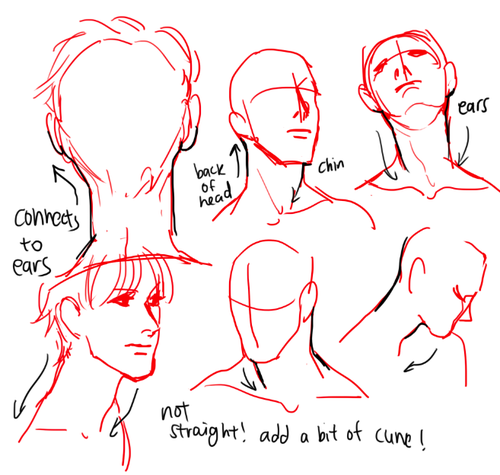
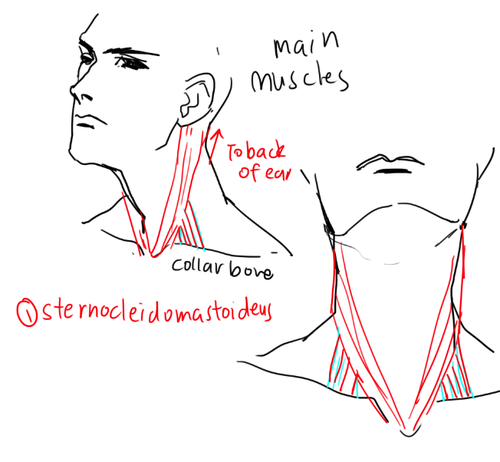

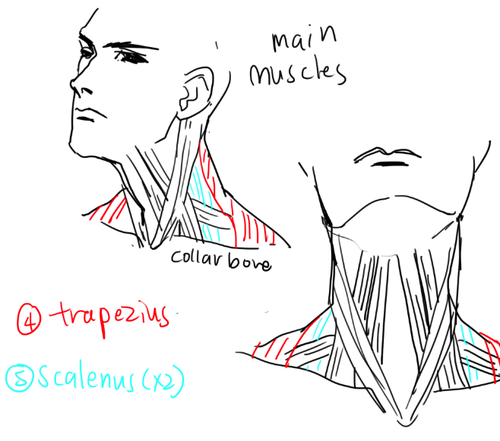
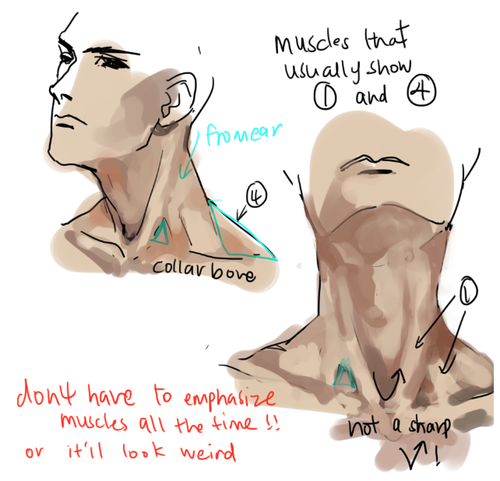


a lot of people asked about necks but i don’t much to say so i covered a little of the muscles too HERE”S A MORE DETAILED muscle diagram if you’re interested! don’t overwork the neck muscles bc in a lot of people they actually don’t rly show up at all ALSO I tend to draw longer necks out of habit ,some people have shorter necks
REAL LIFE REFS ARE THE BEST GO STARE AT SOME NECKS
francis how would you do a vampires teeth so that theyre like. more unsettling in ur opinion
i think honestly a good place to start would be just looking at blood sucking animals in nature, because in most cases their mouths would look pretty unsettling when applied to human anatomy
vampire bats are an obvious starting point but they dont look too uncanny for the most part until you take some liberties w/ it

if youre thinking more along the lines of “nah id prefer to enact psychological warfare against anyone who calls vampires sexy” a lamprey is a GREAT starting point

or a tick

these are just ideas for starting points of course, theres no Rule That Vampire Must Resemble Animal but i think looking to nature is really helpful with creature design and combining animal traits onto human shapes is a great way to make a really fucked up scary looking creature.
but really all a vampire needs to do is to be able to access blood (either by opening a wound and lapping it up as the victim bleeds or getting its mouth into the body and sucking) so like you have a TON of options so you can kind of just go wild with it.
-
 lily-livered-hermit liked this · 1 month ago
 -
 corrupted-unicorn liked this · 1 month ago
 -
 taokyi reblogged this · 1 month ago
 -
 loov1 liked this · 1 month ago
 -
 starite-wishes liked this · 1 month ago
 -
 amfrogg liked this · 1 month ago
 -
 julieemarine liked this · 1 month ago
 -
 venustartrap liked this · 1 month ago
 -
 skingscholar liked this · 1 month ago
 -
 onionowlwatchingu liked this · 1 month ago
 -
 conlainn reblogged this · 1 month ago
 -
conlainn liked this · 1 month ago
-
 dnalkaline liked this · 1 month ago
 -
 artifedexx liked this · 1 month ago
 -
 haithhegimp reblogged this · 1 month ago
 -
haithhegimp liked this · 1 month ago
-
 trash-ben liked this · 1 month ago
 -
 uranium-muncher liked this · 1 month ago
 -
 chrixcrayon liked this · 2 months ago
 -
 fajnychleb liked this · 2 months ago
 -
 zennx-23 liked this · 2 months ago
 -
 beanie-beebo liked this · 2 months ago
 -
 sapphiclittlecryptid liked this · 2 months ago
 -
 ca55ie-blake liked this · 2 months ago
 -
 poppypiqueerer liked this · 2 months ago
 -
 thevoidthatbirths liked this · 2 months ago
 -
 valtiels-darkness liked this · 2 months ago
 -
 prettylittlepickle liked this · 2 months ago
 -
 inconsistent-art-refs reblogged this · 2 months ago
 -
 inconsistent-person reblogged this · 2 months ago
 -
inconsistent-person liked this · 2 months ago
-
 shining-latios liked this · 2 months ago
 -
 ha-senidal liked this · 2 months ago
 -
 deamthy liked this · 2 months ago
 -
 yoko-likes-2-save-stuffs reblogged this · 2 months ago
 -
 puzzlevision liked this · 2 months ago
 -
 bugsme0w liked this · 2 months ago
 -
 guloboreartist reblogged this · 2 months ago
 -
 vitaxsyreni liked this · 2 months ago
 -
 mapleflavoreddice reblogged this · 2 months ago
 -
 bennetwithab reblogged this · 2 months ago
 -
bennetwithab liked this · 2 months ago
-
 rndmdoodlez reblogged this · 2 months ago
 -
rndmdoodlez liked this · 2 months ago
-
 ditzy-town liked this · 2 months ago
 -
 ranahan liked this · 2 months ago