Black History Month Is Coming To A Closeeee But I Have Something That’ll Help You Draw Black Characters


black history month is coming to a closeeee but i have something that’ll help you draw black characters in any month! if it was helpful then hey… here’s my kofi 😏
More Posts from Aether1984 and Others
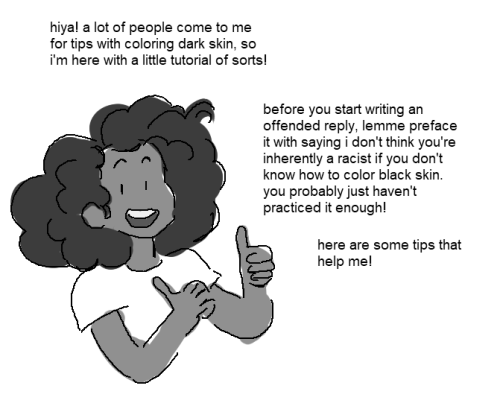

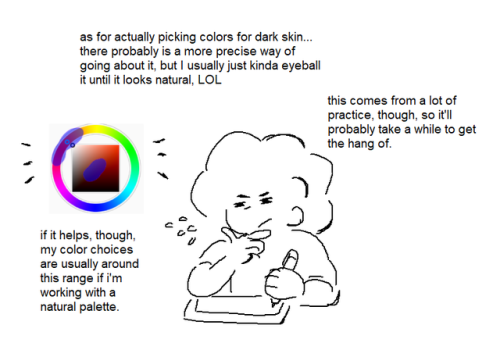
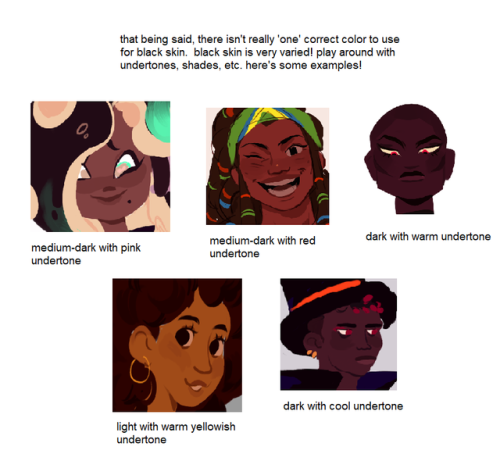
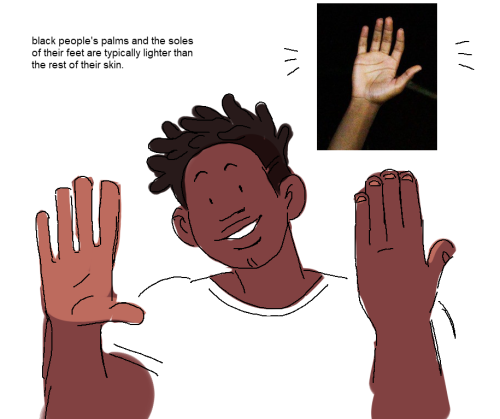
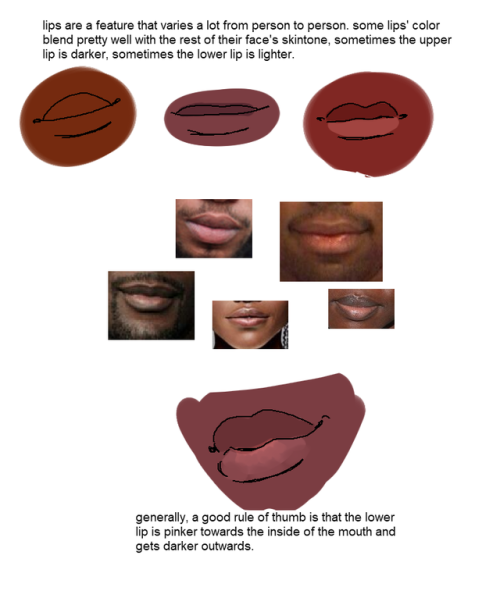
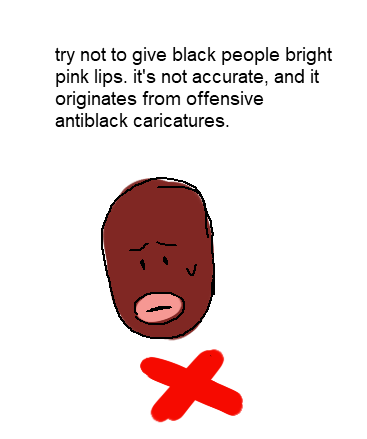
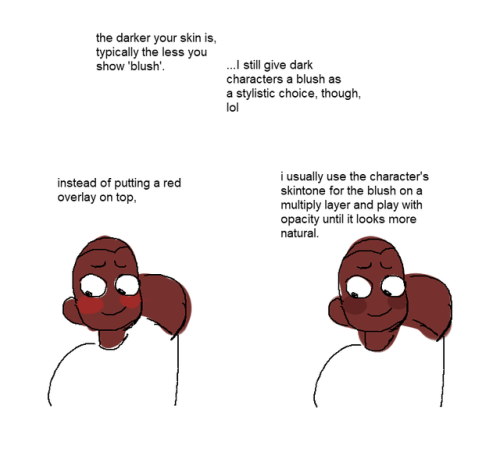
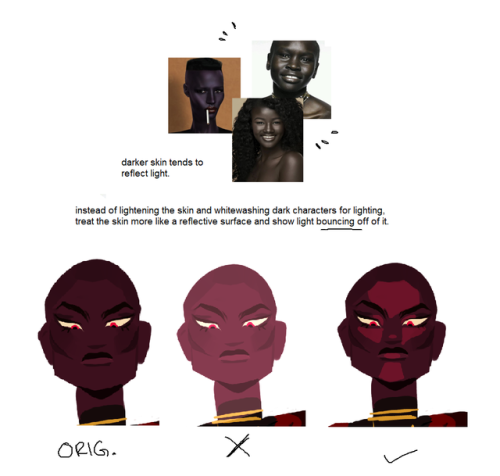
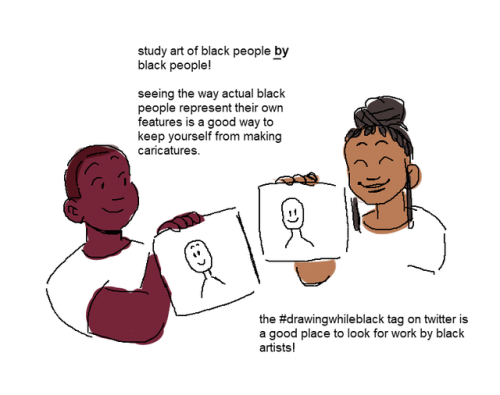

I get asked a lot for tips with coloring black people, so i put together a little tutorial! (and bumps my kofi if you found this helpful)
I struggle INSANELY with doing 3/4 view art. Do you have any tips? I've found a couple guides on pinterest but I'm still having a little trouble.
Hi Anon! So sorry to hear you’re struggling. 3/4th is my favorite comfort zone, but I don’t know how well I can walk you through it any better than the many tutorials out there. There are plenty that do tutorials much better than me and they all kind of follow the same format for 3/4th view, but I’ll try my best to break down my method as understandably as possible!
1: I always start with my eye and middle line guide in whatever direction I want them facing. The middle one is more important than the original eye line.

2: Next I’ll do my head circle to keep my skull guideline and connect it to the bottom of my middle guideline to make the jaw. You’ll want to be kind of careful about this part and not just draw a gigantic circle or one that’s too small. Try to keep it about the size you want your actual head.
Don’t worry too much about the eye line at this point as you’re mostly getting the general shape of your head at this point. You can always edit your eye line later and adjust it to where you need it to be.
If you’re doing a character that has defined cheek bones (Like Vaard who has CHEEK BONES) you can do a line from the side of the head to the side of the chin like I did here that always acts as a great guide to the general area if you’re going to define it.
Make sure this step is on its own layer separate from the rest of your lines.

3: Now using your line and circle guide, go ahead and fill out the far side in whatever shape your character’s face is (angular, round ect.). It’s easiest starting from the top of your brow bone. Keep in mind your center line as this is your direct center of the face.
Vaard’s got a pretty basic, generic face shape as a base. It’s very sharp and square so I did a lot of straight lines with little to no curves to them.
At this point, it’s best to have a reference of a face in the shape you’re going for if you struggle with this step. References are your friend when stepping into unknown territory and angles.
You can also add your hair line guide as well to make sure it’s not too high or too low.
See how the circle we started with now becomes the full skull and makes up the back? This is why we want to be careful about the placement earlier and not go way out of the anatomy you’re going for.

4: Ok now for the fun part. What I like to do, is draw little Star Trek badges under the highest point of the brow you’re going for and on the far side, connect it to the cheek. This becomes your brow/cheekbone on the far side, and your inner eye socket guide on the inside. Don’t worry if they’re too big, you can always erase them later but we’ll come back to these in a bit. You just want the top to be fairly even with each other.

5: So to help line up your eyes in ¾ths view, you can draw a line from each side of the chin or nose. The inner corner of the eyes will usually sit near or close to the same line as the nostril or chin edges. (unless you’re drawing a very narrow or very wide nose, then go with the chin guide lines instead).
My original eye line didn’t quite line up with were I wanted to actually put my eyes but it pretty much lined up with the bottom inside corners so I kept it where it was.
Using the outside ‘Star Trek Badge’ just carry that top line on down and bam, nose bridge perspective!

6: Now using those badge shapes still, you can go ahead and curve your eyebrows right on top of the lines and you have your brows! This really only works if you’re going for a neutral expression though with little to no brow movement or expression.

7: From this point, it’s just a matter of adding your details! You already have a fairly solid base and anything at this point is very easily tweaked or shifted.

8: At this point you can erase all of your guide lines (which should be on a separate layer from your actual face outlines.) and if you happen to have a character with fairly deep set eyes, you can use those badge guides again to shade the eye sockets. Just shade inside them and you have some decent shadow guides.

I hope this helped some! Sorry if it looks like most other tutorials and guides out there, but I did my best. Remember, references are your friend when doing angles you’re not familiar with, even if it’s taking a picture of your own face just to see where shadows fall or how the nose looks at that angle! (The other eye is also the worst. I am in no position to give tips on the other eye, sometimes I don’t even draw it lol).
Best wishes and wishing you the best of luck as you learn to draw in ¾ths! It’s one of the most fun angles to draw once you get the hang of it!
Hey guys!
I have something for you)


PLS tag me if you use my refs for your art 🙏🏻
It will be such a pleasure to know if my refs are helpful 🖤
i’m gonna drop an art tip here
i think an important thing to learn, especially if you start out with drawing anime, is that faces don’t necessarily have to narrow from top to bottom

i like to think of wide top, wide middle, wide bottom, and rectangle-like as the 4 main face shapes
what you should keep in mind about them:
you’re only halfway done: the jawlines, the width-length ratio, the amount of fat in the cheeks, the intensity or subtlety of the face’s curves are all important components you still have to decide on after choosing the shape itself
none of these shapes are exclusively feminine or masculine, don’t hesitate drawing them on any gender
most people in real life have some variation of the wide middle type
if you are trying to draw real people, getting the shape of their face down is the first step
i’ve seen tutorials say the shape of the face can tell a lot of the character’s personality - you don’t necessarily have to live by that rule. as long as you aren’t unrealistically drastic about their proportions, their face shape determines their inner qualities as much as it would in real life (not at all)


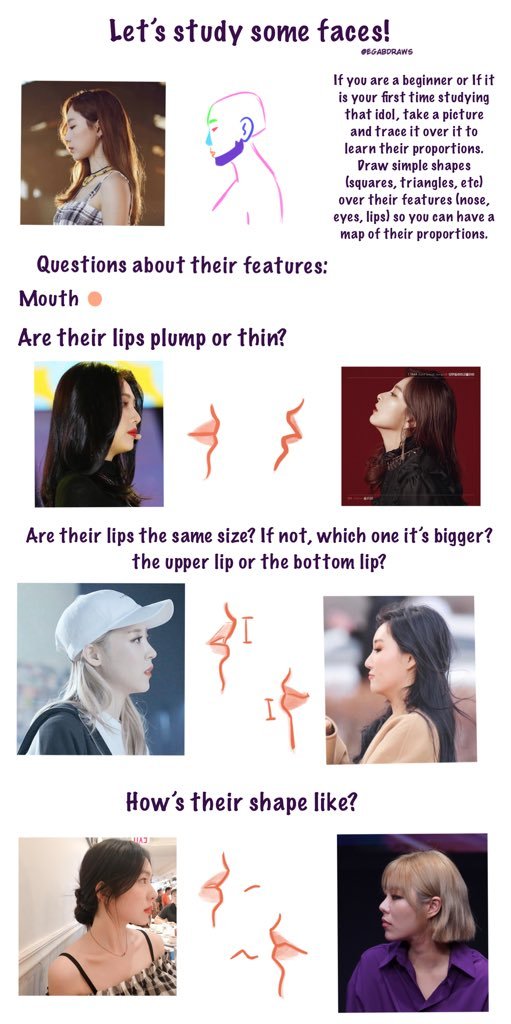

So here are my tips for drawing side profile views and study people’s faces! I wish I could explain more but I’m all over the place I’m sorry ㅠㅠㅠㅠ but well, I hope this can be useful for someone!


disclaimer: I am east asian. if anyone who is not white sees anything wrong with my phrasing, inaccuracies, or insensitivity, or something I missed, please feel free to add on. I'm just one person with one perspective; none of what I say should be taken as The Singular way to draw an Asian character. if you havent done so already, please take the effort to expand your view of Asian culture outside this one tutorial.
if a white person reblogs this and adds something stupid I'm going to bite and kick you like a wild animal


Hi Fer! I simply love your blog and tutorials so much, but I was wondering on how you draw masculine bodies? My drawings have been female and slender men, and when I try... it just doesn't look right. So any tips can be really helpful because I want to try and draw different body shapes. Thank you so much! <3
easiest thing is probably to widen the shoulders and up the muscle mass! it really helps to study anatomy so you know which areas to exaggerate. a more muscular/masculine person will have a more defined sternocleidomastoid (in blue) and bigger traps (green); basically a thicker neck. playing with the shoulder to hip ratio will help as well. i guess if you want a super manly man just make him look like a dorito


hi! umm pls pls PLS if you have the time, do a thingy on arms when you get the chance, they are so hard i could almost cry aslkdjaskjsas, i keep forgetting how many curves an arm should have/how long it should be (in diff positions/when it's not resting at the hips) etc etc etc ahhh omg please!! thank you sosososo much, i l♡ve all of your art and i hope you have a nice day!! ✧ ㅠㅠ ✧


I don’t want to go into detail in terms of muscles, but I’m sure you can find them if you google arm muscles! Hope this helps u out a little!
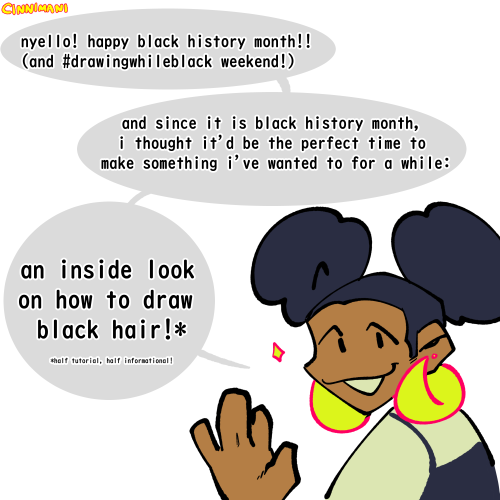
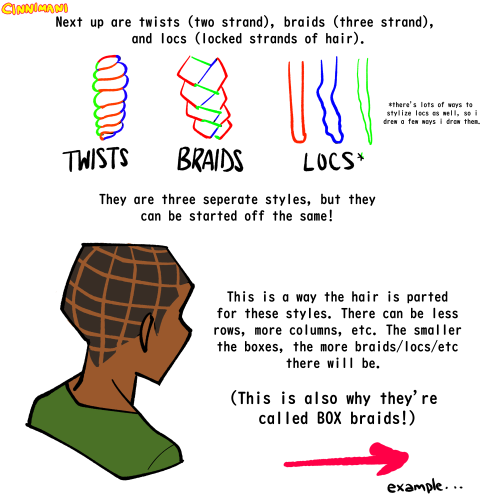
How to draw Afro textured 4c hair - an explanation/Tutorial
For those of you that don’t know what 4c hair is, 4c hair is a hair texture type that contains coils to small and tight that the hair appears to be more puffy rather than curly ( like to photo below ) this is in NO WAY to be confused with curly hair. there is a drastic difference.

As a black artist that primarily draws characters with 4c hair, I’ve been asked many times to do a tutorial on 4c hair so here we go~
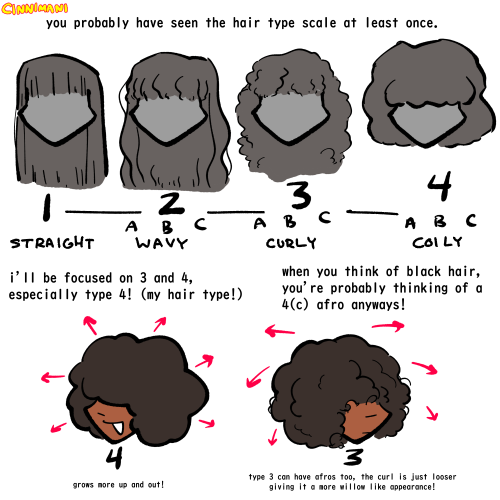
before we get into 4c hair, lets take a moment to fully understand it by talking about hair texture in a general sense first
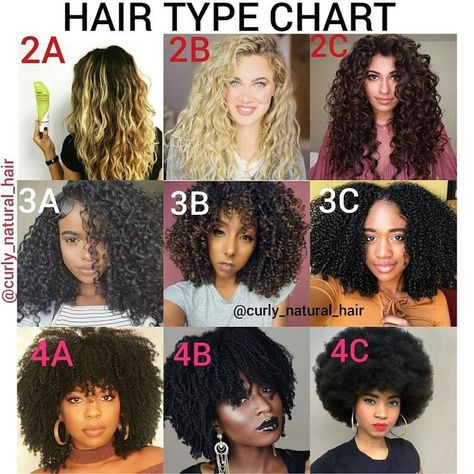
let’s take a look at this example of straight hair vs curly hair ( 1 type straight hair vs 3 type curly hair )

If you take a moment to compare the two you’ll notice straight hair is flat, it has no texture. Straight hair perfectly hangs down similar to liquid-like silk. It’s lack of curl pattern is the reason as to why it hangs perfectly flat.
curly hair on the other hand doesn’t lie down flat and silky like straight hair, It’s more thick. Curly hair in it’s raw and unstyled state has a trapezoid like shape this is because the sides of the hair spread more outward.

So why is this? Why is straight hair flat and curly hair thick?
the answer to that question is a thing called piling up. When it comes to hair texture, the shape of the hair strands aren’t the only thing that matters, its how the strands coexist with each other, Curly hair strands coexist by piling up on top each other.
moisture also effects hair texture too, different hair types absorbs moisture differently, thus the thickness of each hair type is different.


…..soooo, how does this all relate to how to draw 4c hair??
Well let’s take a look at the drawing below. Notice how the arrows go outward more as the hair texture gets curlier. As we’ve already discussed, this is because hair piles up, The curlier the hair texture, the more it piles up on each other, the bigger it gets, the more outward the arrows go.
Out of any hair texture, 4C hair has the most curls. Because of this, the hair piles up on each other so much that it doesn’t lie down flat like straight hair, nor does it make a trapezoid like shape like curly hair, it instead becomes more cloud like.❤️

This is what you need to take into account when it comes to drawing 4C hair.

Think of it as piling up a bunch of cotton balls on each other. The most cotton on top of top to lead to a bigger patch of cotton. this is 4c hair.
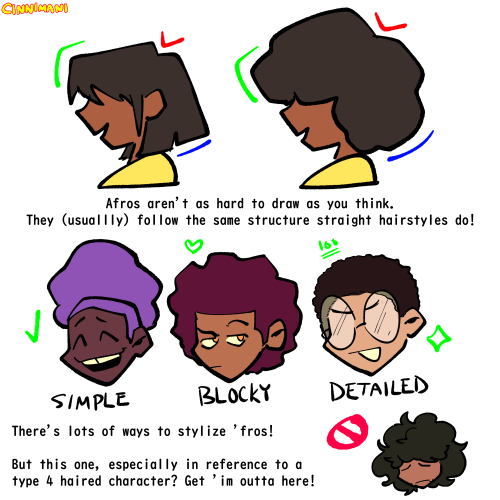
How to not draw 4c hair:
Garnet fanart. Let’s talk about Garnet Fanart. I notice a trend that when artists draw Garnet from Steven universe, her hair texture is usually changed to 3 type curly like texture. This subtle form of White washing has confused me because this is inaccurate.

Garnet’s hair is in the shape of a cube. Though 3 type hair piles up on each other, it isn’t curly nor thick enough for their hair to stay in the shape of a cube. Curly hair lies down more than 4c hair. So garnet’s hair being in the shape of a cube is a dead giveaway that it is 4C. Why do you think hairstyles like flat tops are usually seen on black men with 4c hair? It’s because, the 4c hair texture is thick and strong enough to stay in whatever shape you put it in.

please, if you’re drawing a character with 4c hair, avoid drawing it like curly 3 type hair, this is very anti-black and texturist.
So, how do you draw 4c hair?
honestly, its the most easy thing in the world


i wanna clarify that blobby looking 4c drawings ( like the one on the top left ) can work depending on how cartoony your art style is.
Another thing that I want to greatly clarify when it comes to drawing 4C hair is, YOU. DONT. NEED. TO. DRAW. EVERY. HAIR. STRAND!…..like, seriously. I’ve gotten many messages about how 4C hair is hard to draw, and it’s always left me confused; but then I find out that the same people that have trouble drawing 4C hair, attempt to draw every single strand of hair. This is unnecessarily time consuming because it’s merely impossible to get every single detail down, especially when you have a simple cartoon style. 4C hair does not require much effort, all you’re doing is drawing lumps. It’s that simple, nothing more nor nothing less.
The reason why I greatly advise all of you to avoid drawing every single hair strand is because in real life, when you look at a 4C textured Afro, your eyes don’t pick up on each individual hair strand like straight or curly hair. 4C hair, appears to be more undefined and cloud like, so attempting to draw each and every individual strand is unnecessary and will most likely end up looking inaccurate.


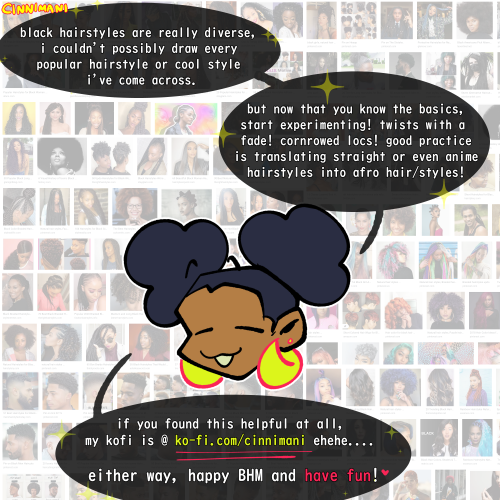
Anyways! that’s it for now! there will be a part 2 to this tutorial that will come out next week! i hope you guys have learned from this and apply it to your black character in your art!~
-
 queermentaldisaster liked this · 1 month ago
 -
 sophi-coby-art liked this · 1 month ago
 -
 everyartreferencepostilleverneed reblogged this · 1 month ago
 -
 pornography-for-kenkus liked this · 1 month ago
 -
 vampmaidenslair liked this · 1 month ago
 -
 everyday-is-brighter-with-you reblogged this · 1 month ago
 -
everyday-is-brighter-with-you liked this · 1 month ago
-
 festeringmoons reblogged this · 1 month ago
 -
 cathode-crew liked this · 1 month ago
 -
 mossy-the-thing liked this · 1 month ago
 -
 voidbirdy reblogged this · 1 month ago
 -
 ambrosiiahoney reblogged this · 1 month ago
 -
ambrosiiahoney liked this · 1 month ago
-
 bororochan liked this · 1 month ago
 -
bororochan reblogged this · 1 month ago
-
 square-opossums liked this · 1 month ago
 -
 strwbrylilys liked this · 1 month ago
 -
 exoni liked this · 1 month ago
 -
 kogetaikid reblogged this · 1 month ago
 -
kogetaikid liked this · 1 month ago
-
 wander-over-the-words reblogged this · 1 month ago
 -
 ejsuperstar reblogged this · 1 month ago
 -
 epicsandwich301 liked this · 1 month ago
 -
 frodoomsday liked this · 1 month ago
 -
 poppal6650 reblogged this · 1 month ago
 -
 the-wahwah liked this · 1 month ago
 -
 silvermatrixglitch liked this · 1 month ago
 -
 butchagave liked this · 1 month ago
 -
 ronie-ami liked this · 1 month ago
 -
 ladyspottedray liked this · 1 month ago
 -
 solarismuller reblogged this · 1 month ago
 -
 itsonlyanapple liked this · 1 month ago
 -
 uselose reblogged this · 1 month ago
 -
 left-hand-of-harkness liked this · 1 month ago
 -
 lemonmelted liked this · 1 month ago
 -
 nirtonic reblogged this · 1 month ago
 -
 ghostedstudios reblogged this · 2 months ago
 -
 ghostywostyroasty liked this · 2 months ago
 -
 monoshii-wasu liked this · 2 months ago
 -
 zokiraaa liked this · 2 months ago
 -
 amy2024ita liked this · 2 months ago
 -
 doodlemotthy liked this · 2 months ago
 -
 rat-in-clown-shoes liked this · 2 months ago
 -
 angelonasher reblogged this · 2 months ago
 -
angelonasher liked this · 2 months ago
-
 yourinaudiblename liked this · 2 months ago
 -
 d3lph1n1um reblogged this · 2 months ago
 -
d3lph1n1um liked this · 2 months ago
-
 lavndrl47 liked this · 2 months ago