Hey Guys!
Hey guys!
I have something for you)


PLS tag me if you use my refs for your art 🙏🏻
It will be such a pleasure to know if my refs are helpful 🖤
More Posts from Aether1984 and Others
could you do a body tutorial please? i always get stuck on the shoulders once ive drawn the head because they always look so board? i’m sure id struggle with the rest of the body too but once i fail with shoulders i usually give up and just draw creepy floating heads...
ooofok so
I’m gonna make u a shoulder tutorial cause a full body tutorial would be absolutely gigantic.ok so u got ur head right, i’m going for a straight forwards view point on this so

there they arenext is the neck, i typically make this thinner than the jawline and bring the length down so that the chin falls about half way between the jaw and the slope of the shoulders.
next i draw the slope of the shoulder on both sides and connect them with a horizontal line. The horizontal line is where you’d put the collar bones.I draw the slopes so that they extend past the ears. I tend to angle them at 45 degrees when standing normally.

I use this bit to quickly sketch in the collar bones and the tendons (?)the actual shoulder joint though i draw as round with a kind of, rounded corner????? both sides are p much even on each joint. I draw the joint as roughly the same width and the shoulder slope.I am god awful at maths so this bit doesn’t add up but it kinda ends up looking as if it’s split into thirds.

as u rotate the shoulders they over lap each other but the basic elements are still there, just shortened or behind something.

i’m not great at explaining shoulders all that well but i hope this helps at least somewhat.
Do you have a tipp how to draw mohawks?
KINDA SLOPPY but my general idea on how I draw mohawks


hairline first, stripe through the middle of the head, head fan for length and direction, add hair! hope this helps somewhat!!
Would you perhaps do a tutorial on arm muscles? Or at least link a few good ones you know
Arm muscles took me a bit to figure out when I got started out with anatomy. But the layout of the arm’ muscles can actually be simplified a whole lot while still maintaining a rather believable look. So let’s have a look-see.

One of the first tidbits I discovered that really made it click for me - was that the upper arm contra the forearm intersections kind of like a set of chainlinks. Both in the way, they sit statically but also how they move. If a “broad” or “wide” side of one of them is shown, the “narrow” side of the other should be shown in correspondence. If you just keep the rough shape of these two lings in mind - you ‘ll have an easier time remembering the layout of muscles.

Just for kicks. This is roughly how the main bones are laid out in the arm. We have the Humerus, the large bone in the upper arm. This one’s rather dense and thick. Then you got the Radius and Ulna that start at the elbow and then reach into the wrist. When we move our wrist, the two ends attached to our wrist twist around one another. ( Take a look at your own hand, turn it, twist it, You should be able to vaguely feel the slight shift in angle in your elbow ).

So here’s a pretty accurate depiction of the muscle layout in the arm. The most notable muscles ( or at least those most iconic ) are the two large ones on the upper arm ( the Bi- and tri-cep), as well as the brachioradialis on the lower arm.

I’ve gone and simplified the layout accordingly to how I usually consider the layout in my own art. Here we can see the “chainlink” figure again. The bi- and tri-cep forming the “upper” chain link, and the brachioradialis along with the flexor carpi Ulnaris former the “lower” chain link.
The reason I tend to simplify this is that the many extendors and flexors on the lower arm, aside from the two listed - are rarely defined on people who’s muscles aren’t highly defined. And having these two braid into one another is just easier than having to keep track of 5-6 different muscles that feed into mostly the same shape.
On the upper arm: We have the bicep in the palest red, the tricep in the darkest red.
On the forearm: The brachioradialis in the darkest red, and the flexors/ extendors gathered up in the lighter red.

What’s interesting to note is that the flex/ex’ es meet with the brachioradialis kind of cross each other in a V-shape, which opens up into the dent of the elbow and attached - not on line with the elbow- but slightly above it. Attaching this muscle group underneath - or on the line with the elbow was a common mistake I used to do - which contributes to your arms looking like sausage links. But just like any other muscle layout, the muscles of the arms are carefully braided with each other with little areas where no muscles are overlapping or weaving into one another.

llllhttps://www.researchgate.net/figure/Agonist-antagonist-operation-of-the-biceps-and-triceps_fig2_326597252
A brief detour for posing- when the forearm is bend upwards (especially in people with highly defined muscles), you’ll notice that the bi-and tri-cep are compressed and thusly build their mass upwards, which makes this engorged bump. The flex is also visible in non-muscular people, but much less prevalent and rarely anything that one depicts - at least in semi-realism unless they want to emphasize a physical strength with their character.

A quick note on more muscle builds can be found here, https://theredlinestation.tumblr.com/post/185528871950/do-you-guys-think-you-could-give-me-a-tutorial-onand are relevant if your character’s muscles are somewhat defined.
- mod wackart ( ko-fi )
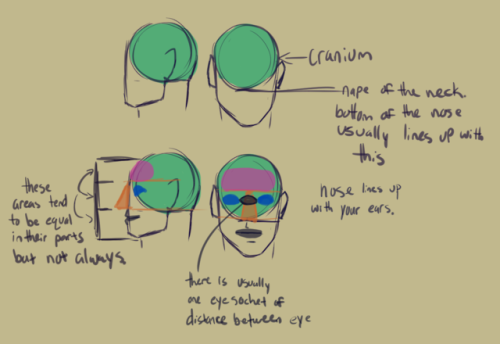
ahh im sorry if youve gotten this before but could you do a tutorial on how the head connects to the neck/neck connects to the shoulders?? i saw a small tutorial on shoulders but it was more about how to draw than than how to connect them to the head and the rest of the body u_u

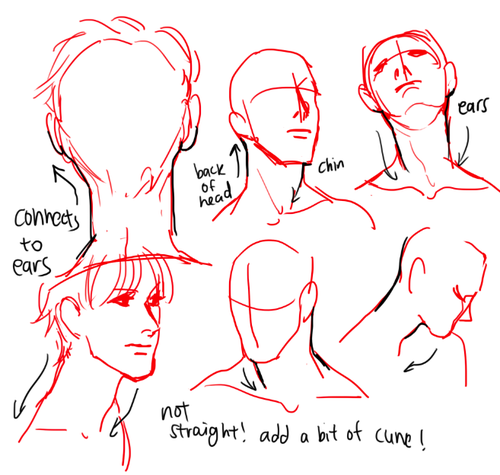
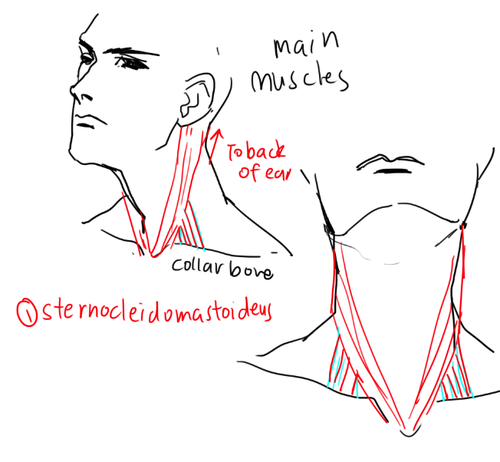

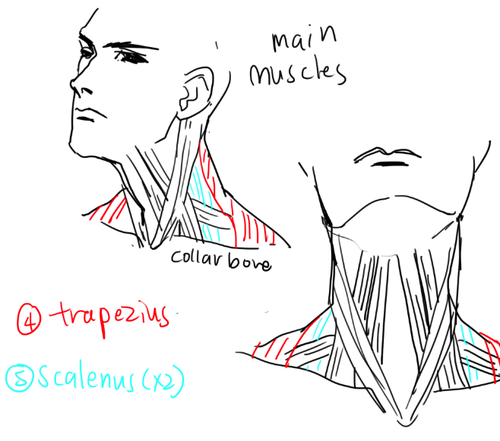
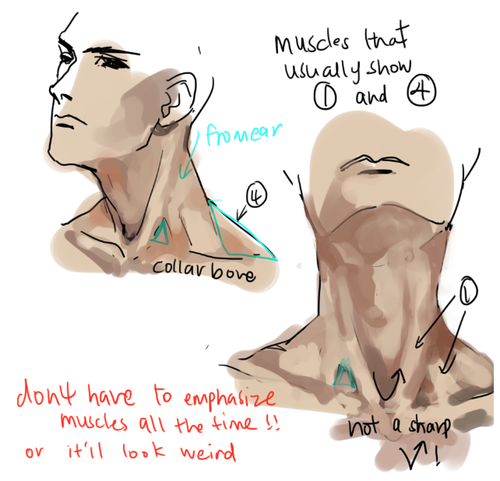


a lot of people asked about necks but i don’t much to say so i covered a little of the muscles too HERE”S A MORE DETAILED muscle diagram if you’re interested! don’t overwork the neck muscles bc in a lot of people they actually don’t rly show up at all ALSO I tend to draw longer necks out of habit ,some people have shorter necks
REAL LIFE REFS ARE THE BEST GO STARE AT SOME NECKS
Bunch of tutorial stuff I did during stream for stuff ppl asked about.
How do I choose which details to draw in non-photorealistic art? I feel so tempted to try and draw everything, but then it looks too busy and cluttered. So many illustrators seem to have a balance of realistic proportions and stuff but not as many details
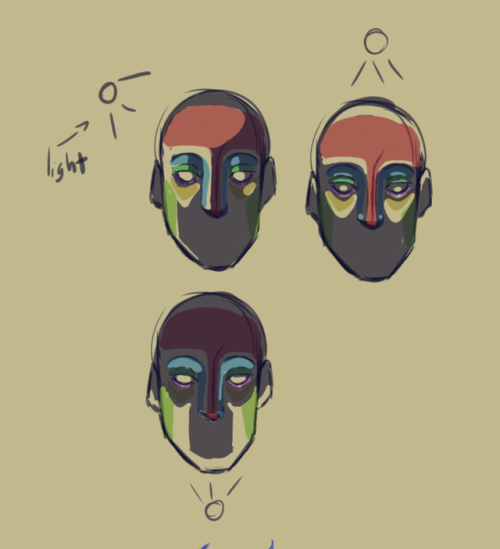
In semi-realistic styles, you have to choose what to keep and what to simplify. My advice would be to keep detail in the areas of focus (the face and the hands are good points of focus). Within the face, you also have smaller areas of focus, such as the eyes, nose, and mouth.
If you’re having trouble with drawing TOO much detail, try this exercise:
1) Try to draw the body/object/face in as few lines as possible while still looking like the original.
2) Then, figure out which parts look weird without the detail (the face, and eyes especially, will probably look flat or fake) and add in as much as needed.

Also! Don’t be afraid to look at those illustrators you think are doing this well and studying where they put how much detail in their drawings. You can learn a lot from observing other artists!
-Mod Future (ko-fi)
yesterday i reblogged a drawing resource that included how to draw hijabs - and it honestly wasn’t the best advice i’ve seen out there
now, i’m not an artist. but what i saw was a video that included hijab styles most of us don’t really wear and incorrect terminology surrounding niqabs and burqas (yes, there is a difference between the two)
so, i went searching and found a tutorial that i felt was better! these drawing guides and examples come from @/winchestermeg on twitter, and i think they’re really great 💕


this has more relevant examples and correct terminologies, and is drawn by a muslim woman
enjoy, artists of tumblr!


The uh ,,
The wing ?tutorial? Featuring many examples and little to no explanation
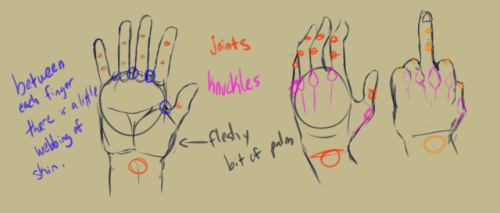
Some advice for if you’re having trouble drawing hands proportionally, for basic pictures–
Put your own hand on your face, with the heel of your palm on your chin. Pay attention to the overall width, and where your fingertips and knuckles are. Then draw a rough outline of the hand over the face you’re drawing, and match the proportions to yours. You can adjust up or down a bit from there if you feel the need, but that should be a good base visual.

-
 saizy0818 reblogged this · 11 months ago
 -
saizy0818 liked this · 11 months ago
-
 wheretheharekissesthefox liked this · 1 year ago
 -
 supermutten liked this · 1 year ago
 -
 e-p-wtoreadlater reblogged this · 3 years ago
 -
 epid13 reblogged this · 3 years ago
 -
epid13 liked this · 3 years ago
-
 not-jadzia-dax liked this · 3 years ago
 -
 thefallenassbuttbitch liked this · 3 years ago
 -
 hypenhyde reblogged this · 3 years ago
 -
 happydistraction liked this · 3 years ago
 -
 abitqueerupinhere reblogged this · 3 years ago
 -
abitqueerupinhere liked this · 3 years ago
-
 withercubz liked this · 3 years ago
 -
 marvel-me-things liked this · 4 years ago
 -
 lunatheproxy liked this · 4 years ago
 -
 confusedwarbler liked this · 4 years ago
 -
 we-are-wondrous-creatures liked this · 4 years ago
 -
 minima-imperuim-blog liked this · 4 years ago
 -
 chrizrizz liked this · 4 years ago
 -
 aureliucs reblogged this · 4 years ago
 -
sneezydarling liked this · 4 years ago
-
 xxtoxicrosexx reblogged this · 4 years ago
 -
 merry--jelly liked this · 4 years ago
 -
 star-studded-zweilous liked this · 4 years ago
 -
 leaena2go liked this · 4 years ago
 -
 siridh71 liked this · 4 years ago
 -
 wimdywednesday reblogged this · 4 years ago
 -
 rex-laqis reblogged this · 4 years ago
 -
 eggoniuss liked this · 4 years ago
 -
 lilyan-angel liked this · 4 years ago
 -
 selectivegeekwithstandards reblogged this · 4 years ago