Would You Perhaps Do A Tutorial On Arm Muscles? Or At Least Link A Few Good Ones You Know
Would you perhaps do a tutorial on arm muscles? Or at least link a few good ones you know
Arm muscles took me a bit to figure out when I got started out with anatomy. But the layout of the arm’ muscles can actually be simplified a whole lot while still maintaining a rather believable look. So let’s have a look-see.

One of the first tidbits I discovered that really made it click for me - was that the upper arm contra the forearm intersections kind of like a set of chainlinks. Both in the way, they sit statically but also how they move. If a “broad” or “wide” side of one of them is shown, the “narrow” side of the other should be shown in correspondence. If you just keep the rough shape of these two lings in mind - you ‘ll have an easier time remembering the layout of muscles.

Just for kicks. This is roughly how the main bones are laid out in the arm. We have the Humerus, the large bone in the upper arm. This one’s rather dense and thick. Then you got the Radius and Ulna that start at the elbow and then reach into the wrist. When we move our wrist, the two ends attached to our wrist twist around one another. ( Take a look at your own hand, turn it, twist it, You should be able to vaguely feel the slight shift in angle in your elbow ).

So here’s a pretty accurate depiction of the muscle layout in the arm. The most notable muscles ( or at least those most iconic ) are the two large ones on the upper arm ( the Bi- and tri-cep), as well as the brachioradialis on the lower arm.

I’ve gone and simplified the layout accordingly to how I usually consider the layout in my own art. Here we can see the “chainlink” figure again. The bi- and tri-cep forming the “upper” chain link, and the brachioradialis along with the flexor carpi Ulnaris former the “lower” chain link.
The reason I tend to simplify this is that the many extendors and flexors on the lower arm, aside from the two listed - are rarely defined on people who’s muscles aren’t highly defined. And having these two braid into one another is just easier than having to keep track of 5-6 different muscles that feed into mostly the same shape.
On the upper arm: We have the bicep in the palest red, the tricep in the darkest red.
On the forearm: The brachioradialis in the darkest red, and the flexors/ extendors gathered up in the lighter red.

What’s interesting to note is that the flex/ex’ es meet with the brachioradialis kind of cross each other in a V-shape, which opens up into the dent of the elbow and attached - not on line with the elbow- but slightly above it. Attaching this muscle group underneath - or on the line with the elbow was a common mistake I used to do - which contributes to your arms looking like sausage links. But just like any other muscle layout, the muscles of the arms are carefully braided with each other with little areas where no muscles are overlapping or weaving into one another.

llllhttps://www.researchgate.net/figure/Agonist-antagonist-operation-of-the-biceps-and-triceps_fig2_326597252
A brief detour for posing- when the forearm is bend upwards (especially in people with highly defined muscles), you’ll notice that the bi-and tri-cep are compressed and thusly build their mass upwards, which makes this engorged bump. The flex is also visible in non-muscular people, but much less prevalent and rarely anything that one depicts - at least in semi-realism unless they want to emphasize a physical strength with their character.

A quick note on more muscle builds can be found here, https://theredlinestation.tumblr.com/post/185528871950/do-you-guys-think-you-could-give-me-a-tutorial-onand are relevant if your character’s muscles are somewhat defined.
- mod wackart ( ko-fi )
More Posts from Aether1984 and Others


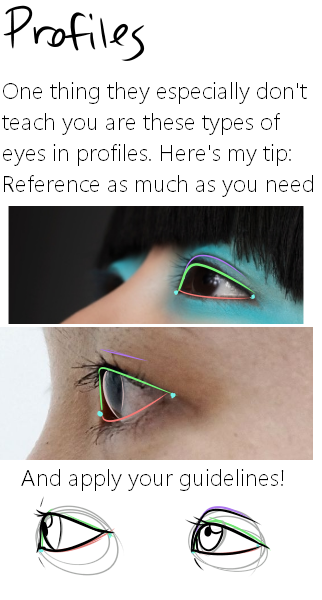
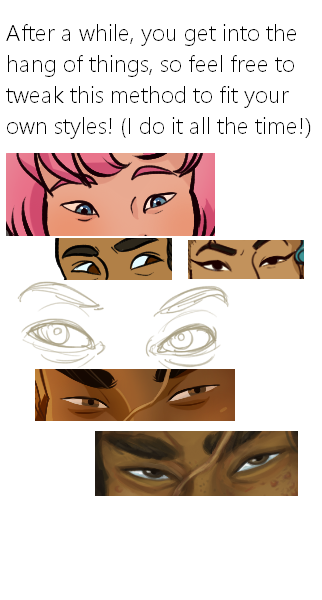
Here it is, my long winded tutorial, complete with some step by step action. I see a lot of people talk about wanting to diversify their artwork but not knowing how. This is my help to you. You really should take the time to invest in learning diverse eye shapes as diverse artwork always makes you a better artist. And frankly I’m really tired of drawing tutorials that talk up character diversity but only have the stereotypical “one Asian eye”.
I did some step by steps for those three diagrams, but I actually got them from this blog which has 14 of those examples! (Bonus: it’s a makeup blog so if you need help with that or want some idea of how to shade these eyes, there ya go)
Hi! I recently saw your tutorial on drawing/designing PoC characters, do you have any tips on drawing monolids? Especially stylized monolids?
Here are a couple of links to really great tutorials:
https://theredlinestation.tumblr.com/post/182913540819/eschergirls-really-cool-tutorial-about-drawing
http://chuwenjie.tumblr.com/post/158694460814/a-compilation-of-stuff-i-know-about-drawing-asian
Here are some of my own observations about monolids and double eyelids. All in all, there’s very subtle differences between the different eyes. It is the combination of all different features that makes someone look a certain way.

-Mod Future (ko-fi)
So I asked a couple jokes earlier but if you're still giving advice - how is it you simulate a painted texture in digital art? Like, I dont understand the jump from sketch to pretty artwork??? Or just colouring in general tbfh
there’s no jump at all, more like steps. base color, shading, blend shading, more shading, highlights. it’s really simple, honestly.


you can leave the colors as a base, but if you want, you can add shadows.


for maximum impact on the shadows, make sure the blended shadows are of a similar hue to the base colors, and the cel shadows are a color that’s opposite on the color wheel. for example, here i used mostly warm colors like brown and peach for the base and blend, but with the cel i used a cool color, blue.

and you’re done!! if you want more of a painting-ish style, use textured brushes or watercolor brushes and lots lots more blending with them. keep in mind where the curves and shapes of your subject are, and use your light source to your advantage. color theory is also good to know! hope this helped some!
How do I choose which details to draw in non-photorealistic art? I feel so tempted to try and draw everything, but then it looks too busy and cluttered. So many illustrators seem to have a balance of realistic proportions and stuff but not as many details
In semi-realistic styles, you have to choose what to keep and what to simplify. My advice would be to keep detail in the areas of focus (the face and the hands are good points of focus). Within the face, you also have smaller areas of focus, such as the eyes, nose, and mouth.
If you’re having trouble with drawing TOO much detail, try this exercise:
1) Try to draw the body/object/face in as few lines as possible while still looking like the original.
2) Then, figure out which parts look weird without the detail (the face, and eyes especially, will probably look flat or fake) and add in as much as needed.

Also! Don’t be afraid to look at those illustrators you think are doing this well and studying where they put how much detail in their drawings. You can learn a lot from observing other artists!
-Mod Future (ko-fi)


Since a lot of people adviced me to improve on body variety I practiced a little bit. Loosely based on the lunar zodiac character traits to make it more fun.


disclaimer: I am east asian. if anyone who is not white sees anything wrong with my phrasing, inaccuracies, or insensitivity, or something I missed, please feel free to add on. I'm just one person with one perspective; none of what I say should be taken as The Singular way to draw an Asian character. if you havent done so already, please take the effort to expand your view of Asian culture outside this one tutorial.
if a white person reblogs this and adds something stupid I'm going to bite and kick you like a wild animal
do you have any tips for anatomy?? the way you draw bodies flows so well and looks so natural, but its also really detailed!!
Thank you!!! There is too much to say on the matter so I summarised some basics. The best way to learn is to draw nudes (looooots of nudes), but I hope those tips make the process easier ~


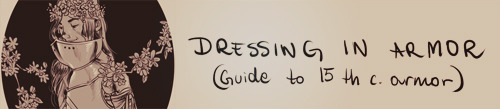
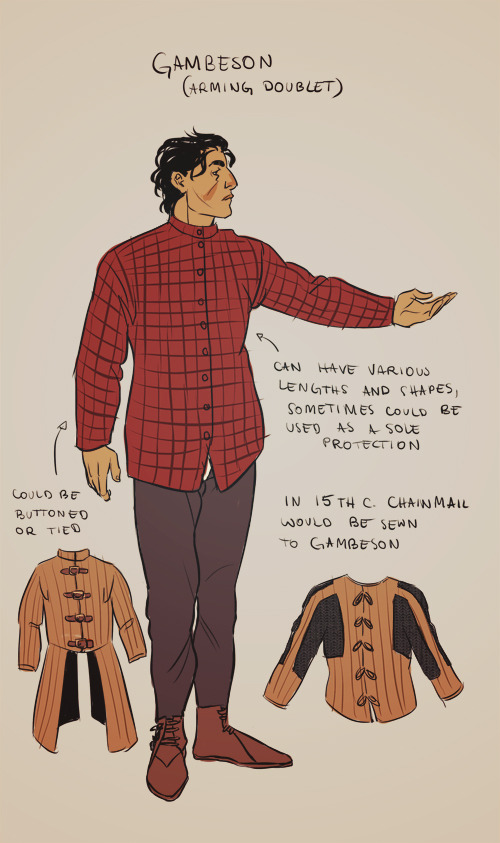
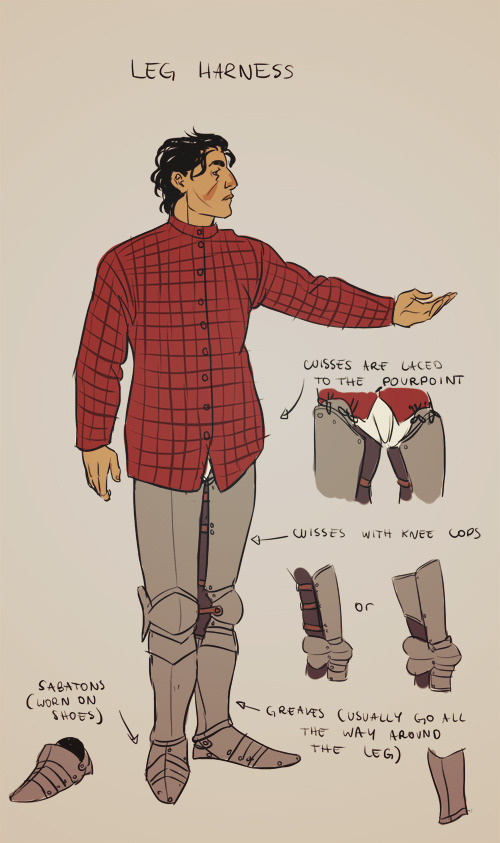
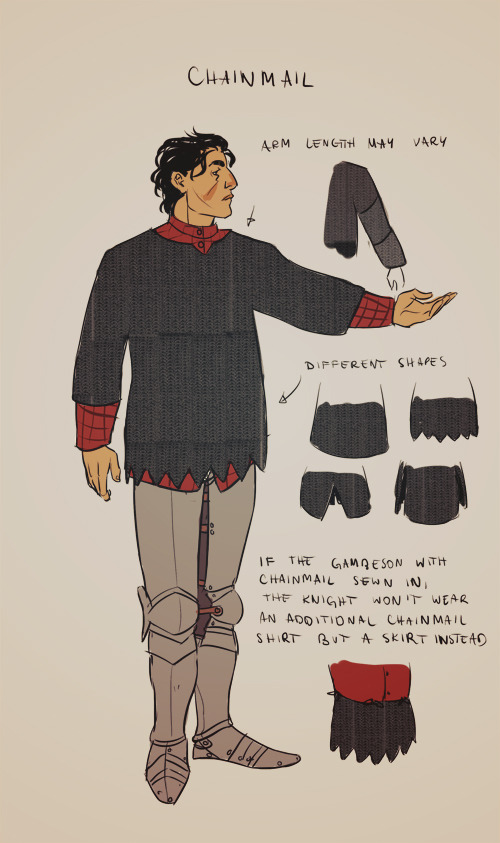
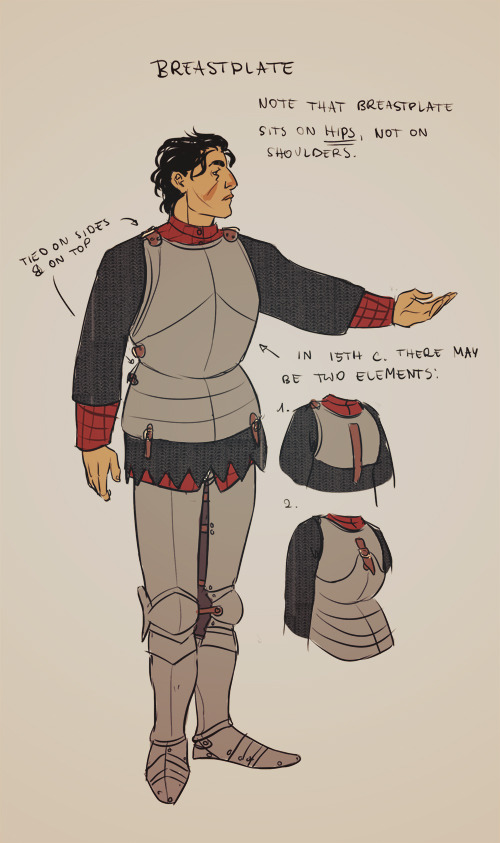
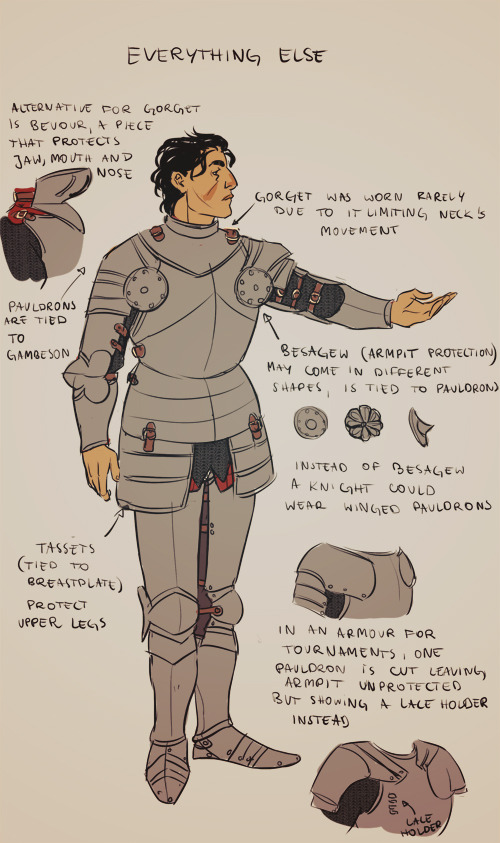
There’s always space for yet another armor tutorial, right? (ノ´ヮ´)ノ*:・゚✧
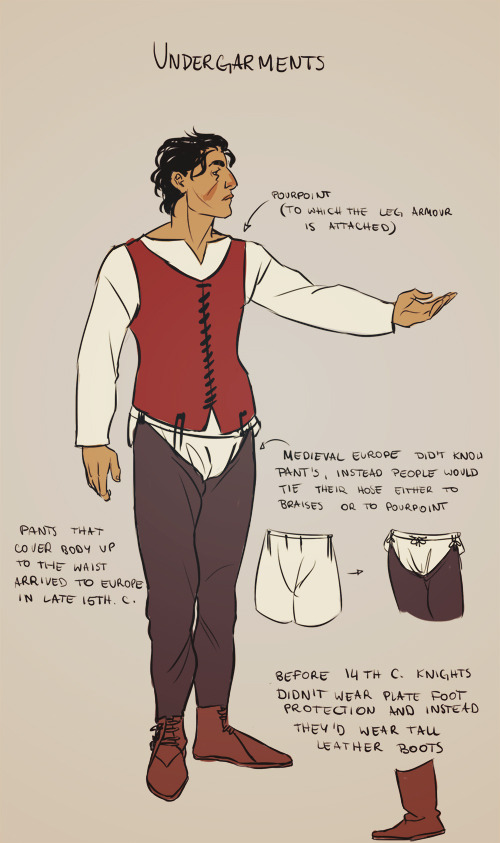
Note that the armor I drew would be worn around 15th century, the more into the future the less and less components knight’s armor had (i. e. in early 14th century instead of greaves a knight would wear long boots only; in 12th century knights didn’t wear plate breastplates and instead a chain mail only). Also the design of armor pattern changed by year and was different in every country (i.e. in eastern Europe armors, while still looking European, were heavily influenced by Turkey). so just make sure you always do research whenever drawing an armor. And one more thing to keep in mind is that armors were expensive, knights wearing a full plate armor weren’t an often sight.
Some links that may be useful:
Armour Archive (I strongly suggest to browse its forum, there is no country or period of which armor wouldn’t be discussed)
Therion Arms (armorer’s page; each accessory is photographed in big resolution and several time so it’s a nice page to use as reference for drawing)
Revival Clothing (another store, but both with medieval clothing and armors; I suggest to read the articles, they’re often supported with pictures)
Basic Armouring:A Practical Introduction to Armour Making (pdf)
Educational Charts (pdf, shows how armors and weapons changed over the years)
Medieval & Renaissance Material Culture (actual medieval resources, mostly paintings. And my favourite subpage - women in armor)
Dressing in Steel (youtube; a demonstration how to dress in armor)
How shall a man be armed? (youtube; another demonstration but with 4 different knights from different periods)
yesterday i reblogged a drawing resource that included how to draw hijabs - and it honestly wasn’t the best advice i’ve seen out there
now, i’m not an artist. but what i saw was a video that included hijab styles most of us don’t really wear and incorrect terminology surrounding niqabs and burqas (yes, there is a difference between the two)
so, i went searching and found a tutorial that i felt was better! these drawing guides and examples come from @/winchestermeg on twitter, and i think they’re really great 💕


this has more relevant examples and correct terminologies, and is drawn by a muslim woman
enjoy, artists of tumblr!
I'm sorry to ask- But You're Really Good At Drawing Art- do you have any tips on drawing big people? i really want to figure it out to properly draw some ocs-
thank you very much, and i’d love to share!
the way i see it, the best way to go about it is to imagine the person you’re drawing being divided into blocks like those little wooden posing figures

i don’t usually plan out a whole character this way, though a good amount of people probably do, but it’s the easiest way to remember where everything goes, anatomy-wise
all you have to do to get varied body types is change the sizes of the blocks, this goes for any body type your going for not just fat ones

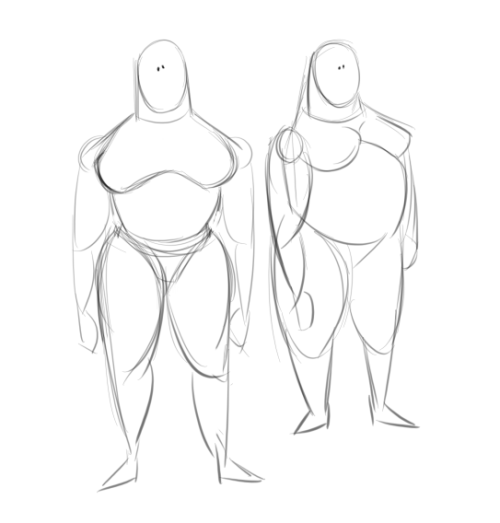
And, of course it’s good to remember where fat or muscle collects on a body like the chest, stomach, biceps, thighs, neck and cheeks (this isn’t any kind of Strict Guideline tho, it’s art do whatever you want)

the most important thing is Use Reference, really look at bodies to figure out how they work, if this doesn’t help as much as it should, making your own observations will most likely help you figure out your Own way of doing it
i WAS gonna link some tutorials that helped me when i was still figuring this stuff out but i can’t find Either of them to save my Life so, hope this helps some
-
 confused-marmalade7 liked this · 3 months ago
 -
 scotfreeman reblogged this · 8 months ago
 -
scotfreeman liked this · 8 months ago
-
 fukyourshit liked this · 1 year ago
 -
 cartoonqtpie liked this · 2 years ago
 -
 savelil reblogged this · 2 years ago
 -
 lillybean730 reblogged this · 3 years ago
 -
 theultracharmingladynoire liked this · 3 years ago
 -
 caffeinatedpoodle-imarealperson liked this · 3 years ago
 -
 rozaliared liked this · 3 years ago
 -
 aj-lethal reblogged this · 3 years ago
 -
aj-lethal liked this · 3 years ago
-
 meganewt liked this · 3 years ago
 -
 ihavenoobjectpermanence reblogged this · 3 years ago
 -
 energon-with-a-curly-straw liked this · 3 years ago
 -
 yesireblogstuff reblogged this · 3 years ago
 -
 ghostfaceblues liked this · 3 years ago
 -
 crazedhopelessromantic liked this · 4 years ago
 -
 theboosker reblogged this · 4 years ago
 -
 sindy-reblogs reblogged this · 4 years ago
 -
 simimiart liked this · 4 years ago
 -
 stardustkarim reblogged this · 4 years ago
 -
 chronicsheepdeprivation liked this · 4 years ago
 -
 zjealy liked this · 4 years ago
 -
 deadlysoup reblogged this · 4 years ago
 -
 batghostgirlfan reblogged this · 4 years ago
 -
 crowncorvidae liked this · 4 years ago
 -
 hystericalfallenstars liked this · 4 years ago
 -
 shigeko-nobufusa reblogged this · 4 years ago
 -
shigeko-nobufusa liked this · 4 years ago
-
 boredmidnighttraveler reblogged this · 4 years ago
 -
boredmidnighttraveler liked this · 4 years ago
-
 sarahdraws-sometimes liked this · 4 years ago
 -
 dxmain reblogged this · 4 years ago
 -
 grimelius liked this · 4 years ago
 -
 bangtsea liked this · 4 years ago
 -
 mcsnagon liked this · 4 years ago
 -
 nicobutnicotine liked this · 4 years ago
 -
 satan-general-irl liked this · 4 years ago
 -
 terrific-togekiss reblogged this · 4 years ago
 -
terrific-togekiss liked this · 4 years ago
-
 torrilin reblogged this · 4 years ago
 -
 miwlkies liked this · 4 years ago
 -
 edgy-senju liked this · 4 years ago