Link To My Face/head Tutorial


Link to my face/head tutorial
This is more just some messy thoughts rather than a tutorial, but some people might find it useful?? The best tips I can give is still just to practice. Take a life drawing class if you can, or just use images of people. You can also learn a lot by copying the work of artists you like (just don’t claim it as your own, of course).
I do have a book recommendation though! Andrew Loomis “Figure Drawing for All It’s Worth”. I remember it used to be extremely easy to find free PDFs of that book, but then it got back in print so I’m not sure. It’s a very old book.
More Posts from Aether1984 and Others
Horns and Antlers
took a while, but i'm mostly back on my feet and have energy again.
I received an ask a while ago about how to add horns and antlers onto a humanoid, so here are my thoughts on that:

(image description: a stock image of the human skull from four angles, front, back, side, and three quarters. Next to it, the same image faded and traced over in blue, with red circles all around the top front portion of the skull. A note on the image says, "there are lots of places you can anchor horns or antlers". end description.)
Here I have marked out some common placements for horns/antlers, and I will show them each in more detail below. The four main areas are: the brow, the center forehead, the top, and the sides of the skull.
As a general rule, horns and antler anchor directly to the skull, but they do not emerge from the skin as solid bone. There is typically a covering layer of some sort, like a keratin sheath, that starts where the horn or antler emerges from the skin. This makes horns and antlers look a bit funny when you remove the skin, because the actual bone base is thinner than the covering layer.


(Image description: same as before, with the four angles of the human skull next to traced versions of it. This time, each of the four images shows the skull with simple horns added and the skull altered to accommodate them in the four basic horn positions. Brow, sides, top, and center forehead. end description.)
Depending on the size of the horns or antlers, you may want to add more bone to the skull, or even thicken the neck bones. Bigger neck and shoulder muscles will also be important to keep the head upright with the additional weight. For horns at the brow and forehead, I've made the brow bone bigger, and for horns at the top and sides, I've made the skull a bit wider and thicker in those areas. It isn't a huge difference, and may not even be very visible on a skin layer, but it's important to be aware of.
And now I also have four sketches of how each horn/antler location would look on a person with the skin and hair in place.

(image description: four simple sketches of people from the shoulders up, in basic shaded colors. From the top left, clockwise:
A man with a mohawk and short beard, frowning. He has curved horns over his brow. A woman with long braided hair and a neutral expression. She has a single horn in the center of her forehead. A man with a beard and long unkempt hair, looking tired but happy. He has moose-like antlers on the sides of his head. An androgynous person with short hair, smiling. They have pronghorn antlers at the top of their head. end description.)
It's very easy on the sides and top of the head to cover the base of the horns/antlers by layering the hair around them. But any horns on the forehead area will be harder to cover this way. I've put thicker skin where the horns and antlers emerge, which has made the brow very heavy on the first two sketches. To balance that out, I also made their nose bridges a bit bigger and more connected to the forehead.
So I hope that helps! Horns and antlers are very fun, and they come in so many shapes.
im sorry to ask, but i was wondering if you may show us how to draw abs please?
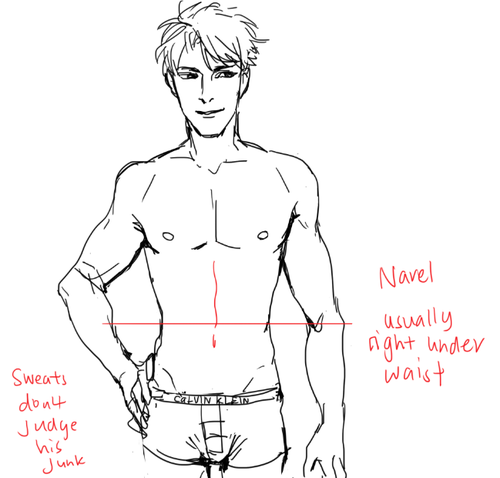
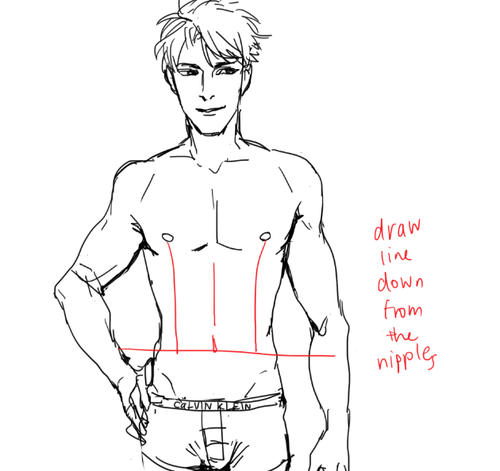
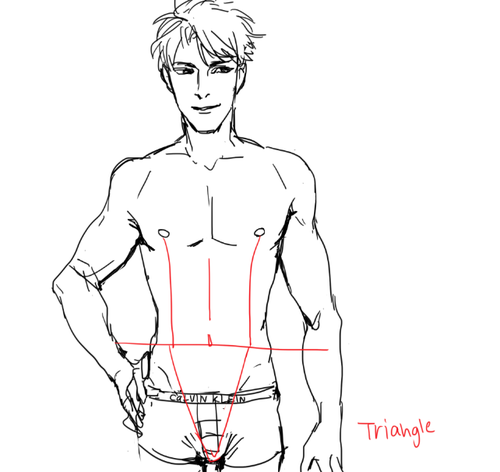
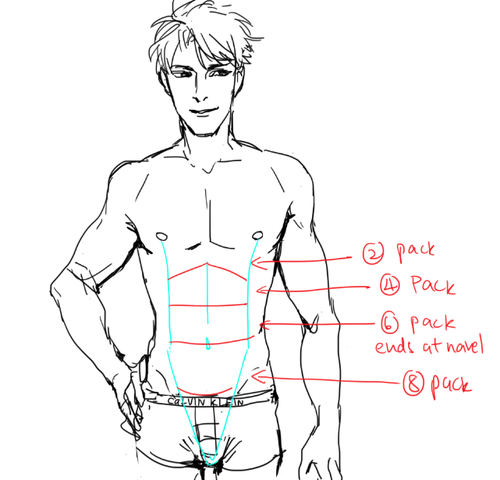
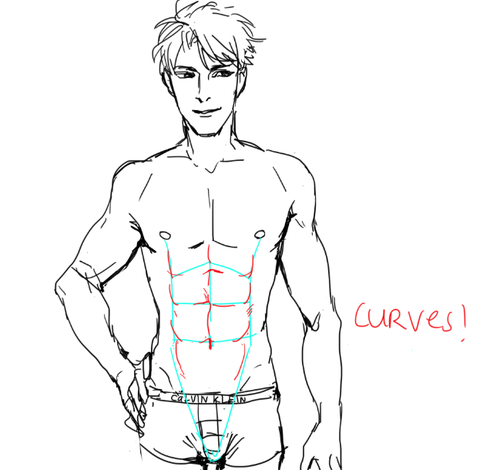
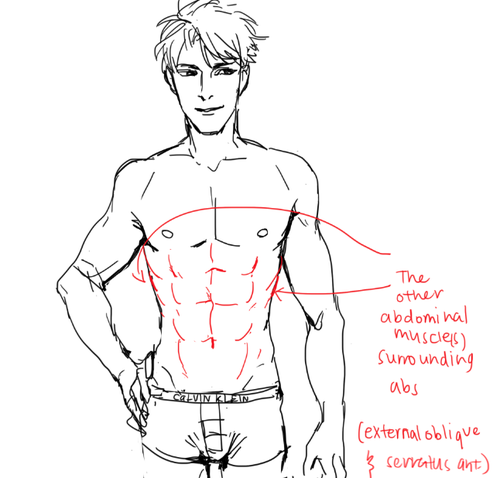

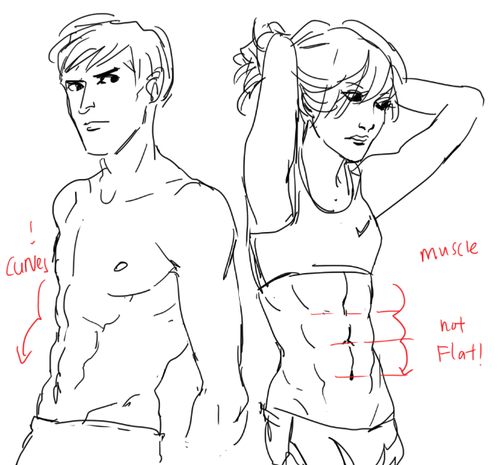
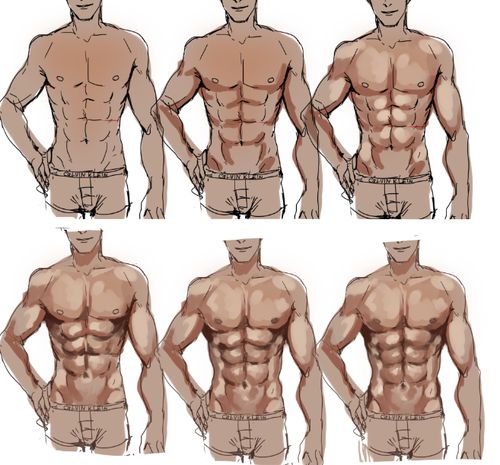
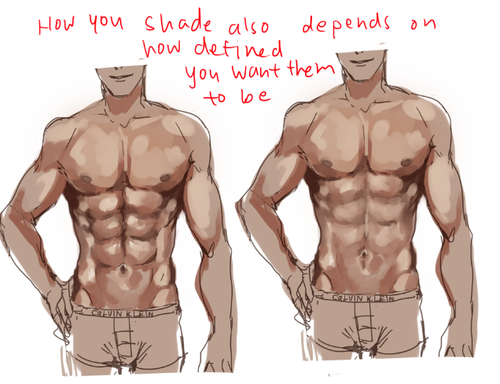
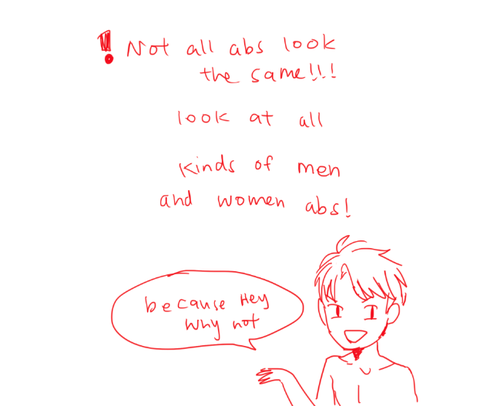
I STILL TAKE A LONG TIME TO DRAW OK looking abs HHahA SOBS AND LIES DOWN but yeah!! GO LOOK AND Some real life abs i promise you it’ll be ten times more helpful than my crude doodles!!
PLS TAKE THIS WITH A GRAIN OF ASALT AND Hope this helps u out a little!!
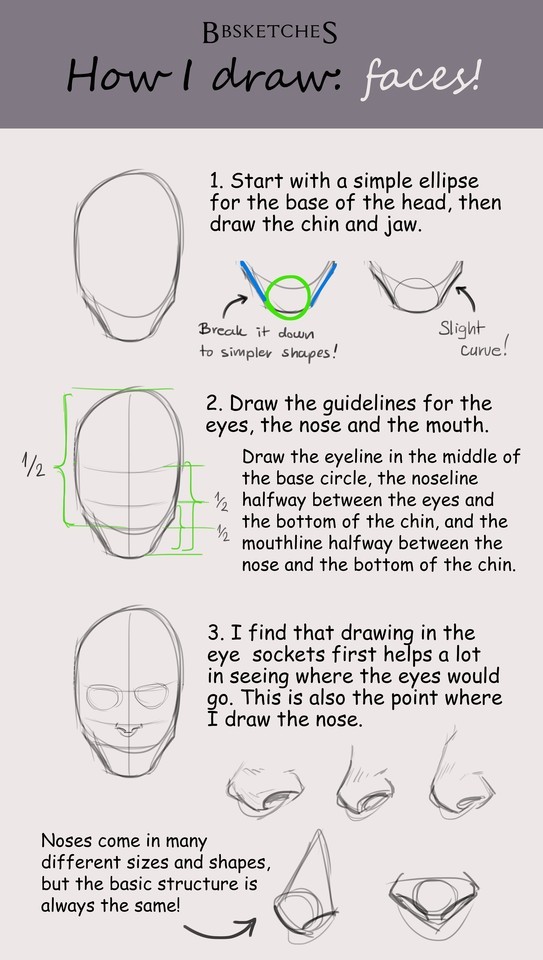

Face tutorial for Anon!
I wasn’t sure whether you meant heads or facial expressions, so here’s a very basic head tutorial! Of course not all faces are the same so proportions and the size of ears/eyes/noses etc. can vary! Feel free to explore and play with them to create unique and interesting characters! I hope this is somewhat helpful, and let me know if you’d like a tutorial on expressions as well!
Hi!! I absolutely love your colors and wanted to ask how you color skin tone :0!! I love how you shade it sm and would love to know how you do it!!! ❤️
HIII i thought i'd make this little tutorial to illustrate my thought process c:
we're starting off with grayscale because i place form sculpting and values above colors...


that's basically it! though, when dealing with different skin tones (both realistic and fantasy-based) i usually make the first layer of shadows a little more colourful to make the transition a bit more visually interesting/appealing
here's some more examples:

hope this was clear! i mentioned some tips in a post here too :]


To celebrate a follower milestone on ig and also so I don’t have to keep a million references open whenever I draw these characters, I’ve made semi-model sheets on all of them, including their general build, face shape, expressions, and fashion styles.
Another comment I’ll make is that Julian and Lucio have quite similar faces, but Lucio is very sharp while Julian’s rounded out.
Each character tends to have a reoccuring line shape throughout their design:
Asra - Semicircles/curves
Nadia - Straight vs flowing lines
Julian - Loose waves
Muriel - Blocky or jagged
Portia - Bubbly waves
Lucio - Sharp and spiky
I hope this can be useful :D
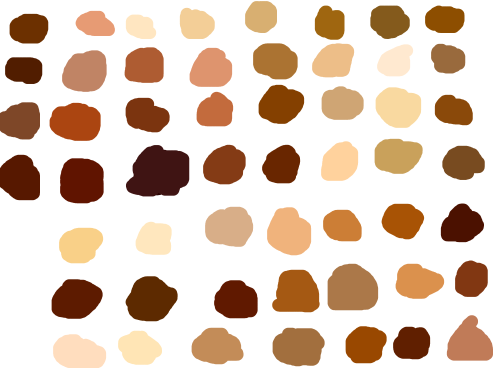
skin color ref because some of yall non-black poc and whites keep fucking up as if yall don’t know there’s other shades of brown when u racebend for woke points or something
(non-black artists please reblog)
how do you bodies/torsos so well? i love them!
first off - thank you so much! i don’t believe i’ve ever had anyone ask me about the way i draw certain things, but i’ll certainly try my best to explain the way i do it…
you won’t hear anything from me that you haven’t heard from any other artist already if i were to give you tips for drawing realistic human bodies!
i believe most of the charm comes from the angularity of my style, so every time i have to draw a body i basically break it down into simple geometric shapes. i dont like the whole ‘draw a line, draw a circle, draw an oval’ business so i just go ham with triangles and squares

you can of course polish the sharp angles and make them smoother after you’re done sketching - that’s up to you
you could also combine straight lines, rough shapes with curvy lines and smooth shapes
if you’re using references you’ll actually notice how common the triangular/rhomboid patterns are on a body

lack of realism when using simple geometry also allows for flexibility and creativity (HUGE shoulders, torsos wider than 3 human heads lined up, etc. im my own cop and i say go ape shit with this stuff)
hopefully this is clear enough to answer your question!
ok heres a small thing for drawing freckles bc i keep seeing artists just putting dots wherever they Feel Like It and as a freckly boy i feel Personally Attacked

try to avoid putting frecks on places that clothes would go a lot
dont space them evenly
dont draw freckles on a Fresh Born Baby
thank u for ur time


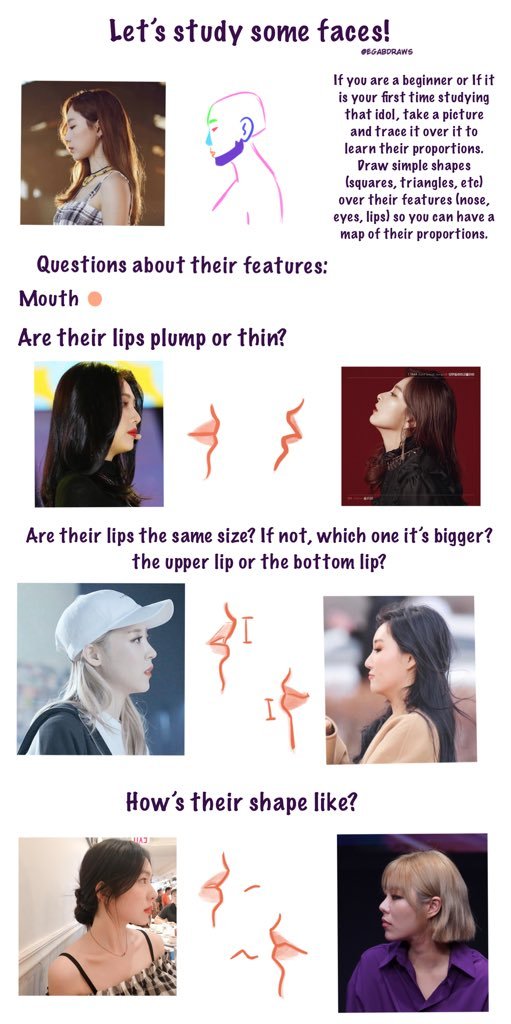

So here are my tips for drawing side profile views and study people’s faces! I wish I could explain more but I’m all over the place I’m sorry ㅠㅠㅠㅠ but well, I hope this can be useful for someone!
Sorry for the disorder, but I wanted to ask if you could do a tutorial on lineless art! By the way, nice art!!!
thanks! lineless art it is, then
i start with the sketch, obviously. since you won’t have the lineart to guide you later, a clean and detailed sketch is pretty important

then i make it transparent enough so that i could focus on the shapes, but was also able to tell the details of the sketch, and pick some background color

then i slap on the colors i wanna use. the accuracy of these splotches of color depends on my mood and patience and the amount of details in the drawing (lol), so it’s fairly arbitrary i guess
the more accurate it is, the less it takes to clean it up later, but the opposite sometimes adds life to the drawing and welcomes the experiments with the colors and shapes
if there’s something that needs extra accuracy (like the earring here) or i just don’t feel like cleaning it up again later, i use several layers (face, hair, etc) or add the details later. but i love using one single layer whenever possible

aaand then i just start erasing / adding stuff to make it all nice and crispy!
there isn’t really a certain point when i start doing it. like, here i added those light hair streaks before defining the shape of her head, so that i could erase the messy parts altogether, but i could also clean up the head first, then lock the layer and add the streaks

when i decide that it’s comprehensible enough for me to work without the sketch, i hide its layer. you could continue working with it, of course, but i find it distracting. it’s nice to take a fresh look and figure out what it’s gonna look like in the end

details time! i enjoy adding lines here a lot, it’s really not the same as creating the lineart beforehand. there’s something comfy and lively about this process, because you compliment the shapes, silhouettes and color rather than just redrawing the empty carcass of a sketch. besides, it adds more definition and movement to the shapes

hope that helps!
-
 naren-fox liked this · 7 months ago
 -
 twadi-gurl reblogged this · 10 months ago
 -
 beetle-ze-bub liked this · 1 year ago
 -
 neighborhood-houseplant liked this · 1 year ago
 -
 martialwriter liked this · 1 year ago
 -
 tomatopersonsstuff liked this · 2 years ago
 -
 starshipsandsuperheroes liked this · 2 years ago
 -
 majormouette reblogged this · 2 years ago
 -
majormouette liked this · 2 years ago
-
 laylowsee liked this · 2 years ago
 -
 2020brokenglowstick liked this · 2 years ago
 -
 terr-ella-ref reblogged this · 3 years ago
 -
 champagnecornflakes liked this · 3 years ago
 -
 themixedmarmaladelaughs reblogged this · 3 years ago
 -
 a-marble liked this · 3 years ago
 -
 sezseulgi liked this · 3 years ago
 -
 mena-2001 liked this · 3 years ago
 -
 alijatoni liked this · 3 years ago
 -
 tuturialreblog reblogged this · 3 years ago
 -
 lazyintrovert17 reblogged this · 3 years ago
 -
lazyintrovert17 liked this · 3 years ago
-
 ducky-of-japan liked this · 3 years ago
 -
 sleepzonesworld liked this · 3 years ago
 -
 shellledsnails liked this · 3 years ago
 -
 graydrawn reblogged this · 3 years ago
 -
 honey-waspsandspace liked this · 3 years ago
 -
 wrensbookofrefs reblogged this · 3 years ago
 -
 cryptickarma liked this · 3 years ago
 -
 theowelman liked this · 3 years ago
 -
 akithedumbass liked this · 3 years ago
 -
 stitchthepaleontologynerd reblogged this · 3 years ago
 -
 lamentedandmalcontented liked this · 3 years ago
 -
 unknownnubroooo liked this · 3 years ago
 -
 lijabook liked this · 3 years ago
 -
 valeriavales liked this · 3 years ago
 -
 aboutdakashi liked this · 3 years ago
 -
 justthinkingsposts reblogged this · 4 years ago
 -
 faryalreads liked this · 4 years ago
 -
 caro-aro-art liked this · 4 years ago
 -
 usersummer liked this · 4 years ago
 -
 wowdragonhead liked this · 4 years ago
 -
 agent-emerald reblogged this · 4 years ago
 -
agent-emerald liked this · 4 years ago
-
futuristicbakerydreamerzine liked this · 4 years ago