PROFILE NOSES:
How do you make noses? I think they look really cool but I can't ever draw them like that, the spacing just gets wayyyy off
THAT IS AN EXCELLENT QUESTION AND I REALLY HOPE I CAN ANSWER IT CUZ I LOVE DRAWING NOSES
HERE WE GO BOIS
[MIGHT HAVE TO CLICK FOR BETTER RESOLUTION SO UH]
PROFILE NOSES:


¾ VIEW NOSES:


FRONT PROFILE NOSES:

UP CLOSE NOSE FOR SHADOW REFERENCE AND SHAPE:

MANY NOSES FOR REFERENCE:

OBVIOUSLY, noses vary based on race and age, so it’d probably be a good idea to get some references, but every nose has the same basic form.
So remember: SHADOWS, BROWBONE, TOP LIP, AND NO KILLER KNIFE-NOSES.
and of course
MAKE IT PRETTY!!!
I hope this helps!!! :D
More Posts from Aether1984 and Others

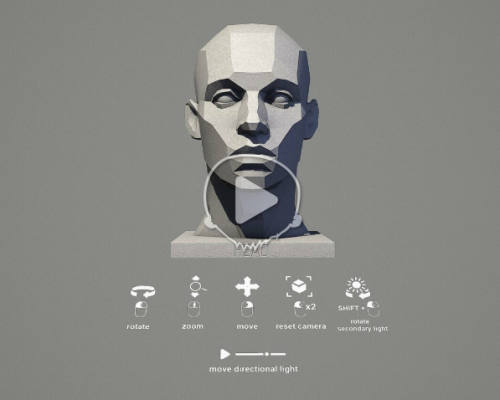

MALE HEAD LIGHT REFERENCE TOOL by William Nguyen
Click here to use the interactive reference!
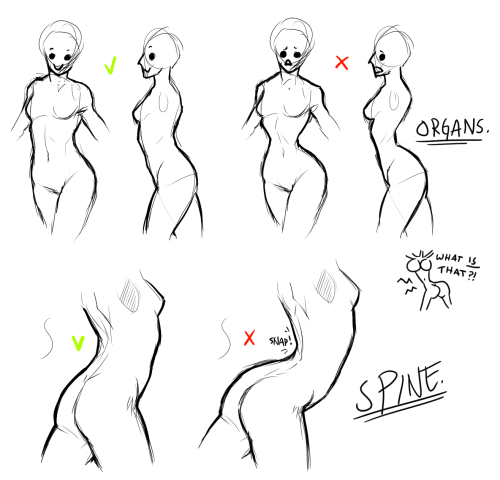
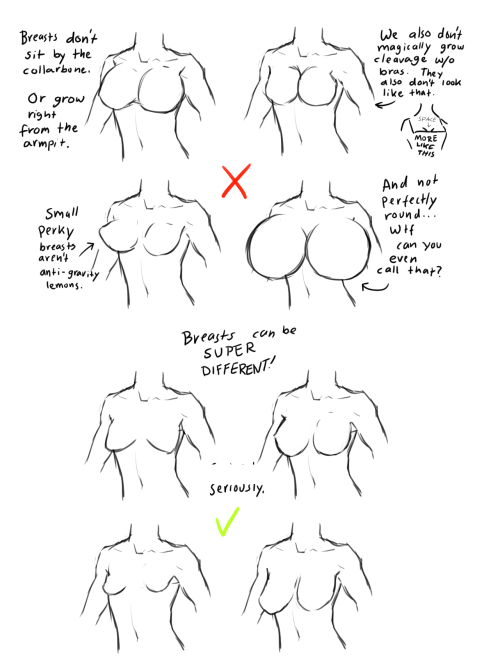

I don’t really think I’m that good at anatomy (or females) but this is quite a popular request so… I’m making a tutorial, and this is the part to show you what NOT to do with your fellow humans. More coming… eventually.
I suck at breast variations, but I try; see this page for awesome references: x
do you have a reference/tutorial for the way you draw teeth??


I kinda just freehand it myself since i got it memorized but i made one for ya- i hope it’s alright;;v;!!
Would you perhaps do a tutorial on arm muscles? Or at least link a few good ones you know
Arm muscles took me a bit to figure out when I got started out with anatomy. But the layout of the arm’ muscles can actually be simplified a whole lot while still maintaining a rather believable look. So let’s have a look-see.

One of the first tidbits I discovered that really made it click for me - was that the upper arm contra the forearm intersections kind of like a set of chainlinks. Both in the way, they sit statically but also how they move. If a “broad” or “wide” side of one of them is shown, the “narrow” side of the other should be shown in correspondence. If you just keep the rough shape of these two lings in mind - you ‘ll have an easier time remembering the layout of muscles.

Just for kicks. This is roughly how the main bones are laid out in the arm. We have the Humerus, the large bone in the upper arm. This one’s rather dense and thick. Then you got the Radius and Ulna that start at the elbow and then reach into the wrist. When we move our wrist, the two ends attached to our wrist twist around one another. ( Take a look at your own hand, turn it, twist it, You should be able to vaguely feel the slight shift in angle in your elbow ).

So here’s a pretty accurate depiction of the muscle layout in the arm. The most notable muscles ( or at least those most iconic ) are the two large ones on the upper arm ( the Bi- and tri-cep), as well as the brachioradialis on the lower arm.

I’ve gone and simplified the layout accordingly to how I usually consider the layout in my own art. Here we can see the “chainlink” figure again. The bi- and tri-cep forming the “upper” chain link, and the brachioradialis along with the flexor carpi Ulnaris former the “lower” chain link.
The reason I tend to simplify this is that the many extendors and flexors on the lower arm, aside from the two listed - are rarely defined on people who’s muscles aren’t highly defined. And having these two braid into one another is just easier than having to keep track of 5-6 different muscles that feed into mostly the same shape.
On the upper arm: We have the bicep in the palest red, the tricep in the darkest red.
On the forearm: The brachioradialis in the darkest red, and the flexors/ extendors gathered up in the lighter red.

What’s interesting to note is that the flex/ex’ es meet with the brachioradialis kind of cross each other in a V-shape, which opens up into the dent of the elbow and attached - not on line with the elbow- but slightly above it. Attaching this muscle group underneath - or on the line with the elbow was a common mistake I used to do - which contributes to your arms looking like sausage links. But just like any other muscle layout, the muscles of the arms are carefully braided with each other with little areas where no muscles are overlapping or weaving into one another.

llllhttps://www.researchgate.net/figure/Agonist-antagonist-operation-of-the-biceps-and-triceps_fig2_326597252
A brief detour for posing- when the forearm is bend upwards (especially in people with highly defined muscles), you’ll notice that the bi-and tri-cep are compressed and thusly build their mass upwards, which makes this engorged bump. The flex is also visible in non-muscular people, but much less prevalent and rarely anything that one depicts - at least in semi-realism unless they want to emphasize a physical strength with their character.

A quick note on more muscle builds can be found here, https://theredlinestation.tumblr.com/post/185528871950/do-you-guys-think-you-could-give-me-a-tutorial-onand are relevant if your character’s muscles are somewhat defined.
- mod wackart ( ko-fi )

I’m creating the world’s first true ENCYCLOPEDIA of drawing tutorials under the hashtag #howtoTHINKwhenyouDRAW, all of which is FREE for EVERYONE, FOREVER - you can see EVERY TUTORIAL on OUR MASSIVE INSTAGRAM HERE and OUR GIANT TWITTER HERE! PLUS! CLICK HERE for 300 EXTRA FREE TUTORIALS! Lorenzo!
So I asked a couple jokes earlier but if you're still giving advice - how is it you simulate a painted texture in digital art? Like, I dont understand the jump from sketch to pretty artwork??? Or just colouring in general tbfh
there’s no jump at all, more like steps. base color, shading, blend shading, more shading, highlights. it’s really simple, honestly.


you can leave the colors as a base, but if you want, you can add shadows.


for maximum impact on the shadows, make sure the blended shadows are of a similar hue to the base colors, and the cel shadows are a color that’s opposite on the color wheel. for example, here i used mostly warm colors like brown and peach for the base and blend, but with the cel i used a cool color, blue.

and you’re done!! if you want more of a painting-ish style, use textured brushes or watercolor brushes and lots lots more blending with them. keep in mind where the curves and shapes of your subject are, and use your light source to your advantage. color theory is also good to know! hope this helped some!


I wanna do more of these… >:U
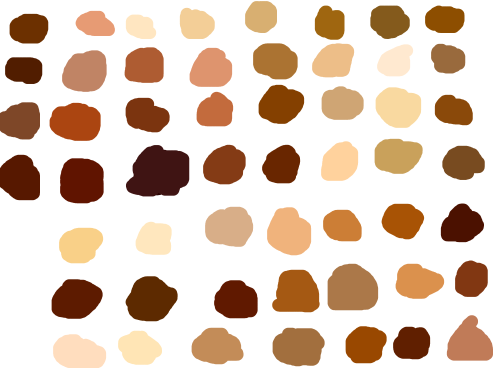
skin color ref because some of yall non-black poc and whites keep fucking up as if yall don’t know there’s other shades of brown when u racebend for woke points or something
(non-black artists please reblog)


-
 spark-lapis liked this · 3 years ago
 -
 squidsketch liked this · 3 years ago
 -
 jaxisntdoingartthings liked this · 3 years ago
 -
 mmmreferences reblogged this · 4 years ago
 -
 mrsoverbeck liked this · 4 years ago
 -
 itzykids-mp3 liked this · 4 years ago
 -
 shadowcrow liked this · 4 years ago
 -
 justroll liked this · 4 years ago
 -
 cankarmawrite reblogged this · 4 years ago
 -
cankarmawrite liked this · 4 years ago
-
 valssoul liked this · 4 years ago
 -
 wisestudentgeek liked this · 4 years ago
 -
 yell0wybear liked this · 4 years ago
 -
 frosty-the-killer-doll reblogged this · 4 years ago
 -
frosty-the-killer-doll liked this · 4 years ago
-
 stickyanimegrungecowboy liked this · 4 years ago
 -
 mauveriq liked this · 4 years ago
 -
 wea-telefonica-1 liked this · 4 years ago
 -
 rebloggeddump reblogged this · 4 years ago
 -
 midheavenjupiter reblogged this · 5 years ago
 -
 queenofhearts579 liked this · 5 years ago
 -
 bluebells-and-black-beetles liked this · 5 years ago
 -
 mimisunnybun liked this · 5 years ago
 -
 moetine liked this · 5 years ago
 -
 librajac liked this · 5 years ago
 -
 mischiefnoxmanaged reblogged this · 5 years ago
 -
 casualavocados liked this · 5 years ago
 -
 stop-grating-cheese liked this · 5 years ago
 -
 mcavoysss liked this · 5 years ago
 -
 deepestherringcloudturkey-blog liked this · 5 years ago
 -
 scittz liked this · 5 years ago
 -
 xosincerelyezzie liked this · 5 years ago
 -
 stresschemicals liked this · 5 years ago
 -
 klausiee liked this · 5 years ago
 -
 heichie liked this · 5 years ago
 -
 mystic-clairdelune liked this · 5 years ago
 -
 art-tip-tapdance reblogged this · 5 years ago
 -
 yasmeenbelikee liked this · 5 years ago
 -
 papita-adobada liked this · 5 years ago
 -
 pointleesloveinapointlesslife liked this · 5 years ago
 -
 skeletshoo liked this · 5 years ago
 -
 hellopeanut145 reblogged this · 5 years ago
 -
 ethanoic-acids reblogged this · 5 years ago
 -
ethanoic-acids liked this · 5 years ago