Aether1984 - Un Ambiente De Revista


More Posts from Aether1984 and Others
I struggle INSANELY with doing 3/4 view art. Do you have any tips? I've found a couple guides on pinterest but I'm still having a little trouble.
Hi Anon! So sorry to hear you’re struggling. 3/4th is my favorite comfort zone, but I don’t know how well I can walk you through it any better than the many tutorials out there. There are plenty that do tutorials much better than me and they all kind of follow the same format for 3/4th view, but I’ll try my best to break down my method as understandably as possible!
1: I always start with my eye and middle line guide in whatever direction I want them facing. The middle one is more important than the original eye line.

2: Next I’ll do my head circle to keep my skull guideline and connect it to the bottom of my middle guideline to make the jaw. You’ll want to be kind of careful about this part and not just draw a gigantic circle or one that’s too small. Try to keep it about the size you want your actual head.
Don’t worry too much about the eye line at this point as you’re mostly getting the general shape of your head at this point. You can always edit your eye line later and adjust it to where you need it to be.
If you’re doing a character that has defined cheek bones (Like Vaard who has CHEEK BONES) you can do a line from the side of the head to the side of the chin like I did here that always acts as a great guide to the general area if you’re going to define it.
Make sure this step is on its own layer separate from the rest of your lines.

3: Now using your line and circle guide, go ahead and fill out the far side in whatever shape your character’s face is (angular, round ect.). It’s easiest starting from the top of your brow bone. Keep in mind your center line as this is your direct center of the face.
Vaard’s got a pretty basic, generic face shape as a base. It’s very sharp and square so I did a lot of straight lines with little to no curves to them.
At this point, it’s best to have a reference of a face in the shape you’re going for if you struggle with this step. References are your friend when stepping into unknown territory and angles.
You can also add your hair line guide as well to make sure it’s not too high or too low.
See how the circle we started with now becomes the full skull and makes up the back? This is why we want to be careful about the placement earlier and not go way out of the anatomy you’re going for.

4: Ok now for the fun part. What I like to do, is draw little Star Trek badges under the highest point of the brow you’re going for and on the far side, connect it to the cheek. This becomes your brow/cheekbone on the far side, and your inner eye socket guide on the inside. Don’t worry if they’re too big, you can always erase them later but we’ll come back to these in a bit. You just want the top to be fairly even with each other.

5: So to help line up your eyes in ¾ths view, you can draw a line from each side of the chin or nose. The inner corner of the eyes will usually sit near or close to the same line as the nostril or chin edges. (unless you’re drawing a very narrow or very wide nose, then go with the chin guide lines instead).
My original eye line didn’t quite line up with were I wanted to actually put my eyes but it pretty much lined up with the bottom inside corners so I kept it where it was.
Using the outside ‘Star Trek Badge’ just carry that top line on down and bam, nose bridge perspective!

6: Now using those badge shapes still, you can go ahead and curve your eyebrows right on top of the lines and you have your brows! This really only works if you’re going for a neutral expression though with little to no brow movement or expression.

7: From this point, it’s just a matter of adding your details! You already have a fairly solid base and anything at this point is very easily tweaked or shifted.

8: At this point you can erase all of your guide lines (which should be on a separate layer from your actual face outlines.) and if you happen to have a character with fairly deep set eyes, you can use those badge guides again to shade the eye sockets. Just shade inside them and you have some decent shadow guides.

I hope this helped some! Sorry if it looks like most other tutorials and guides out there, but I did my best. Remember, references are your friend when doing angles you’re not familiar with, even if it’s taking a picture of your own face just to see where shadows fall or how the nose looks at that angle! (The other eye is also the worst. I am in no position to give tips on the other eye, sometimes I don’t even draw it lol).
Best wishes and wishing you the best of luck as you learn to draw in ¾ths! It’s one of the most fun angles to draw once you get the hang of it!

Any advice on necks? they are my nemesis ;;
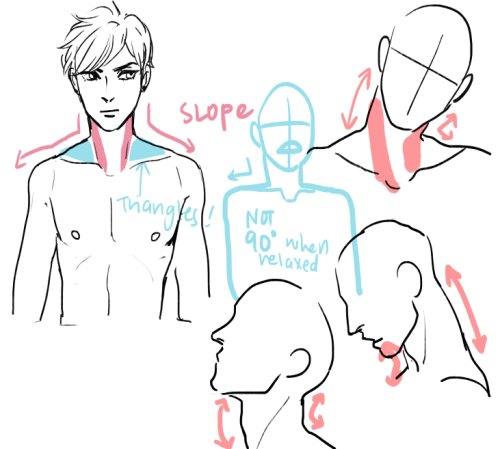


Im not gonna go into detail w the muscles but if you wanna learn the specifics here are some good diagrams! 1,2 Hope that helps a little! Look up rl refs too!
I've always loved drawing people and especially portraits. Your art is so inspiring! Do you have any advice on drawing portraits with accurate proportion? What aspects are the most important in portraits, do you think? And what are good exercises? I'm sorry for bombarding you with so many questions! :3
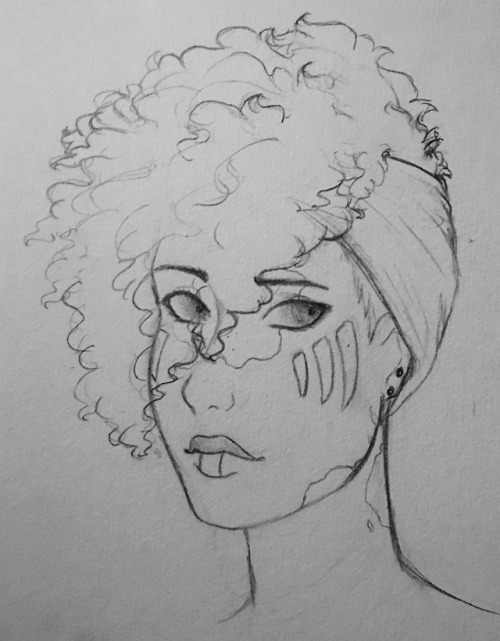
Thank you! There’s one thing about drawing portraits that I don’t think I’ve ever touched on, and it’s the technique of constraining features. Basically, it becomes easier and more intuitive to rotate the face in 3D space once your mind grasps exactly where the features are located and, furthermore, where they can’t be located.
I use a weird double trapezoid shape that I’ve depicted below in red to keep track of facial feature placement every single time I draw a face. It follows the top of the eyebrows, touches the corner of the eye, traces down to the corner of the lips, and finally ends at the bottom of the lips.

The shape of the constraint will change depending on the person’s features, and it works for every angle of the head. For me it really internalized where each part of the face was, as well as where it started and ended. It kinda helps moderate your drawings; i.e., you’ll stop drawing features that are wildly misplaced or off-sized. I don’t literally draw this shape out every time I draw a face, but I see it in my mind’s eye 100% of the time.
If you’re still learning proportions, a good exercise is to grab pictures of people and trace this shape over them (either digitally or with a marker or something) to get an idea of what realistic constraints looks like. Then go back to studying faces, and constantly check your drawing by tracing along the eyebrows and down to the bottom of the lips to make sure that things aren’t off (e.g., the constraint isn’t terribly asymmetric). It takes a while to get used to, but it might help you get a good feel for portraiture.
There’s one other unrelated thing I like to do with faces, and if you’ve seen a lot of my pics you’ve already picked up on it. If you kinda add some shading to the area on the cheek just below the eye and down to the nose, I think it adds a decent amount of depth to a face. Don’t go overboard of course but there’s another little tip that could be of use.

A Tutorial Masterpost
I said that I’d show some tutorials I have saved up to someone, but decided that I’d just go ahead and post most of what I have stored away and create a sort of masterpost out of it. (I figure it’ll help me just as much since, as of now, they’re all pretty scattered between my Tumblr and bookmarks)
A lot of these are hosted on my personal Tumblr, but I don’t change my url so it’s pretty safe to bookmark them there (and not have to worry about the url changing) if you don’t wish to reblog them yourself for whatever reason.
Feline tutorials:
Basic domesticated cat tutorial
The domestic cat body
Improving upon (lion) anatomy
Realistic lion faces tips
Big cat paw tips
Canine vs. feline - paws and legs
Beginner feline tutorial
Guide to big cats
Feline comparison
Canine vs. feline - facial anatomy
Canine vs. feline - chest anatomy
Guide to little cats
Big cat eyes (could work for other eyes)
Canine tutorials:
Basic wolf anatomy
Skeleton notes on wolf legs
The wolf skeleton as a whole
The wolf skull and teeth
Wolf paw tips
Basic canine poses
Canine ears and chest
Drawing realistic wolves
Basic wolf tutorial
Wolf paw tutorial
Paw pad tips
Wolf skeleton and muscles
Wolf fur direction
Canine vs. feline - paws and legs
Canine vs. feline - facial anatomy
Canine vs. feline - chest anatomy
And this is just an excellent DA for wolf reference images
Avian tutorials:
Bird wing anatomy applied on humanoids
Bird wing tutorial (lots of underrated tips)
Varying bird wing structure
Basic owl anatomy
Bird wing vs. bat wing vs. pterodactyl wing vs. human arm
Bird wings and flight
Various bird wings
Human(oid) tutorials:
Hand tips and reference
Simplifying human anatomy
Feet and shoes tutorial
Bird wing anatomy applied on humanoids
A guide to movement: flexibility
A male shoulder study
Altalamatox face tutorial
Male legs reference
The human hand
Male vs. female waist
Excellent expressions tut
Understanding anatomy part 1 (follow desc. links for more)
Painting skin
Simplifying hands
More simplified hands
Pose tutorial
Varying the female figure
Profile proportions
Expression tutorial
Virtual lighting studio
Breaking up the male torso
Male torso anatomy in use
Simplifying the human foot
Various facial and body shapes reference
Drawing the nose
Female anatomy patterns
Human mouths
Breaking down the human nose
How to draw the ear
More hand(y) tips
Neck and torso tut
Jawline and kissing tip
Yet another hands tutorial
Male torso in motion
The human head at various angles
Variation of colour throughout the skin
Excellent action and couple references
Advice on eyes
Feet reference drawings
Nose shapes
The human skull and face
Facial features
Portrait lighting cheat sheet
Animating dialogue (mouth movement)
A kissing tutorial
The fist
Various athletic builds
Various types of hair
Proportional height of different positions
Expressions photo references
The hand in motion
Skintone palettes
Semi-realistic eye tutorial
Male muscle reference
The human body in perspective
The human head at various angles
Painting a realistic eye
Arm shape and muscles
Animal feet on a human figure
Hand poses
The face in profile
Skin tutorial
Body type diversity
Drawing hair
Muscles in the neck and face
A beginner’s guide to knees
Another ladies tutorial
Breakdown of lips
Blocked out human faces
Practice figure drawing (animals as well)
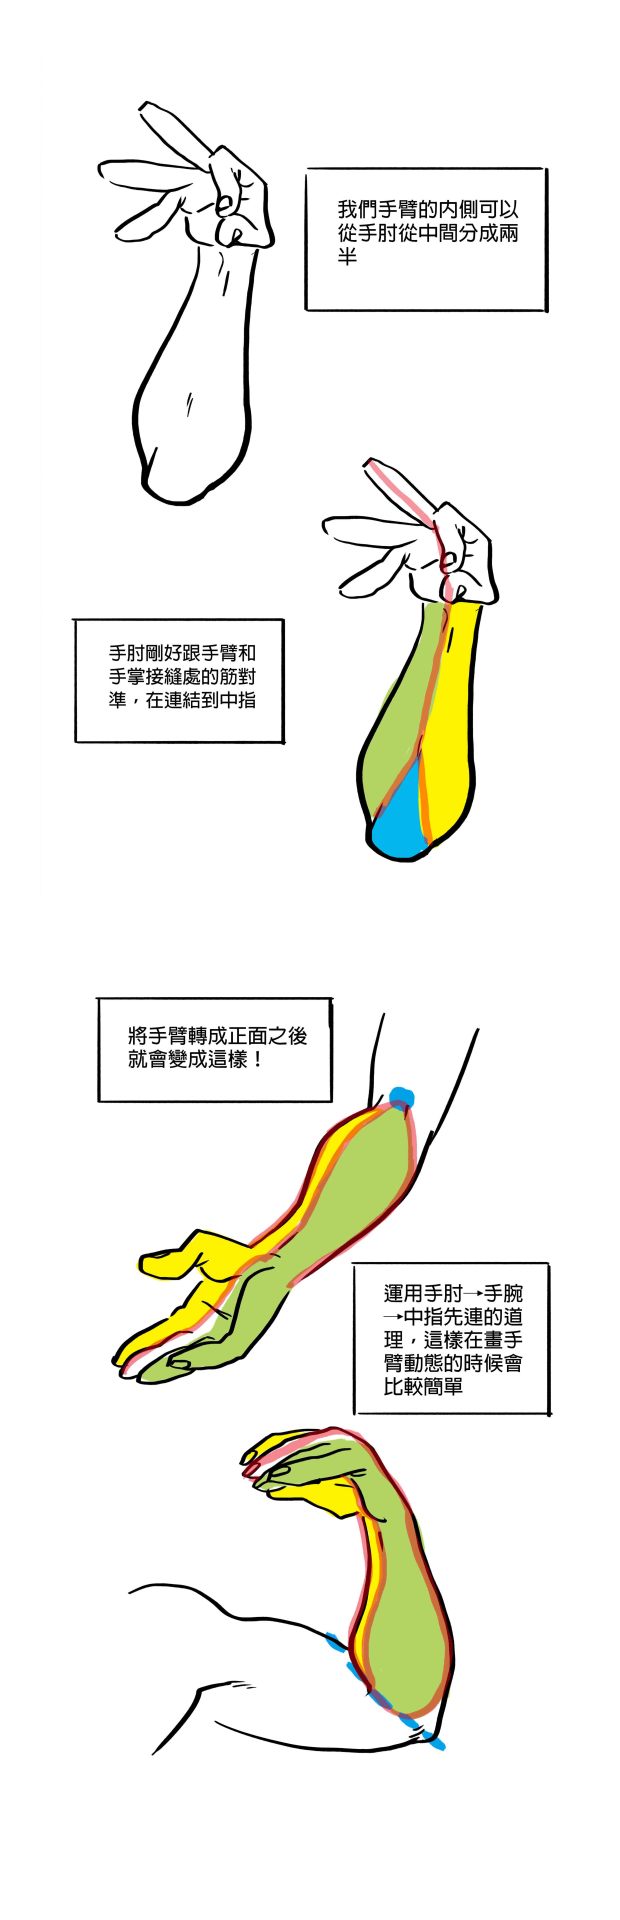
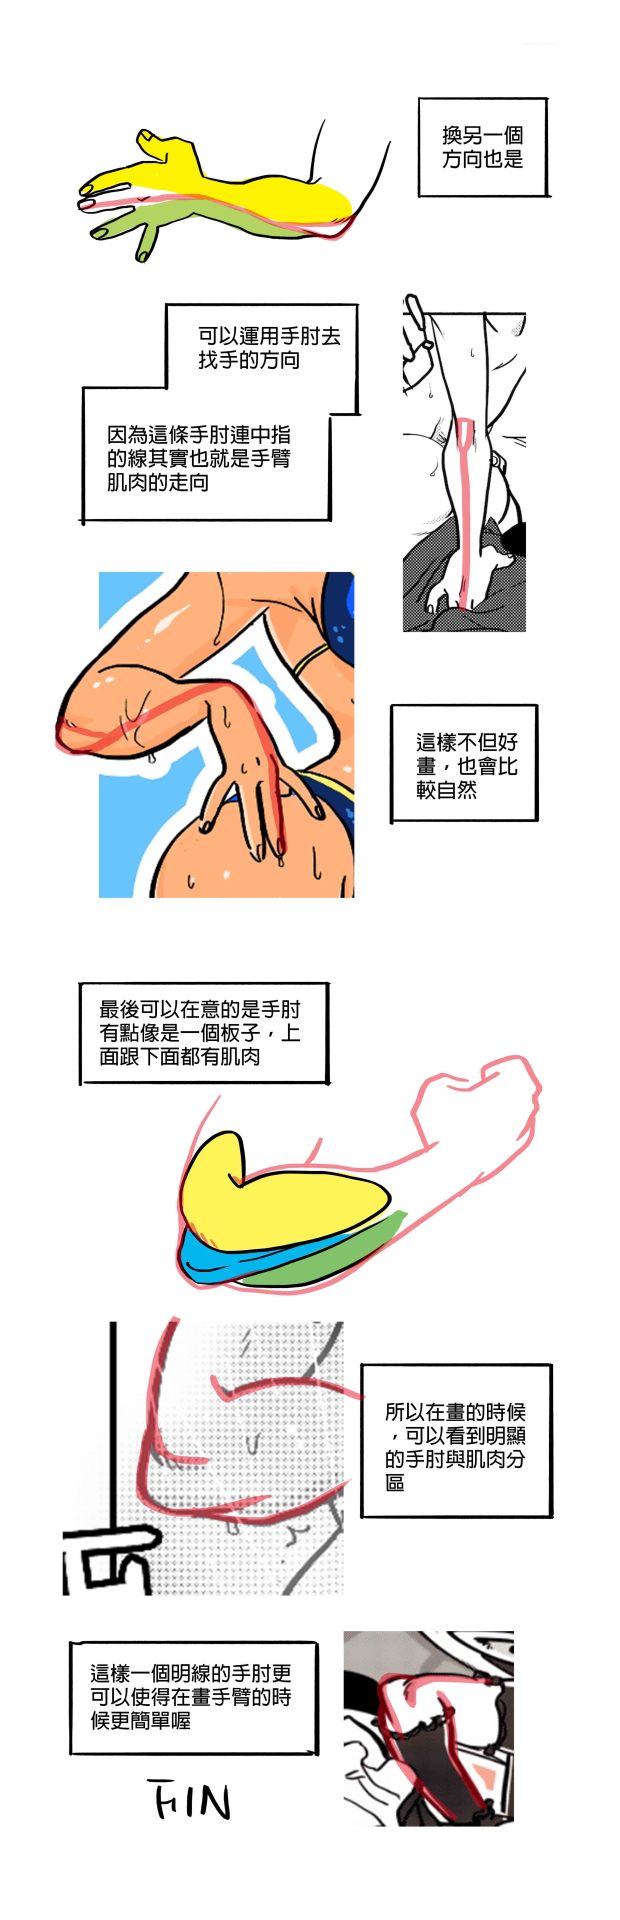
A neat arm trick
Excellent ear anatomy tutorial
Fullbody proportions tutorial
Over the shoulder poses
Male torso photo reference
Detailed arm muscle drawings
Guide to human types
Dragon tutorials (and bat wings):
Anatomy of the Western dragon
Dragon wing tips
Dragon wing tutorial
Dragon anatomy
Dragon tutorial
Equine tutorials:
Basic horse (back) reference
The equine skeleton
Horse anatomy and pointers
A good, large collection of horse stock references
Skeleton of a horse and its rider
Horse hooves
Cervine tutorials:
Basic deer anatomy
Deer skeleton drawing
Deer skull reference
Deer musculature
Deer skeleton
Ursine tutorials:
Fantastic bear anatomy/poses references
Basic bear structure
Bear anatomy tutorial
Miscellaneous animal tutorials:
Sheep vs. goats
Background and objects tutorials:
Griffsnuff background tut part 1 (second in desc.)
Tree tutorial
Realistic gems tut
Water tutorial
General water tutorial
Drawing crystals
Drawing bows
Painting rocks
Clothing tutorials:
Fabric tutorial
Clothing folds part 1 (second in desc.)
Drawing hoods
Drawing jeans
Hat on human figure reference
Armor
More hat on figure references
Different shirt collars
Colour palette turtles
General painting, drawing, and style tips:
Altalamatox digital painting walkthrough
Simple fur tutorial
Realism painting tutorial (human subject)
Excellent colour tutorial
Painting a wolf (good fur painting visual)
Photoshop brushes tut
Basics of Photoshop tutorial
Another digital painting tutorial
Common digital painting mistakes
Colour and light
Soft cel-shading tutorial
Various types of hair
Colour tips and the mood it expresses
Composition tips
Lighting and colour tips
Shadows
Another composition tut
Simple colouring via overlay
From paper to digital
Painting gold
Hope these help!
do you have any tips on drawings noses? particularly non-white noses?? all the tutorials are european noses and i just want to learn how to draw my own nose!!
oh i feel you. the nice thing about being a poc is that you can always study yourself in the mirror to learn how to draw yourself better! but anyways:


if you’re wondering which kinds of noses are frequent for which race, i like to use this guide. I can’t verify how accurate it is, but it’s pretty damn comprehensive for racial traits around the world. I also really like this guide for learning how to draw a variety of East Asian noses (it’s not all flat!). Here’s an equivalent guide that includes drawing African noses. And there’s always Google images for more specific requirements.
+ 3D models are really helpful when drawing noses: x x x
+ here are some general nose tutorials by better artists lol: x x
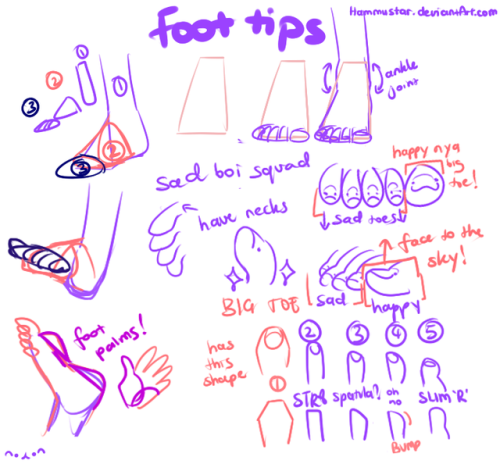

I put together notes on what i know about drawing feet. It’s not 100% accurate or anatomically correct, but i hope it can help others who have difficulty drawing feet o/


Hello! Do you have any tips for drawing cows? I really struggle with stylizing them and I love how you draw them
sorry this took so long to reply to but i finally got around to cows again.
western cattle are very much an arrangement of rectangles. their topline is straight and angular contrasted by their flabby skin and wrinkles, then you see them from the front or back and they’re round?? the best way to learn to draw animals is life sketches, I go to our annual agriculture show to see cows. They’re also shaved for the show ring there so i get a clear image of them.

looking at skeletals and anatomy drawings is also helps a lot, i recommend Hermann Dittrich’s lithographs and Jack Hamm’s ‘how to draw animals’
when you can visualize the shapes you can start to play with them and stylize


cows and horses are not closely related and their skeletons are very different, especially their hindquarters. i’m not sure what other specific tips i have i hope these help
-
 beewolves reblogged this · 3 years ago
 -
 noctthebat liked this · 4 years ago
 -
 bruised-tulips liked this · 4 years ago
 -
 louweezerz liked this · 4 years ago
 -
 elykazem-blog liked this · 4 years ago
 -
 catamount7755 liked this · 4 years ago
 -
 favesgrave liked this · 4 years ago
 -
 kaneista liked this · 4 years ago
 -
 josemapsart liked this · 4 years ago
 -
 aether1984 reblogged this · 4 years ago
 -
 mimingghie-art liked this · 4 years ago
 -
 chmeesecake liked this · 4 years ago
 -
 themightypasta liked this · 5 years ago
 -
 walking27disaster liked this · 5 years ago
 -
 pathetic-whisper liked this · 5 years ago
 -
 marodha707 liked this · 5 years ago
 -
 coolartgloopwantstostudy reblogged this · 5 years ago
 -
 god---boy liked this · 5 years ago
 -
god---boy reblogged this · 5 years ago
-
 lemmejustyeet liked this · 5 years ago
 -
 caikitsune reblogged this · 5 years ago
 -
caikitsune liked this · 5 years ago
-
 jokesitos-art liked this · 5 years ago
 -
 glowberts-for-posterity reblogged this · 5 years ago
 -
 happycato liked this · 5 years ago
 -
 modestqp liked this · 5 years ago
 -
 joshlerisphun liked this · 5 years ago
 -
 rocadito liked this · 5 years ago
 -
 jk00ki liked this · 5 years ago
 -
maaaaggguui liked this · 5 years ago
-
 elusivestarnights liked this · 5 years ago
 -
elusivestarnights reblogged this · 5 years ago
-
 wingedcatkingdom liked this · 5 years ago
 -
baugua liked this · 5 years ago
-
 kitschy-me liked this · 5 years ago
 -
 mark-gatiss-m8 liked this · 5 years ago
 -
 190ml reblogged this · 5 years ago
 -
 yeymolly liked this · 5 years ago
 -
 inactive011 liked this · 5 years ago
 -
 gray-goo liked this · 5 years ago
 -
 museofthemuses liked this · 5 years ago
 -
 jante18 reblogged this · 5 years ago
 -
jante18 liked this · 5 years ago
-
 putheresomethingoriginal liked this · 5 years ago
 -
 venomos-hydrihok liked this · 5 years ago