A Compilation Of Stuff I Know About Drawing Asian Faces And Asian Culture! I Feel Like Many “How-To-Draw”


A compilation of stuff I know about drawing Asian faces and Asian culture! I feel like many “How-To-Draw” tutorials often default to European faces and are not really helpful when drawing people of other races. So I thought I’d put this together in case anyone is interested! Feel free to share this guide and shoot me questions if you have any! I’m by no means an expert, I just know a few things from drawing experience and from my own cultural background.
More Posts from Aether1984 and Others


Very happy to finally post my third tutorial! Thank you so much for your overwhelming support of my last tutorial, I am so happy it was useful for you guys 🙇♀️. I feel like this topic was harder to explain so feel free to ask me some questions if you want!
Like last time, I really hope this helps some of you in your art path 🙌


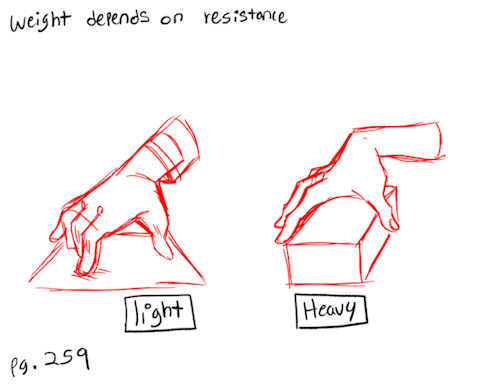
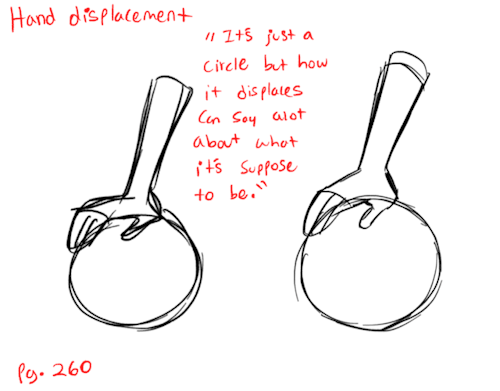
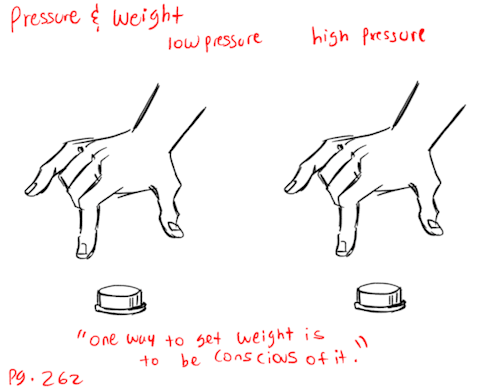
Notes from “The Animator’s Survival Kit” book.
[Pg.259 - 265] This is the end of my book studies. I’m pretty proud to have gotten through it and do a handful of the exercises. But this is only step one, I’m moving onto more advance animation techniques and will be posting those as I complete them. At the moment I’m currently wrestling with Toon Boom, so we’ll see how that goes.
——————- Tools: Rough Animator - Ipad + Apple Pen Patreon: [patreon.com/lunaartgallery] Twitter: [@LunaArt_Gallery] Instagram: [@lunaartgallerys]
I struggle INSANELY with doing 3/4 view art. Do you have any tips? I've found a couple guides on pinterest but I'm still having a little trouble.
Hi Anon! So sorry to hear you’re struggling. 3/4th is my favorite comfort zone, but I don’t know how well I can walk you through it any better than the many tutorials out there. There are plenty that do tutorials much better than me and they all kind of follow the same format for 3/4th view, but I’ll try my best to break down my method as understandably as possible!
1: I always start with my eye and middle line guide in whatever direction I want them facing. The middle one is more important than the original eye line.

2: Next I’ll do my head circle to keep my skull guideline and connect it to the bottom of my middle guideline to make the jaw. You’ll want to be kind of careful about this part and not just draw a gigantic circle or one that’s too small. Try to keep it about the size you want your actual head.
Don’t worry too much about the eye line at this point as you’re mostly getting the general shape of your head at this point. You can always edit your eye line later and adjust it to where you need it to be.
If you’re doing a character that has defined cheek bones (Like Vaard who has CHEEK BONES) you can do a line from the side of the head to the side of the chin like I did here that always acts as a great guide to the general area if you’re going to define it.
Make sure this step is on its own layer separate from the rest of your lines.

3: Now using your line and circle guide, go ahead and fill out the far side in whatever shape your character’s face is (angular, round ect.). It’s easiest starting from the top of your brow bone. Keep in mind your center line as this is your direct center of the face.
Vaard’s got a pretty basic, generic face shape as a base. It’s very sharp and square so I did a lot of straight lines with little to no curves to them.
At this point, it’s best to have a reference of a face in the shape you’re going for if you struggle with this step. References are your friend when stepping into unknown territory and angles.
You can also add your hair line guide as well to make sure it’s not too high or too low.
See how the circle we started with now becomes the full skull and makes up the back? This is why we want to be careful about the placement earlier and not go way out of the anatomy you’re going for.

4: Ok now for the fun part. What I like to do, is draw little Star Trek badges under the highest point of the brow you’re going for and on the far side, connect it to the cheek. This becomes your brow/cheekbone on the far side, and your inner eye socket guide on the inside. Don’t worry if they’re too big, you can always erase them later but we’ll come back to these in a bit. You just want the top to be fairly even with each other.

5: So to help line up your eyes in ¾ths view, you can draw a line from each side of the chin or nose. The inner corner of the eyes will usually sit near or close to the same line as the nostril or chin edges. (unless you’re drawing a very narrow or very wide nose, then go with the chin guide lines instead).
My original eye line didn’t quite line up with were I wanted to actually put my eyes but it pretty much lined up with the bottom inside corners so I kept it where it was.
Using the outside ‘Star Trek Badge’ just carry that top line on down and bam, nose bridge perspective!

6: Now using those badge shapes still, you can go ahead and curve your eyebrows right on top of the lines and you have your brows! This really only works if you’re going for a neutral expression though with little to no brow movement or expression.

7: From this point, it’s just a matter of adding your details! You already have a fairly solid base and anything at this point is very easily tweaked or shifted.

8: At this point you can erase all of your guide lines (which should be on a separate layer from your actual face outlines.) and if you happen to have a character with fairly deep set eyes, you can use those badge guides again to shade the eye sockets. Just shade inside them and you have some decent shadow guides.

I hope this helped some! Sorry if it looks like most other tutorials and guides out there, but I did my best. Remember, references are your friend when doing angles you’re not familiar with, even if it’s taking a picture of your own face just to see where shadows fall or how the nose looks at that angle! (The other eye is also the worst. I am in no position to give tips on the other eye, sometimes I don’t even draw it lol).
Best wishes and wishing you the best of luck as you learn to draw in ¾ths! It’s one of the most fun angles to draw once you get the hang of it!


I made some tips on how to draw eyes in a side profile. I am not a professional artist.
please do not make bleached panther
black panther was released in theaters less than half a week ago (2/19) and i’ve already seen the main characters with white features and people making the characters too light and you absolute buffoons have let these posts blow up so im here’s a post on how to avoid bleaching black characters
skin color reference lip reference lip/nose/hair reference
if you want to take a skin color reference do not play by eye use this bitch right here

i wish this was obvious but if the source is an edited picture say like this

don’t use that source. it’s best to use a source where there is more natural light or you can look up the actor/actress and get a solid picture of them. also take note of what kind of facial features these characters have (nose, lips, etc) by looking at stills or posters of them. not all of these characters have slim noses or smaller lips.
i know this is going to be a new experience for people drawing black characters so if you make a mistake, learn from it especially if it’s from a black person. get the okay from black people before posting. you’ll get better with time and practice. this isn’t a “let people draw them the way they want” thing because this movie respects african and black cultures like how they put so much effort into the costumes and i really would not hurt to respect black people
feel free to post more sources
Do any of the mods have tips for drawing a full body in side view? I always get it wrong


There’s a really good side view breakdown in Bridgman’s Constructive Anatomy book, however I can’t find it! I did my best to emulate what I know.
If you already have the front view down, it’s a simple thing of translating the proportions over to the side view. One thing that helps me construct the body is using boxes to construct the head, ribs, and pelvis. The shoulder usually sits with bias towards the back, unless the person is slouching or their shoulders are raised in tenseness. I would recommend studying the bone structure of this if you really want an analytical sense of how it works!

-Mod Future (ko-fi)


Some drawing tips previously posted on twitter. More drawing tips on my patreon. Hope some of these can be helpful.
Hi there I am a person trying to learn art but I was wondering if you could make a endo sketch of a person please and could you make a mans body bc I am not very good at it it would be really help full plus it doesn’t have to be the best work you’ve ever made just a nice endo sketch please
okay hahhahah
actually, those are the only things I remember while drawing and I am so used to them that I'm not even sure if I use them at all XD
But yea! Here you go! If you want me to draw a female body, I can do that too uwu


A lot of people ask me for tutorials. I guess this counts. I don’t really know how to tackle a full tutorial just yet. Styles range so much that I feel it’s more just tips or suggestions
-
 colorfullysarcastic reblogged this · 1 month ago
 -
colorfullysarcastic liked this · 1 month ago
-
 stupidsandwitch3 reblogged this · 1 month ago
 -
stupidsandwitch3 liked this · 1 month ago
-
 muchtoohazy liked this · 1 month ago
 -
 mk19s liked this · 1 month ago
 -
 parchmentknight reblogged this · 1 month ago
 -
parchmentknight liked this · 1 month ago
-
 necrowmancerzzz liked this · 1 month ago
 -
 vex-rattus liked this · 1 month ago
 -
 encapando liked this · 1 month ago
 -
 sirtotallynotatimetraveler liked this · 1 month ago
 -
 wendighost83 liked this · 1 month ago
 -
 welpurgisnacht-hq reblogged this · 1 month ago
 -
welpurgisnacht-hq liked this · 1 month ago
-
 toastycobalt liked this · 1 month ago
 -
 pigeonbubblebuddy liked this · 1 month ago
 -
 corvikari liked this · 1 month ago
 -
 rvrvth liked this · 1 month ago
 -
 daboyau liked this · 1 month ago
 -
 eternalparadisearchive reblogged this · 1 month ago
 -
 bubsythefox liked this · 1 month ago
 -
 sentijazz reblogged this · 1 month ago
 -
 superarti liked this · 1 month ago
 -
 pinkcottonwood liked this · 1 month ago
 -
 only-lonely-stars liked this · 1 month ago
 -
 adventuretolkienlover reblogged this · 1 month ago
 -
 karkatvantes reblogged this · 1 month ago
 -
 the-summersun liked this · 1 month ago
 -
 chaosborb reblogged this · 1 month ago
 -
 justletmereadmycomics reblogged this · 1 month ago
 -
justletmereadmycomics liked this · 1 month ago
-
 spiderdragon15 reblogged this · 1 month ago
 -
spiderdragon15 liked this · 1 month ago
-
 screwnames-ihatenames reblogged this · 1 month ago
 -
 overthinkingspark-blue reblogged this · 1 month ago
 -
 kitsuneflare liked this · 1 month ago
 -
 cryinhmoonl liked this · 1 month ago
 -
 lucaosmuahahaha liked this · 1 month ago
 -
 serendark reblogged this · 1 month ago
 -
serendark liked this · 1 month ago
-
 lonelysa1lor reblogged this · 1 month ago
 -
 lenore-d0ve liked this · 1 month ago
 -
 stephist23 liked this · 1 month ago
 -
 insomniacferret liked this · 1 month ago
 -
 butch-de-101 liked this · 1 month ago
 -
 saturninka liked this · 1 month ago
 -
 wink-e reblogged this · 1 month ago