✨Custom Stone Toa !✨

✨Custom stone Toa !✨
Yay ! It’s so big there are shadows on the top of my shelf studio.
Also, we’re already at 4/6 for these, isn’t that crazy ? I think it is.
Details below the cut !
Front/back :


I had some kind of vision with this one. As I started messaging by around with pieces, my brain said 'scorpion'. So mandibles and tail (and that’s about where the scorpion resemblance ends). Of course, I had to keep an element of Pohatu, so his foot is the end of the tail (which is quite wobbly-).
I tried to vary shapes from what I had previously, so I made some big shoulder parts, which look okay and offer some interesting movements, but are pretty weird if you think about it too hard.
The body-legs connection is a bit thin, but it still kind of work with the overall design, so I left it that way (that, and I am running out of brown pieces…)
The weapon are simple sticks with harpoons (?), nothing too complicated, though it was meant to be a single stick originally, it was waaaay to long for the photos. Also, has anyone any idea of which set these harpoons (still '?') come from ? I can’t seem to find it, apparently.
Side shot :

As you may see, I’ve made all the limbs quite thick, because it fitted what I had in mind well, and I messed with a bunch of old pieces for the legs (mostly the sand pieces). There is also have a Bohrok’s body for each foot, because these work surprisingly well, and the middle segment of the leg is backward to give some hypothetical springiness to the legs. Also, Rahkshi feet as armor, that’s always a good recipe.
Head shot ! (Ah, that’s funny.)

Look at how dark that shot is ! If only I had taller shelves…
Anyway, the head is a mix of Rahkshi and Vahki heads, which mix well (there is also a gear underneath. Don’t ask me why. It just exists.)
All of that makes it looks like a V2 Rahkshi (when there is a single stick) which was pretty much on purpose.
On a side note, I’m pretty much done with my big project (which is good, I’m meant to expose it this weekend. Whoops, that’s suddenly very close.)
And, yes, I finally added the #moc, thank you for reminding me every time, I’ll add it from now on :}
More Posts from Antrylis and Others

✨Cargo starship ! ✨
A 'little' part of a larger idea I’m developing~
Right under the cut, closeups and some explanations !
Tiny container carrier :


It’s small, it’s adorable, and I still haven’t figured to how the container will be properly held, so the entire system underneath is improvised and will be subject to changes, hopefully.
Cargo closeups :


Lot more to say about this ! Firstly, that the support I gave it is very unstable, but that should be fixed later.
I was playing around with the idea of a small ship with six rows of container in an hexagon, and ended using a combination of 3-branched crossed around a technic axe to do that. Then, one thing following an other, I needed up with two sections connected by one of these large rings like you see in some movies for gravitational purposes. The entirety of this piece, at the exception of the very beginning of it, it held by a single long technic axe. Obviously, large transparent-blue rods to make reactor trails and truncated cones as the reactor bases. The ring is held by rods, too, with an upside down tread — getting them to have a proper circular shape was a complicated journey.
The colourful containers were another fun thing to do : firstly, getting all the right pieces and make the pattern not too regular. And to pretend they’re all connected by nothing, they’re only partially connected, and 'held' by an electromagnetic field figured by the transparent blue pieces on each side of the container rows, which would then be picked by the small container carrier above.
And now, the most important thing : the reason of why I absolutely needed to make this cargo, instead of anything else. It’s quite simple, actually. I needed to get the scale of these containers. Because. Because I had this idea to make a large, large trading spare station with a ring around a large axis, which would be the perfect excuse to make an awful lot of small spaceships. And for that, I needed something for scale, and since it’s a trading station, a container was my best bet. So I have a plan, which I’ll elaborate on probably next week, along a batch of my small ships.
I rarely, if ever, reblog things, but that’s just beautiful; Lego at its finest.
BESTIES BESTIES BESTIES

FOUND THIS SUCKER IN A LEGO STORE IN NYC
and the employees had pronoun pins as well!

✨Snowman !✨
Couldn’t miss this year’s Christmas-themed MOC, of course ! Although it certainly is way less 'christmasy' than the previous ones (here and here) and more of a general winter decoration, it fits well.
There’s not a lot of technical work here, the spheres are classic designs which I tweaked a little, the arms are quite simple, the scarf has nothing complicated either; the only interesting bit might be the hat, because I used a really old technic piece — can’t find its id on bricklink… — with some other gears and such.
Anyway, merry Christmas to those who celebrate, and good day to everyone else !
Also, sorry for the terrible pic quality, I don’t have any proper set up; and I know I have a few things sitting in my inbox, I’ll get to it I swear.

✨Another edited photo, yay !✨
This is an entire version of the blog’s banner, too !
Technic details under the cut !
So ! Looking through my archives, I found images for the process I described in my previous similar post, including my made up studio (and very messy desk…) :

As you can see, it’s not quite a professional set up..
To be more precise, this is three led bands hooked to a power bank, on top of which my phone is meant to be sitting to take two photos in a row. Obviously, there is also a desk lamp illuminating the scene, so here is a picture without it :

So, the way this is organised is that I have my black screen in the background which reflects the lights a little, but not the actual minifigs; the characters are held by transparent pieces connected to ball joints, so that I can have a steady but adjustable display. Light-wise, the two prominent led bands are colour-coded with the character’s color (kinda) to get them in opposition; the junction between the two is covered by some black bricks to create a darker area to offer more contrast; ans on top of the stage is help a (theoretically) white led with lesser intensity to make sure the scene stays lighted up properly, even if the light sources are from underneath. The red pieces I have used as frames are really good to hold these light bands, because I can have varied angles and heights plus a very solid structure, which is all I want.
Finally, to get the floating render, I take a first shot with the characters, then a second one at the same place without the characters :


And then, with a bit of editing magic and other simple image manipulations, you get the result I have at the top of the post ! I’d recommend trying it for yourself, because it can be a lot of fun !

✨ Breach of containment ✨
This is the last I’ve been working on for the past few weeks, very, very inspired by the game Carrion (if you haven’t played it yet, you absolutely should !), which is made all the more special because I finally took time to use my lighting kit (seem below). Of course, closeups and commentaries below the cut

Left containment unit closeups :

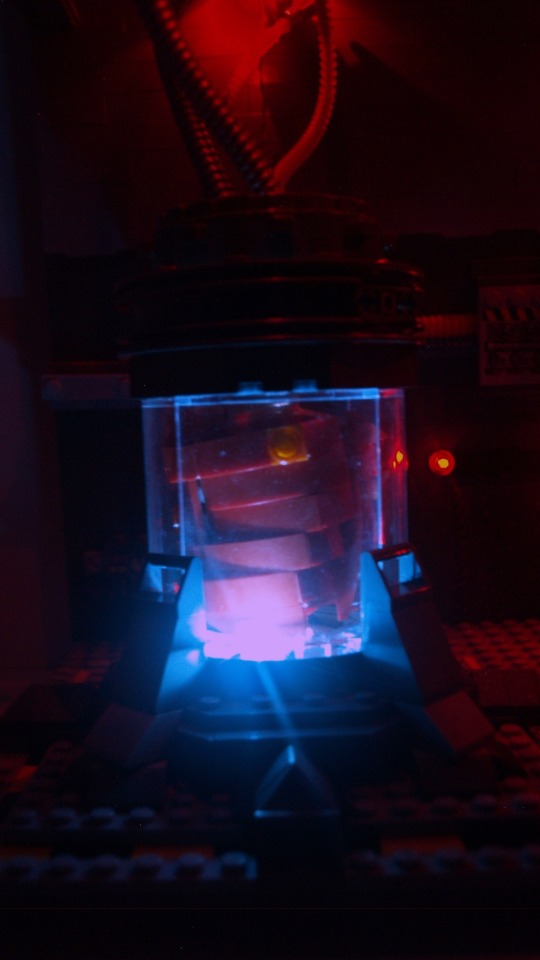
Right containment unit closeups :


Top closeup :

Alt version (studio lights + in-built lights) :

This is one of the screenshots I’ve been working with (where the monster just breached containment) :

So, as I said previously, this piece is heavily inspired by Carrion. I tried to look up any previously made Lego thing related to the game, but all I could find were a few Reddit posts with (debatably) interesting takes on the monster. So, the good news is that this is most likely the most original piece I’ve made yet.
The original plan was to have only one container, and one monster, with left being the body inside and right being the outside part. However, placing Left in the middle of the transparent pieces made it mostly good on its own, so with some modifications, I made it work alone and expanded the outside part inward, and ended up with two of them.
Left is pretty okay from all angles, but Right is not necessarily as good from the back, and had a supplementary jaw on the side of the container which can’t be seen on the photos.
Getting back to comparing that to the game. I tried to stay close while adding my own little details. The wiring and cable system is from me, but the container is mostly inspired by the game, just like the electric box (middle) and the little informative display (under the electric box) which is…empty, yes.
Some details can’t be seen on the photos (or barely), which are mostly some filler sci-fi stuffs to make the wall less flat and less empty.
What also helped with breach the flatness of the wall is the switch from dark grey to light gray, using the awesome spring projectile launcher piece, which has this very nice shape which make the transition just a bit smoother.
So, let’s talk about whatever I’ve done with the lighting !
I’ve had this old lighting kit (originally designed for a car model) lying around for a long time, and finally got to use it ! It doesn’t look really good without my studio lights because my camera is not made for that (The effect in reality really gives escaping monstrosity a dark vibe which is not well depicted with my photos…). Another thing which is not noticeable with the photos is that the two red dots in the center are actually blinking lights (and somehow, they tend to desynchronise).
The choice of letting some of the wires out is debatable, but I think it adds to the vibe (and some of them would have been a pain to hide anyway). And sadly, the back is but a mess of wires, but I can’t actually do anything about that.
Speaking of the back, the whole thing is one dot large and completely flat, and the ceiling only hold without pillars because of the use of tension linking directly the baseplate and the roof through the use of technic bars; and probably because the ceiling itself is not that heavy. It is, in fact, only constitued of six old road pieces connected together and frames, which give the roof little weight and high sturdiness (and the shape on the side of the piece offers a nice sci-fi effect as a bonus).
The addition of tentacles in the vent (which hides the connection between road plates in the roof) is just another reminder of the game : you can’t be safe anywhere, if air flows~

✨Custom fire Toa !✨
Yay, yet another custom bionicle ! And a big one this time !
Details below the cut !
Front/side views :


I’m using Vakama Metru’s kanohi for that one, as it’s pretty good shape-wise and there are few dark-red kanohis anyway.
Anyway, this was a lot of fun to make, and this time starting with absolutely nothing. Most of the bright red pieces were added at the end to give a bit of contrast. You might recognise some Stars elements, as well as some Bohrok elements from an unknown set, and even a very old piece from the precursors of Bionicle.
If you pay attention to proportions, the legs are completely messed up (bottom part too small, higher part far too long). It’s fixed on all the others of this series, luckily. Given it still works visually, I kept it that way.
The weapon is a mix of a cool disc launcher, with the flame sword from Stars set, to make…what you want it to be. I initially said it was some type of crossbow, but to be fair, it doesn’t look like anything at all.
Just like the others I have shared so far, I am doubling some limb pieces to quickly give some thickness. On the higher part of the legs, though, I have used the body
Most of this is quite experimental, from the feet to the higher parts of the legs using Vakama Metru’s body piece (it’s a fun one to work with).
And, yes, maybe I will be spreading this over 6 weeks to get enough time to finish my current project (currently waiting for important parts to arrive…), and because I am running out of content faster than I can make it, but well.
To pardon me, take this picture I took to see if the articulations had a good enough range :


✨Clone wars diorama !✨
Another one, technically the largest I have posted (yet~), featuring the 212th and a (placeholder) Jedi.
Of course, closeups and additional details below !
Views from directly in front/above :


Before I continue, I must confess it. This horrendous mistake, which you might spot by paying close attention to the right part of the image.
Yes. I somehow created an offset on the entirety of the wall’s height.
Overall, I’m quite happy with this one, mostly the environment, which turned out great (except for the offset….). What I’m not really sure leases with are the cheap AT-RTs from the battle packs, which are too bulky, but it works well enough for the moment, and since I’m not exposing to any connoisseur, it does the job.
Most of the minifigs are from these battle packs too, except for the Jedi, which is actually a savage oppress with a cloak, but every time I try to just remove the minifig, it feels like something is missing. The paratrooper captain has the hold grey kama and pauldron which always work well, even if it could have done with an additional visor.
Anyway, let’s get going with the closeups !
AT-RT scenes :


On the left, an engineer (my favorite kind of clone) fixing a broken down leg, with the help of one of the pilots. It was hard to get the minfigs in a 'lively' position, and the photo doesn’t render it correctly. The small white backpack is a piece I’ve stolen from the 501st specialist pack, because it’s nice.
On the right, a paratrooper with a completely inaccurate rocket launcher (the clone wars’ ones don’t look as cool, though). I quite like the way this part came together, even if it’s just a small detail.
Explosion scene :


I’ll admit it’s my first try with building explosions, and I’ll hopefully improve.
On the right, the clone says hi ! Well. No. He doesn’t, but it’s what he looks like on the photo, which I funny, I’ll admit, but not the image I wanted to convey, even if technically he’s set properly, as a projectile caused by the explosion.
The picture on the right convey the feeling of movement much better, with the clone shooting on the left, the others running along, and the paras being blown.
Other scenes :


The focus on the left is the droid ! I really like how it’s sprawled over that rock. Other droids can be found in the diorama, notably one being crushed by the rocket launcher AT-RT, partially under a rock, and part of one in the explosion.
On the right, we see a paratrooper down (but still fighting !) with, at his side, a medic applying a hypo. While it’s hard to see with this picture, he has a pouch at his side, and some chroma-black legs, because I was missing a pair of legs the medic has prosthetic legs, isn’t that awesome and convenient ? That is a lesson to learn, any lack can become lore ! Well, kind of. It’s what I also did with the Kashyyk MOC : I was missing all but the helmet of my ninth minifig, so I turned it into a grave of the missing squad member.


✨Bionicle insect !✨
Yay, back to Bionicles MOCs !
I made fewer of these, but here is the first one (other images and additional details below the cut).
I’m still not entirely convinced of the edited photos, but given the size of these MOCs, I didn’t really have much choice but to do how I did. At least the ones with background give a few colours.
Anyway, photos of the left and underside !


This was really a fun one to work with, obviously largely inspired by the Visorak sets (I kept the head piece and the claws), but with more legs !
The claws are combined with feet to add some shape (the two pieces work quite well together) to the end of the legs, then I made of 4 joints articulations to give it a proper insect-like stance. The middle legs are slightly longer (using a long transparent blue piece, instead of the small dark one), which makes it less linear.
I kept the disc of the Visorak, held in place by…a broken Pirahka headpiece. Yes, I’m not exactly very original in my techniques, and I have a lot of these broken pieces. As you might see in the third picture, I have the secondary connectors of that piece attached to the belly of the beast, so to speak.
Although, speaking of techniques, the one I’m using for the 'tail' is not exactly recommendable. It’s a bit tough to see, but there is an elastic band attached to the foot used as a tail part on the third picture. It’s the only element which connects the end of the tail (shiny Visorak claw in second picture) to the rest of the body, which makes it wobbly but offers some interesting movements if needed.
Oh yeah, I also used Vakama’s disc launcher again, as mandibles this time. I originally tried to make a transparent blue disc (from all promotional sets) inside, but it doesn’t fit well enough).
I’m considering making another in another colour, but I’ll have to see if I even have enough ressources to do so~ Maybe green and silver, since these are pieces I have a bunch of, or black and silver…Only time will tell.

✨Bionicle Beetle !✨
Ah, another insect ! Check the other one here.
Does it ring a bell ? The head (and some of the brown parts) come directly and with very few modifications from the Jaller & Gukko set. I never managed to get Jaller, so instead, I turned Gukko into this nice, big Rahi.
Now, of course, detail and the other pictures below the cut !
Front, hind, and neath !


I’m absolutely delighted with how it turned out. First of all, I really like the head which has been intact for as long as I can remember, although I know that I’ll never complete the set because I don’t have Jaller’s Kanohi. What I have plenty of, however, are the pearl grey Rahkshi shells, so you can see that I’ve used three of them on top. Then, I have to find pieces with a good enough curvature. So the next piece is from a Toa torso (Hordika) and the next one is used as a wing/pauldron on different sets, which has a perfect shape. On the sides, I’m using practically only pieces from a brown Vahki.
The underside is quite simple, but I wanted to make sure the colours remained coherent with the head, so I kept this bright brown while trying to make it as light as possible (the six legs are already barely letting it stand).
Under the dual Rahkshi shells, I have a bit of space which could let me add a nice feature, although I don’t know what yet. I planned on making actual elytra, but that would have been too complex, so there is currently nothing.
There isn’t much left to add, since for once, I have made simple legs (only because the body was more complicated…), but I nevertheless want to point out how well the small arm pieces I used to connect body and feet are for insect-like shapes, while keeping it quite mechanical. Just the perfect balance.
Also. Would anyone happen to know if there is a spreadsheet referencing all Bionicle (bonkle ‽-) gens with images and additional infos ? I have done a tremendous amount of research because I can’t remember any of the names properly, and having a single spreadsheet would be easier. AND, if not, would anyone be interested in access in such a spreadsheet ? Because if I do end up making one, I would be happy to share !
Have a nice day :}
-
 anaustisticpigeon liked this · 1 year ago
 -
 no-04s-slowly-collapsing-life reblogged this · 1 year ago
 -
 weedthestampede liked this · 1 year ago
 -
 centropristis liked this · 1 year ago
 -
 supbro50000 liked this · 1 year ago
 -
 dungeonmasterdisbelief liked this · 1 year ago
 -
 origsmocs reblogged this · 1 year ago
 -
 origulator liked this · 1 year ago
 -
 biomarker liked this · 1 year ago
 -
 liquidink21 reblogged this · 1 year ago
 -
 anasianfriend liked this · 1 year ago
 -
 ghost-mantis reblogged this · 1 year ago
 -
ghost-mantis liked this · 1 year ago
-
 a-whole-lotta-bunkum liked this · 1 year ago
 -
 toaofconfusion reblogged this · 1 year ago
 -
toaofconfusion liked this · 1 year ago
-
 antrylis reblogged this · 1 year ago

They/them - AroaceLego MOCs and photography with a wide range of different characters and environments, every Wednesday (in theory-)
77 posts