What Are We
What are we
Boop
That is a very boop question.
More Posts from Antrylis and Others
A tangent about hexagons
Because the project I’m working on brought it, I found it interesting, and I thought some people might need it.
So, as I’m working on a quite large project (hopefully done by next week, although I have doubts on that), and the base structure of it is more or less hexagonal. Anyway, here are some of my tips to get good hexagonal shapes.
The easiest way to do this is obviously with hinges and plates, like that :

While not necessarily accurate, it’s cheap and efficient, albeit squishy, and can be expanded to any size.
Instead, we can go the technical way, and use maths, by considering that a hexagon is the combination of 6 equilateral triangles. We end up with this :

Practically unbreakable, very stable, and can be made with as much technical bricks as possible, so it is easily expandable, but it’s harder to attach it to classic bricks.
So, none of these two designs are really good alone, whether on pure usability, or on durability. Alone, that is. Now, here is the fun part : thanks to the way Lego works…


…they work together ! And, with some modified 2*2 plates, they mostly hold to one another ! Isn’t that awesome ? What’s more is that, while I’m using 2*4 plates and a 7 holes technic bars, that also works with 2*6 and 11 holes bars, which is good.
Now, let’s apply this knowledge to make a solid prism with an hexagonal base :

By using a bunch of plate and two of these hexagonal bases, we get a hollow tube, which is solid through the hexagons, but can still break because of a diagonal force. To fix that, we need to add supports between the supports, like so :
This also means that this design becomes stackable. Congrats, you made a long hexagon tube ! It can also be round, with the right modifications, notably with 2*2 curved tiles :

It fits perfectly, and it’s good to make solid near-circles !
Sorry for the photos’ quality !- They were taken quite late with my phone, and without proper lighting.

I realised I’ve posted quite a lot of my MOCs on this blog, but any of my more 'photographic' works, yet, so here’s one of the first I made (we don’t talk about previous attempts), which still works quite well, although there are some things I would do differently, were I to do this again.
My process, and other details, below :}
So. The process I used to get this effect is not a really complicated one, but it still offers a more or less good render at the end, which is nice.
The blue guy has nothing special, but the red one I made float, but how ? The answer is not telekinesis, but superposition. Take a look at the images below :


Left one is the original, with no special effect (and no cropping, to offer a larger view), while the right one is the same, without the red minifig. By taking both photos without changing the camera angle (which is a painful thing to do with a phone, I would not recommend), and with a simple image editor, I put the 'empty' image (right) on a layer under the image I want to modify, and simply erase the supports.
It is important to note that if the erased bit casts a shadow, it’s better to also remove it, to avoid weird effects (here, there are no shadows because of the light source).
I’m also using an old set of blue LEDs inserted directly into Lego bricks to get this foggy aspect at the top, and to get a darker aspect to the blade of the red minifig, though there is also a desk lamp above providing some proper light, of the whole thing would be blue.
Last interesting point, this technic is the same I’ve used for the blog’s banner (but with proper lighting, for once). One might even recognise that the background for the two pictures is the same, because black was easily findable and gives quite the dramatic effect. The banner is, in fact, only half of my picture. Since you’ve made it here, I’ll offer another tiny bit of it here, as a treat :}

(And yes, I stole the characters from Star Wars sets, gave them light sabres even if they’re not meant to have one, and also added one of my cool cloaks, and made them fight. Don’t you dare judge my poor choices.)

✨Trans pride flag !✨
Had some inspiration and a nice motivation (here)
(See previous work here)
Alt version below the cut :
Pastel version ! It looks a bit bland because I didn’t have enough pieces to make enough variations (this type of pink is exactly what I needed, but also happens to be very hard to find). It’s probably more fitting for the actual flag compared to the one above, which is very neon-y (and I tuned it down a bit, it could be much worse brighter than it is now). But the above version looks better, I admit, and it give a bit of peps in the middle of all my other works, too, because of the unique colors.


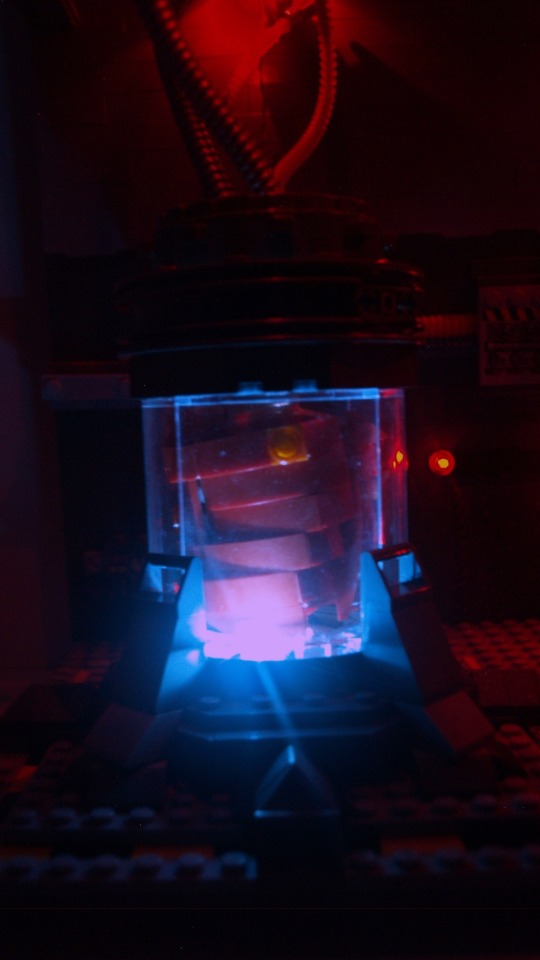
✨ Breach of containment ✨
This is the last I’ve been working on for the past few weeks, very, very inspired by the game Carrion (if you haven’t played it yet, you absolutely should !), which is made all the more special because I finally took time to use my lighting kit (seem below). Of course, closeups and commentaries below the cut

Left containment unit closeups :

Right containment unit closeups :


Top closeup :

Alt version (studio lights + in-built lights) :

This is one of the screenshots I’ve been working with (where the monster just breached containment) :

So, as I said previously, this piece is heavily inspired by Carrion. I tried to look up any previously made Lego thing related to the game, but all I could find were a few Reddit posts with (debatably) interesting takes on the monster. So, the good news is that this is most likely the most original piece I’ve made yet.
The original plan was to have only one container, and one monster, with left being the body inside and right being the outside part. However, placing Left in the middle of the transparent pieces made it mostly good on its own, so with some modifications, I made it work alone and expanded the outside part inward, and ended up with two of them.
Left is pretty okay from all angles, but Right is not necessarily as good from the back, and had a supplementary jaw on the side of the container which can’t be seen on the photos.
Getting back to comparing that to the game. I tried to stay close while adding my own little details. The wiring and cable system is from me, but the container is mostly inspired by the game, just like the electric box (middle) and the little informative display (under the electric box) which is…empty, yes.
Some details can’t be seen on the photos (or barely), which are mostly some filler sci-fi stuffs to make the wall less flat and less empty.
What also helped with breach the flatness of the wall is the switch from dark grey to light gray, using the awesome spring projectile launcher piece, which has this very nice shape which make the transition just a bit smoother.
So, let’s talk about whatever I’ve done with the lighting !
I’ve had this old lighting kit (originally designed for a car model) lying around for a long time, and finally got to use it ! It doesn’t look really good without my studio lights because my camera is not made for that (The effect in reality really gives escaping monstrosity a dark vibe which is not well depicted with my photos…). Another thing which is not noticeable with the photos is that the two red dots in the center are actually blinking lights (and somehow, they tend to desynchronise).
The choice of letting some of the wires out is debatable, but I think it adds to the vibe (and some of them would have been a pain to hide anyway). And sadly, the back is but a mess of wires, but I can’t actually do anything about that.
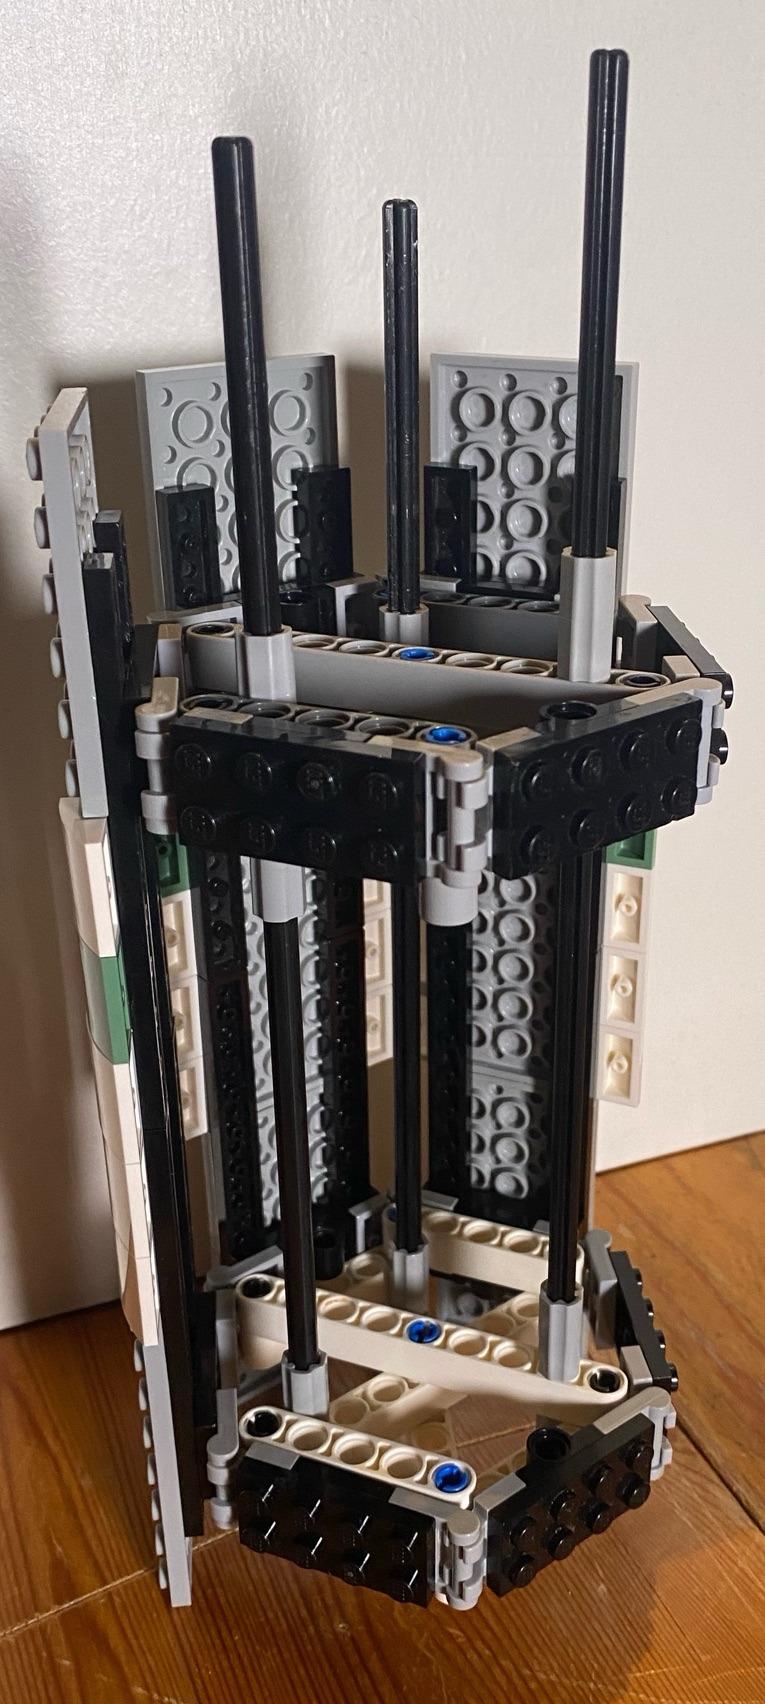
Speaking of the back, the whole thing is one dot large and completely flat, and the ceiling only hold without pillars because of the use of tension linking directly the baseplate and the roof through the use of technic bars; and probably because the ceiling itself is not that heavy. It is, in fact, only constitued of six old road pieces connected together and frames, which give the roof little weight and high sturdiness (and the shape on the side of the piece offers a nice sci-fi effect as a bonus).
The addition of tentacles in the vent (which hides the connection between road plates in the roof) is just another reminder of the game : you can’t be safe anywhere, if air flows~


✨Brick separators !✨
Run, they have teeth now !
This is a silly project I did ages ago; given that I've officially been posting for a year straight each week (ignoring my disappearing space station post, ahem), I thought it would be nice to post that little guy whose view welcomes me every morning.
And, sure, it's not my finest work, by far, albeit I could go on a rant about the many fun technics I used (look at the horn !). But that's alright !Why ? Because the main goal of legos is not to build extravagant looking buildings, or ships, and landscapes. I don't even need to give a profound answer to what it's meant to be; everything is in the title :
"The name 'LEGO' is an abbreviation of the two Danish words “leg godt”, meaning “play well”. It's our name and it's our ideal." - Lego.com 'About Us' page
In the end, it's just a toy, and what you build with it is not important, as long as you had fun making it ! The pieces I enjoy the most are the one that come to me as a vision that I develop, and I appreciate them much better than some of my (arguably better) commissions I get (because, yes, that somehow happens), because commissions are not spontaneous.
The morale of the story, I guess, is that you don't have to hesitate if you want to build something, no matter how silly it is, no matter it's your first or hundredth moc; and you should be proud of it, no matter how it turns out, if you had fun with it.

✨Custom air Toa !✨
6/6, that’s the last one ! And the biggest one, too-
Closeups under the cut !
Front/back views


As you might notice, it is tall. And it has more than four limbs, which would not be a problem if it was the only one. But. It appears that all my green mocs end up with too much limbs, and I can’t fathom why. Really, another prototype standing on my desk also has for and so does the green hero factory one…You get the idea.
Anyway, the colour scheme for this one is dark green and silver, with some translucent bright green accents. Using only bright green would have brought too much contrast with the others Toas (notably the dark red one), but I had these cool pieces to use and no one else to put them onto. And since these are experimental…
The two supplementary limbs are intended as movement claws, given that we usually see air Toas moving in jungles (Lewa mostly, that is). The silver pieces at the front and back ends are respectively Kopaka’s skis and Pohatu’s foot pieces (shoes ?). The largest bits are made out of technic pieces directly, to give some simple angles.
Bust views


I find this silver/green chest piece really cool, it’s a shame I don’t have much of them. The two bright pieces on either sides are Vahki head pieces, and since their only connectors are on their relative tops (side of the piece in their actual orientation), you may remark that they are connected to nothing. I’m having the arm socket go through them, and the rest of the body’s shape avoid too many movements. While nice, this also limits the movement range of the arms, but it works well enough (these are not really made to play, anyway~). The two bright pieces with spikes are from a Ehlek. Wish I could have managed to put that one back together, but it instead served a higher purpose.
The Kanohi is Hordika Matau’s, with transparent Bohrok eyes underneath (it share this technic with my previous white Toa). The back piece is coming from a Piraka, but it’s actually a broken piece. I have quite a bunch of these, where the mask and flexible parts have broken off, so I make the most of it (like you might see in the future on another MOC). I’m using technic angle (type 3, to be precise) to keep the shape of the middle ones, but the others are free.
Finally, a (dismantled) leg view.

Finally, the leg segment !
The Toa was too big for proper leg showcase, my lights created terrible contrasts (shelf not deep enough…), so here is a stand alone leg instead.
Once again I have integrated the Metru chest piece to the leg, but as a foot this time. It offers a good stability and looks nice.
The next part doesn’t have much interesting bits, except that I’m using technic tubes to hold the additional piece, making this technic less illegal that my usual works (keyword : less; there is still a whole lot of stress on these poor pieces).
The top part is…somewhat more complicated. The frame is of technic pieces (like the additional limbs), which keeps together an immobile socket joint which keeps the double socket and two Bohrok feet (one for decoration, one connected to the hip socket). The double socket is used both to connect the two halves of the leg and to hold the small arm piece which is here only for decoration.
And that’s it for this series ! I’m hoping to bring them to next month’s exhibition, along with some Bionicle MOCs I haven’t showcased here because…shelf…Given the sheer size of my big project (posted here next week in theory), I’m gonna have to improvise something quickly, and profite of it to get some pictures of my other big ones while I’m at it. Eh, I’ll figure it out (and if I don’t, I’ll just delete that statement later :}
Thanks for reading, have a good day !

✨Small theatre !✨
A small but really fun build made for a relative’s birthday.
While there isn’t much to mention build-wise, a few details are interesting :


Firstly, I managed to get the effect of multiple curtains in a row by making 'banners' which are directly connected to the ground.
The base is partially empty, and behind the gold details are 1*4 black tiles on snots which give a pretty nice black aspect (although now that I think back on it, 1*4 bricks would have done the job.
Finally, the floor is a single, large door from a castle set ! I really like the way it’s shaped and likely will reuse that technic again someday.

✨Cargo starship ! ✨
A 'little' part of a larger idea I’m developing~
Right under the cut, closeups and some explanations !
Tiny container carrier :


It’s small, it’s adorable, and I still haven’t figured to how the container will be properly held, so the entire system underneath is improvised and will be subject to changes, hopefully.
Cargo closeups :


Lot more to say about this ! Firstly, that the support I gave it is very unstable, but that should be fixed later.
I was playing around with the idea of a small ship with six rows of container in an hexagon, and ended using a combination of 3-branched crossed around a technic axe to do that. Then, one thing following an other, I needed up with two sections connected by one of these large rings like you see in some movies for gravitational purposes. The entirety of this piece, at the exception of the very beginning of it, it held by a single long technic axe. Obviously, large transparent-blue rods to make reactor trails and truncated cones as the reactor bases. The ring is held by rods, too, with an upside down tread — getting them to have a proper circular shape was a complicated journey.
The colourful containers were another fun thing to do : firstly, getting all the right pieces and make the pattern not too regular. And to pretend they’re all connected by nothing, they’re only partially connected, and 'held' by an electromagnetic field figured by the transparent blue pieces on each side of the container rows, which would then be picked by the small container carrier above.
And now, the most important thing : the reason of why I absolutely needed to make this cargo, instead of anything else. It’s quite simple, actually. I needed to get the scale of these containers. Because. Because I had this idea to make a large, large trading spare station with a ring around a large axis, which would be the perfect excuse to make an awful lot of small spaceships. And for that, I needed something for scale, and since it’s a trading station, a container was my best bet. So I have a plan, which I’ll elaborate on probably next week, along a batch of my small ships.
✨I made a carrd✨
A friend of mine said I could use it — they were right !
Essentially, I now have all of my published MOCs sorted by theme in a single place (as well as a few unpublished ones !)
Here it is : https://enteroctoups-darkysils.carrd.co/ !

It also feature some none-Lego photographs, too, feel free to take a look.
Small, unnecessary update bellow the cut :
I’m gonna have to remove the 'one post every Wednesday', for multiple reasons : firstly, I’m gonna start a long maths cursus which won’t leave me much time to build — or even to post; and, beside that, I’m running out of MOCs ! I still have a few, which I will probably work on and queue so that they appear semi-regularly. I received just earlier today part of the pieces I’ll need for my final(?) MOC. And it’s a big one. Well anyway, I’ll be off to work on it now ! Thanks for reading this far~

✨Micro-Nether !✨
And a small wither to go with it~
There’s not much to say about this build, it’s mostly just a tiny box with triangles and cubes inside. I’m considering making more of these in the future (feel free to suggest biomes/mobs in my inbox !) while keeping the scale (8*8*8), which is a bit of a challenge, but it’s fun.

They/them - AroaceLego MOCs and photography with a wide range of different characters and environments, every Wednesday (in theory-)
77 posts