So You Might Be Saying: Lion Why A Guide On Drawing Black People? Well Young Blood It’s Because A Lot

So you might be saying: Lion why a guide on drawing black people? Well young blood it’s because a lot of people cant…seem…to draw…black people..Amazing I know.

Racist (caricatures) portrayals of black people have been around forever, and to this day people can’t seem to draw black people like they are human. If your artwork resembles any of the above even remotely your artwork is racist and offensive. If you try to excuse that as a stylistic choice you’re not only a terrible artist, but racist too!!! Congrats.

Whitewashing is also a problem. A lot of people refuse to draw black features on canonly black characters. While this example isn’t colored, lightening the skin-tone of a character is also considered whitewashing. So lets start with features!

Now all black people have different noses thats a no-brainer, but black noses tend to have flatter bridges, and wider nostrils. Please stay from triangular anime noses and small button noses. Your drawings should not depict black people with abnormally large noses. (Especially if you do not draw other characters this way)

If you feel like the way you draw lips on black characters is offensive or resembles a caricature,it probably does and you should change it. ABSOLUTELY AVOID PLACING LIPS AT THE BOTTOM OF THE FACE.

Hair is so diverse! Please get used to drawing braids, locs,kinks and coils! If you can learn to draw ringlets and long waves you can learn how to draw black hairstyles.

Add clips! Learn how to draw baby-hairs and never be afraid to add color Pinterest and Google are free my dudes! Also try using square brushes for blocking in coils.
OK THAT’S ALL YOU GUYS

More Posts from Aether1984 and Others


Very happy to finally post my third tutorial! Thank you so much for your overwhelming support of my last tutorial, I am so happy it was useful for you guys 🙇♀️. I feel like this topic was harder to explain so feel free to ask me some questions if you want!
Like last time, I really hope this helps some of you in your art path 🙌
Horns and Antlers
took a while, but i'm mostly back on my feet and have energy again.
I received an ask a while ago about how to add horns and antlers onto a humanoid, so here are my thoughts on that:

(image description: a stock image of the human skull from four angles, front, back, side, and three quarters. Next to it, the same image faded and traced over in blue, with red circles all around the top front portion of the skull. A note on the image says, "there are lots of places you can anchor horns or antlers". end description.)
Here I have marked out some common placements for horns/antlers, and I will show them each in more detail below. The four main areas are: the brow, the center forehead, the top, and the sides of the skull.
As a general rule, horns and antler anchor directly to the skull, but they do not emerge from the skin as solid bone. There is typically a covering layer of some sort, like a keratin sheath, that starts where the horn or antler emerges from the skin. This makes horns and antlers look a bit funny when you remove the skin, because the actual bone base is thinner than the covering layer.


(Image description: same as before, with the four angles of the human skull next to traced versions of it. This time, each of the four images shows the skull with simple horns added and the skull altered to accommodate them in the four basic horn positions. Brow, sides, top, and center forehead. end description.)
Depending on the size of the horns or antlers, you may want to add more bone to the skull, or even thicken the neck bones. Bigger neck and shoulder muscles will also be important to keep the head upright with the additional weight. For horns at the brow and forehead, I've made the brow bone bigger, and for horns at the top and sides, I've made the skull a bit wider and thicker in those areas. It isn't a huge difference, and may not even be very visible on a skin layer, but it's important to be aware of.
And now I also have four sketches of how each horn/antler location would look on a person with the skin and hair in place.

(image description: four simple sketches of people from the shoulders up, in basic shaded colors. From the top left, clockwise:
A man with a mohawk and short beard, frowning. He has curved horns over his brow. A woman with long braided hair and a neutral expression. She has a single horn in the center of her forehead. A man with a beard and long unkempt hair, looking tired but happy. He has moose-like antlers on the sides of his head. An androgynous person with short hair, smiling. They have pronghorn antlers at the top of their head. end description.)
It's very easy on the sides and top of the head to cover the base of the horns/antlers by layering the hair around them. But any horns on the forehead area will be harder to cover this way. I've put thicker skin where the horns and antlers emerge, which has made the brow very heavy on the first two sketches. To balance that out, I also made their nose bridges a bit bigger and more connected to the forehead.
So I hope that helps! Horns and antlers are very fun, and they come in so many shapes.
Love your artwork!! :) as a professional illustrator, would you tell me some advice on developing potrait? im always mess up when it comes to potrait drawing. i really dont know how artist like you can be so precise in developing value for face. Thank you very much :)
Hello and Thank You :)
The first thing if You want to do portraits is to know anatomy. Start with learning what is under the skin and understand how it affects the face. When You got that covered You must know how face is structured. That will give You the knowledge how to light head. Head is a cube-like object. (yea! NOT sphere!) On face we have other little cube-like object (nose).
A great exercise is to find photos of a face and draw structure lines over it.
Example:
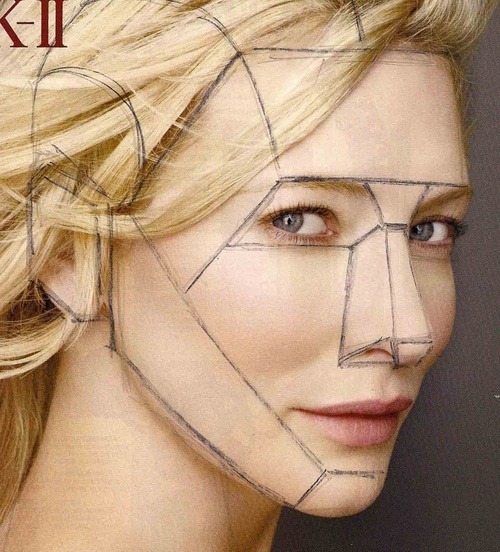
You see clearly now? The structure of a nose, where cheeks are, forehead etc.
After doing this You will be able to create the face from a memory using these helping lines.
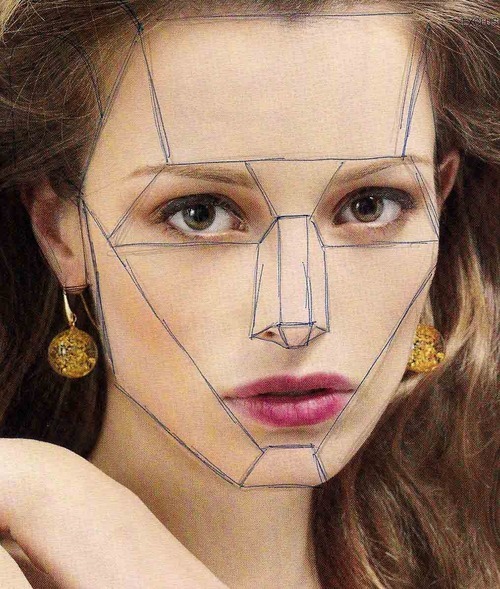
Like here. This is Michael Hampton exercise:

You see how everything fits thanks to the structure lines?
Drawing a face requires TONS of practice. Find thousand photo references and practice.
Understand the anatomy and face structure first. It’s basic.That would be the things I would recommend for everyone who start drawing faces :)
I hope it helps a little!


I don’t know why y’all ask me for tutorials, I think mine might be the least helpful in the world haha. TuT Mostly I just draw the thing people are asking about over and over again. But!!! @floriani1 and @governmenthookerleaderofamerica, I hope this helps with your nose-drawing woes.
I still struggle with facial feature diversity, including noses (namely at this point I want to give everybody big hooky noses because I LOVE them ahhh) so I feel u guys, fight the good fight.
As far as I can see you've found my refs helpful. Here's one more)

PS: Hope someone will notice this post too, not only previous, hah.
do you have any advice on how to draw armor?? please im dying
yeas <3 so right off the bat i think its important to state but my like. basis from drawing armor is almost completely off of my history of drawing soulsborne characters...... i have a disease, but anywyas yea. i highly recommend it for explorations of interesting yet accurate armor design :-) my favorite designs are from 2 and demons, and i steal a lot of inspiration from their concept art. i simply think it should be ok to take how you draw/view armor or something like that from something else. armor is goofy just draw whatever looks cool.
how i draw armor is basically separating it into sections to focus on ..

heres a lionel fr ref. layering is really important i think. i usually just kinda mix up what exactly i have fr each bit but uhhh that works.

from there its just shoving random metal, a cape, and some other doohickeys on top. i recommend looking at either preexisting armor or video game/tv show/what have you armor designs you like and just taking bits from it to make your own :-)

for gauntlets and the like i usually just simplify it to the point of pointing out where the knuckles are. theyre pretty simple to just shove shit on top of to mkae fancier but theyre super basic. sabbatons too you can get away with just showing where the foot will bend cus they got sooo many segments. think worms. worm shoes.
other than that. if u dont wanna draw a bit just shove a cape on top. i promise no one will notice. people will think its cool. capes always improve a design. i draw every single character with armor with a cape so i dont have to draw it sometimes. or so i just have to draw hints of it. its fine cheating is epic.
uhhh thats kinda all my off the top of my head tips i hope any of them help feel free to ask more specific shit im not good at teaching shit like this :pensive:
Hi there I am a person trying to learn art but I was wondering if you could make a endo sketch of a person please and could you make a mans body bc I am not very good at it it would be really help full plus it doesn’t have to be the best work you’ve ever made just a nice endo sketch please
okay hahhahah
actually, those are the only things I remember while drawing and I am so used to them that I'm not even sure if I use them at all XD
But yea! Here you go! If you want me to draw a female body, I can do that too uwu


could you do a body tutorial please? i always get stuck on the shoulders once ive drawn the head because they always look so board? i’m sure id struggle with the rest of the body too but once i fail with shoulders i usually give up and just draw creepy floating heads...
ooofok so
I’m gonna make u a shoulder tutorial cause a full body tutorial would be absolutely gigantic.ok so u got ur head right, i’m going for a straight forwards view point on this so

there they arenext is the neck, i typically make this thinner than the jawline and bring the length down so that the chin falls about half way between the jaw and the slope of the shoulders.
next i draw the slope of the shoulder on both sides and connect them with a horizontal line. The horizontal line is where you’d put the collar bones.I draw the slopes so that they extend past the ears. I tend to angle them at 45 degrees when standing normally.

I use this bit to quickly sketch in the collar bones and the tendons (?)the actual shoulder joint though i draw as round with a kind of, rounded corner????? both sides are p much even on each joint. I draw the joint as roughly the same width and the shoulder slope.I am god awful at maths so this bit doesn’t add up but it kinda ends up looking as if it’s split into thirds.

as u rotate the shoulders they over lap each other but the basic elements are still there, just shortened or behind something.

i’m not great at explaining shoulders all that well but i hope this helps at least somewhat.

Long time no see Tumblr. Quick guide on coloring deeper skin tones
yesterday i reblogged a drawing resource that included how to draw hijabs - and it honestly wasn’t the best advice i’ve seen out there
now, i’m not an artist. but what i saw was a video that included hijab styles most of us don’t really wear and incorrect terminology surrounding niqabs and burqas (yes, there is a difference between the two)
so, i went searching and found a tutorial that i felt was better! these drawing guides and examples come from @/winchestermeg on twitter, and i think they’re really great 💕


this has more relevant examples and correct terminologies, and is drawn by a muslim woman
enjoy, artists of tumblr!
-
 twinworm liked this · 1 month ago
 -
 svetlyrarog liked this · 1 month ago
 -
 krowspiracyanon liked this · 1 month ago
 -
 mauvesauce liked this · 1 month ago
 -
 spicealopii liked this · 1 month ago
 -
 littlescribbs liked this · 1 month ago
 -
 trexfries liked this · 1 month ago
 -
 inimitable-ability reblogged this · 1 month ago
 -
 lovelyladylavie reblogged this · 1 month ago
 -
 frogandbird liked this · 1 month ago
 -
frogandbird reblogged this · 1 month ago
-
 atta651 reblogged this · 1 month ago
 -
 chiquitosbrain liked this · 1 month ago
 -
 esgaril liked this · 1 month ago
 -
 chaoticke reblogged this · 1 month ago
 -
 keilykim liked this · 1 month ago
 -
 anapplescruff liked this · 1 month ago
 -
 skcirthinq reblogged this · 1 month ago
 -
 xiaovein reblogged this · 1 month ago
 -
 that-rat-kid liked this · 1 month ago
 -
 ace-mcspades reblogged this · 1 month ago
 -
 wolfsskills reblogged this · 1 month ago
 -
 asoftspotforangels reblogged this · 1 month ago
 -
 theartsynebulawhodoodles liked this · 1 month ago
 -
 loserfurry liked this · 1 month ago
 -
 joonebugg reblogged this · 1 month ago
 -
joonebugg liked this · 1 month ago
-
 colorfulpuppychaos liked this · 1 month ago
 -
 wormcanines reblogged this · 1 month ago
 -
 kayayayayayayay liked this · 1 month ago
 -
 li-bialo reblogged this · 1 month ago
 -
li-bialo liked this · 1 month ago
-
 stunningtoredorsweetheart liked this · 1 month ago
 -
 queeraliensposts liked this · 1 month ago
 -
 febrieese liked this · 2 months ago
 -
 breadwheathead reblogged this · 2 months ago
 -
 breadheaddoodles liked this · 2 months ago
 -
 samejazzed reblogged this · 2 months ago
 -
samejazzed liked this · 2 months ago
-
 bigmommamd liked this · 2 months ago
 -
 tacoguy02 liked this · 2 months ago
 -
 cappybawa106 liked this · 2 months ago
 -
 xhais reblogged this · 2 months ago
 -
xhais liked this · 2 months ago
-
 ozzie-nrg reblogged this · 2 months ago
 -
 kokocactus reblogged this · 2 months ago
 -
kokocactus liked this · 2 months ago
-
 whatthedip liked this · 2 months ago