.. / … . . / -.– — ..-


.. / … . . / -.– — ..-
More Posts from Nastysynth and Others


A basic tutorial on how I do ghoul skin for anon!! I wanted to include how to do fat/veins and stuff underneath the skin, but this tut is already long enough so I just stayed with the basics! Sorry if this is a bit messy, but I hope it helps!
Custom brush tutorial kinda??
Heres how you can make pixel brushes in Clip Studio Paint
first make a little pixel pattern and made sure that the background layer is transparent.

then you want to select edit -> register material -> image. this i remember from trying it before

next name it and choose a place for it to go among the others. doesnt matter where really. also check the texture box.

next to make the brush choose whatever brush that youd like to give it that has the properties you want and copy it. i just chose the standard oil brush. go to the copied brushes settings and click texture

click where it says none and find the brush that you made. after you click it change the setting to this

for me the texture works for subtract, multiply and compare. dont really know the differences between them all or form the others but for what i wanted those three seemed to work.
i did this for a bunch of different pixel patterns and brushes and got some cool effects! check it out!

i appreciate all the help and suggestions yall gave me!

maybe once i figure them out some more i could offer stylized commissions with them :V
So

Can we just……

Talk about………

All of……………

The…………………….


Similarities??????????????????
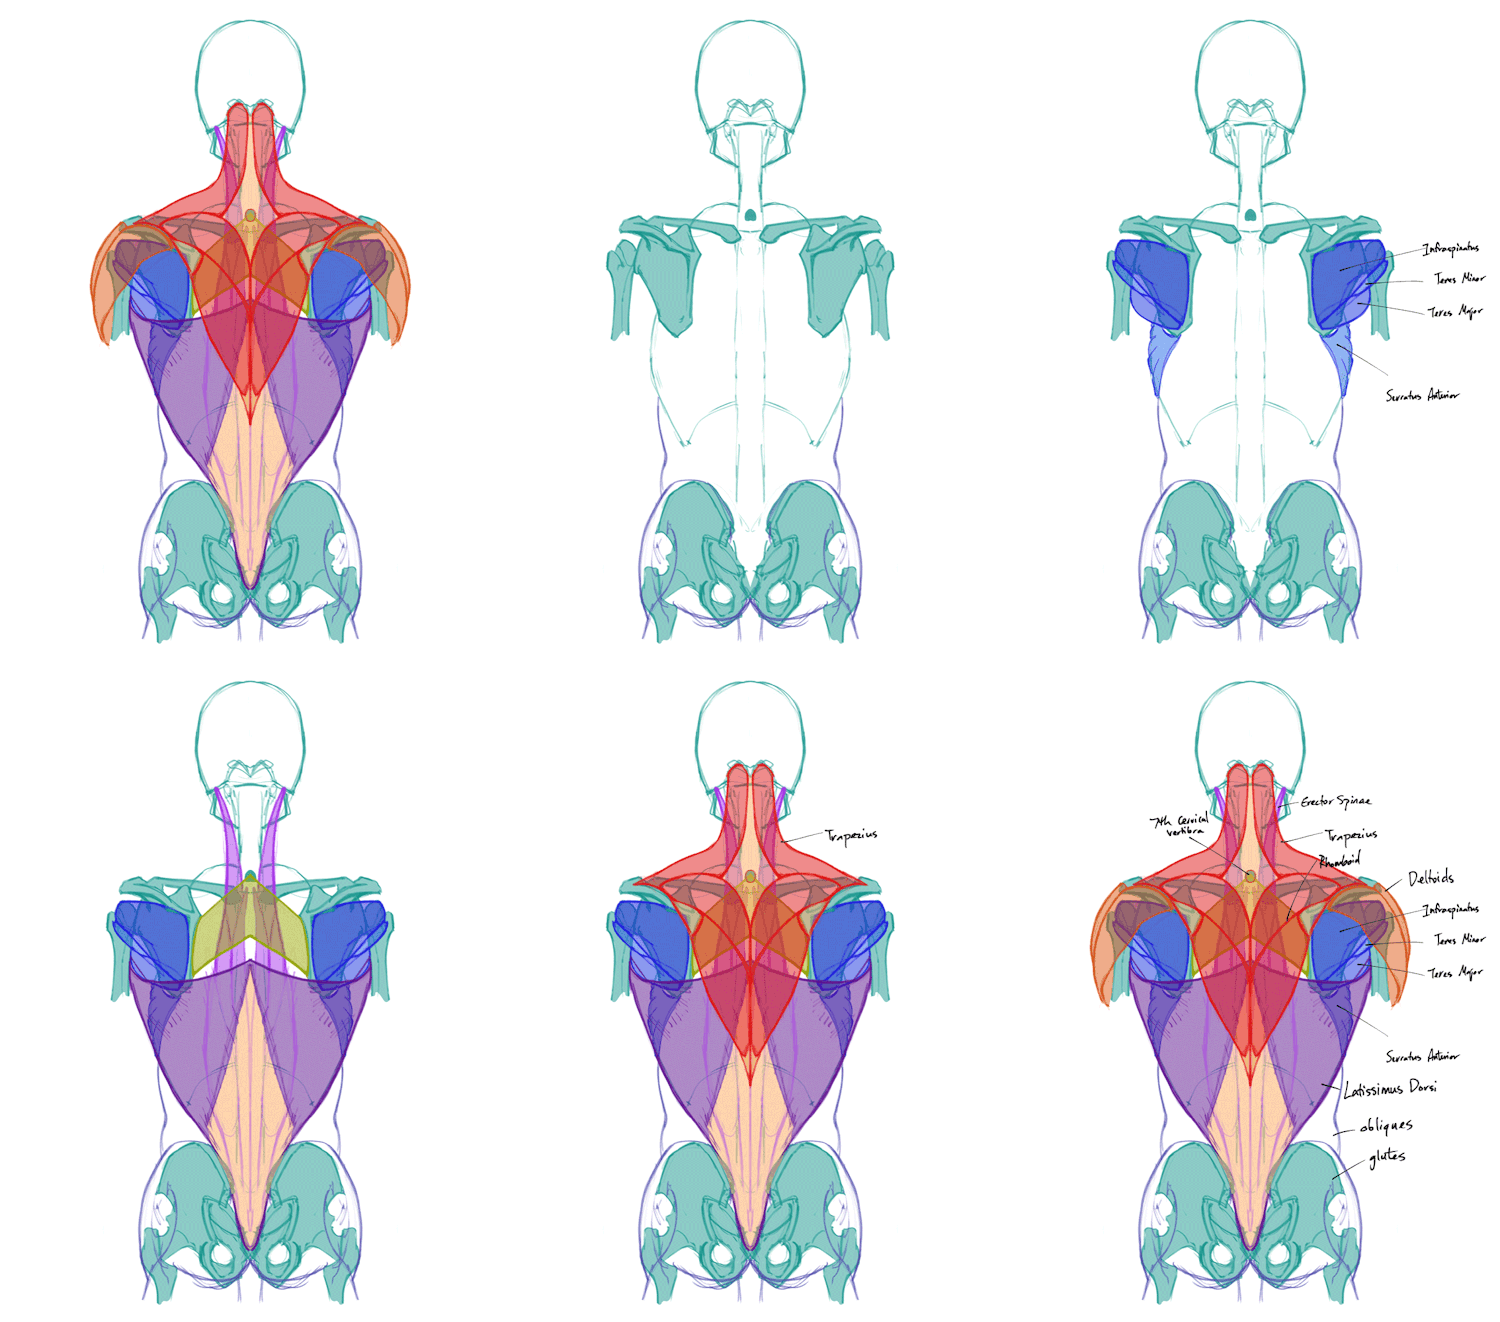

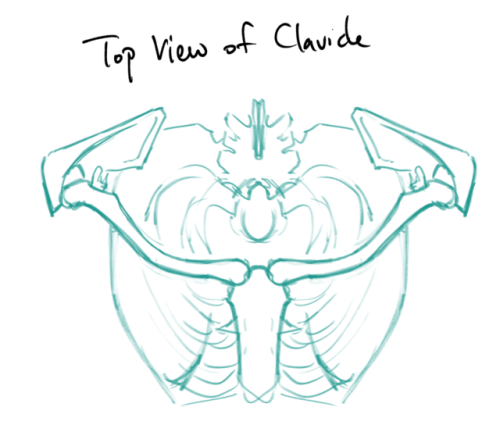
Back muscles!
SKELETAL LANDMARKS

shoulder blades: most of the upper back muscles attach to them directly, placement is affected by the arms. They can get obscured on very muscular backs, but most people these are the most dominant features!
7th cervical vertebra: neck bone that sticks out in most people, it sits in the center of that diamond shaped tendon in the middle of the trapezius
Also, obviously always keep the general shape of the ribcage and spine in mind, it was too much of a pain to draw them all in lol.
BACK MUSCLES

Erector Spinae: make the column-like structures around the spine, they extend all the way up to the neck, but you really only see the bottom part.
Latissimus Dorsi: are very thin, so most of the time you only see the structures underneath (such as the erector spinae). But when flexed, (for example, when climbing), you can see here on Jimmy Webb’s back that swooping curve it makes under the armpits.

The lats are also responsible for most of a person’s upper body strength and are the “V” shaped part of the back. For example, it’s how Bruce Lee was so strong despite being a small guy. Just look at those wings, man.


Infraspinatus, Teres Minor, and Teres Major: sit on the shoulder blade itself, and connects it to the top of the arm bone. These are responsible for a lot of the crazy shapes you see in bodybuilders’ backs.
Underneath them is the serratus anterior, which technically isn’t a back muscle but sits on the side of the ribs. These form that zig-zag pattern on the ribs that makes people look super ripped when visible with the external obliques, both wrapping around the sides of the torso. They’re not technically back muscles but fill out the silhouette, so it’s good to keep them in mind.
the glutes/butt muscles… they go farther up the back than one might assume and they, along with the pelvis, do affect the surface appearance of the lower back.

Rhomboid: simple shape, attaches from the inner edge of the shoulder blades to the middle of the spine at the 7th cervical vetebra to about the 4th or 5th thoracic vetebra. It does not overlap with the latissimus dorsi

Trapezius: divided roughly in the top, middle, and bottom sections. The top is quite thick and cylindrical and makes the sloping shape from the neck to the shoulders.
The bottom part is very thin; like the latissimus dorsi, the forms underneath it are visible when relaxed, making the rhomboid visible if it is flexed and the traps are not. Also not where the bottom part’s tendons attach to the shoulder blades; it outlines the curve of the shoulder blades even in people who are covered in brains muscles.
When fully flexed, it doesn’t taper into a point, but makes a small “w” shape at the bottom.
The 7th cervical vertebra sits at the center of the diamond-shaped tendons between the first and second sections of the trapezius. This part appears recessed in very muscular people.

Deltoid: not really a back muscle, but they overlap with the Infraspinatus and insert into the upper ridge of the shoulder blades, so it’s good to see how they interact with the others.

Ah, now for an example, featuring Thor himself. Note the curve where the traps meet the shoulder blades, the diamond-shaped tendon, and the rough “w” shaped contour of the lower back. Also note the two dimples, which is formed by the pelvis bones. They tend to be more prominent in women, although they are found in both men and women.
Try to find the back muscles on other people yourself, and then GET DRAWING

(PS, Generally it’s best to be able to simplify the forms instead of trying to render straight away - that’s how you know you really internalized the anatomy! I… honestly still don’t understand the back enough to do that yet, hence the lack of examples, unlike with the forearms post. But nonetheless, I hope that this is still useful as a general reference. I know it’s helped me at least remember what the different parts are, even if I don’t yet have a grasp of how they interact in motion!)
Free to use textures, credit optional.


How do you draw noses?
I’m not sure what specific part you’re wondering about, so here’s a run-through of my process from sketching to painting!
1) The first thing I do is simplify the nose into a few basic shapes to get a prism-like block, like so:

2) I can now easily draw the prism shape in three-dimensional space depending on the angle and rotation of the head.

3) Using the guidelines/planes I can draw a proper nose in any angle! There aren’t many tricks or shortcuts for this step, unfortunately (other than practicing lots). I recommend using references, they’re always helpful :)
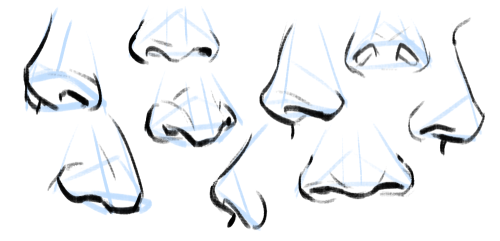
4) Really important to note: all noses vary greatly, especially from different ethnicities! A high-bridge “aristocratic” sort of nose or a ski-slope button nose might be accurate for some people, but definitely not everyone. Compare differences in size, width, a hooked or button nose tip, high or low nose bridge, and so on:

5) Then I paint! I have a skin tone tutorial here, if it helps. Take note of the lighting, skin tone, etc. Here are some things I keep in mind:
For pale skin tones, the nose sometimes has a redder colouration than the rest of the face because of increased blood flow.
The nose also usually has highlights (due to oil). These are located on the tip of the nose, the nostril groove, and where the base of the nose meets the flat area of skin around it!

Hope this helps! In the end, all stylistic choices are completely up to you. Art’s subjective, so feel free to draw any noses you want :)
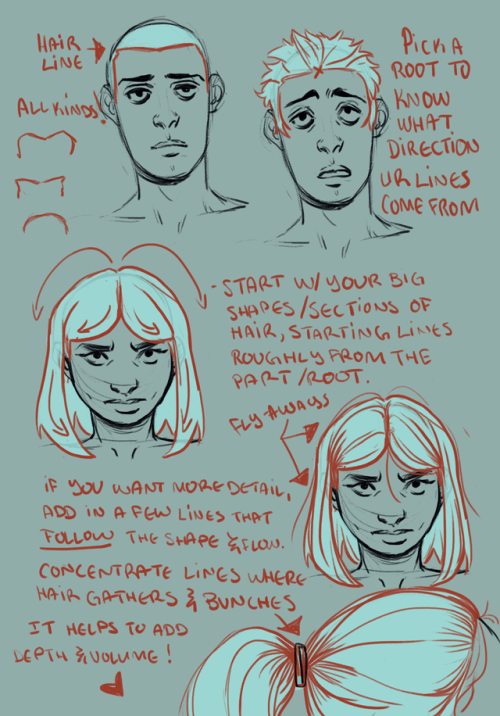
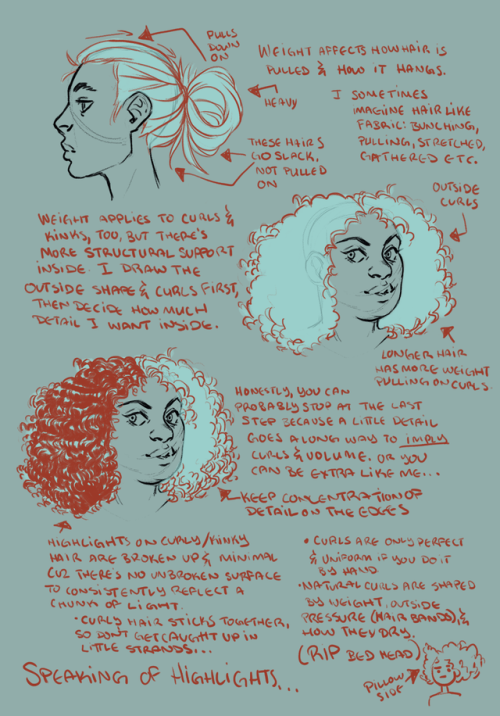
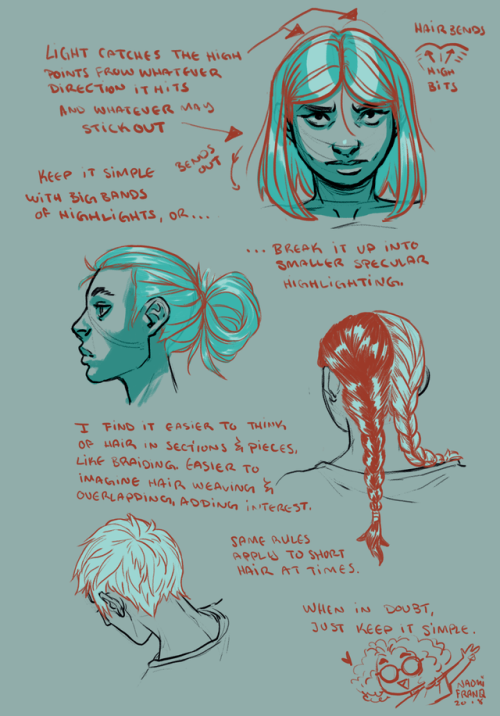
I jotted down for a friend of mine some tips and notes on how I approach drawing hair, and things I keep in mind while doing so, and thought I’d share. There are loads of other ways to do it, and the learning never stops, so I hope this helps!


Some of you have been asking for a tutorial on how I draw faces so I threw together a thing for you. *finger guns*
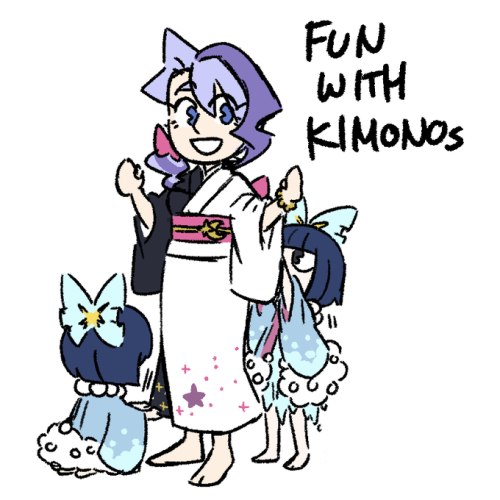
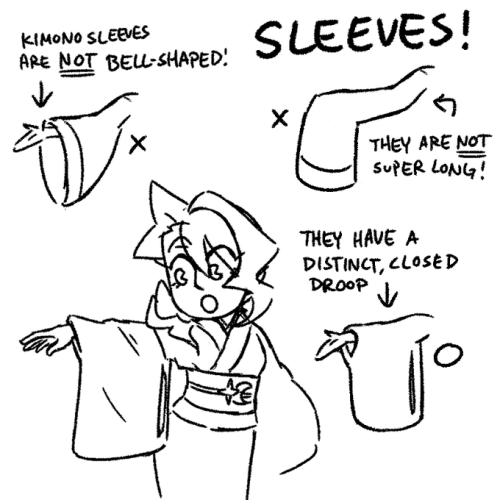
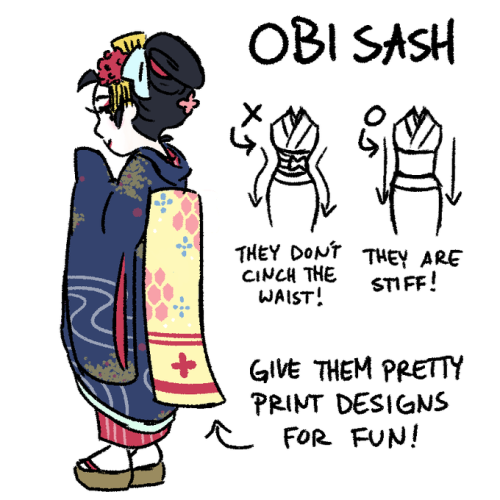
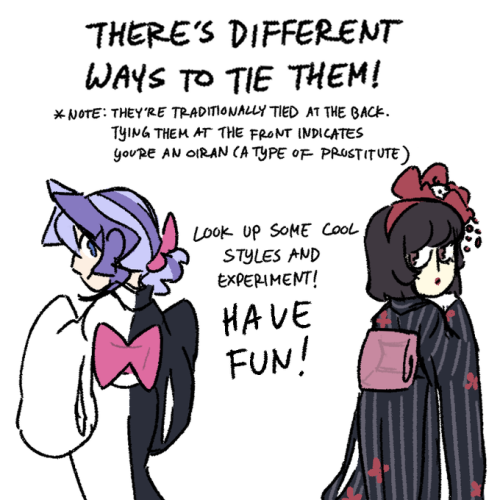
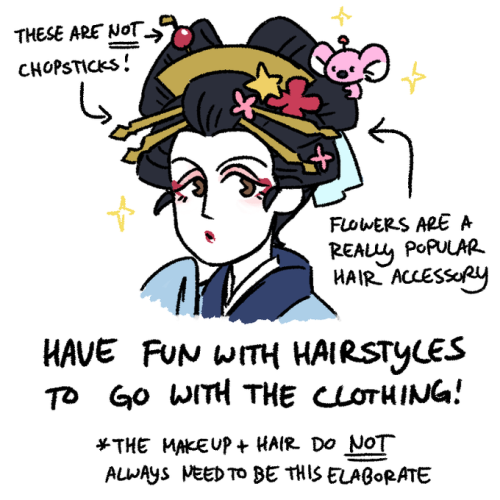
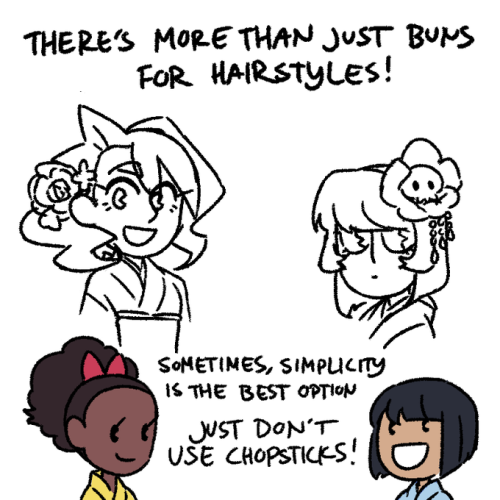
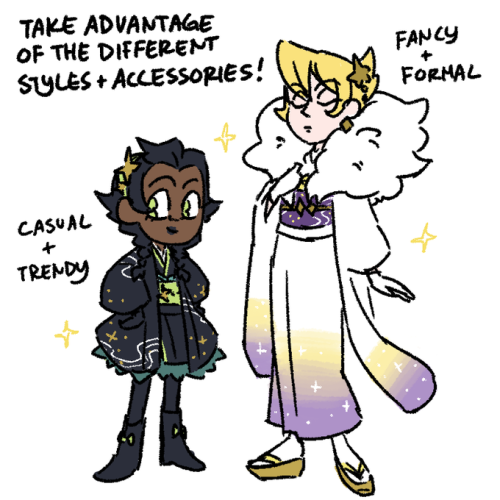
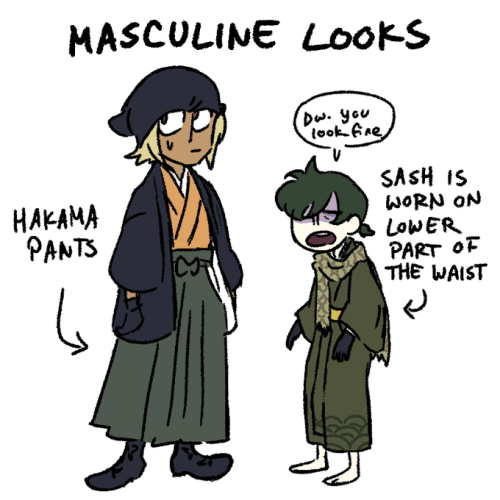
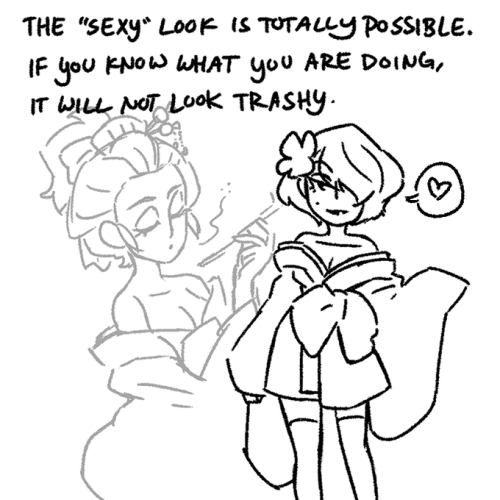
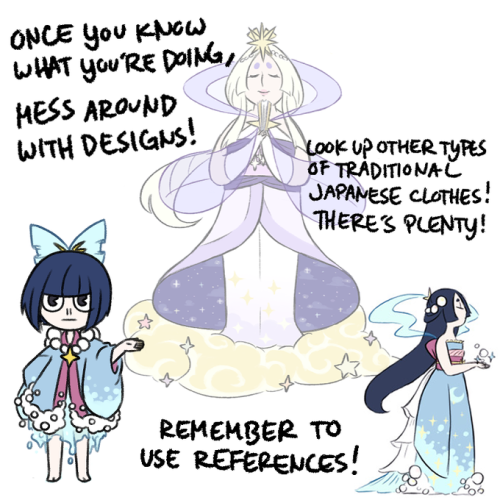
Little quick and light kimono tutorial because I’m noticing a trend of weird things non-Japanese people do with them.
Bathrobes =/= Kimonos
Kimonos aren’t sacred. They’re for everyone. Just practice drawing them, use tons of refs, be respectful, and have fun. There’s also tons of other types of traditional clothes you can mess around with. Research is your best friend


I’m not really good at explaining or teaching things… so… Here you go. This is more like an example of how I draw noses, rather than how you need to draw them. I mean, it’s pretty basic, but maybe some artists have other ways to do it }: ? I hope it at least helps a little bit! (nothing fancy, but… yeah). sorry it took me so long to produce this half-assed thing }X D
-
 critterofthenight liked this · 1 week ago
 -
 theboobird liked this · 1 week ago
 -
 liches-covered-in-lich reblogged this · 1 week ago
 -
 liches-covered-in-lich liked this · 1 week ago
 -
 phobophilic liked this · 1 week ago
 -
 grippingtraverse liked this · 2 weeks ago
 -
 anothermagnusprotocolinterest reblogged this · 2 weeks ago
 -
 testedpack2015 reblogged this · 2 weeks ago
 -
 patema-introverted reblogged this · 2 weeks ago
 -
 rainydaymilktea liked this · 2 weeks ago
 -
 ninja-grace liked this · 2 weeks ago
 -
 annieinutero reblogged this · 3 weeks ago
 -
 lovely-being liked this · 3 weeks ago
 -
 caseythecasket liked this · 3 weeks ago
 -
 treezooks liked this · 3 weeks ago
 -
 knees-and-bees liked this · 3 weeks ago
 -
 pepa16 reblogged this · 3 weeks ago
 -
 broken-from-the-inside liked this · 3 weeks ago
 -
 pepa16 liked this · 4 weeks ago
 -
 tabbbbyyyy reblogged this · 4 weeks ago
 -
 tabbbbyyyy liked this · 4 weeks ago
 -
 cheeesedemon-blog liked this · 4 weeks ago
 -
 zay-zay-ace liked this · 1 month ago
 -
 xanams liked this · 1 month ago
 -
 mycena-luxaeterna reblogged this · 1 month ago
 -
 mycena-luxaeterna liked this · 1 month ago
 -
 ghostofneo reblogged this · 1 month ago
 -
 ghostofneo liked this · 1 month ago
 -
 ash-the-bee reblogged this · 1 month ago
 -
 lapinauxfraises reblogged this · 1 month ago
 -
 foggyjune liked this · 1 month ago
 -
 lapinauxfraises reblogged this · 1 month ago
 -
 lapinauxfraises reblogged this · 1 month ago
 -
 lapinauxfraises liked this · 1 month ago
 -
 inbeesinblood reblogged this · 1 month ago
 -
 inbeesinblood liked this · 1 month ago
 -
 andrewminyards liked this · 1 month ago
 -
 cosmic-mj liked this · 1 month ago
 -
 swirlspill reblogged this · 1 month ago
 -
 3ndergender reblogged this · 1 month ago
 -
 3ndergender liked this · 1 month ago
 -
 holy-leaves reblogged this · 1 month ago
 -
 monarchkocho liked this · 1 month ago
 -
 cosmocreates464 liked this · 1 month ago
 -
 sugarfortia liked this · 1 month ago
 -
 sketchunit liked this · 1 month ago
 -
 super-andi-ness liked this · 1 month ago
 -
 draculasteethtxt liked this · 1 month ago
 -
 batghostgirlfan reblogged this · 1 month ago
 -
 foxish-nonsense reblogged this · 1 month ago

Sylwester | i will mostly post sketches, because i'm too lazy to end them
196 posts