Art Tips For Facial Features?
Art tips for facial features?
I would love to help but you need to be bit more specific. “facial features” can mean a lot of stuff.
Most vague tip i can give is uh - silhouette, shapes and proportions: silhouette helps block out unique features, geometric shapes can aid with structure and keeping the same face consistent between drawings, and proportions convey characteristics like age easily to the viewer.


More Posts from Nastysynth and Others
Sorry, if you've answered this before, but do you have any tips on drawing mouths and lips?
Hello anon! :D I’m not the best at making tutorials and giving tips but I’ll do my best to answer your question! ^^
I sure do love drawing lips! It might be in fact my favourite part of the face to draw.
Let’s see what makes them so irresistible ;)

tip 1: let them shine! that tiny shiny spot does wonders for the lips - it makes them fuller, softer and more three dimensional. It also makes the lips look slightly wet. Sexy!
tip 2: Build the depth with some darker spots. Quirking corners are great for that, and if you make the darkest spot in the middle of the mouth it seems like it’s about to part. And maybe whisper something seductive ;)
tip 3: The very middle of upper lip is my favourite area, it gives the mouth its distinct character. It’s also a great spot to play with shadows, one lighter stroke, one darker stroke and you have a very dramatic shading going on!
tip 4: When drawing lineart it’s good to keep the line varying in width and pressure. Equally thin, flat line might look good in anime, but even there it’s rarely the case. Making the line thicker in the shadowy part of the mouth adds depth to your drawing.
General remarks:
I almost never outline the upper lip, it tends to look weird. Just a thin “U” shape in the middle is usually enough.
Upper lip is usually in the shadow, at least half of it. Lower lip tends to catch the light, especially with pouty plump lips. The more shadow you add under it, the fuller the lips look.
When drawing male characters I usually play around with skin tones instead of pink and red (see the third row of examples). But it’s not a rule. Some boys rock them rosy lips. ;)
Never paint the teeth white, never. Gray, yellowish and pinkish tones are great.
And the final tip: use reference! Look for pictures of people with beautiful lips, with thin lips and full lips, try to see which line goes where and how it changes the shape and expression. I hardly ever draw without a reference.
Good luck! 👄

Absolutely!!
Muzzles are one of my favorite parts of drawing animals/furry characters & really fun to draw expressions for. I always start to draw long muzzled characters the same way, by drawing two circles, one representing the basic shape of the head, and the second where the basic placement of the nose is going to be.

From there I sus out the basic shapes without worrying about details. things like the mouth and nose details I always add in last, since theyre less important in the sketching stage than the basic shapes.

For open mouthed or front-view muzzles I basically always use the same process.
This same process also works for shorter muzzled characters as well

It took me a while to get good at drawing muzzles from different angles & stuff, but once you figure out a good method that works for you its WAY easier than it seems. the most important part of drawing muzzles is just understanding the shape of your characters face.
I hope that was helpful! I dont usually make tutorials but I tried to make this as clear as I could, my sketch process is pretty messy lol.


i wanted to update my VERY OLD nose tutorial now that ive learned how to draw! as always, this isn’t an all encompassing guide– just a jumping off point for practice@


a few ppl asked a while ago how to do the glitchy texture effect n i never rlly gave a good answer so heres a small tutorial:
1. add a wave modifier first, make the height really small (like 0.1-0.2), turn the speed to 1 and the width to less than 0.4
2. add a subsurf second (sometimes u dont need this one though, its mostly to stop the face/eyes collapsing on low poly models)
3. add a decimate modifier last
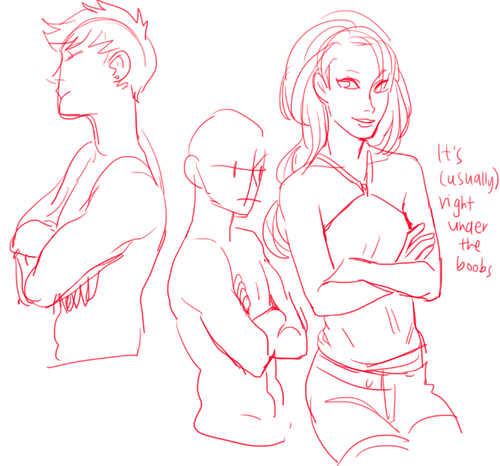
Hiya how do you draw arms crossed over?

Could you do one on how to draw facial features? Lihow do draw nose? How do draw eyes? How do draw lips/mouths? Esp at different angles


this is a more holistic look at drawing faces in perspective
each individual feature could really be its own tutorial
hope this helped!
LITERALLY the most Lynch thing i’ve seen
i literally love how your color and shade if it’s ok do you have any tips on digital coloring? you don’t have to answer this if you don’t feel like it :) thanks!!
hello friend!! i have a tutorial i made on twitter a while ago which is more or less how i make my colours more interesting. i still use the technique and in general it’s just a lot of colour adjustment nothing too special LOL here!!


i am SO sorry for the super long response, but i thought this might make a nice little tutorial opportunity, since soft body physics can be… frustrating, to say the least. i’ve noticed that it tends to respond better to spherical meshes than most others, so getting it to work with something with a lot of hard edges and flat planes can be a little tricky (at least in my experience).
so! to get started, here’s my basic setup

the only thing i’ve done so far is place my object in the scene, along with a plane to act as the ground and a camera to record everything.
next you want to select your object, and in the properties menu on the right, select the physics tab (should be the very last one, the icon looks like a bouncing ball)

and for your object, you want to apply a collision and a soft body modifier (some people use rigid body instead of collision, so if you have issues with one there’s a chance the other might work out better. as for me, i usually stick to collision)

then select your plane and apply the collision modifier only.
now when you hit the play button at the bottom of the screen, this happens

it’ll just kinda float in place.
so to fix that, you select the object, go back into the physics menu, and look at its soft body settings

now uncheck the box that says “Soft Body Goal” (this’ll let gravity do its thing)

now when you press play after that

poor dude just kinda dies.
so there are a couple things i like to do to help it not… do… whatever that is.
go back into your object’s soft body menu and click on the tab that says “Soft Body Edges”

now underneath where it says “Collision:” you want to make sure that you have either “Edge” or “Face” (or both, why not live a little) applied to the object (this can help prevent clipping!)

we’re trying to make it wiggle n’ jiggle while still maintaining its shape, so what usually works for me is to crank up the “Bending” spring as high as it’ll go (which is 10) and enabling “Stiff Quads”

and we’re left with this!

and that’s how i do it! there are probably more efficient ways to get this effect, but for me


The Back and Spine
-
 freshlectronicsartzonk liked this · 1 year ago
 -
 modarthelp reblogged this · 2 years ago
 -
modarthelp liked this · 2 years ago
-
 former-cardassian-oppressor liked this · 2 years ago
 -
 big-scary-bird liked this · 2 years ago
 -
 ejpj liked this · 2 years ago
 -
 ecliiqse liked this · 2 years ago
 -
 maxvantisio liked this · 2 years ago
 -
 sweet-beee liked this · 3 years ago
 -
 name-less-things liked this · 3 years ago
 -
 midoriyadont liked this · 3 years ago
 -
 darkbouquetpoet liked this · 3 years ago
 -
 metaltitanblue liked this · 3 years ago
 -
 cocaine-for-children liked this · 3 years ago
 -
 guttedfishart liked this · 3 years ago
 -
 pleasureoftheclouds liked this · 3 years ago
 -
 just-an-adventurer liked this · 3 years ago
 -
 hidden-n-sick liked this · 3 years ago
 -
livimisis liked this · 3 years ago
-
 cup-o-koffee liked this · 3 years ago
 -
 ghost-of-marianos liked this · 3 years ago
 -
 tiemo98 liked this · 3 years ago
 -
 aratlesbian liked this · 3 years ago
 -
 h-llhound liked this · 3 years ago
 -
 riptd-e liked this · 3 years ago
 -
 holographicang3l liked this · 3 years ago
 -
 cattleyamoth liked this · 3 years ago
 -
 oldbookist liked this · 4 years ago
 -
 jaxisntdoingartthings liked this · 4 years ago
 -
 voidpotatooooo liked this · 4 years ago
 -
 moth-moth-moths liked this · 4 years ago
 -
 my-hearts-require-tea liked this · 4 years ago
 -
 centerofreality liked this · 4 years ago
 -
 baka-bun liked this · 4 years ago
 -
 jojojy liked this · 4 years ago
 -
 infinitenines reblogged this · 4 years ago
 -
 va-vooms liked this · 4 years ago
 -
 gangstars-paradise liked this · 4 years ago
 -
 spider-gets-inspired reblogged this · 4 years ago
 -
 thefoxwhodraws liked this · 4 years ago

Sylwester | i will mostly post sketches, because i'm too lazy to end them
196 posts