Weekly Anatomy Tip!
Weekly anatomy tip!
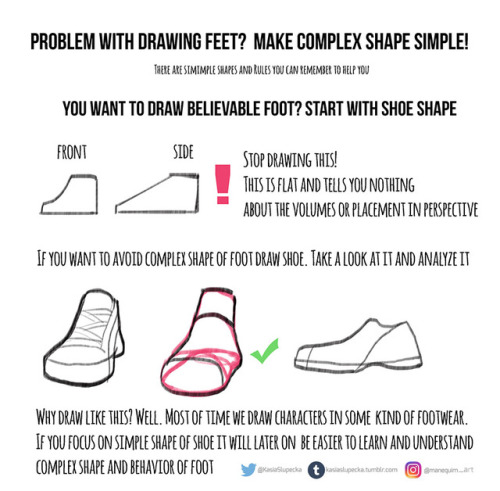
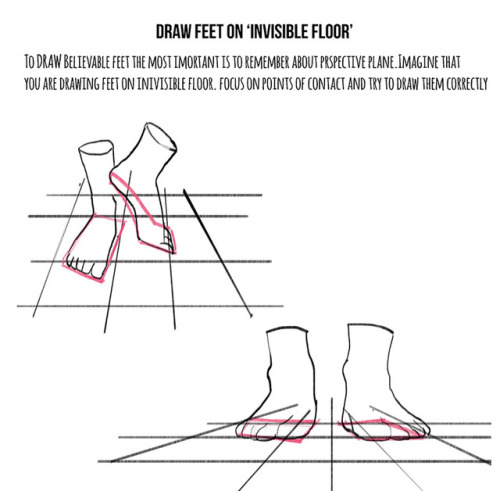
This week I tackle feet. I know how many of you asked for it.
It is hard topic indeed. It’s hard to draw nice looking character with feet that doesn’t look believable.
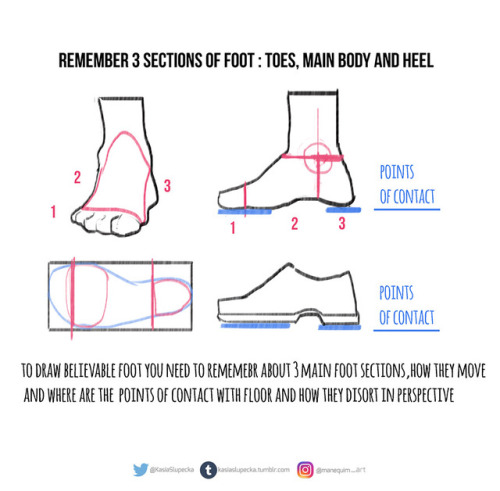
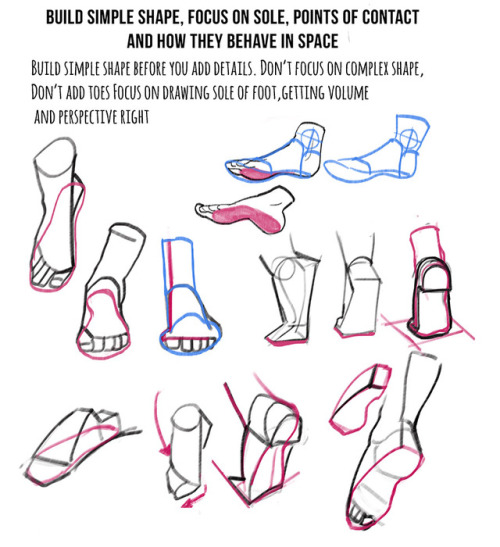
A lot practice is needed. I just presented few ideas and now you have to put it to practice.
Hope this helps !
More Posts from Arttuti and Others


Do you find drawing environments overwhelming? I did too, for a really long time. I started out drawing characters, and making the switch to painting environments was really hard at first! In my latest patreon tutorial, I break down the process into the most basic and essential steps, so that you don’t get lost in the details and know exactly what to focus on. Find it here for just $5: patreon.com/loish
How to do “extra” facial expressions!
Drawing basic facial expressions is not the hardest. Most people can draw a sad face, a happy face, angry etc., but making more multidimensional expressions is more of a challenge. I have gotten a lot of compliments on how I draw facial expressions, (specifically “angsty ones”) telling me that they are very dramatic and well… expressive! And there are actually only a few things I think about when I draw faces that take them to the next level, so I thought i’d illustrate them all here!
SUPER IMPORTANT TIP BEFORE WE START: Look at your own face when you draw faces. Even making the face when you are drawing (you don’t even have to look at it), will give you some sense of how the face muscles pull and where things fold and stretch, because you can feel it. You are the best reference when it comes to facial expressions!
Angles
Draw the head in an angle that matches the expressions you want to make. It is not a requirement, but is going to add to the effect.

Symmetry vs asymmetry
A face is rarely symmetric. Unless the face the character is making is 100 % relaxed or even dissociating, the eyebrows, mouth and facial muscles will have different placements of their respective side. This image shows the dramatic impact asymmetry has on a face:

That’s the difference between a smile and a smirk!

The first one’s like “oh yeah?” and the second is like “oH YEAH??”
The “balloon squishing principle”
This is something I did subconsciously, and I didn’t know about until I made this tutorial. And this principle goes hand in hand with an asymmetric face. Basically, if you squish one part of the face, you need to even out the empty space by “inflating” the other part of the face so that it doesn’t appear shrunken. The picture hopefully explains it:

Teeth
Don’t forget to add the gum when the mouth is open to its full potential!

Squinting and folding
Adding folds around the eyes when a character is squinting makes a HUGE difference. It makes a smile more genuine and a growl more intimidating. Adding folds to the face in general makes your characters more lifelike and ‘visually relatable’. Like, they look human, and less plastic or fake.


and so on..
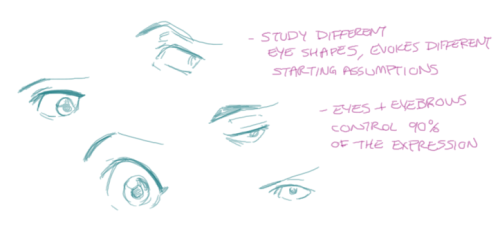
Pupils and irises
The placement of the iris and pupil in relation to the eyelids is very important! The less of the white you see, the more relaxed the character is.

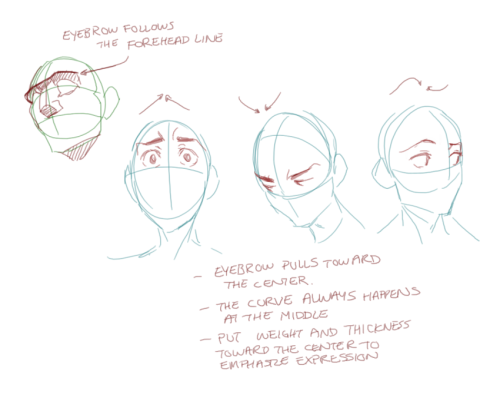
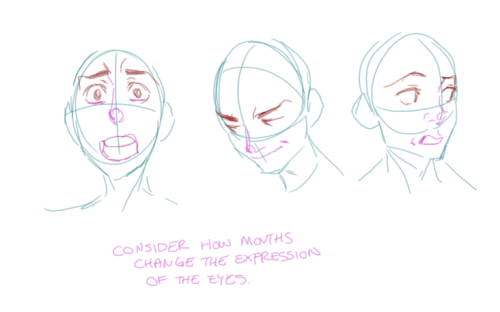
And then of course eyebrows and eyes go hand in hand!


Gestures, spitting, sweating…
Adding more elements than just a face is key to making the character actually look like they are feeling what you want them to feel. Just the tiniest sweat drop adds to their anxiety, spitting adds frustration to their rage, slouching shoulders, waving hands, a double chin, extreme angles, the list goes on! Add whatever and see what kind of impact it makes! Does it do the trick? Great! Add it!
Over exaggeration!!
Remember that you can almost always exaggerate more. Don’t be afraid to do draw “too much” because you’re just experimenting. See what works and what doesn’t. What do you like to exaggerate?


Now that you know some theory, it’s time to practice!
Practicing!!
The 25 Essential Expressions (a classic! I’ve done it multiple times)

And the one I do when I’m bored:
Fill a page with circles and fill them in with different expressions. Try and exaggerate as much as you can!


This is mostly for experimenting. They are quicker to draw than complete faces, but the same rules should apply!
And that’s about it!
I don’t know if I covered everything in this tutorial, since some things might be obvious for me, and this post perhaps only scratches the surface. So feel free to send me a message if you want an explanation about something more in depth! Thank you for reading! And now DRAW!!! ✨🎨


Anonymous said: Thanks for your tutorials, they are so simple to understand even for someone quite dumb about arts (me)! If you’ll have time and mood, can you, please, create tutorial for making lineart. I’m fairy bad at that.
Thank you! That’s really great to hear that! :D If you browse my gallery you’ll notice that lineart isn’t something I use often (so that’s why I digged in my old drawings a bit to get some examples u_u) Anyway, I think there are more competent and skillful people out there whom you can ask about it but this is what I do. Just study other artists’ art, it’s helpful. Try to use different brushes and see what works best. Also things I think are important: ⁎ use bigger canvas (mistakes are less visible) ⁎ don’t use smal brushes with smooth but very defined edges because the lines will seem very jerky and ragged ⁎ vary thickness of your lines to make everything more dynamic but try to make it natural (it’s a little bit like calligraphy) ⁎ practice! lines will be smooth and flowy if you make your hand confident: - draw traditionaly - excercise with drawing straight lines and curves - make quick, long strokes instead of drawing short lines (they’ll look sketchy) or doing painfully precise, slow moves - don’t zoom in too much - turn off the stabiliser (at least sometimes)) (Aaaand… you can always use vector drawing tools as a last resort :))


Hi! Idk if my qn got sent before (tumblr mobile yeesh) I wanted to say i really really love your blog and art style! I was wondering if you have tips to draw Dean's and Cas's hair??
REALLY LATE REPLY BUT UM Dean’s got a hair parting on either side but his hair kinda all comes out from a spot on the back of his head. Keep the sides short but flip up the hair in the front

And here’s Cas again! Recapping: part on one side and have the hair come out from the parting and flip up in front as well. He’s got a longer fringe than Dean’s


-
 slightly-unsure-buryatwoman liked this · 3 weeks ago
 -
 arwenkenobi48 reblogged this · 1 month ago
 -
 jessicathehedgehog123 liked this · 1 month ago
 -
 bobthecatbruh liked this · 1 month ago
 -
 ichigomiso liked this · 1 month ago
 -
 digbydigbydigbydigby reblogged this · 2 months ago
 -
digbydigbydigbydigby liked this · 2 months ago
-
 radioactiveratling liked this · 2 months ago
 -
 yourlocalzombie liked this · 2 months ago
 -
 mrmaniac0118 liked this · 2 months ago
 -
 dogth1ng liked this · 2 months ago
 -
 h-didanart liked this · 2 months ago
 -
 yeah-chilidogs reblogged this · 2 months ago
 -
yeah-chilidogs liked this · 2 months ago
-
 kobold-text liked this · 2 months ago
 -
 local-cryptid-2000 reblogged this · 2 months ago
 -
local-cryptid-2000 liked this · 2 months ago
-
 joyfulexperiment reblogged this · 2 months ago
 -
 pasta-blends liked this · 2 months ago
 -
 prince-lumilous liked this · 2 months ago
 -
 neppux liked this · 2 months ago
 -
 komodocomics liked this · 2 months ago
 -
 darkerpit liked this · 2 months ago
 -
 ferntasie liked this · 2 months ago
 -
 spade-the-space-witch liked this · 2 months ago
 -
 pruthiveeakaearthly liked this · 2 months ago
 -
 echo1905 liked this · 2 months ago
 -
 akeema88 reblogged this · 2 months ago
 -
akeema88 liked this · 2 months ago
-
 anndrag0n liked this · 2 months ago
 -
 local-robotgirlthing reblogged this · 2 months ago
 -
 filipnofishstickfailure liked this · 2 months ago
 -
 jessicakesss935 liked this · 2 months ago
 -
 starlingmation reblogged this · 2 months ago
 -
starlingmation liked this · 2 months ago
-
 how-should-i-call-myself reblogged this · 2 months ago
 -
how-should-i-call-myself liked this · 2 months ago
-
 notafannaf reblogged this · 2 months ago
 -
notafannaf liked this · 2 months ago
-
 blushft liked this · 2 months ago
 -
 the-magnificent-otaku-draws reblogged this · 2 months ago
 -
 neiros liked this · 2 months ago
 -
 electrohazard reblogged this · 2 months ago
 -
 onionowlwatchingu liked this · 2 months ago
 -
 saturnsedan reblogged this · 2 months ago
 -
 ninler reblogged this · 2 months ago
 -
 miidnight98 liked this · 2 months ago
 -
 miravomitpuppy liked this · 2 months ago
