DreamWorks Storyboarding Tips By Rob Koo.
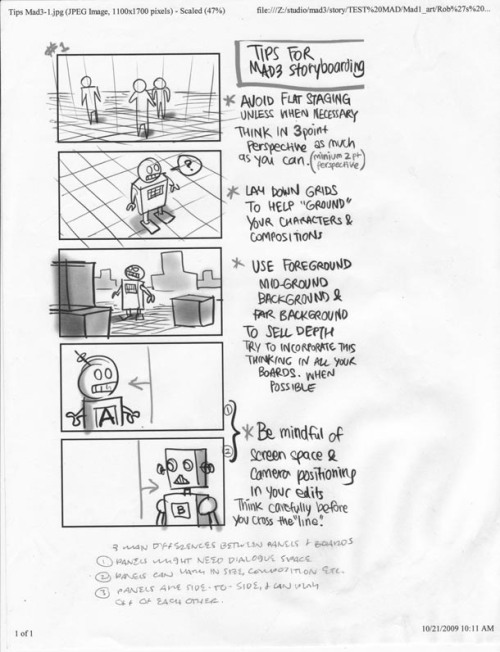
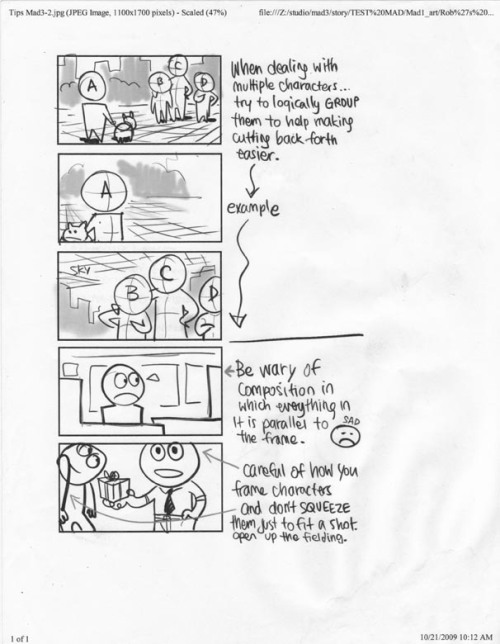

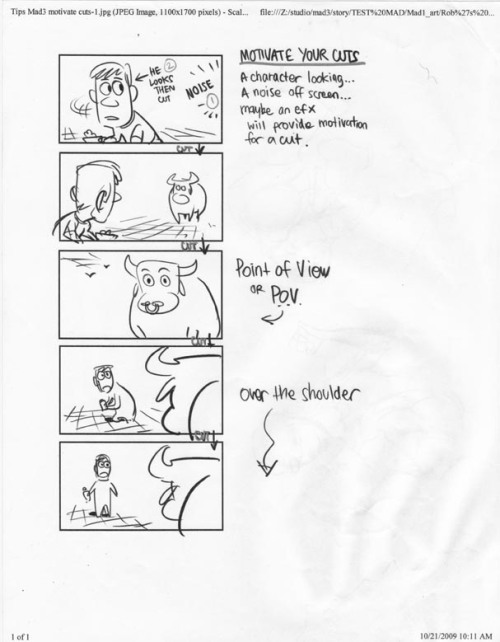
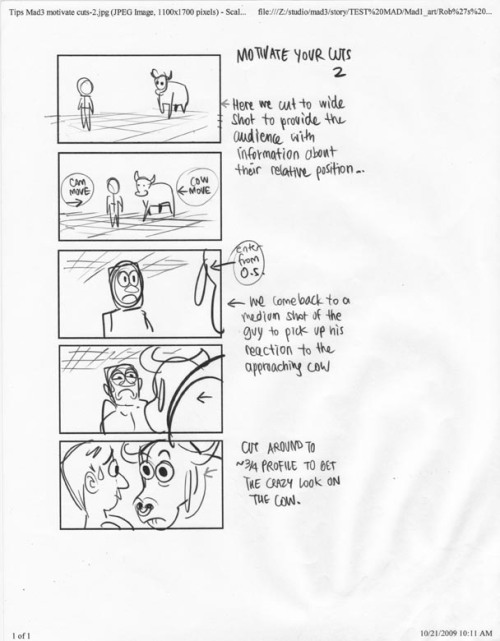
DreamWorks Storyboarding Tips by Rob Koo.
Via Ben Caldwell.
More Posts from Arttuti and Others


![WATCH: Ingenious Hack For Sketching With Two Point Perspective Using An Elastic String [video]](https://64.media.tumblr.com/0b13ff3d75c562f8d4f738c467f901c5/tumblr_oej2mru2ss1rte5gyo1_500.gif)
![WATCH: Ingenious Hack For Sketching With Two Point Perspective Using An Elastic String [video]](https://64.media.tumblr.com/472a041782e1e2136987ad48fbacd0f0/tumblr_oej2mru2ss1rte5gyo2_r1_500.gif)
WATCH: Ingenious Hack for Sketching with Two Point Perspective Using an Elastic String [video]


quick proportion tips
- eyeballs are an eyeball width apart - ears align with the top of your brows to the bottom of your nose, and are the center-point of a profile view - lip corners line up to the center of each eye - hands are roughly the size of your face - feet are the same size as your forearm - elbows are aligned with your belly-button - your hands reach down mid-length of your thighs - both upper and lower legs (individually) are roughly the same size as your torso (this is all rough estimates for proportion! feel free to add more to help others)


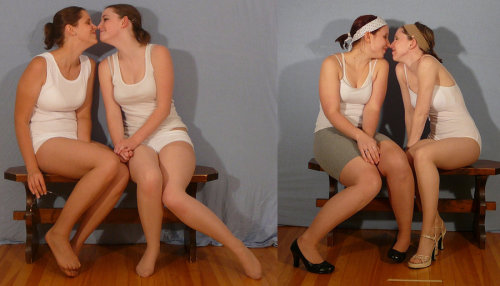
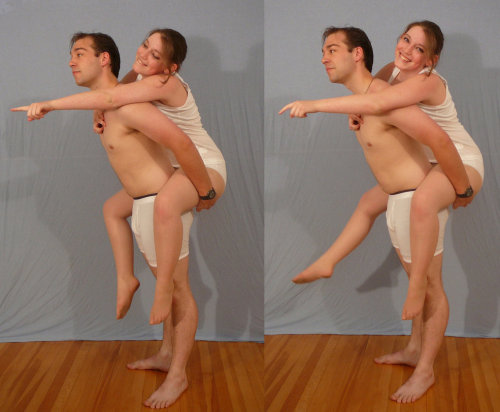
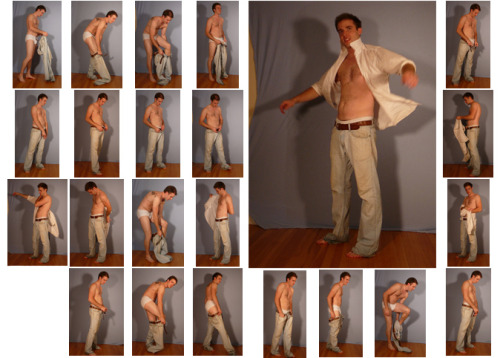
SenshiStock’s gallery consists of millions of pictures that are free to use as reference.
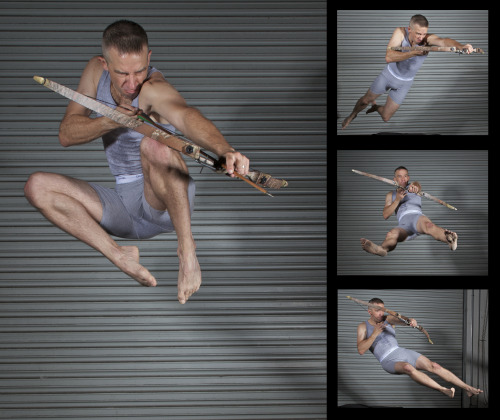
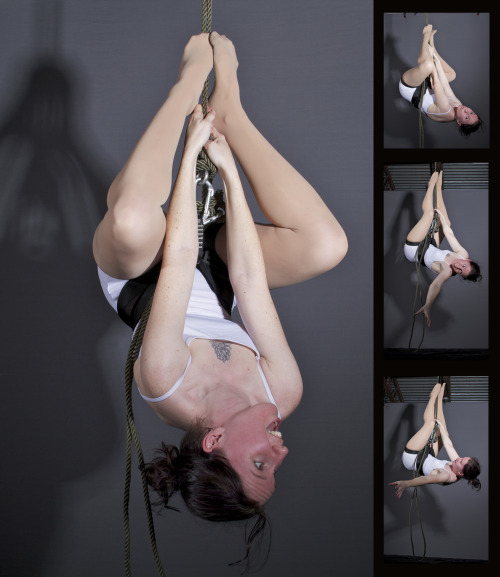
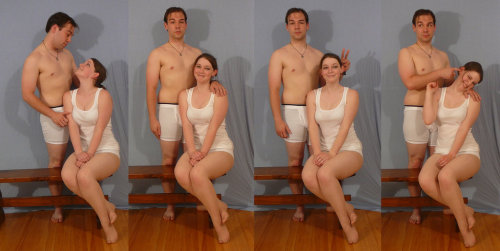
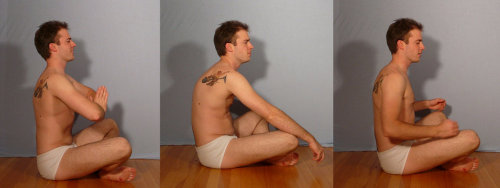
General Drawing Poses Sit and Kneel Dramatic and Reaching Drawing Poses Magic and Hogwarts Drawing Poses Staff Weapon Pose Reference Hammer, Axe and Bat Pose Reference Sword Weapon Drawing Reference Small Bladed Weapon Pose Reference Gun Weapon Pose Reference Bow and Arrow Archery Stock Foreshortening and Perspective Poses Dynamic Flying Falling Action Poses Deafeated or Laying Drawing Poses Magic Crystal Magical Girl Wand Weapon Transformations and Dance Cards Back Pose Reference Pin Up Inspired Poses for Drawing Performances Poses Life in General Poses Fights and Fighting Pose Reference Leaning Poses Classic Sailor Senshi Poses Wings Sailor Moon Villains Pairs Romance or Couples Pose Reference All the Male Stock Hanging Stock Drawing Reference Three or More Groups Instruments Mirrors Whip Technobabble
Hoi!! I saw a little bit of the process on your Instagram, but could you explain how you go about making a pattern? I absolutely love how that neato cactus/desert one you did turned out!
Alrighty!
So to make a repeating pattern:

1. Open a canvas and draw in the center WITHOUT touching any of the edges.

2. [Below: Light cyan lines] Divide your canvas into four equal parts.
Make four guides framing the canvas, and two across the middle.
For the ones in the middle, View > New Guide > Horizontal or Vertical for needed orientation > type in 50% to get the exact middle of your canvas. These are photoshop shortcuts, may be different on your programs.

3. [Above: Yellow arrows] Make sureyou have ‘Snap’ checked under View > Snap, then select each quarter of your piece > layer via cut > move diagonally to the other side.
After you’re done moving things diagonally, you can either turn off Snap so your doodling won’t stick to the center lines, or toggle the guide visibility off (Ctrl+;). Merge the layers back together.

4. Draw in the middle without touching the borders, color the entire thing if you plan on doing that.

5. Setting your image as a pattern After your image is done, merge all layers into one > select the entire canvas (Ctrl+A) > Edit > Define Pattern
Open a new canvas bigger than the one you made the pattern on, and paint bucket it in! (Instead of the Foreground button at the top when paint bucket is active, select Pattern then your pattern)
If you aren’t using a program that lets you define patterns, merge everything into one layer and duplicate & tile them manually.

Cheers!


-
 grievingangelhopefuldemon reblogged this · 4 months ago
 -
 incrediblenickname liked this · 5 months ago
 -
 handercover liked this · 5 months ago
 -
 izumi-yami liked this · 5 months ago
 -
 twadi-gurl reblogged this · 5 months ago
 -
 ricosuave-seduction liked this · 5 months ago
 -
grievingangelhopefuldemon reblogged this · 5 months ago
-
 mai-fanblog liked this · 5 months ago
 -
 the-void-is-sapphic liked this · 5 months ago
 -
 luidilovins reblogged this · 5 months ago
 -
luidilovins reblogged this · 5 months ago
-
luidilovins liked this · 5 months ago
-
 crunchyspositivybubble liked this · 5 months ago
 -
 superbb liked this · 5 months ago
 -
 chibisketches liked this · 5 months ago
 -
 leviathan-dark liked this · 5 months ago
 -
 aegialeus reblogged this · 5 months ago
 -
 turtleloser liked this · 5 months ago
 -
 askoobleck-bendy liked this · 5 months ago
 -
 art-stuff-to-save reblogged this · 5 months ago
 -
 frozenoverblackballoon liked this · 5 months ago
 -
 krowspiracyanon reblogged this · 5 months ago
 -
 mohcoctcyy liked this · 5 months ago
 -
 icnaw liked this · 5 months ago
 -
 crebazalr liked this · 5 months ago
 -
 alexdrawings liked this · 5 months ago
 -
 fruitloopsfactory liked this · 5 months ago
 -
aegialeus liked this · 5 months ago
-
 mothzarellaman liked this · 5 months ago
 -
 resource-arena reblogged this · 5 months ago
 -
 shannonsketches liked this · 5 months ago
 -
 doodlepede liked this · 5 months ago
 -
 arttipcollage reblogged this · 5 months ago
 -
 tweltchy liked this · 5 months ago
 -
 justpickupthatpen reblogged this · 5 months ago
 -
 distractedandhungry liked this · 5 months ago
 -
 three--buckets reblogged this · 5 months ago
 -
 classifiedprojectciel liked this · 9 months ago
 -
 un-local liked this · 11 months ago
 -
 adventuresadrenaline reblogged this · 1 year ago
 -
 artking-4 reblogged this · 1 year ago
 -
twadi-gurl reblogged this · 1 year ago
-
 y-lisse reblogged this · 1 year ago
 -
 theonewiththegays liked this · 1 year ago
 -
 astriferous reblogged this · 1 year ago
 -
 chiaraislily liked this · 1 year ago
 -
 breathe-2am liked this · 1 year ago
