Homemade Camera Rig Takes Stunning Close-up Pictures Of Snowflakes
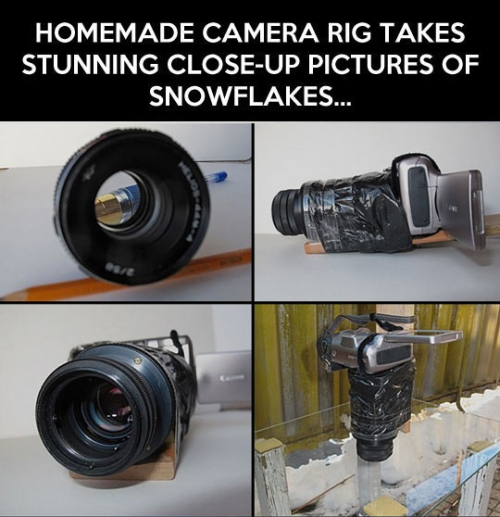
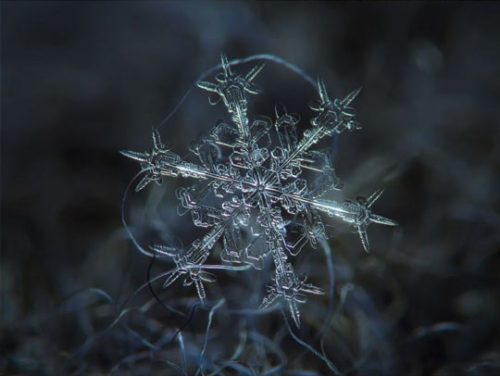
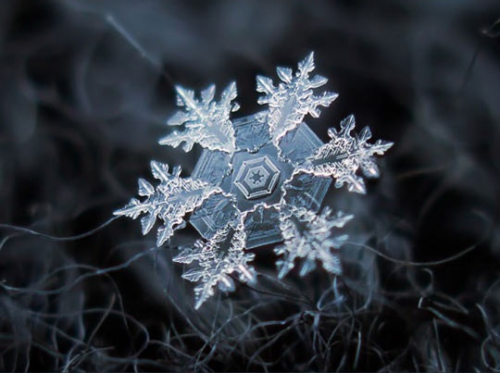

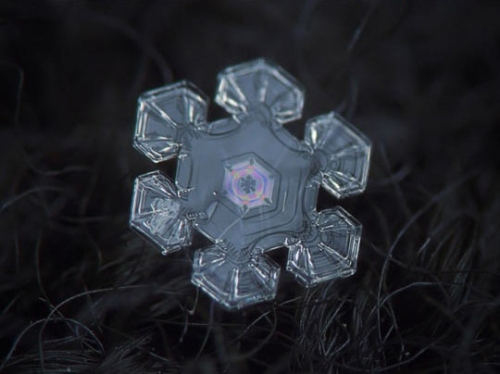

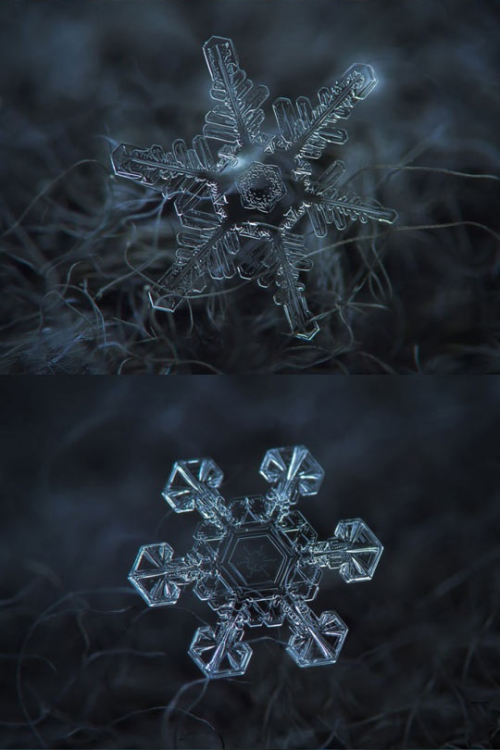


Homemade camera rig takes stunning close-up pictures of snowflakes
More Posts from Zelo-ref and Others

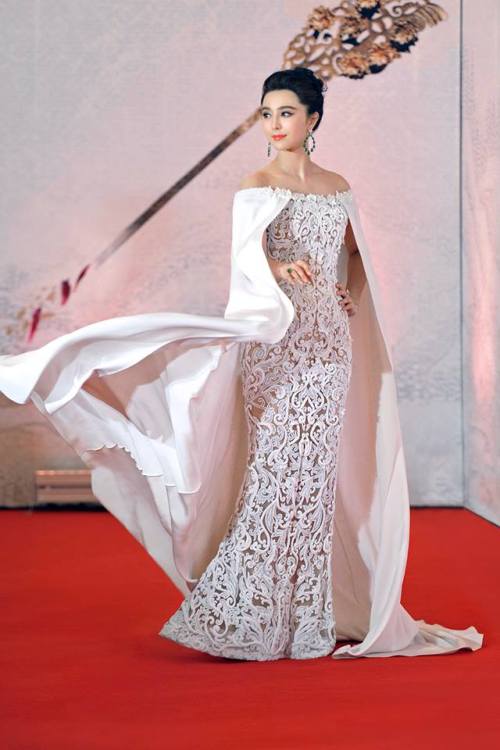
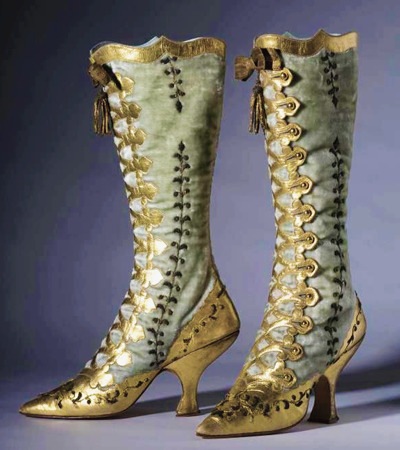
Day dress, 1860′s
From the Museo de la Moda via the Museo del Romanticismo on Twitter
HOW NOT TO DRAW ARCHERY: AN ART TUTORIAL.
DISCLAIMER: I was going to make this “how to draw archery”, but that would probably have taken the rest of my life. This is all stuff I’ve learned from practicing archery in the past, and the tips I’ve given should translate to many, if not all styles of archery. If you take issue with any of the information given here please contact me, as I’m aware I’m not an expert!
Okay, I’ve seen too many bad drawings of archery online. Most of the time I can overlook it, but I’ve made this guide to address drawings where a) the character would hurt/maim themselves if they shot like that, or b) if you tried to shoot like that, the arrow would just make a sad trajectory to the ground, the aerodynamic equivalent of a “WAH-WAH” on a trumpet.
With this in mind:
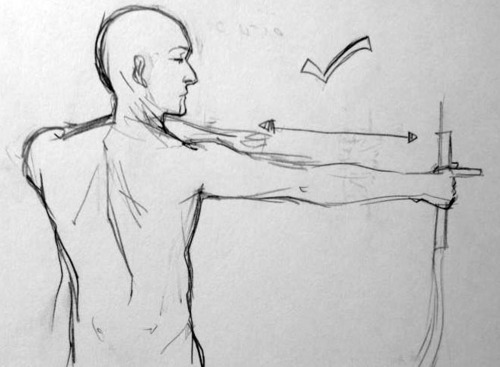
POINT ONE: WHY IS YOUR ARM LIKE THAT
If successful archery is about one thing, it is about consistency - being able to make your body take exactly the same stance over and over and over again. Your body is a key part of the weapon, and just as you wouldn’t want a gun that had components that wobbled and shifted, you don’t want your body to.
With this in mind, characters shooting, particularly at full draw (this is when the arm pulling the string is stretched all the way back), should have the arm that is holding the bow straight. Not locked - I’ll get into that - but straight. A straight arm is easy to replicate - a bent arm could be at a different angle each time. Simple as that.
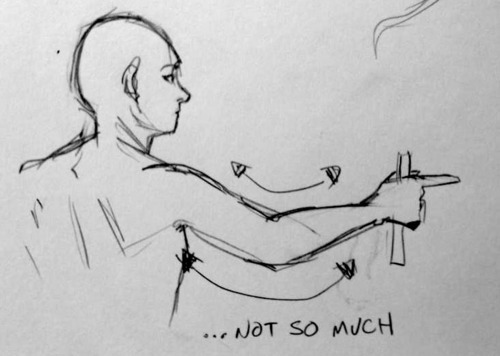
POINT TWO: DON’T SHOOT YOUR TIT OFF
See this diagram
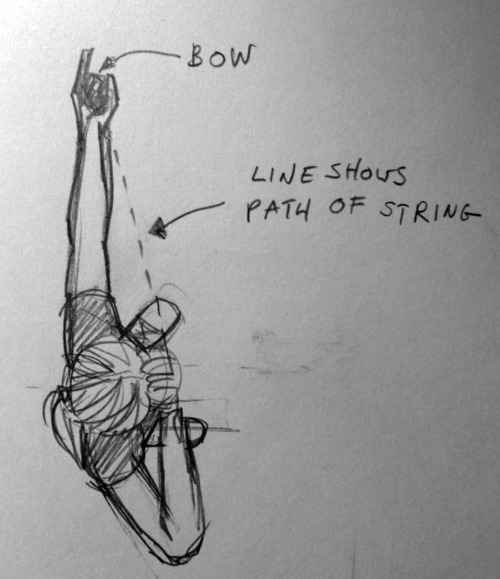
the dotted line is the path the string will take. The string is extremely tight - it has to be for the bow to work. It will therefore move extremely fast. Do you want any part of your body to be in the way of that.
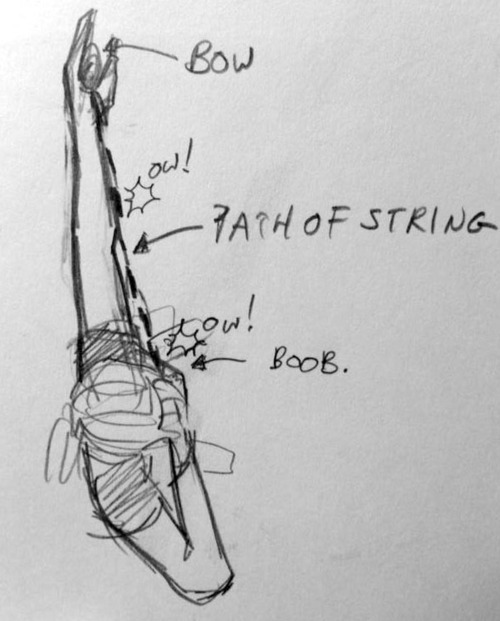
if you have any part of your body (elbows and breasts/pectoral muscles tend to be the worst offenders) in the line of the string, they will get hit. And this will hurt. A LOT. Google “archery bruise” to see how. Yikes. Furthermore, if your arm or chest gets in the way, it’ll knock the arrow off course, and in addition to having sliced your nipple off you’ll have missed your shot too. So KEEP STUFF OUT OF THE PATH OF THE STRING.
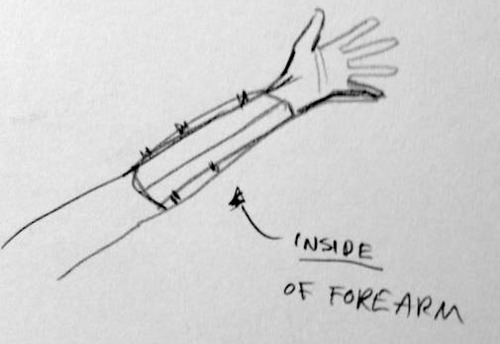
side note: this is where the myth of amazons chopping their boobs off came from. Also, why archers sometimes wear chest-guards - this looks like a one-cupped unisex bra. Stylish. Also why archers often wear protective gear called a bracer. This goes on the tender inside of the arm and wrist that might get clipped by the string, not the outside that is nowhere near it.
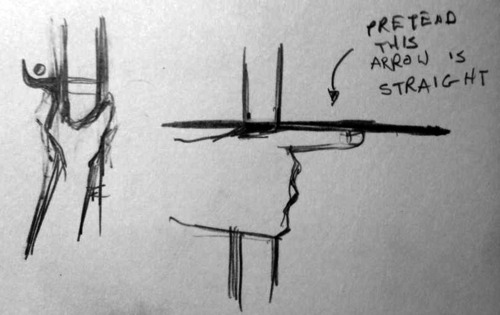
POINT THREE: WHAT ARE YOU DOING WITH YOUR FINGERS STOP THAT
Okay I keep seeing this

Having the fingers clasping the arrow like this makes it highly likely that the pressure from them will send the arrow off-course.
Many modern bows have an arrow rest so you needn’t rest the arrow on your hand at all. If that isn’t the case, it works better to rest the arrow on the first knuckle of the index finger (where it meets the hand). If it’s just being used as a platform, the finger shouldn’t be able to exert enough pressure to make the shot go all over the place. Also you won’t end up shredding your fingers with the fletchings.
Talking of that…
POINT FOUR: DON’T SLICE YOUR FINGERS OFF
remember what I said earlier about how incredibly taut bowstrings are
imagine pulling that back with your soft fleshy fingers
it is basically like cheesewire through…soft fleshy fingers.
Use protection. Illustrated below are the tab and archery glove, or just go to google or something, stop the madness.

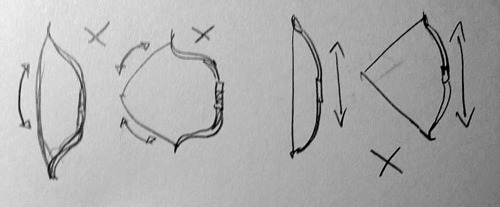
POINT FIVE: PHYSICS DOESN’T WORK LIKE THAT
A strung bow is taut. The body of the bow is pulled by the (very tight) string, making a D shape. An unstrung bow will be straighter.
The tension in the string means a string should always be a straight line. If the bow is drawn, it’s two straight lines.

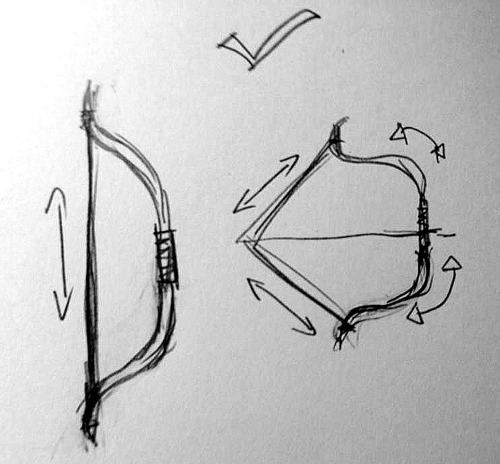
If there is any curve in the string, the arrow will probably fall limply to the floor.
ALSO. When the string is drawn back, it exerts more pressure on the bow, creating that really exaggerated curve. This is where the power comes from. (I think. I am not physics). Basically, if you’re drawing a character at full draw, the string should be straight and the bow should be curved. If the opposite is true something very wrong has happened and you should be sad.
OKAY! I hope this has been helpful, if you have any questions or concerns let me know. And if in doubt, doctor google will help you - look at olympic or professional archers, and see how they’re standing and how their bows behave.
GOOD LUCK DRAWING!


DIY 2 Body Chains - one with hex nuts and the other with coins.
Body Armor Jewelry is still trending, but I haven’t seen many DIYs for body chains, harnesses,or headpieces on DIY blogs. The jewelry itself is really cheap to make, especially if you find the right chain and can buy it by the foot.
For pages of DIY Chain Handpieces or Panjas go here.
Bottom Photos: DIY Body Chain Tutorial from Letters and Beads here. She used a belly dancing hip decoration for the chains and decoration.
Top Photo: Find the tutorial for this DIY Hex Nut Body Chain from A Little Fashion here. You can also check out the video below.
Find my 12 Body Armor DIYs Roundup on Tumblr here.

Really usefull
I'm kinda ashamed to ask this, but could you make a tutorial on how to draw hands? ;A;
omg dont be ashamed at all!! Hands are generally tough to get used to, lots of artists struggle with it! so dont be ashamed i feel you.
and I actually have made a hand anatomy guide before in fact! If you want to get better at drawing hands I def recommend you learn the basic anatomy first. Please check out the ones I made, I try to make it simple and easy to understand:
Artistic Anatomy: Hands Part 1
Artistic Anatomy: Hands Part 2
There’s my guide to the anatomy, but here’s some more tips that I’ve noted to myself that I’d like to include
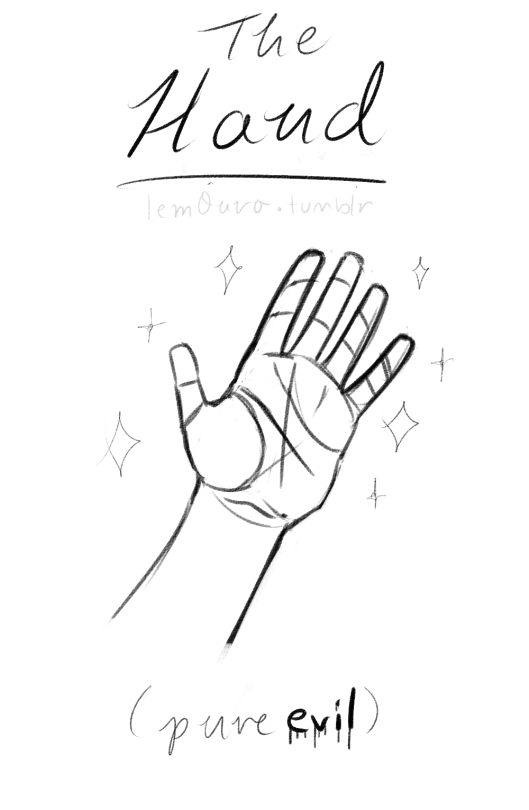
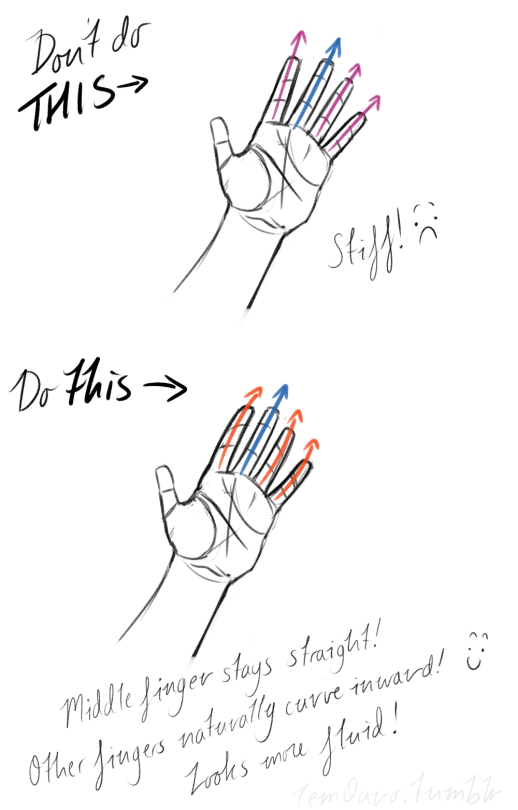
First off, I’d like to just note on the fingers: if you pay close attention to your own hand, you may notice the fingers are ever ever so slightly curved inward. It’s a very subtle detail, but I noticed that, despite how slight it is, it can make a hand look more lively, and less stiff.
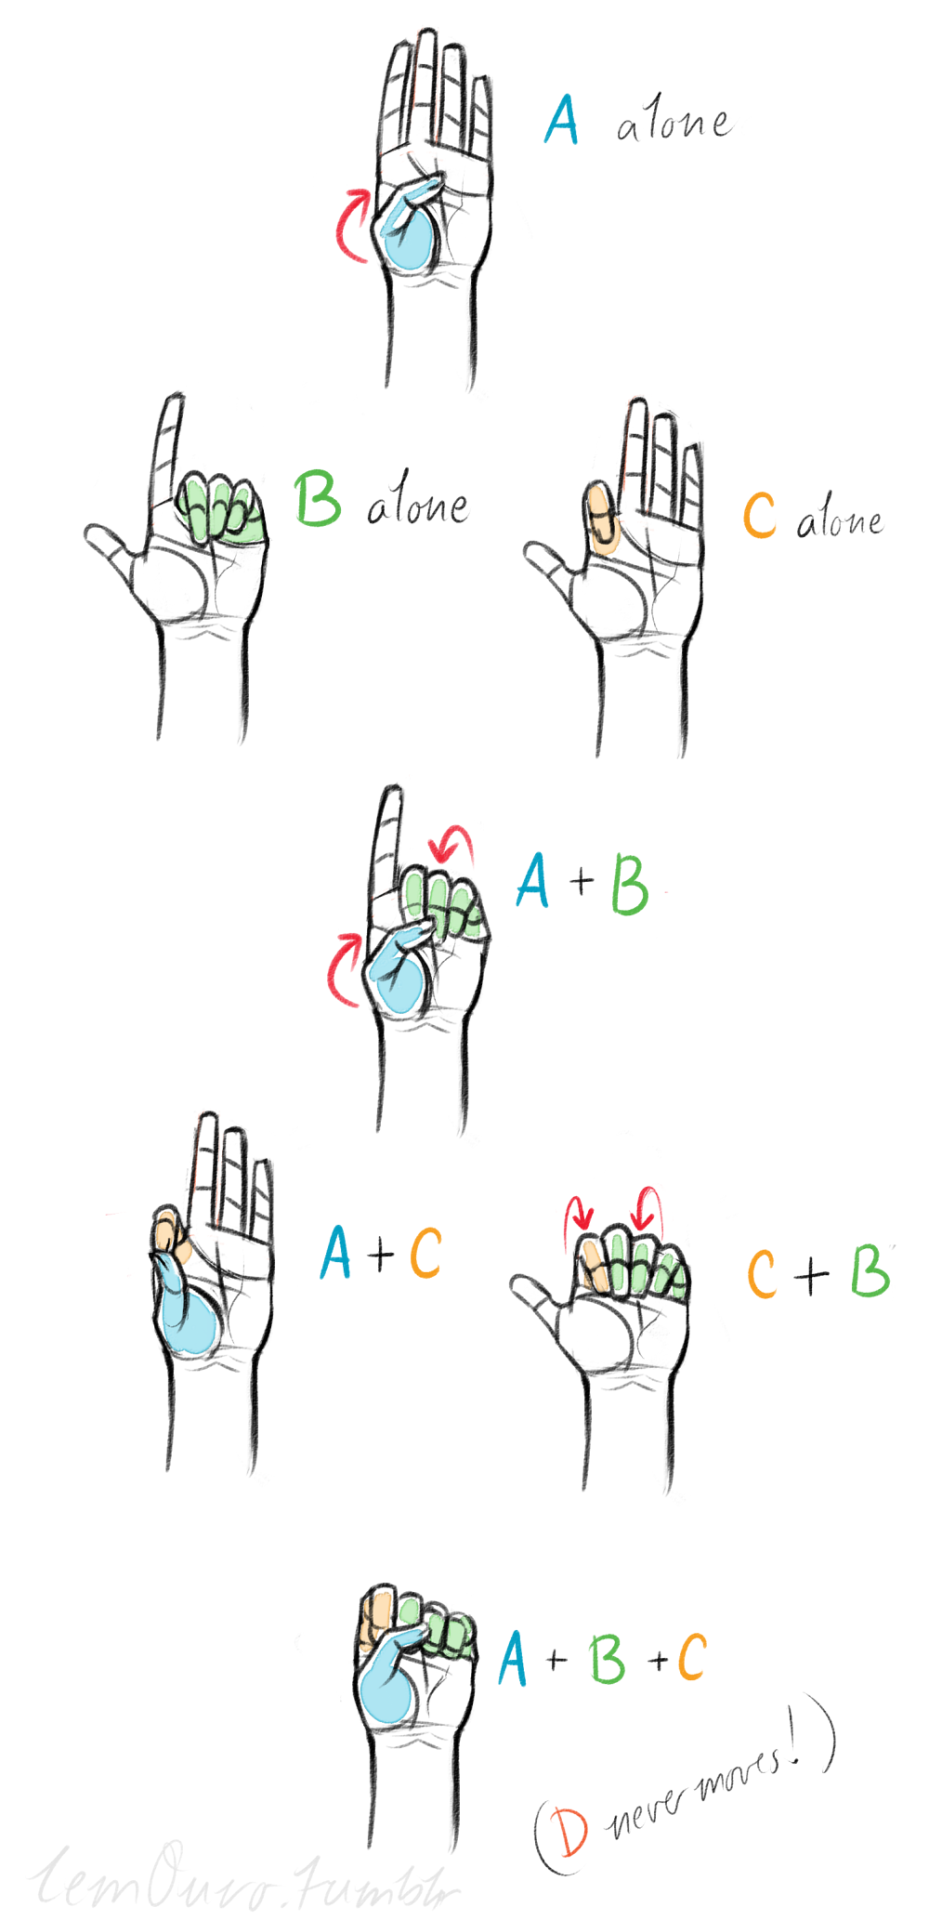
Second, the “M” on the palm! Your hand moves in many ways, and because it does it creates creases in your hand. The most prominent creases appear to make an M shape; this is handy to remember for what I’m going to talk about next. (It also could be a “W” I guess, or to be more specific a “ )X( “; just think of it in whatever way helps you remember!)

SO now that you see the M, draw your hand as a basic blocked shape and add your details. As you do, you can see that the M divides the palm into four basic parts!


When the hand moves, parts A, B, or C of the palm, alone or in different combos, will create the general poses that the hands do normally. These parts are the parts that move, with D being stationary, no matter what!
Here’s a chart of all the possible combos. Once you have down what part of the hand moves for a certain pose, you can change up the fingers and tweak it a bit to do what you need to make it more specific!
This is simply my method of drawing hands. God knows there are hundreds of tutorials out there by other artists, but personally, this way helps me the best (after learning the anatomy first).
This way I can divide the hand and combine the parts in any such way I need!
Hands take a lot of effort to grapple, and you need to practice them a lot, especially foreshortening of the hand; that’s really something you need to learn through your own studies. Look at your own hands, draw hands from life, from magazines, shows, comics; just draw hands! You’ll eventually figure out a method that works best for you. So to get better at drawing hands; draw hands!! And don’t stress over it, have fun with it!


DIY Shell Wrap Bracelet
Make this easy boho beachy wrap bracelet using just a few supplies.
Learn how to create summer charms for this bracelet, using copper headpins, shells, and wooden beads.
Find this DIY Shell Wrap Bracelet Tutorial from Happy Hour Projects here.
More Beachy Shell Summer DIYs
TIP: Shells can be bought at the Dollar Store and Craft Stores.
DIY Gold Ordon Inspired Shell Ankle Cuffs from Honestly WTF here.

DIY Shell Bracelet with Sliding Knot Closure from Happy Hour Projects here.

DIY Shell Candles from Burkatron here.

DIY Seashell Jewelry Tutorial from Polka Dot Chair for Everything Etsy here.

DIY Knockoff Fortalezza Shell Ring from you want me to buy that? here. Spend $225 for the “real deal”, o a few minutes and dollars to make your own.

DIY Kelly Wearstler Knockof Metallic Sea Shell Earrings from Honestly WTF here.

DIY Inspiration Shell Collage from A Mermaid’s Tale here. Match items from nature, like shells and rocks, with quotes or words that have meaning to you or loved ones.


-
 punk-pebbles liked this · 2 months ago
 -
 a10wea liked this · 2 months ago
 -
 ichigosasaki liked this · 2 months ago
 -
 masterofnone72 liked this · 2 months ago
 -
 wallsarecrumbling reblogged this · 3 months ago
 -
 kudsir liked this · 3 months ago
 -
 hill-art02 liked this · 4 months ago
 -
 aaaaaaaaaaa13478 liked this · 4 months ago
 -
 terrablighter liked this · 4 months ago
 -
 blood-orange517 liked this · 4 months ago
 -
 caden001 liked this · 4 months ago
 -
 quietcairn liked this · 4 months ago
 -
 yodawashere reblogged this · 5 months ago
 -
 lunar--ghost liked this · 5 months ago
 -
 rosesbblog liked this · 5 months ago
 -
 iisgremlin reblogged this · 5 months ago
 -
iisgremlin liked this · 5 months ago
-
 nuttyinternetsheep liked this · 5 months ago
 -
 merlin513 liked this · 5 months ago
 -
 meret118 reblogged this · 5 months ago
 -
 sparkley-bones liked this · 5 months ago
 -
 gen-x-catmom reblogged this · 5 months ago
 -
 causing-chaosss liked this · 6 months ago
 -
 sobearwolf liked this · 6 months ago
 -
 marionette1212 reblogged this · 6 months ago
 -
gen-x-catmom liked this · 6 months ago
-
 lightbeamtraveler liked this · 6 months ago
 -
 literallyanythingabouteverything reblogged this · 6 months ago
 -
literallyanythingabouteverything liked this · 6 months ago
-
 joia-pra-alegria liked this · 6 months ago
 -
 winterbirch liked this · 6 months ago
 -
 annita89yzbmwdeh liked this · 7 months ago
 -
 annaoayin liked this · 7 months ago
 -
 annita89w07baqh liked this · 7 months ago
 -
 anna35foc liked this · 7 months ago
 -
 clayerotica liked this · 7 months ago
 -
 cosandarts reblogged this · 7 months ago
 -
 louis-der-ter liked this · 7 months ago
 -
 medjed liked this · 7 months ago
 -
 aesthetically-ts reblogged this · 7 months ago
 -
 littlevnavy liked this · 7 months ago
 -
littlevnavy reblogged this · 7 months ago
-
 annab7mck liked this · 7 months ago
 -
 zanyruinspaper reblogged this · 7 months ago
 -
 annita89v9ul06h liked this · 7 months ago
 -
 annita896bm596p1h liked this · 8 months ago
 -
 kittycats10 liked this · 8 months ago
 -
 starfallings reblogged this · 8 months ago