DIY American Duchess Cape FREE PATTERN

DIY American Duchess Cape FREE PATTERN
This easy to make Cape is based an original 1910s cape appearing (photo on top of post).
There are so many YouTube videos on the making of this 1910 American Duchess cape here: www.youtube.com/results?search_query=american+duchess+cape
For a plus size cape:
… this pattern comes in just one size - Noelle from Costuming Drama made a great video with lots of details where she made the cape with some pattern alterations for a plus-sized frame: youtu.be/h6xcI5mC9Wk
Find the free pattern for this beautiful 1910 Cape from American Duchess here.
Check out the cape made by @pennyheartbleed on Instagram here.
View this post on Instagram
A post shared by PennyHeartbleed (@pennyheartbleed)
Or this cape from @seeminglyimmaterial here.
View this post on Instagram
A post shared by Olivia | Seemingly Immaterial (@seeminglyimmaterial)
@rhysandmarie sewed this cape here.
View this post on Instagram
A post shared by Lia Marie Delmater (@rhysandmarie)
@lindsey.sews sewed up this version here.
View this post on Instagram
A post shared by @lindsey.sews
@Siricheshire made this gorgeous cape here.
View this post on Instagram
A post shared by Siri Cheshire 🍒 (@siricheshire)
More Posts from Lokisbur and Others
Because of the bots taking all fics to feed it to AI you want to lock your work for registered users only but have too much fics to do that one by one?
FEAR NOT. You can edit in bulk!!
Here's a tuto
Firsr, go to your works and tap on "edit works".

Tap on "all". This will select every single fic you posted.
Then, tap on "edit".

You'll get to this page, so scroll aaaall the way down.

And boom. You get to all the possible changes. Now scroll to "Visibility". Now tap on "Only show to registered users" and finally, tap on "Update all works".


They'll ask you if you're sure, so say ok.

And boom! Your edits were put through !

And now your works are only available to registered users.

.
Reminder that if you have an AO3 account, you can give away invitations to others so they don't have to go through the wait of the normal registration.
writer’s block (dry) = no desire to write, no ability to write (bearable)
writer’s block (wet) = HUGE desire to write, no ability to write (very evil)
Chapter: 1/1
Series: Part 2 of In Purgatory's Shadow and By Inferno's Light
Words: 1281
Language: English
Fandom: Star Trek, Star Trek: Deep Space Nine
Rating: Not Rated
Warnings: Creator Chose Not To Use Archive Warnings
Relationship: Garashir
Characters: Julian Bashir, Elim Garak
Additional Tags: Dissociation, Crying, Hugs, Claustrophobia, Episode: s05e15 By Inferno's Light


i've been asked what brushes i use so here they are (ibispaintx only)
bonus details:


no google docs you don't understand this is a sexy, necessary grammar mistake
Visible Mending
Introduction:
Visible mending is a decorative way to fix up an item. Instead of trying to make your mend as invisible as possible, the idea is to make it part of the garment's design.
Visual mending is not a single technique: it's more of a mindset. If you've got an item you love, it deserves to be mended, and if you're going to put that love into stitches, why not show them off?
That being said, there are some specific techniques that are popular with visible menders. Let's take a look!
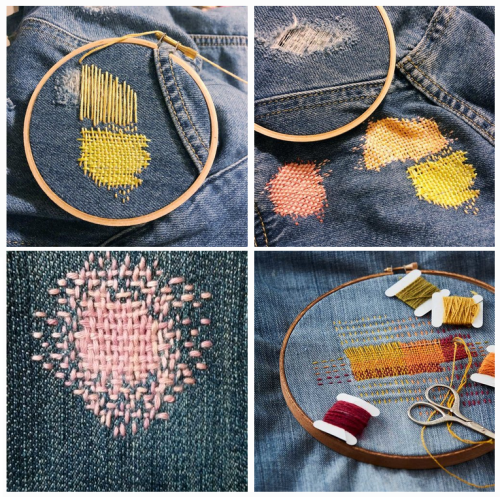
Sashiko:
Sashiko is a type of traditional Japanese embroidery that is used to both decorate and reinforce fabric. In visible mending, sashiko is often used to cover up holes with patches or to reinforce thinning fabric. This technique uses a variation on the running stitch.
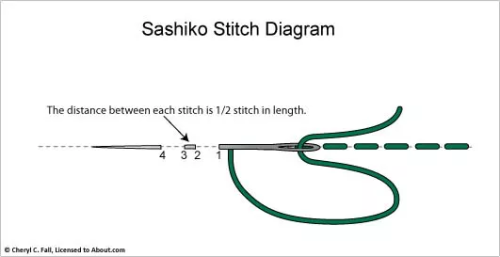
(Image source)
Some resources on sashiko:
SashiCo on YouTube: sashiko livestreams and information on the cultural aspect of sashiko.
Written tutorial by Upcycle Stitches.
Free sashiko templates by TheSpruceCrafts.
Fixing jeans with sashiko by Soluna Collective.
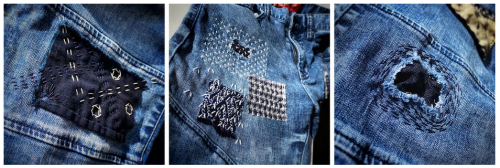
(Image source)
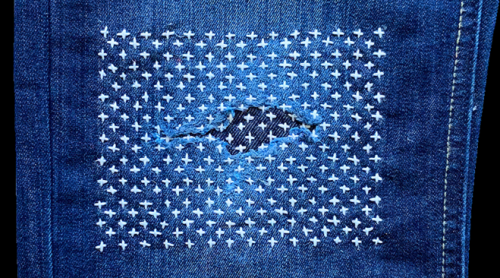
(Image source)
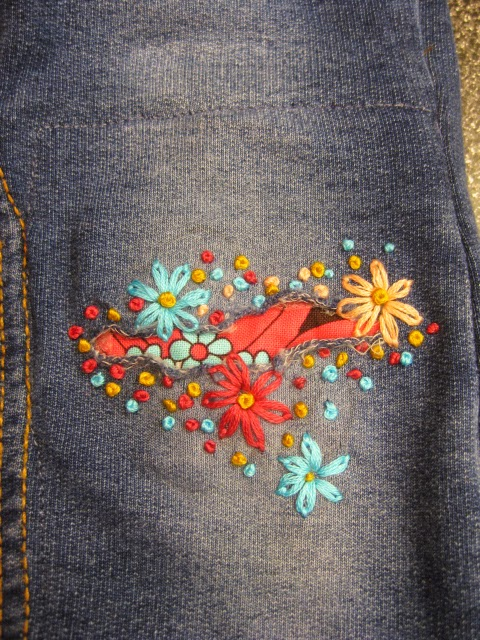
Embroidery:
Regular embroidery is also a popular technique to accentuate your mends. Check out my embroidery 101 post to learn how to get started. You can embroider patches, or use embroidery to hide or accentuate any stitches you've made to fix holes. Embroidery's also a great way to cover up stains.
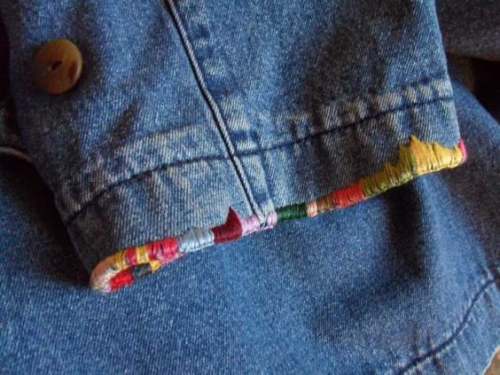
(Image source)
(Image source)
Patches:
There are many ways to add patches to a garment. My tutorial on patches is a good place to start if you want to make custom-shaped patches to sew on top of your fabric. You can also sew your patch on the inside of your garment and have it peek out from beneath the hole you're trying to fix. Fun ideas for this are lace or superheroes.
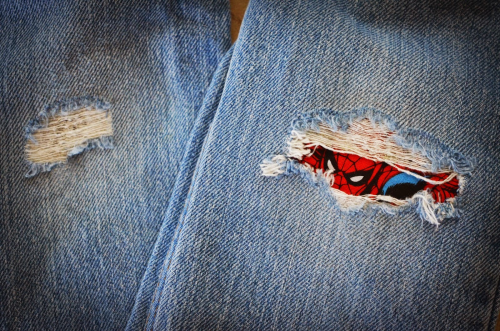
(Image source)

(Source)
Darning:
Darning is a technique used to repair holes in fabric by using running stitches to weave extra fabric over the hole as to fill it up again. While traditionally darning is done in an invisible way by using the same colour of thread as your fabric, you can also use contrasting colours to accentuate your fix. Check out this written tutorial on darning by TheSpruceCrafts.
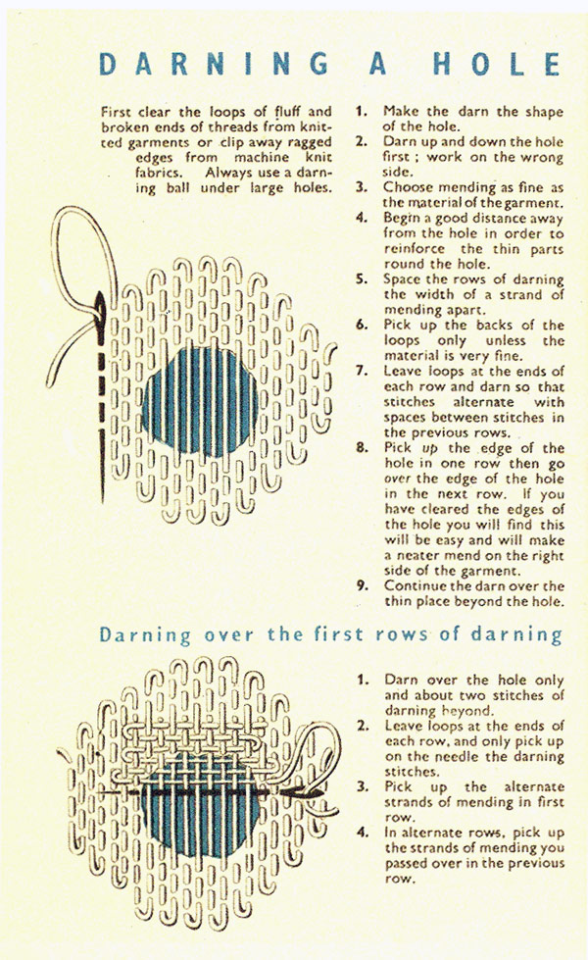
(Image source)
(Image source)
Conclusion:
Visible mending is a creative way to fix up your clothes and give them some personality at the same time.
You should be proud of the fact that you took the time and learned the necessary skills needed to mend your clothes! Show off what you did!
A fun side effect of wearing these obvious mends is that people will notice them. They'll remember your fixes the next time they're faced with a hole in their wardrobe, and it will make them more likely to try it for themselves.
These are just a few ways to visibly mend your garments. Want more inspiration? Check out Pinterest or r/Visiblemending on Reddit.
Editing Checklist
Editing Software:
StyleWriter 4 is fantastic. It’s an add-on for Microsoft word and has a 14-day trial period. It goes through your text, picks out “glue words”, misspellings, long sentences, homonyms, passive tense, shows your reading grade level, and more.
Editminion *FREE* checks for adverbs, weak words, passive voice, cliches, and homonyms among other things.
Pro Writing Aid is another online editor. It is mostly free, but offers more features if you pay.
AutoCrit offers free analysis for under 500 words, otherwise you have to pay for more text and more editing features.
Paper Rater offers a free service for editing, but it is designed for essays.
Formatting Checklist: This follows the general guide of formatting a manuscript in Microsoft word. However, some literary agents and editors have their own requirements.
Under the paragraph option, change the special indentation to first line at .5”. Change to document to double spaced.
There should be no spaces between paragraphs.
When showing a scene break, center # on a blank line.
Font should be easy to read. Courier New and Times New Roman are preferred at size 12.
All margins should be 1”.
Start chapters on a new page and put the chapter title 1/3 down the page. Write the chapter like so: CHAPTER ONE - CHAPTER TITLE. Press return 4 - 6 times before starting the text of the chapter.
For the header, put YOUR NAME/BOOK TITLE/PAGE NUMBER in the upper right-hand corner. Start this header on the first page of the first chapter.
The cover page of your manuscript should have your name, word count, and contact information in the upper left-hand corner.
The title on the cover page should be in all caps. Your name should be underneath in all caps. If you use a pen name, write YOUR REAL NAME (WRITING AS PEN NAME).
At the end of the manuscript, start a new page and write END.
Self-Editing Checklist:
Spelling:
If you are using Microsoft word for your word processor, use the spell check. After that, go through the manuscript line by line to make sure everything is spelled right. You may have used “form” instead of “from” and skipped it because Microsoft word did not see it as misspelled.
Printing out your work or viewing it in another way (such as a pdf on an ereader) helps find these mistakes.
Beta readers can find what you missed as well.
Use editing software to check homonyms or look up a list of homonyms and find them in your document using ctrl + f. Check these words to make sure you used the right spelling.
Grammar and Style:
First use Microsoft word’s grammar checker, but be aware that it is not always right. Check grammar girl if you are unsure.
For dialogue, you can always pick up a professionally published book and look at how the dialogue tags are used, where commas are placed, and when other punctuation is used.
If you’re in school and your English teacher isn’t too busy, have them take a look at it.
Look out for prepositions. Most of the time, you can omit these words and the sentence will still make sense. Beginner writers use a lot of these in their writing and it slows the flow.
Check for adverbs. You’d be surprised at how many you use in your writing, sometimes up to five a page. Using a few in narration is okay, but only a few. Delete adverbs you find, especially those that end in “-ly”, and rewrite the sentences in necessary.
Delete gerunds and forms of “to be” if writing in past tense. Instead of “were running”, write “ran”.
Check subject-verb agreement.
Use correct dialogue tags. People don’t bark their words. They shout.
Two digit numbers should be written as words (twenty-seven) while numbers with more than two digits should be written with numbers (123).
Avoid passive verbs.
Vary sentence length.
Show with the five senses rather than telling.
Most of the time, you can delete the word “that”.
Avoid using “unique” or “significant” words too often.
Consistency:
Make sure all your font is the same size and type.
Make sure you have no plot holes. Use the comment feature in Microsoft Word to track these plots.
Make sure your time line is consistent.
The tone should fit the scene.
There should be one POV per scene. Unless you’re a brilliant writer and can pull off third person omniscient.
Verb tense should be consistent.
Keep track of the details you release of people, places, and things. The reader will remember if in one chapter you say your protagonist has blue eyes and in another you say green.
Pacing:
The whole book should flow in and out of fast paced scenes to keep your reader interested and slow scenes to give them a break.
The middle should not “sag”.
Sentences should flow smoothly.
Plot:
Keep track of all your plots and sub-plots. Readers will remember them.
There should be a beginning, middle, and end.
Is the initial problem at the beginning of the manuscript?
There should be at least one antagonist. This does no have to be a person.
Is there enough conflict?
There should be a resolution.
All scenes should have something to do with plot.
The climax should be the most exciting part.
Character:
The protagonist should change by the end of the book.
Make sure all characters who come in contact with one another have some kind of relationship, whether good or bad.
Characters must have motivation for everything.
The protagonist must want something right from the start of the conflict.
The protagonist needs to be captivating. The readers wants to root for the protagonist. This does not mean the protagonist needs to be likable all the time.
The readers likes to relate to characters. Make sure your characters are diverse enough that readers can identify with one.
Know who your protagonist is. The main character is not always the same. For example, Nick in The Great Gatsby is the main character, but Jay Gatsby is the protagonist. This is important to know while writing your query letter.
If you can delete a minor character from a scene and nothing changes, then delete that character.
Sometimes you can make two minor characters one without losing any essential parts of the story. If you can, do this.
All characters react and act.
Each character has his or her own life.
Dialogue:
Dialogue should be believable. Read it out loud.
Don’t go overboard with phonetic spelling if a character has an accent.
Dialogue should be informal and natural. It does not have to be grammatically correct.
Prose:
Avoid purple prose. I’ve never met anyone with “emerald eyes” or “hair of fire” (except for the Flame Princess).
Don’t use too many adjectives.
Avoid cliches.
Other:
Don’t info dump. Pace information through dialogue and narration.
The first sentence should spark interest, or at least the first three. If it does, the first paragraph should be the same. And the first 250 words. The goal is to get the reader past the first page.
Let your story rest. When you’re ready to edit, start at the end. Writers tend to get lazy at the end of their story whether they are writing it for the first time or revising it after revising the rest of the story.
Make sure your manuscript is within range for your genre’s word count.
Ok, I think that for Rediscovery I’ll make the actual chapters as finished, and add it to a series

-
 runningheadless reblogged this · 1 month ago
 -
runningheadless liked this · 1 month ago
-
 teslas-pigeons reblogged this · 1 month ago
 -
 copingwithcatastrophe liked this · 1 month ago
 -
 n3bulas-and-satelites reblogged this · 1 month ago
 -
 tvklike reblogged this · 1 month ago
 -
 mothreblogmess reblogged this · 3 months ago
 -
 gamesandgems reblogged this · 5 months ago
 -
 accidentalrayofstan liked this · 5 months ago
 -
 wildpigeon8 liked this · 5 months ago
 -
 spiffingcthulhu liked this · 7 months ago
 -
 kgreference reblogged this · 9 months ago
 -
 maeanalda liked this · 9 months ago
 -
 stickypandadonut liked this · 9 months ago
 -
 confused-magpie liked this · 11 months ago
 -
 caneverythingcalmdownplease liked this · 1 year ago
 -
 smolyokai liked this · 1 year ago
 -
 zephyrbug liked this · 1 year ago
 -
 inquisitorsnappy liked this · 1 year ago
 -
 curiousdevice reblogged this · 1 year ago
 -
curiousdevice liked this · 1 year ago
-
 saphairheartnett liked this · 1 year ago
 -
 cringebutfree reblogged this · 1 year ago
 -
cringebutfree liked this · 1 year ago
-
 yarrow-and-mint liked this · 1 year ago
 -
 kiranandcosart reblogged this · 1 year ago
 -
kiranandcosart liked this · 1 year ago
-
 nebbie-lite liked this · 1 year ago
 -
 puddlethawn reblogged this · 1 year ago
 -
puddlethawn liked this · 1 year ago
-
 myathesleepyoctopus reblogged this · 1 year ago
 -
 outcastspice liked this · 1 year ago
 -
 saphire-dance reblogged this · 1 year ago
 -
 blazecatz27 liked this · 1 year ago
 -
 exdraghunt reblogged this · 1 year ago
 -
 alcairsei liked this · 1 year ago
 -
 sylverkii liked this · 1 year ago
 -
 yarrowandmarrow liked this · 1 year ago
 -
 pinkponky liked this · 1 year ago
 -
 lillloki liked this · 2 years ago
 -
 crimson-ashes reblogged this · 2 years ago
 -
crimson-ashes liked this · 2 years ago
-
 thereisaspoon reblogged this · 2 years ago
 -
thereisaspoon liked this · 2 years ago
-
 lushiga liked this · 2 years ago
 -
 void-birb liked this · 2 years ago
 -
 kaiyumidiary liked this · 2 years ago
 -
 soupy-eros liked this · 2 years ago

xey/xem French Don't be fooled, I'm a platypus, I don't much stuff (art side account)
288 posts